• JP Precision Glass is the leading glass shower doors company in Chicago

Tag Archives: Shower Door Repair Chicago

glass closet door repair

Stop Struggling with Sticking Glass Closet Doors for Good

Fix Sticking Glass Closet Doors Safely

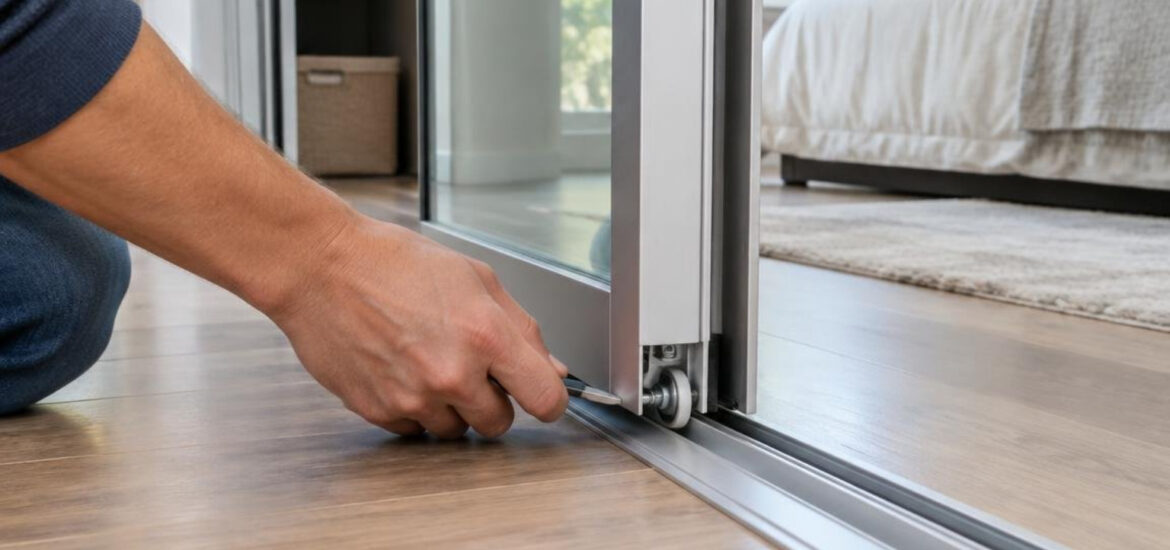
For most glass closet door repair problems, start by cleaning the track, tightening loose screws, and checking whether the rollers are worn or out of alignment. If the mirror is cracked, the frame is separating, or the glass is loose, stop using the door until it is secured or professionally assessed.

Common causes include:

  • Dust, pet hair, and grime packed into the track
  • Worn rollers that grind, wobble, or jump the rail
  • Loose frame screws or a shifted rubber gasket
  • Bent tracks that force the door out of alignment
  • Cracked or shattered mirror panels

Sliding mirror doors save floor space, reflect natural light, and can make a smaller room feel much larger. But because mirror panels are heavy and fragile, use cut-resistant gloves and eye protection before removing a door or handling damaged glass.
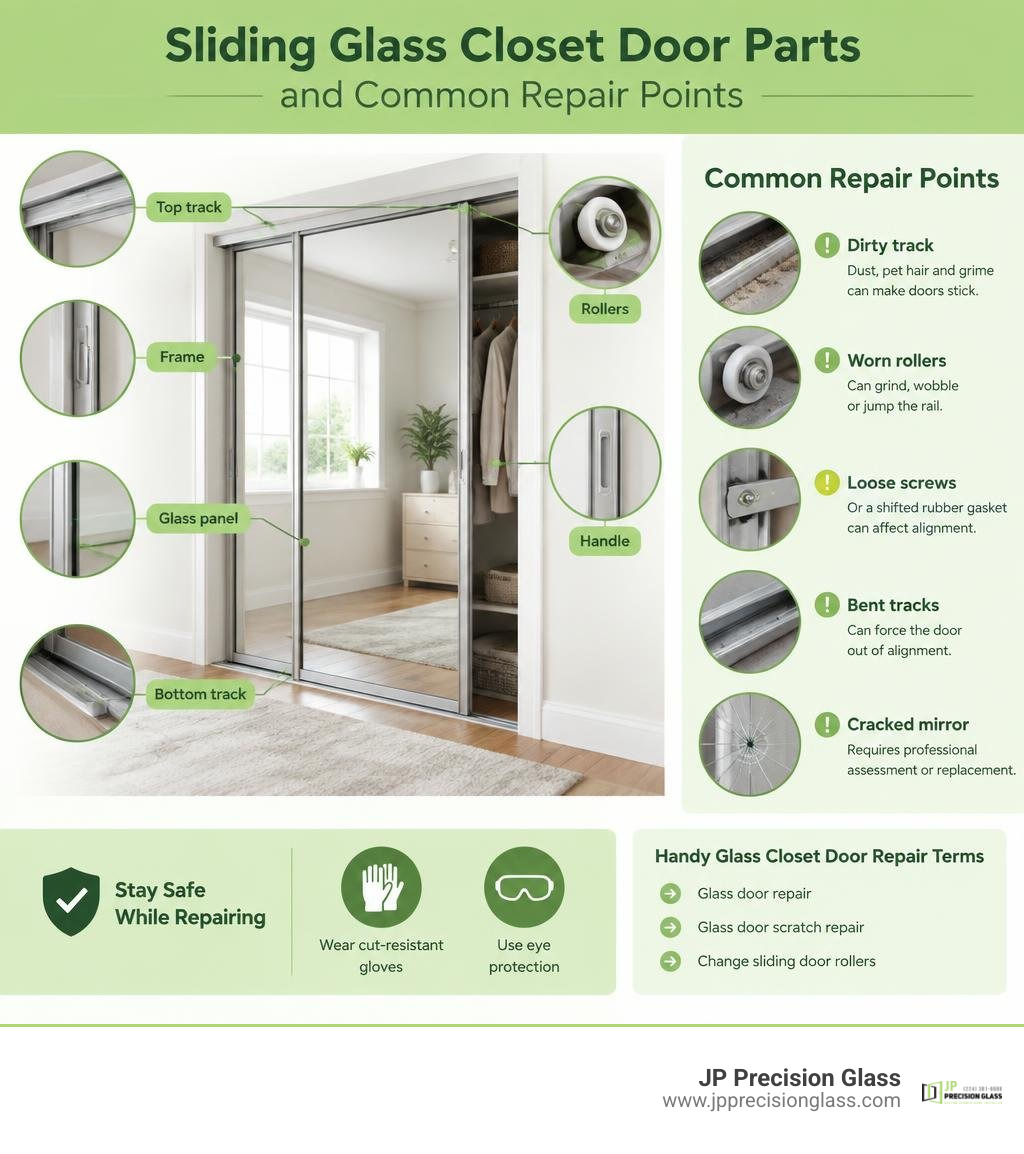
Sliding glass closet door parts and common repair points infographic

Handy glass closet door repair terms:

Diagnosing Common Sliding Glass Closet Door Issues
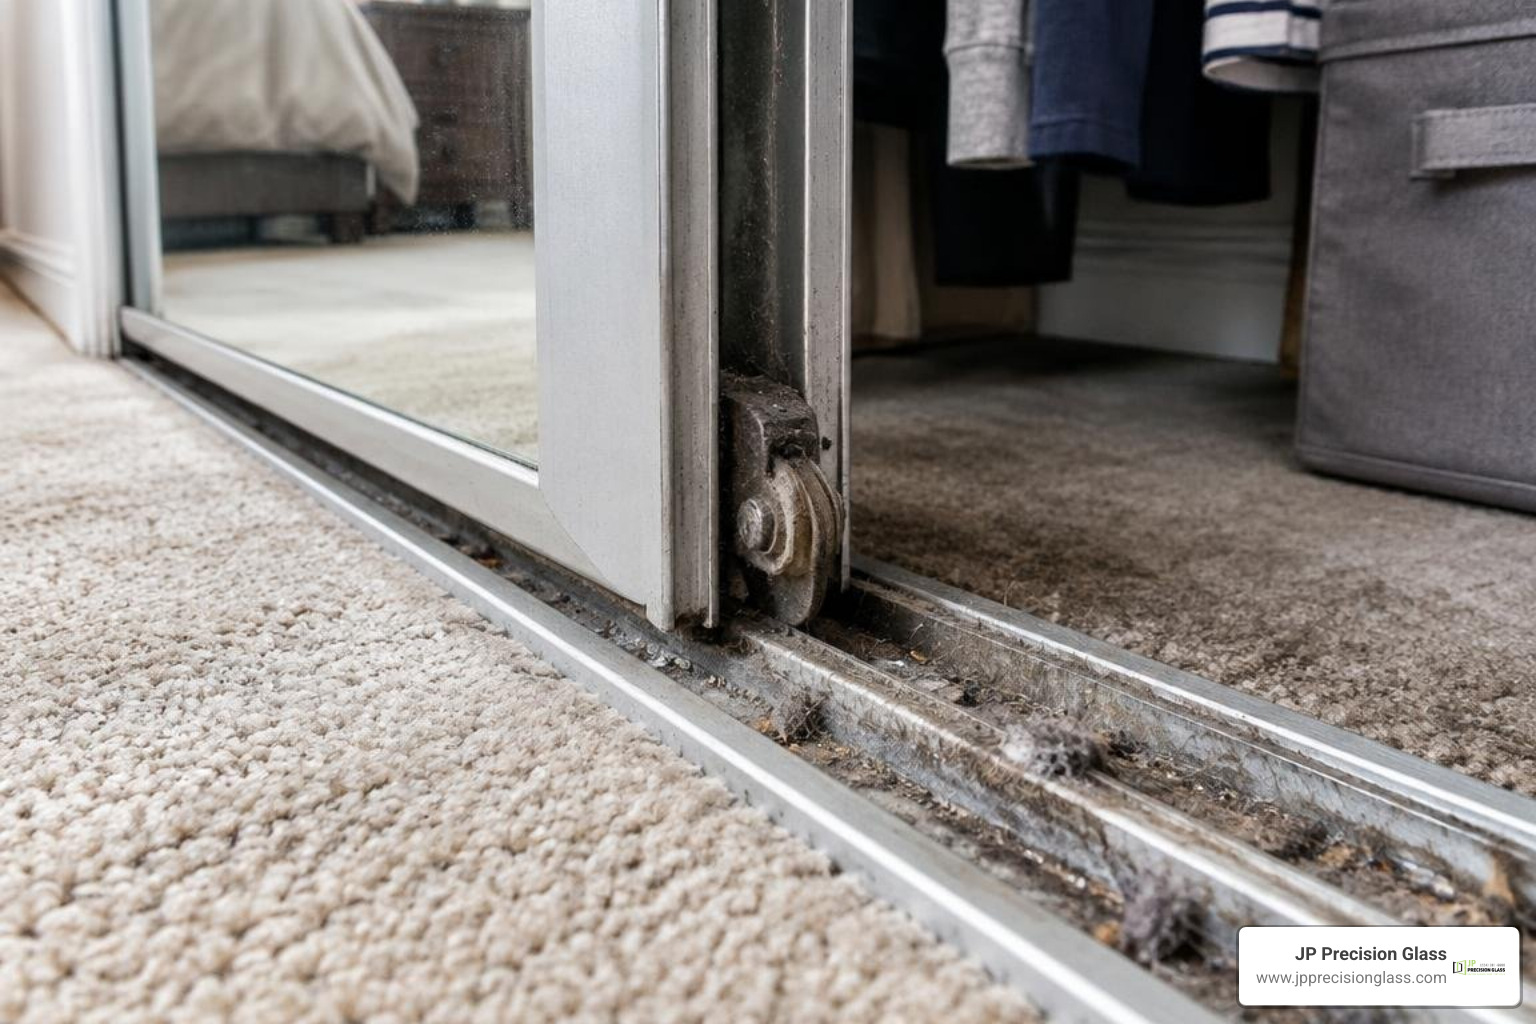
Clogged closet door bottom track and worn roller mechanism

When a sliding mirrored wardrobe door stops gliding effortlessly across the room, it can turn your morning routine into a workout. Before diving into tools and replacement parts, we need to pinpoint exactly what is causing the mechanical failure. Because glass panels carry significant weight, any issue with hardware or tracks places physical stress directly onto the glass itself.

Identifying these issues early protects your door from irreversible track warping or sudden glass breakage. While you might be familiar with repairing bent aluminum tracks on exterior patio sliders, interior closet systems have their own unique structural quirks that require careful diagnosis.

Dirty, Dented, or Misaligned Tracks

The bottom track of a sliding closet system acts as a natural dust trap. Over months and years, loose carpet fibers, pet hair, dirt, and stray items settle directly into the channels. When combined with old lubricant, this debris forms a sticky, abrasive sludge that jams the wheels.

Beyond simple dirt, tracks frequently suffer physical trauma:

  • Dented rails: Stepping on the bottom track or dropping heavy storage bins can crush aluminum channels, creating pinch points that derail rollers.
  • Track misalignment: If the fastening screws loosen along the floor or header, the track shifts out of parallel. This forces the door panels to bind against each other or scrape the frame.
  • Uneven mounting surfaces: Settling floors can create low spots where rollers bottom out, leaving the top guide disconnected from the ceiling channel.

Worn-Out Rollers, Springs, and Hardware

Sliding glass door hardware does not last forever. The internal wheels are typically molded from nylon or steel, mounted onto ball bearings or axle pins that endure constant friction. Over time, nylon wheels develop flat spots, crack, or split entirely.
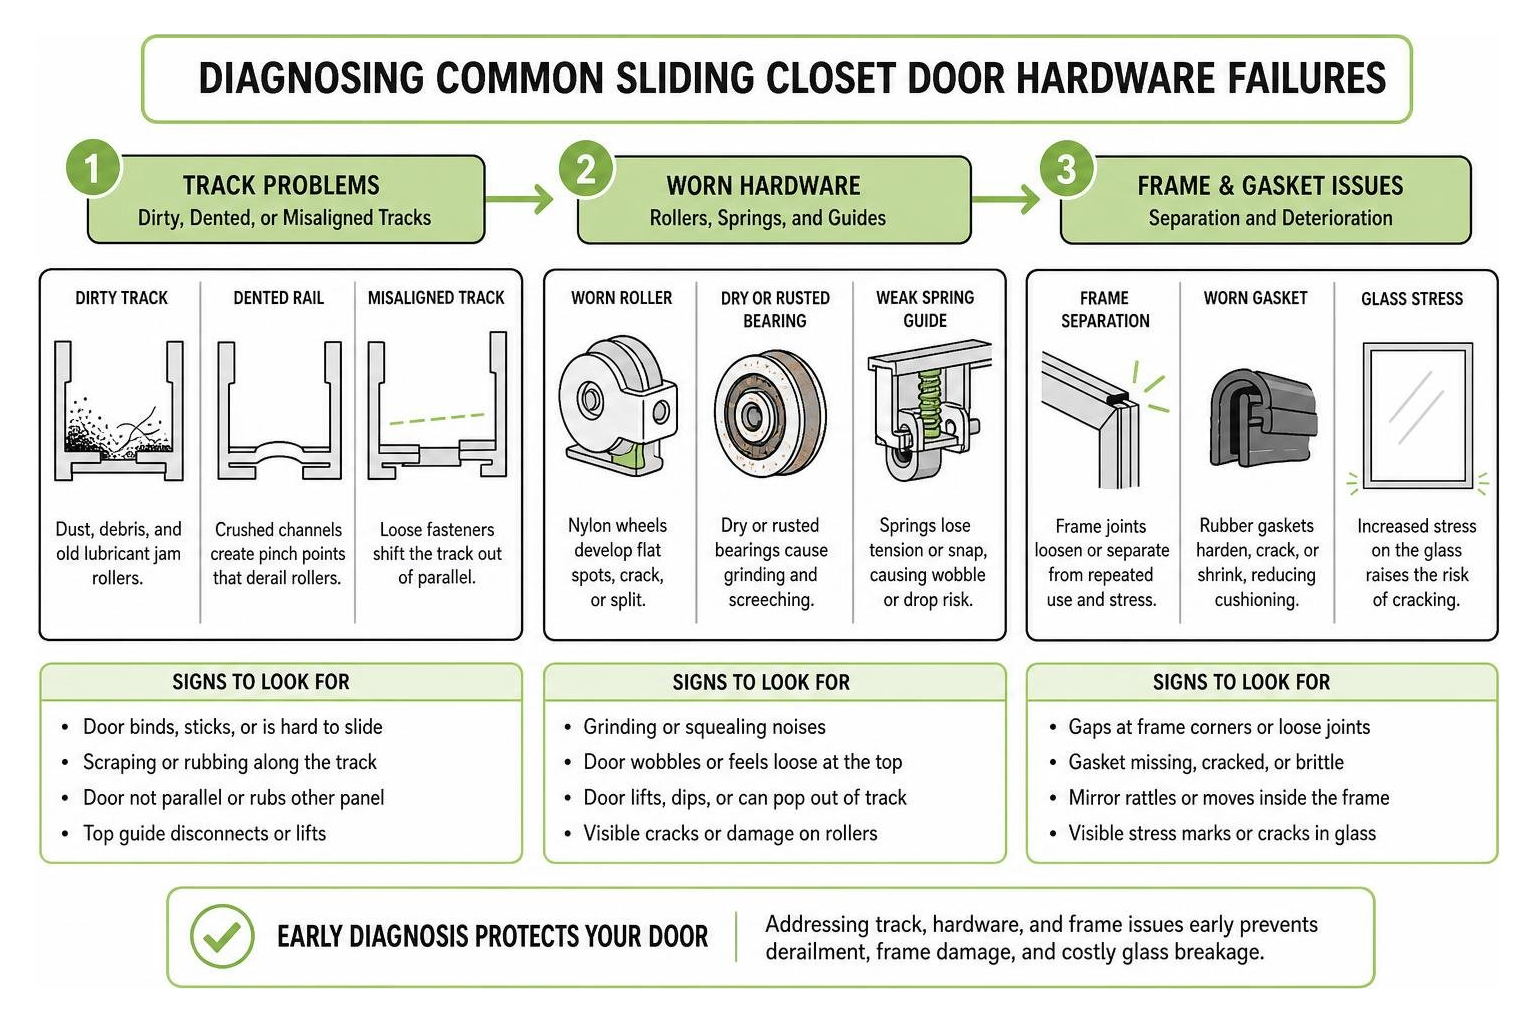
Diagnosing common sliding closet door hardware failures

When internal bearings dry out or rust, they produce an unmistakable grinding screech. Furthermore, many modern top-hung systems rely on spring-loaded tension guides. If these springs lose tension or snap, the door will wobble uncontrollably within the header channel, threatening to drop out of the frame. Inspecting and replacing sliding door rollers restores alignment before the door derails and cracks the mirror.

Frame Separation and Deteriorating Gaskets

Mirrored closet doors typically consist of a large mirror panel surrounded by an aluminum perimeter frame, cushioned by an internal U-channel rubber gasket. As the door is pulled and pushed over thousands of cycles, the physical pull force concentrates on the frame stile rather than the glass.

Over time, this dynamic causes:

  • Gasket retraction: The rubber gasket dries out, shrinks, and creeps backward into the aluminum profile cavity, leaving the glass unanchored.
  • Loose corner assemblies: Corner joinery screws vibrate loose, causing the aluminum frame to splay outward away from the glass.
  • Glass slippage: Without tight gasket tension, the mirror panel slides down inside the metal frame, dragging against the floor track and creating extreme stress along the bottom glass edge.

Step-by-Step Glass Closet Door Repair for Smooth Sliding
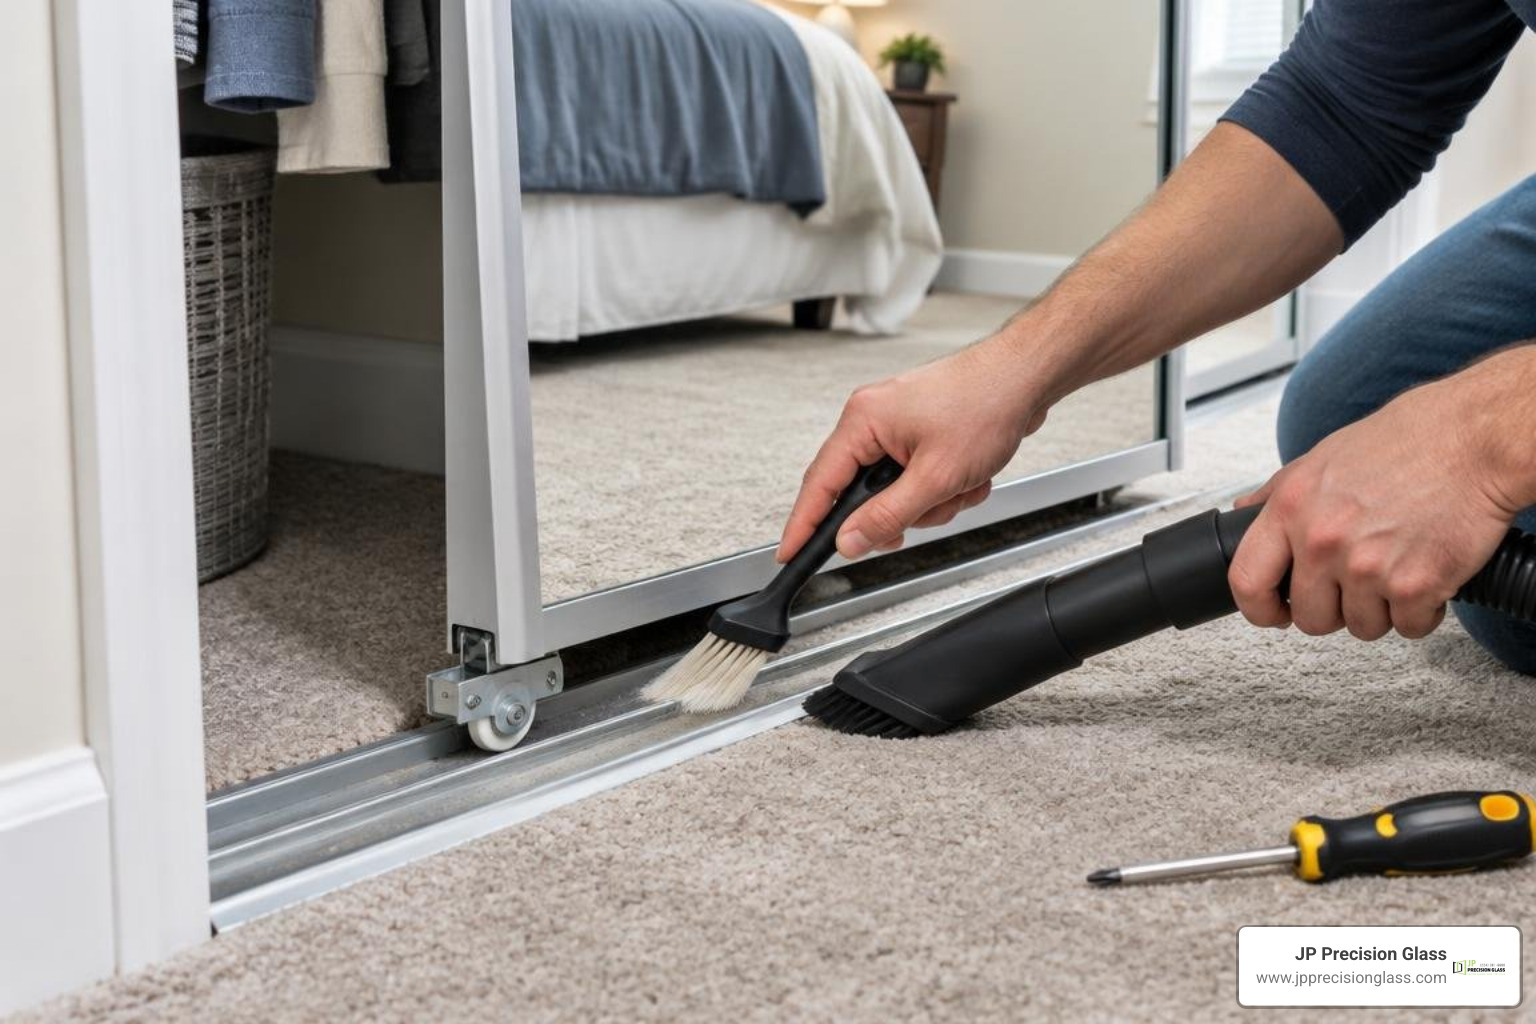
Cleaning tracks and adjusting roller height screws on sliding door

Fixing a stubborn sliding mirror door is entirely manageable when you follow a methodical sequence. Glass handling demands patience, controlled movements, and a clean, padded workstation. Never rush the physical removal or reinstallation of large mirrored panels.

Essential Tools and Materials for Glass Closet Door Repair

Before starting your repair, set up your work area. Clear a wide floor space and lay down thick moving blankets or drop cloths to support the glass panel safely.

Gather the following tools and supplies:

  • PPE: ANSI-rated safety glasses and cut-resistant work gloves.
  • Screwdrivers: #2 Phillips head and flat-head screwdrivers for roller adjustment and frame assembly.
  • Cleaning supplies: White vinegar, liquid dish soap, a spray bottle, microfiber cloths, and a stiff nylon scrub brush.
  • Track adjustments: A rubber mallet and a wooden scrap block for reshaping bent metal rails.
  • Chemicals: Dry PTFE lubricant spray (avoid greasy petroleum-based oils) and specialized pH-neutral mirror mastic.
  • Glass surface care: A glass cleaning squeegee, plastic putty knife, and specialized compounds for buffing surface glass scratches.

Cleaning and Lubricating the Track System

Never spray wet oils like standard WD-40 into your tracks. Wet lubricants act as a magnet for dust and pet hair, rapidly transforming into a thick abrasive paste that destroys roller bearings. Instead, rely on deep cleaning and dry friction reducers.
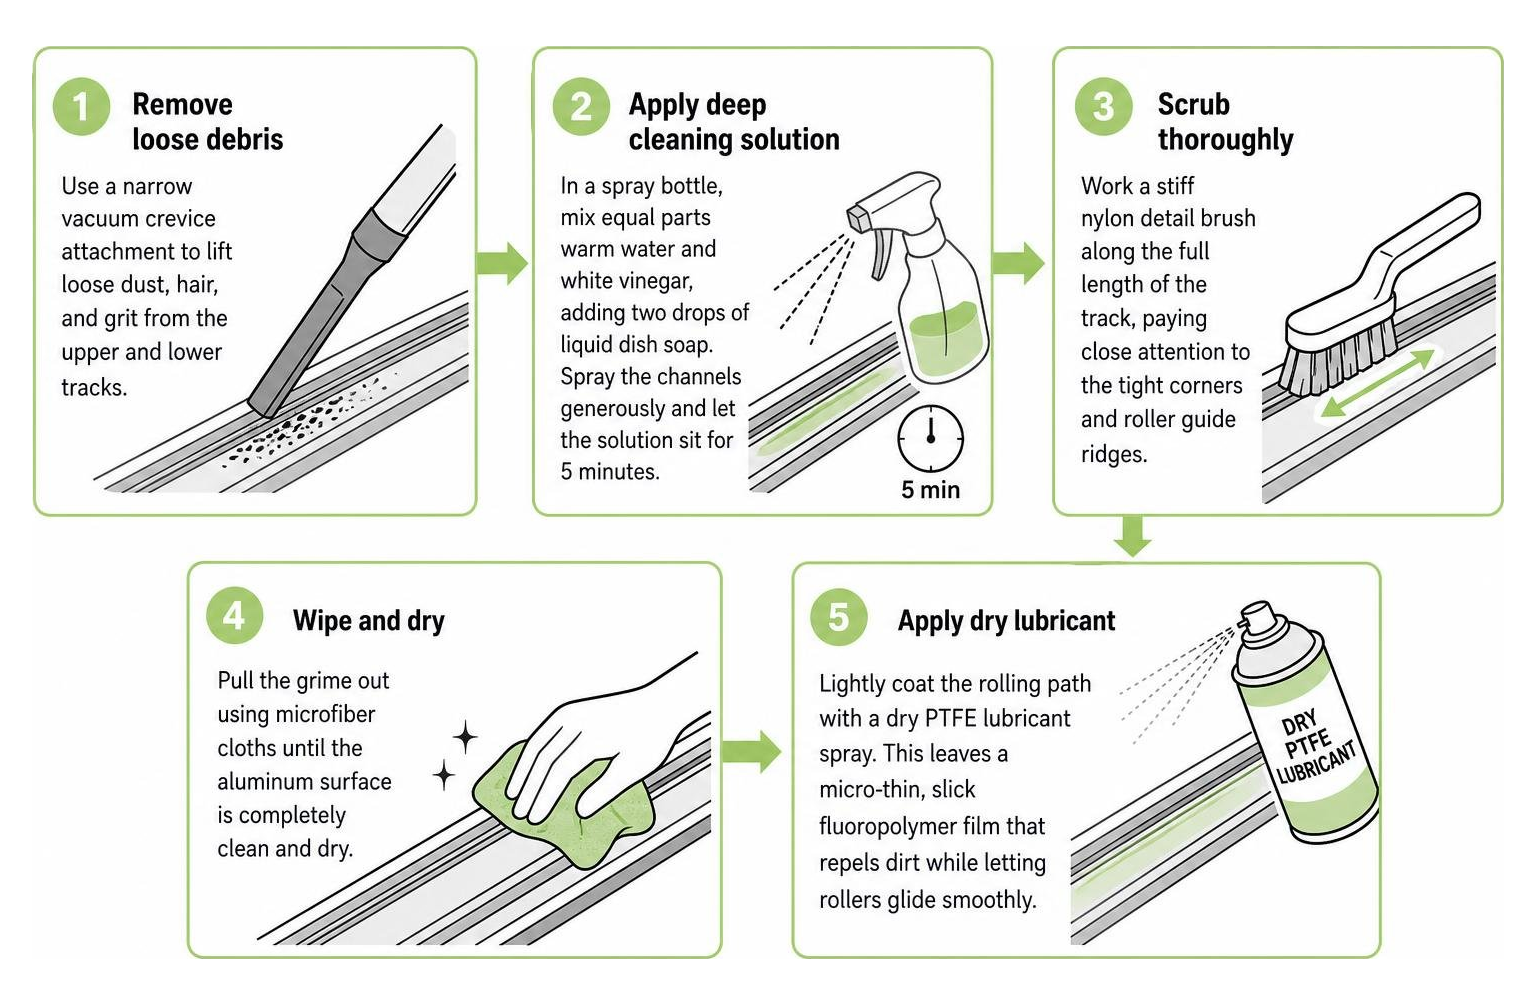
Step by step track cleaning and lubrication process

  1. Remove loose debris: Use a narrow vacuum crevice attachment to lift loose dust, hair, and grit from the upper and lower tracks.
  2. Apply deep cleaning solution: In a spray bottle, mix equal parts warm water and white vinegar, adding two drops of liquid dish soap. Spray the channels generously and let the solution sit for 5 minutes to break down hardened sludge.
  3. Scrub thoroughly: Work a stiff nylon detail brush along the full length of the track, paying close attention to the tight corners and roller guide ridges.
  4. Wipe and dry: Pull the grime out using microfiber cloths until the aluminum surface is completely clean and dry.
  5. Apply dry lubricant: Lightly coat the rolling path with a dry PTFE lubricant spray. This leaves a micro-thin, slick fluoropolymer film that repels dirt while letting rollers glide smoothly. For continued smooth operation, follow a preventative mirror door maintenance guide to keep your tracks in peak shape.

Realigning Wheels and Replacing Damaged Rollers

If cleaning alone does not restore effortless movement, you must adjust or replace the roller assemblies.

  1. Remove the door panel: Grip the mirror door firmly by its metal stiles. Lift the door straight up into the deep top track to clear the bottom wheels from the floor rail, then swing the bottom of the door toward you and lower the entire panel out. Place it face-down onto your padded blanket.
  2. Inspect the roller mechanisms: Look closely at the wheels. If they are flattened, cracked, or loose on their center rivets, remove the mounting screws and slide the old roller assemblies out of the bottom frame corners.
  3. Install new rollers: Match your replacement rollers to the original manufacturer profile. Slide the new units into the frame channels and secure them with the mounting screws.
  4. Rehang the door: Insert the top guides into the upper header channel first. Push upward against any internal guide springs, align the bottom wheels directly over the floor track rails, and gently lower the door into place.
  5. Calibrate height and plumb: Locate the adjustment screw near each bottom wheel. Turn the screw clockwise to raise that side of the door, or counter-clockwise to lower it. Adjust both sides until the door hangs plumb, fits flush against the wall jamb, and moves with minimal effort.

Addressing Cracked Glass Panels, Detached Frames, and Replacements

Glass damage requires immediate attention. A shifting frame or an unaddressed crack compromises structural stability, turning a routine household fixture into a safety hazard.

Stabilizing Surface Cracks with Glass Resin

If your mirror has sustained a small, localized hairline surface crack (under 1 inch) rather than a complete through-and-through fracture, you can stabilize the glass using an optical-grade windshield resin repair kit.

  • Clean the surface: Wipe away all surface contaminants with isopropyl alcohol and let the glass dry completely.
  • Position the bridge injector: Center the applicator suction cup directly over the origin of the crack to seal the area.
  • Inject low-viscosity resin: Drop the specialized optical resin into the chamber. Screw down the pressure plunger to force resin deep into the microscopic fissure, evacuating trapped air pockets.
  • Cure under UV light: Place clear curing film over the repair and expose it to a UV curing lamp (or direct sunlight) for 15 to 30 minutes.
  • Scrape flush: Carefully hold a fresh razor blade at a 45-degree angle to scrape away hardened surface resin without scratching the surrounding glass mirror.

Note: Resin stabilizes the glass and restores reflective clarity, but severe or edge-to-edge fractures cannot be safely repaired and require complete panel replacement.

Reattaching Detached Mirror Frames and Gaskets

When an aluminum stile separates from the mirror glass, do not force the frame back on with a hammer while the door is hanging. Instead, take the panel down and rebuild the edge connection:

  1. Disassemble the corner: Lay the door on your padded surface and unscrew the top and bottom corner fasteners on the detached side.
  2. Inspect and reseat the gasket: Pull the loose metal channel completely away. Straighten the flexible rubber U-channel gasket, wrapping it tightly and evenly along the bare edge of the mirror glass.
  3. Apply specialized adhesive: If the mirror backing is loose from a wood or composite substrate, use only pH-neutral mirror mastic. Standard construction adhesives contain harsh acids that eat away the silver reflective coating, causing ugly black spots (desilvering). Apply mastic in golf-ball-sized dabs rather than spreading it flat. Review safe methods to re-adhere mirror closet door panels to ensure a long-lasting, non-corrosive bond.
  4. Reassemble the frame: Press the aluminum stile back over the gasketed glass edge using steady, even hand pressure. Tap gently with a rubber mallet if necessary. Reinstall and tighten the corner assembly screws, then let the assembly cure undisturbed for a full 24 hours before rehanging.

Replacing Just the Mirror Panel vs. the Entire Door

Homeowners often wonder whether a broken mirror requires an entirely new door system or just a fresh sheet of glass.

Repair Factor Replacing Just Mirror Glass Panel Replacing Entire Door System
Best Used For Broken mirror with intact frame and tracks Severely bent frames, crushed tracks, obsolete hardware
Safety Standard Category II safety backing required Factory-certified safety backing included
Hardware Reusability Keeps original rollers, top guides, and stiles Provides brand-new, modernized tracking and quiet rollers
Aesthetic Result Preserves matching trim with other room closets Upgrades room with modern finishes and contemporary styles
Structural Integrity Relies on condition of existing metal frame Brand-new structural frame under full warranty

When to Choose Professional Glass Closet Door Repair

While routine track maintenance and wheel replacements are great DIY projects, certain situations demand professional equipment and expertise:

  • Shattered safety glass: Handling broken glass sheets requires heavy suction lifters, safety containers, and disposal protocols.
  • Large, heavy custom panels: Floor-to-ceiling mirrored doors are extremely heavy. Carrying and setting these panels without bending the frame requires multiple experienced technicians.
  • Severely warped structural frames: If the aluminum frame is twisted, custom fabrication is necessary to ensure the new glass sits evenly without stress points.
  • Complex hardware sourcing: Older or discontinued closet systems often feature obsolete track profiles that need custom retrofit solutions.

Most standard residential glass repairs can be diagnosed and resolved quickly in a single service visit.

Frequently Asked Questions About Sliding Mirror Closet Doors

Why does my sliding mirror closet door keep jumping off the track?

Doors typically jump their rails due to three main issues:

  1. The bottom roller height adjustment is set too low, leaving excessive slack at the top header guide.
  2. Hardened debris in the track acts as a ramp that forces the wheel up and out of its groove.
  3. The nylon wheel has developed a crack or flat spot that catches on the track lip during movement.

Can I use standard construction adhesive to glue my closet mirror?

No. Never use standard construction adhesive or general-purpose silicone on mirrors. These formulas contain acetic acid and solvents that react chemically with the silver and copper backing of the mirror. Within weeks or months, the backing will corrode, creating permanent black spots and causing the glass to separate from the substrate. Always use a dedicated, pH-neutral mirror mastic.

What are the main benefits of installing sliding mirror closet doors?

Sliding mirror closet doors combine functional wardrobe access with smart interior design. They reflect both natural and artificial light to make compact bedrooms feel nearly twice as large, double as full-length dressing mirrors without occupying extra wall space, and slide completely within the closet opening without swinging out into your floor space.

Restoring Function and Safety to Your Glass Doors

Maintaining your glass closet doors keeps your home functional, bright, and safe. With routine track cleaning, proper dry lubrication, and timely hardware adjustments, your sliding panels will glide quietly for years to come.

When your glass fixtures require precision work, custom sizing, or complete hardware replacements, working with experienced specialists makes all the difference. At JP Precision Glass, we bring that same dedication to accuracy, premium materials, and made-to-size craftsmanship to every home project. Discover how our expert glass shower door and specialty repair services can transform your living spaces with durable, elegant, and safe glass installations tailored perfectly to your home.
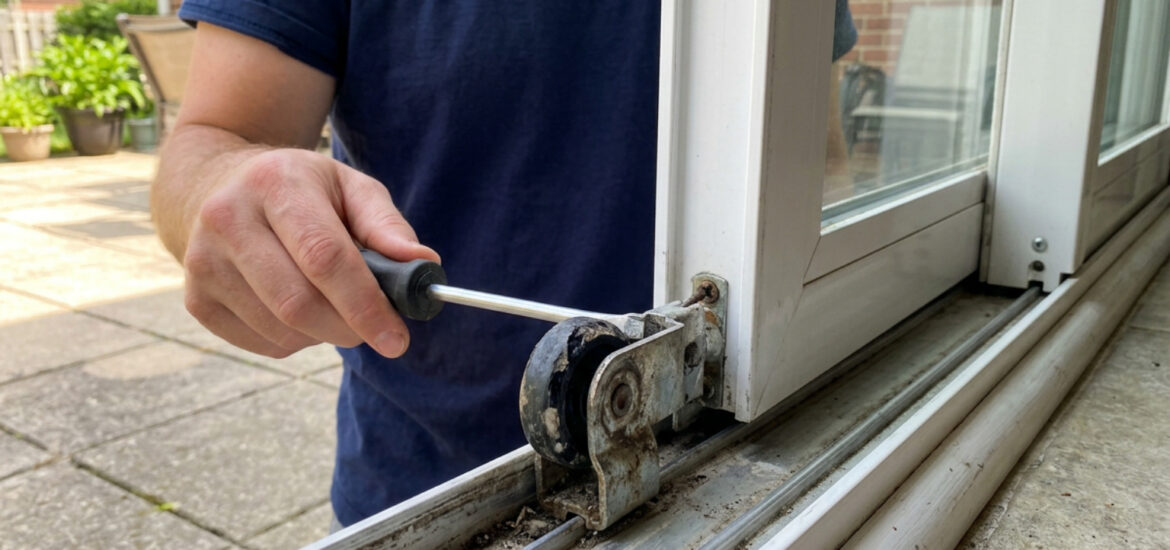
sliding glass door rollers

How to Remove and Replace Sliding Glass Door Rollers Without Breaking the Bank

Change Sliding Door Rollers to Restore a Smooth Glide

If your patio door drags, grinds, wobbles, or will not latch cleanly, first vacuum the lower track and try small, even adjustments to the height screws near the bottom corners. If the wheels are cracked, rusted, flat-spotted, or still bind after cleaning and adjustment, change sliding door rollers by removing the panel with a helper, matching the old roller assembly exactly, replacing both sides, and then leveling the door again.

Most problems come from worn rollers, debris, or a bent track – not a door that needs to be replaced. Because glass panels can be heavy, protect the floor, use a second person for lifting, and stop if the track is crushed or the panel uses heavy impact glass.

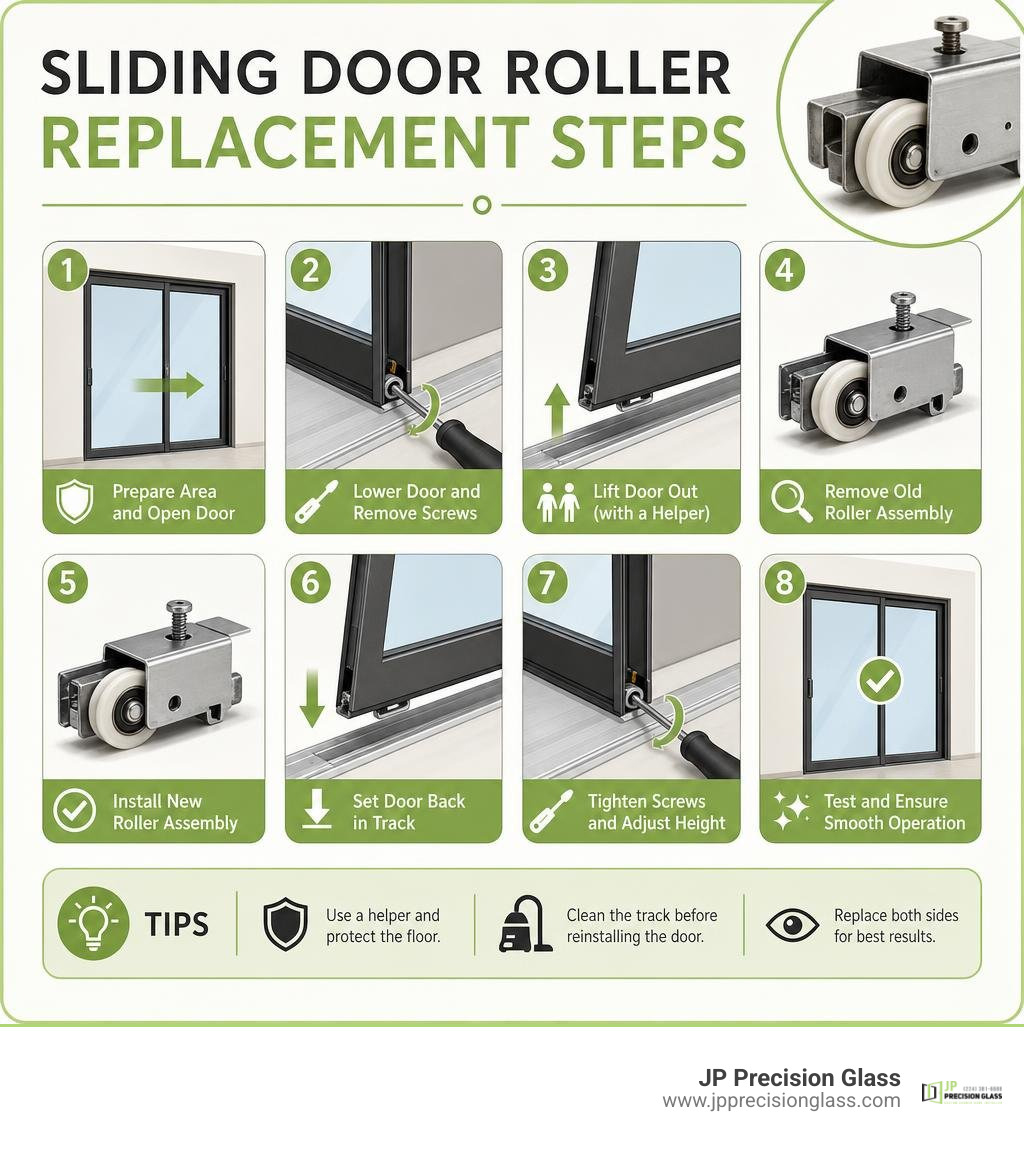
sliding door roller replacement steps infographic

Change sliding door rollers word list:

Diagnosing Sliding Door Issues: Adjustment vs Replacement

A sliding door should glide with minimal effort. When opening the door turns into a workout involving two hands and a hip check, the rolling mechanism is almost always screaming for help. Before tearing down your frame, it helps to distinguish between a simple height misalignment and mechanical failure.

Doors naturally settle over time. Daily use, structural shifting, and vibrations can cause the height adjustment screws at the base of the door to loosen. When this happens, the bottom aluminum rail drops down and drags directly across the raised metal track rib. This metal-on-metal contact produces a loud, harsh screech and shaves off aluminum dust.

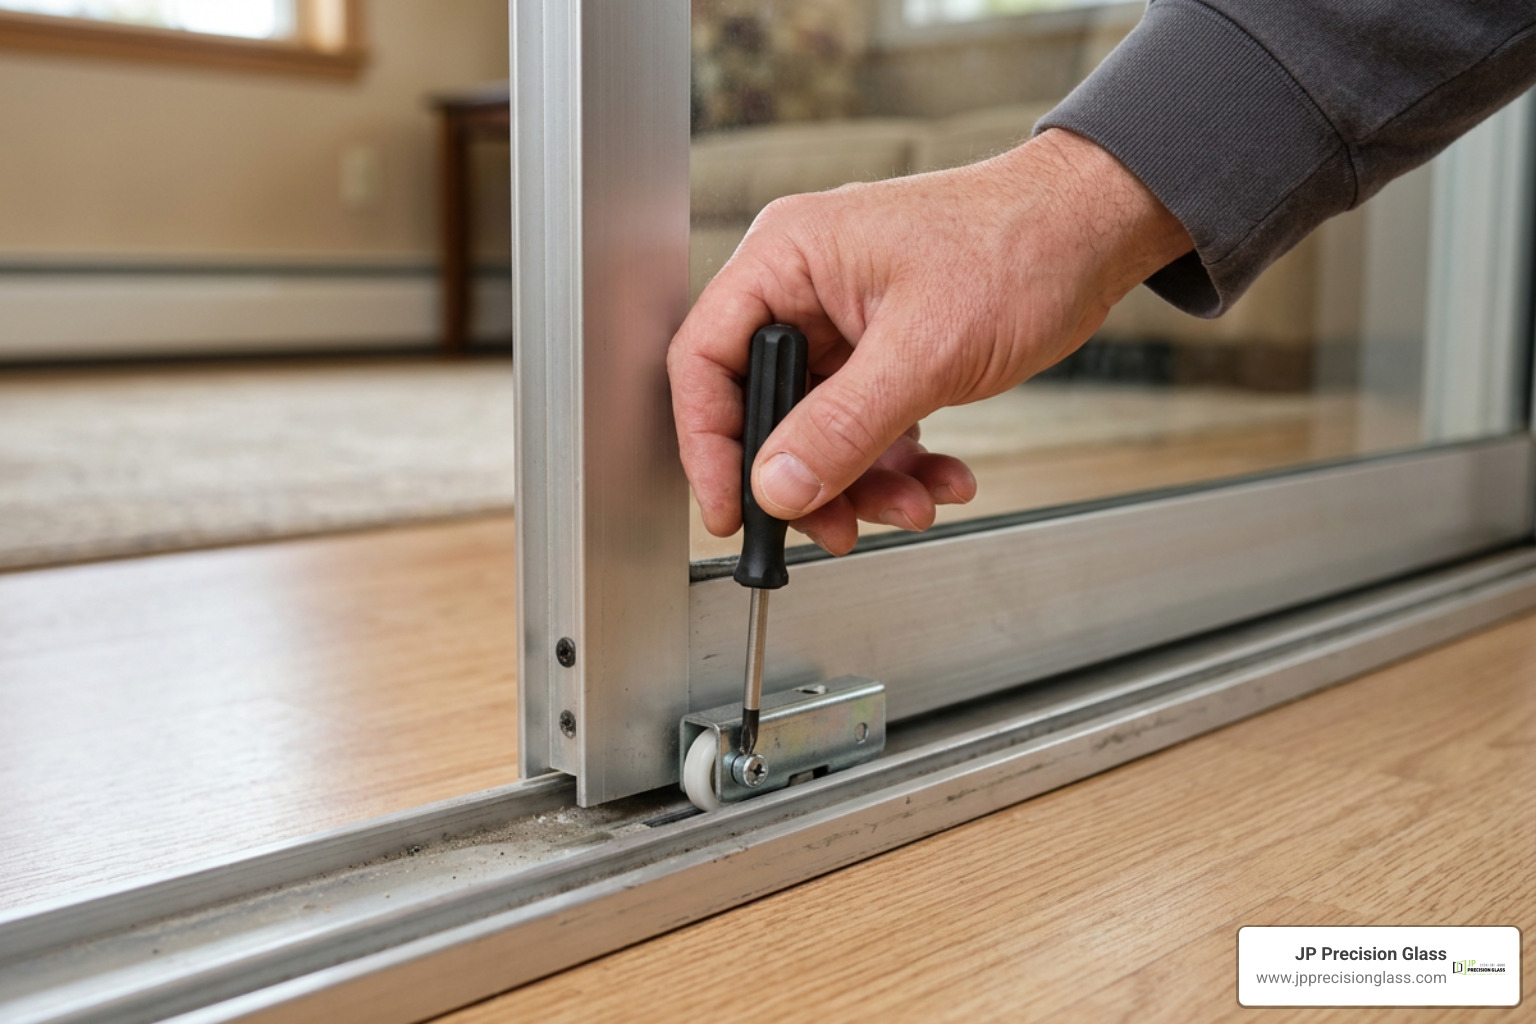
To determine if you only need an adjustment, locate the small access holes near the bottom edge of the door frame (often hidden under plastic snap-in caps). Using a screwdriver, turn the screws clockwise a quarter-turn to raise the panel. If raising the door lifts the rail clear off the track and restores a smooth, quiet glide, an adjustment was all you needed.

However, if turning the adjustment screws causes the screw head to spin freely without lifting the panel, or if the door continues to rumble, shudder, and bind, the roller internals are compromised. In that case, tackling a sliding-into-savings with diy aluminum glass door repair project by replacing the internal wheel assemblies is the proper course of action.

Signs of Worn Rollers and Damaged Tracks

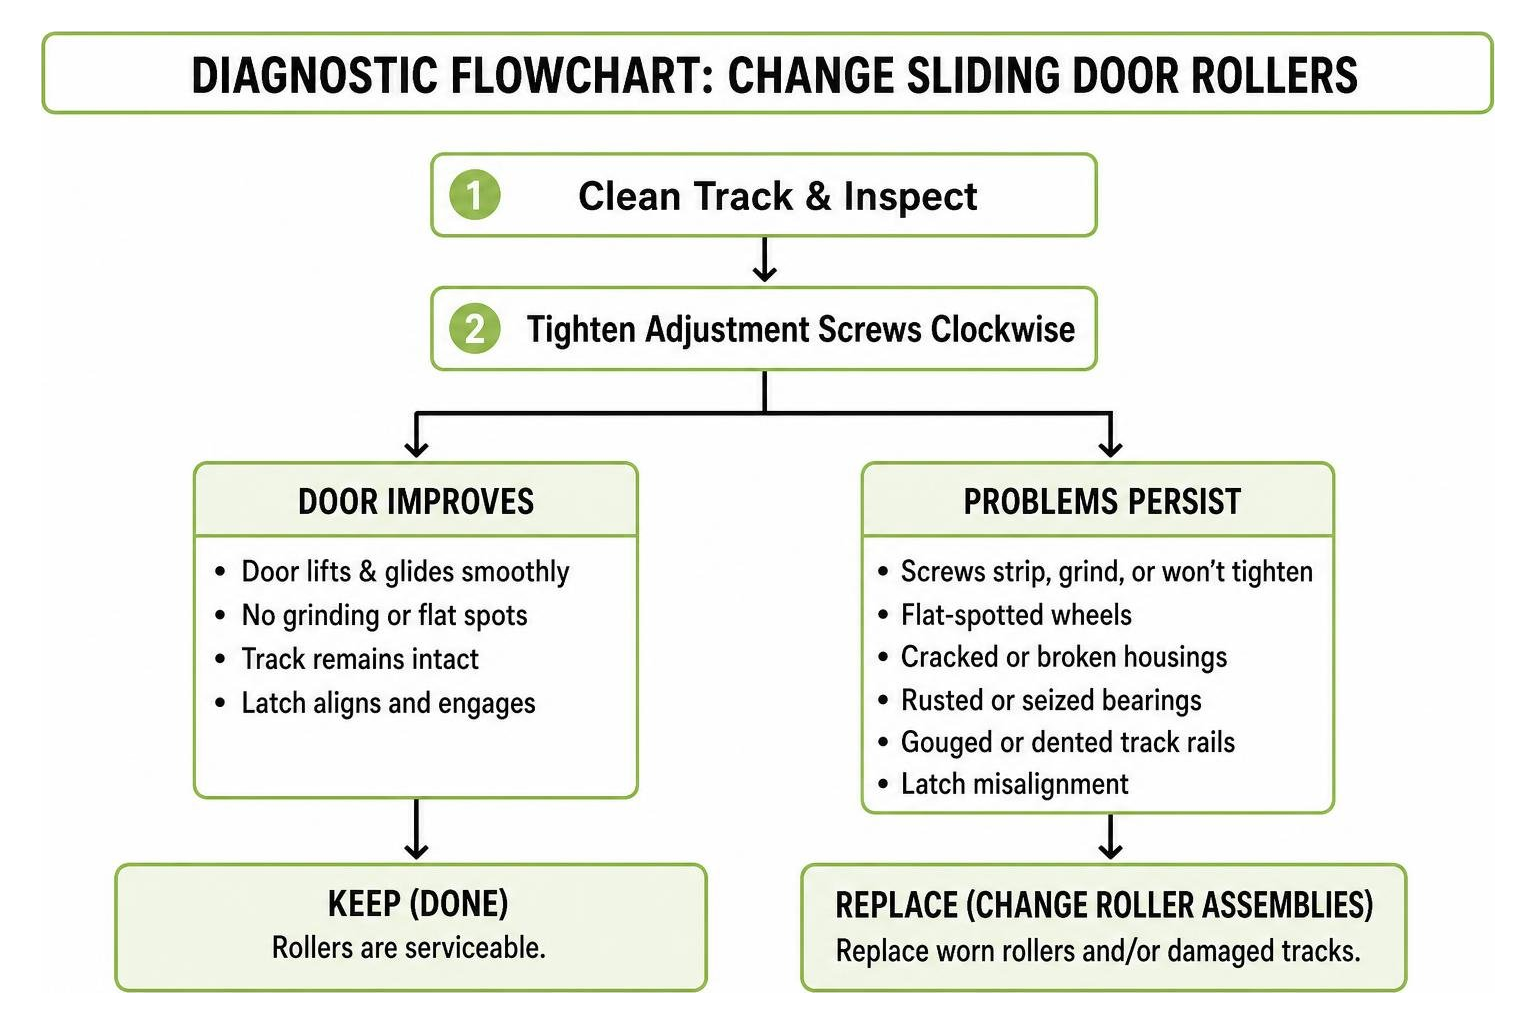
When sliding door wheels reach the end of their service life, they leave clear physical symptoms:

  • Flat-Spotted Wheels: If a ball bearing seizes from corrosion or grit, the wheel stops rotating and slides across the metal track. Friction quickly grinds a flat spot onto the wheel circumference, creating a rhythmic bumping sensation whenever the door moves.
  • Cracked or Broken Nylon Housings: Constant downward pressure can fracture the wheel flange or split the outer roller housing, making the door wobble from side to side.
  • Internal Rust and Seized Bearings: Exposure to condensation, cleaning chemicals, or outdoor rain causes carbon steel bearings to rust solid.
  • Gouged or Dented Track Rails: Running flat-spotted or seized rollers over time will chew through the soft aluminum track crown, creating sharp gouges, metal burrs, or wavy valleys that catch the rollers.
  • Latch Misalignment: When one roller fails, that corner of the door sags. This creates an uneven reveal against the side jamb, preventing the door lock hook from engaging the strike plate properly.

diagnostic flowchart for sliding door roller repair

Roller Materials Compared: Steel, Nylon, and Stainless Steel

Selecting the proper roller material ensures longevity and protects your track from premature wear. Different materials offer unique trade-offs in weight capacity, operating sound, and environmental resistance:

Roller Material Load Capacity Operating Noise Corrosion Resistance Best Application
Standard Carbon Steel High (100–200+ lbs per pair) Moderate to High Low (Prone to rust in damp environments) Standard interior or mild-climate exterior patio doors
Molded Nylon / Delrin Medium (50–100 lbs per pair) Whisper Quiet (Reduces noise by up to 30%) High (Impervious to rust; chemically inert) Lightweight panels, screen doors, and interior partitions
Stainless Steel Very High (150–300+ lbs per pair) Moderate Superior (Resists salt spray, humidity, and standing water) Heavy patio doors, coastal zones, and high-moisture spaces

Builder-grade carbon steel rollers often last only 3 to 5 years before moisture causes their open bearings to degrade. For standard residential exterior doors, premium tandem rollers with sealed bearings and engineered Delrin or stainless steel wheels can deliver 10 to 15 years of smooth operation.

Pre-Repair Checklist: Tools and Roller Identification

A standard residential glass patio door panel weighs between 80 and 150 pounds, while double-pane thermal or impact-resistant panels can easily exceed 200 pounds. Proper preparation is essential to protect both your back and the glass panel.

Always conduct this repair with a helper. Never attempt to lift, maneuver, or balance a heavy glass sliding door panel alone. Make sure you have a clear, flat resting space ready before you start lifting.

Essential Tools Needed to Change Sliding Door Rollers

Gather these tools before beginning your project:

  • Screwdrivers: #2 and #3 Phillips head screwdrivers, along with a sturdy flathead screwdriver.
  • Prying and Tapping Tools: A non-marring rubber mallet, a wooden block (no thicker than 3/4 inch), and a stiff putty knife.
  • Pliers: Needle-nose pliers or a balance hook to extract internal roller cartridges.
  • Safety Equipment: Heavy-duty work gloves with grip palms and impact-rated safety glasses.
  • Track Maintenance Supplies: A shop vacuum with a narrow crevice attachment, a stiff nylon bristle brush, and a can of dry silicone spray lubricant (avoid oil-based lubricants like standard WD-40 or thick wheel grease, which attract dust).
  • Staging Materials: Two heavy moving blankets or a set of padded sawhorses to support the door panel horizontally during hardware swaps.

How to Measure and Identify Replacement Rollers

Hardware manufacturers have produced hundreds of distinct roller variations over the decades. Universal roller kits exist, but matching the original equipment manufacturer (OEM) dimensions ensures a drop-in fit without needing to drill new mounting holes.

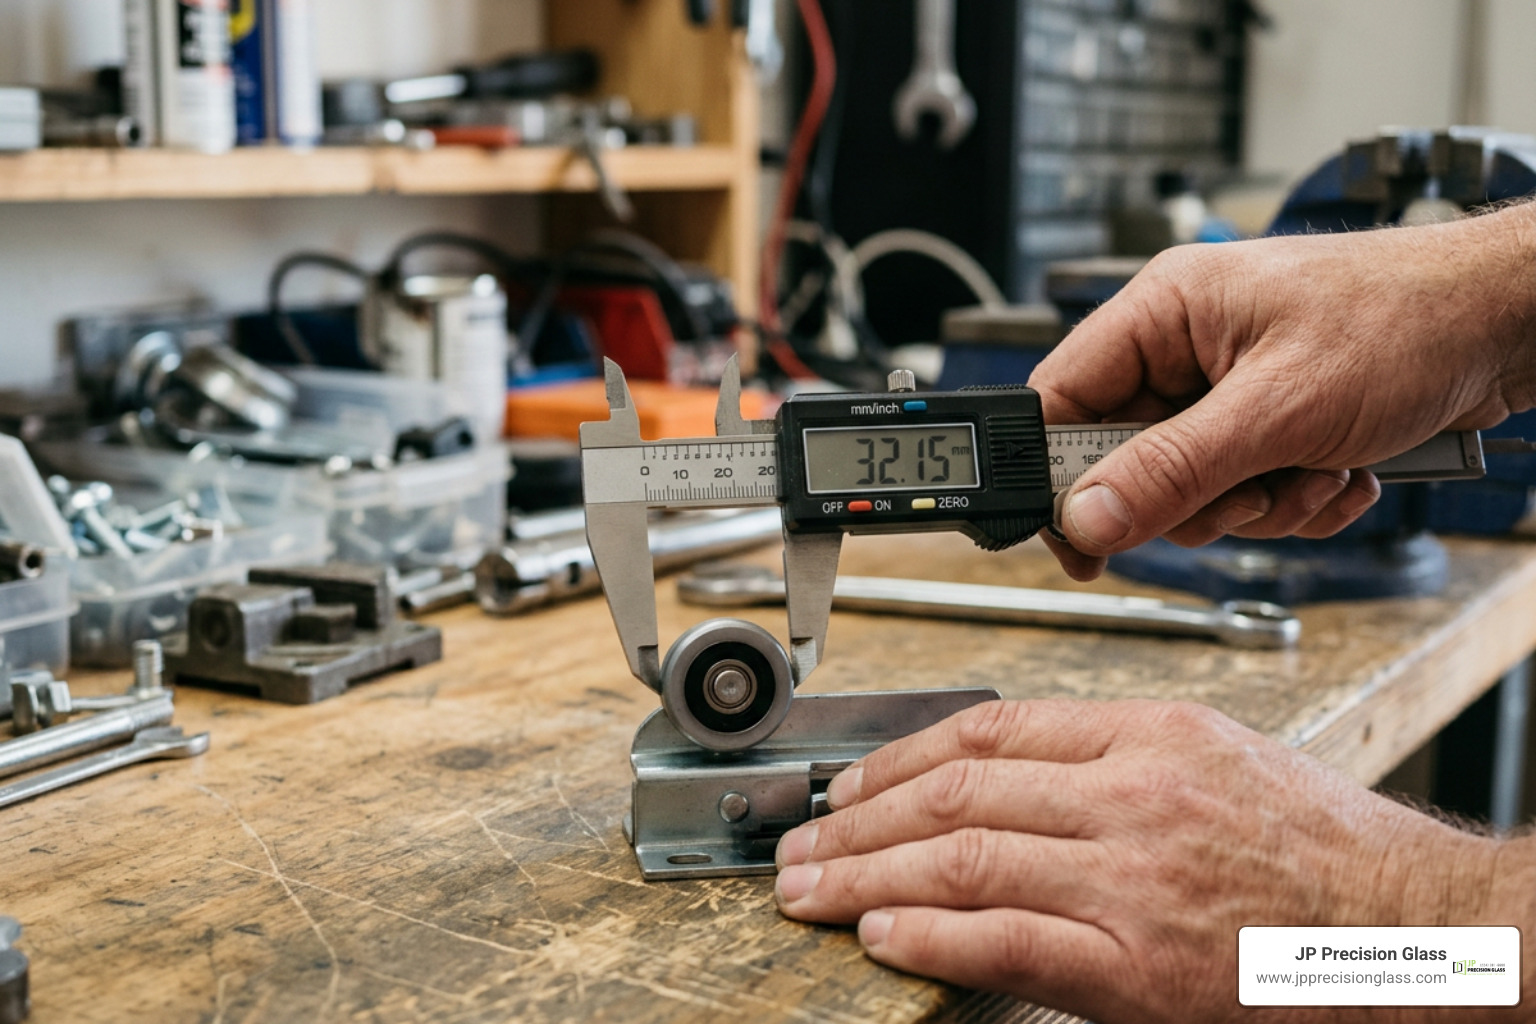
measuring sliding door roller dimensions with calipers

Because subtle differences can affect fit, consult a comprehensive DIY roller replacement guide or take your old roller assembly directly to a local hardware specialist.

When measuring your existing roller assembly, check these four critical dimensions:

  1. Wheel Diameter: Measure the outside diameter of the wheel (common sizes include 1″, 1-1/8″, 1-1/4″, and 1-1/2″).
  2. Housing Dimensions: Measure the width, height, and overall length of the metal cartridge housing that slots into the door stile.
  3. Mounting Hole and Screw Locations: Note whether the assembly mounts through the side of the housing, the top, or the end, and measure the center-to-center distance between screw holes.
  4. Wheel Profile and Edge: Determine if the wheel has a concave (grooved) edge designed to sit on top of a raised track rail or a flat/convex edge.

Step-by-Step Guide: How to Change Sliding Door Rollers Safely

With your workspace cleared, moving blankets laid out on the floor, and tools within reach, you are ready to begin the replacement process.

Removing the Sliding Panel and Extracting Old Rollers

  1. Retract the Rollers Completely: Locate the adjustment screw access holes at the bottom outer corners of the door. Turn both adjustment screws counter-clockwise until the internal rollers retract fully into the bottom rail. This lowers the door frame and creates the maximum vertical clearance between the top of the door and the head track.
  2. Remove Head Stops or Anti-Lift Blocks: Inspect the upper track channel. Many modern sliding doors feature small aluminum or plastic anti-lift blocks screwed into the top channel to deter intruders. Unscrew and remove these blocks.
  3. Lift and Tilt the Panel: Stand facing the door with your helper, placing one person on each side of the panel. Firmly grip the vertical stiles. Lift the entire panel straight up into the deep upper track pocket until the bottom edge clears the raised bottom track rail. Swing the bottom of the door outward into the room and gently lower the panel down.
  4. Stage the Door Securely: Carry the panel carefully and set it down horizontally across your padded sawhorses or flat on the moving blankets. Never rest the bare glass directly on hard concrete or tile.
  5. Extract the Old Roller Assemblies: Inspect the bottom rail cavity. Depending on your door model, the roller may be secured by an end screw through the vertical stile or by a side mounting screw. Back out the retaining screws. If the roller is stuck from years of accumulated grime, insert a flathead screwdriver or hook tool into the housing notch and pry the assembly outward.

Installing New Roller Assemblies and Rehanging the Door

  1. Clean the Internal Pockets: Vacuum loose dirt, metal shavings, and insect debris out of the hollow bottom door rail pockets.
  2. Insert the New Assemblies: Slide the replacement roller cartridges into the cavity, ensuring the adjustment screw aligns perfectly with the access port on the door edge.
  3. Secure the Mounting Hardware: Thread the mounting screws into place. Hand-tighten them securely, taking care not to cross-thread or strip the aluminum channels.
  4. Pre-Set Roller Height: Before rehanging, turn the adjustment screws until both wheels are drawn halfway into their housings. This provides baseline clearance while allowing room for fine-tuning once the door is back in its frame.
  5. Inspect the Track System: Before lifting the door back into place, take a moment to vacuum, scrub, and wipe down the bottom track rail. Similar to how you how to install and maintain sliding glass shower doors, keeping sliding pathways clean prevents premature hardware wear.
  6. Rehang the Sliding Door: With your helper, lift the door panel, insert the top edge into the deep upper frame channel, swing the bottom inward until the wheels hover over the raised rail, and slowly lower the wheels directly onto the track crown.

Height Adjustment and Track Alignment

adjusting roller height screws with a screwdriver

Once the door sits securely in the track, you must level the panel to achieve an airtight seal:

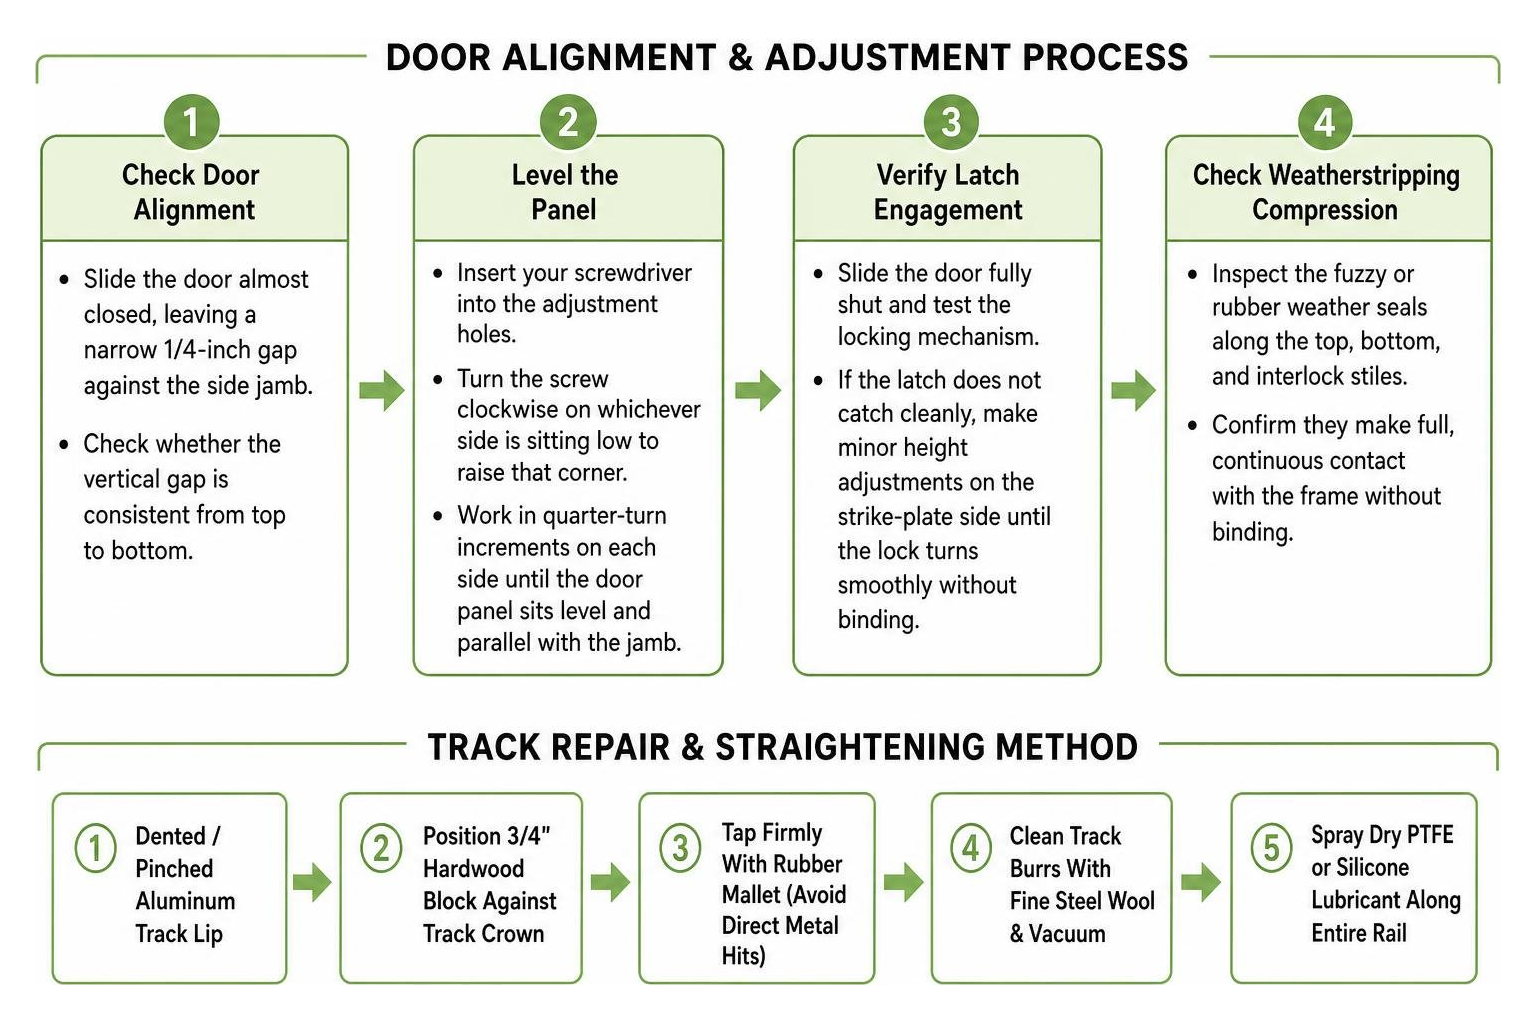
  • Check Door Alignment: Slide the door almost closed, leaving a narrow 1/4-inch gap against the side jamb. Check whether the vertical gap is consistent from top to bottom.
  • Level the Panel: Insert your screwdriver into the adjustment holes. Turn the screw clockwise on whichever side is sitting low to raise that corner. Work in quarter-turn increments on each side until the door panel sits level and parallel with the jamb.
  • Verify Latch Engagement: Slide the door fully shut and test the locking mechanism. If the latch does not catch cleanly, make minor height adjustments on the strike-plate side until the lock turns smoothly without binding.
  • Check Weatherstripping Compression: Inspect the fuzzy or rubber weather seals along the top, bottom, and interlock stiles to confirm they make full, continuous contact with the frame without binding.

Common Troubleshooting and Long-Term Maintenance

Even with brand-new hardware, surrounding track deformities or improper maintenance habits can cause premature roller failure. Addressing these common issues keeps your door gliding smoothly year-round.

track straightening and maintenance process

Correcting Sagging, Jumping Tracks, and Uneven Slides

If a door continues to jump the track or drag unevenly after roller replacement, check these trouble spots:

  • Straightening Bent or Pinched Track Rails: Heavy foot traffic can bend the raised aluminum track crown inward or outward. If the track is pinched, place a 3/4-inch block of wood against the damaged section and tap the wood firmly with a rubber mallet. This reshapes the metal without denting or cracking the aluminum rail. Detailed structural techniques can be found in this troubleshooting guide for sliding door repairs.
  • Installing a Track Cap / Cover: If previous seized rollers wore deep grooves into the track crown, new wheels will drop into those ruts and stick. You can snap a stainless steel track cover (repair cap) over the existing damaged rail to create a fresh, smooth surface without replacing the entire outer threshold.
  • Frame Misalignment: Misaligned frames cause approximately 70% of premature roller failures. If your home’s foundation or door frame has settled out of square, adjusting the rollers to their maximum height might not fully compensate. In that case, the outer frame may need shimming.

Cleaning and Lubrication Best Practices

To maximize the life of your new rollers, perform basic maintenance every six months:

  1. Deep Clean the Tracks: Vacuum pet hair, loose sand, and outdoor dirt from the sill. Use an old toothbrush and warm soapy water to break up hardened grime and mineral deposits, then dry the track thoroughly with a microfiber towel.
  2. Apply Dry Lubricants Only: Never spray standard penetrating oils, automotive grease, or cooking sprays into sliding tracks. Wet lubricants attract dirt and sand, forming an abrasive paste that grinds down bearing seals and wheel profiles. Always use a dry silicone spray or PTFE dry lubricant.
  3. Maintain Overhead Systems: Just as you regularly clean and protect sliding shower doors from soap scum and hard water scale, keeping patio tracks dry and free of debris prevents moisture from corroding lower wheel assemblies.

When to Call a Pro vs Change Sliding Door Rollers Yourself

While changing standard patio rollers is a manageable DIY task for handy homeowners, certain situations call for professional glass technicians:

  • Impact-Resistant Laminated Glass: Coastal impact doors feature thick, laminated glass panes that often weigh between 200 and 350 pounds. Lifting these panels requires specialized vacuum suction cups and mechanical equipment to avoid dropping the door or warping the structural frame.
  • Crushed or Split Frame Thresholds: If the bottom sill is crushed flat or structural rot has softened the subfloor beneath the track, simply replacing the rollers will not fix the issue. The door assembly must be removed to rebuild the structural foundation.
  • Seized Frame Stile Screws: Older aluminum or vinyl frames may have corroded assembly screws that strip or snap when loosened, requiring specialized extractors and re-tapping tools.

Frequently Asked Questions About Sliding Door Roller Replacement

How do I know if my rollers need adjustment or complete replacement?

If your door is difficult to slide, first clean the track and turn the adjustment screws to raise the panel. If the door lifts, stays level, and slides easily, an adjustment was all that was needed.

If the adjustment screw turns without lifting the door, the roller makes a continuous grinding sound, the wheels have flat spots, or the door continues to wobble and scrape the sill, the internal bearings are worn and the rollers must be replaced.

Can I replace sliding door rollers without removing the entire door panel?

On certain aluminum sliding door designs, you can access the rollers by loosening the bottom corner assembly screws and tapping the bottom rail down with a wood block and mallet while the door remains upright.

However, this method carries substantial risk. If you tap the frame unevenly, you can twist the metal stile or apply point-load stress to the tempered glass edge, shattering the entire panel. Removing the door panel onto a flat, padded surface is far safer and allows you to inspect the track and clean the roller pockets thoroughly.

Why does my sliding door still drag after installing new rollers?

If your door still drags after installing new rollers, check these four common culprits:

  1. Rollers Adjusted Too Low: The new rollers may be retracted too far into the housing, allowing the bottom aluminum frame to drag on the track. Turn the adjustment screws clockwise to raise the door.
  2. Damaged Track Crown: If the track has dips, deep gouges, or flat spots from previous failed rollers, the new wheels will drop into those depressions. Installing a stainless steel track cap will fix this.
  3. Debris in the Upper Guide Track: Dirt, spider webs, or failing top weatherstripping in the head channel can bind the top edge of the panel.
  4. Out-of-Square Door Frame: If the rough opening has settled, the top or side frame may pinch the panel as it slides open.

Conclusion

A sticky, stubborn sliding glass door does not mean you need to replace your entire door assembly. In most cases, removing the sliding panel, cleaning out years of track debris, and installing a fresh pair of matched tandem rollers will restore a smooth, quiet glide.

Taking the time to measure your replacement assemblies accurately, leveling the panel evenly with the corner adjustment screws, and applying dry silicone lubricant every season protects your hardware against premature wear.

When dealing with extra-heavy impact glass, structural subfloor settling, or intricate bathroom enclosures, working with professional glass specialists guarantees safe handling and precise alignment. If your home features specialized custom glass installations or requires professional shower door repair chicago services, precision-crafted hardware and professional expertise ensure your glass installations operate safely, cleanly, and effortlessly for years to come.

glass door scratch repair

Clear View Ahead: A Practical Guide to Glass Door Scratch Repair

Glass Door Scratch Repair Starts With the Right Diagnosis

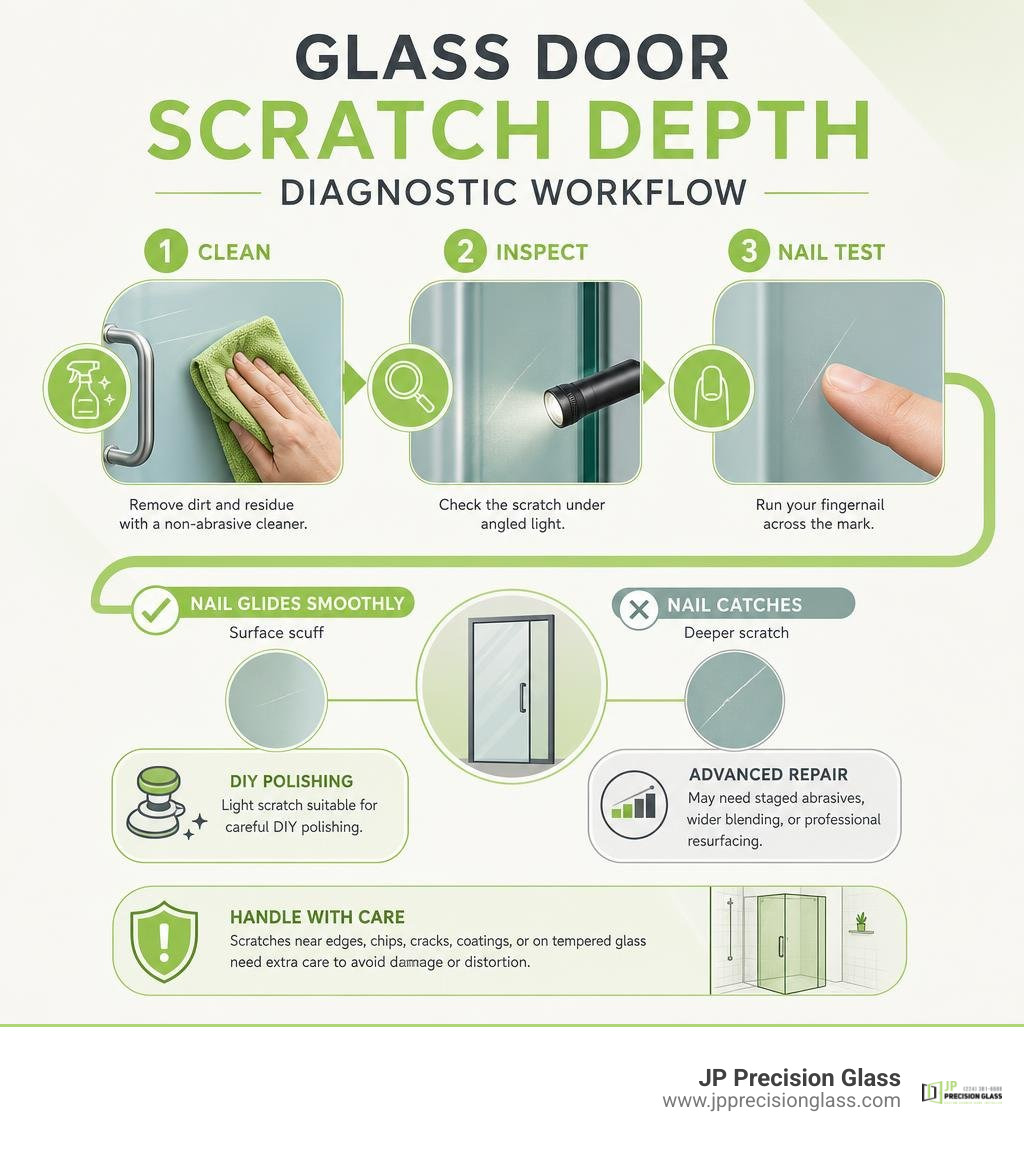
Most light scratches on a glass door can be reduced or removed by cleaning the glass, checking the scratch with a fingernail, then polishing with a glass-specific cerium oxide compound and a felt pad. If your nail glides over the mark, it is usually a surface scuff suitable for careful DIY polishing. If it catches, the damage is deeper and may need staged abrasives, wider blending, or professional resurfacing to avoid haze and optical distortion.

Glass door scratch repair works by removing a very thin layer of glass around the scratch, then polishing the area back to clarity. Do not treat every mark the same: scratches near an edge, cracks, chips, coated glass, and deep damage on tempered shower doors need extra care because too much heat or pressure can damage the panel.

For shower doors, start with the least aggressive method. Clean with a non-abrasive glass cleaner and microfiber cloth, inspect under angled light, and test a small hidden area before using a drill-mounted polishing kit.

Glass door scratch depth diagnostic workflow infographic

Glass door scratch repair definitions:

Assessing Damage: How to Evaluate Scratches on Glass Doors

Before reaching for power tools or polishing compounds, it is essential to accurately diagnose what kind of damage you are facing. Glass panels on patio sliders, interior dividers, and shower enclosures regularly face abrasive threats—from pet claws and gritty sponges to jewelry impacts and construction debris.

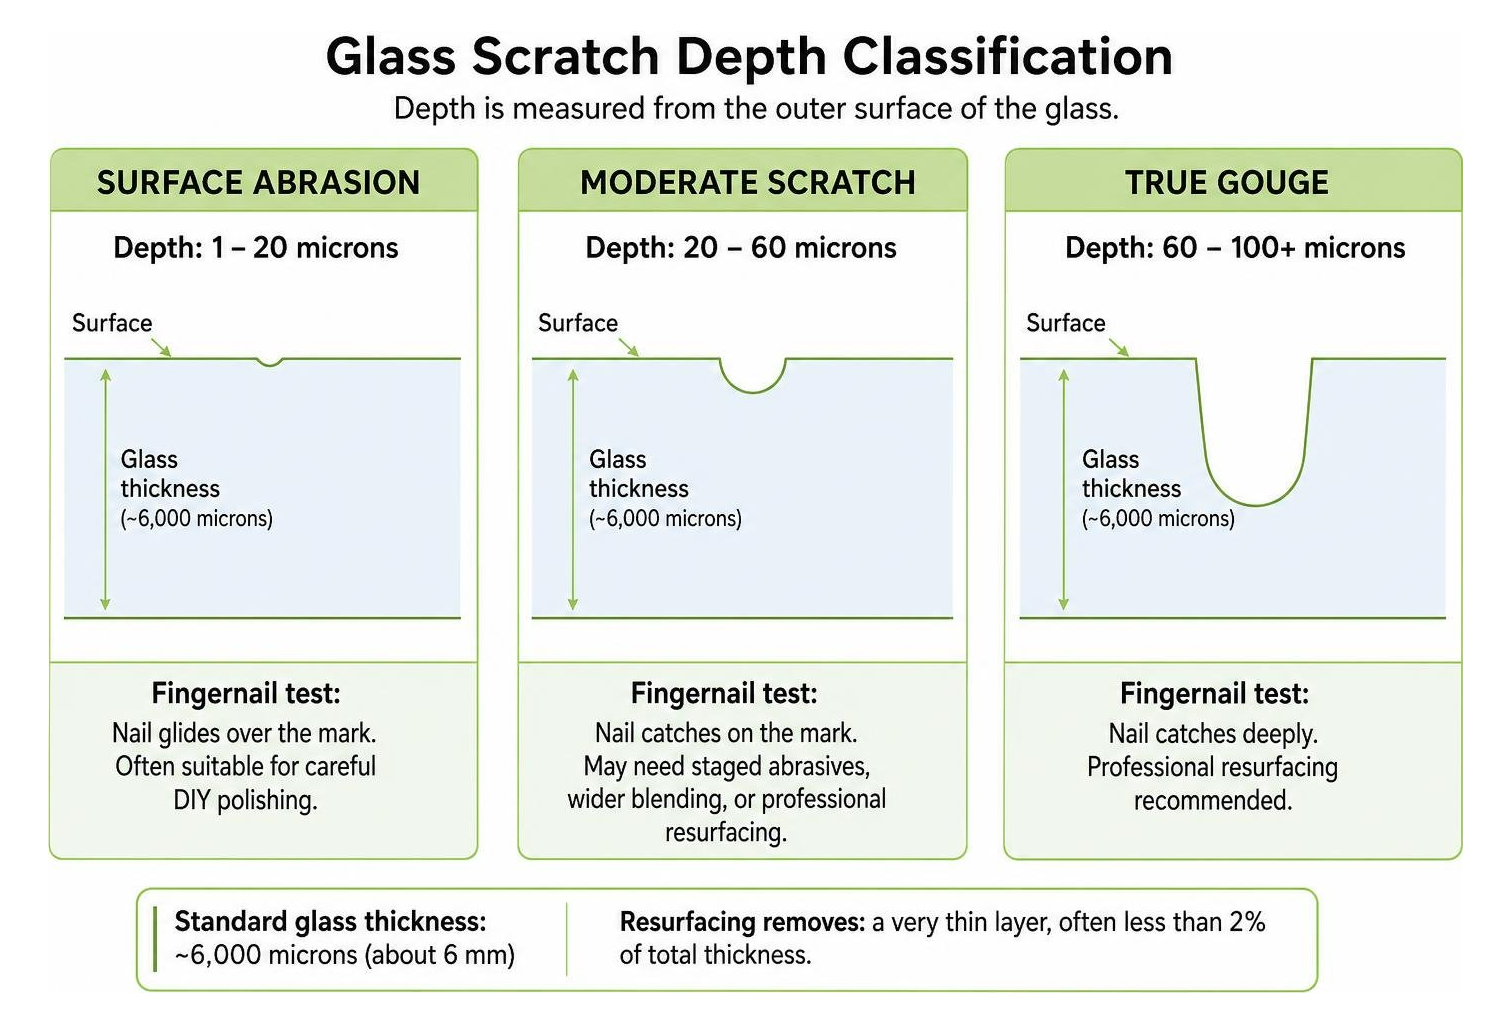
Evaluating the damage requires a careful optical inspection under direct, multi-angle lighting. Standard architectural glass found in residential doors is typically around 6 millimeters thick (roughly 6,000 microns). Most common scratches exist solely on the outer boundary of this layer. Surface abrasions often sit anywhere between 1 and 20 microns deep, whereas moderate scratches settle around 20 to 60 microns. True gouges reach 60 to 100+ microns into the surface.

glass scratch depth classification

Because resurfacing only shaves away a fraction of a percent of the total glass thickness (often less than 2%), restoring visual clarity without weakening the panel is entirely feasible. To learn more about scratch depths and classifications across different glass profiles, you can consult this comprehensive glass restoration guide for in-depth technical breakdowns.

The Fingernail Test for Depth Assessment

The quickest diagnostic test available is the simple fingernail test. Clean the glass thoroughly and drag your fingernail perpendicular across the scratch line.

  • Level 1: Surface Scuffs (Glides Smoothly): If your fingernail glides over the mark without catching, the damage is superficial (under 20 microns). These scuffs only require light buffing with a high-purity polishing paste.
  • Level 2: Moderate Scratches (Slight Catch): If your fingernail catches slightly—similar to catching on a seam of paper—the scratch has penetrated deeper into the silicate layer. This level generally requires fine mechanical sanding before final polishing.
  • Level 3: Deep Gouges (Hard Stop): If your fingernail drops into a distinct groove or comes to an abrupt halt, you are dealing with a severe gouge. These require multi-stage abrasive discs with wide feathered blending to avoid creating an optical lens effect.

Tempered vs. Annealed Door Glass Considerations

Understanding whether your door features annealed or tempered glass changes how you handle friction and heat during repair.

Standard float (annealed) glass breaks into large, sharp shards when fractured. It handles progressive grinding well but can develop thermal stress cracks if friction is concentrated in one spot.

Tempered glass, standard in modern patio doors and shower enclosures, undergoes extreme thermal heating and rapid cooling during manufacturing. This creates balanced internal compression and tension, causing it to crumble into dull, pebble-like granules if structurally compromised. While a common myth suggests tempered glass cannot be resurfaced, it can safely be repaired provided you manage heat dissipation carefully and avoid working directly on chipped edges where internal tension is most fragile.

Step-by-Step Guide to DIY Glass Door Scratch Repair

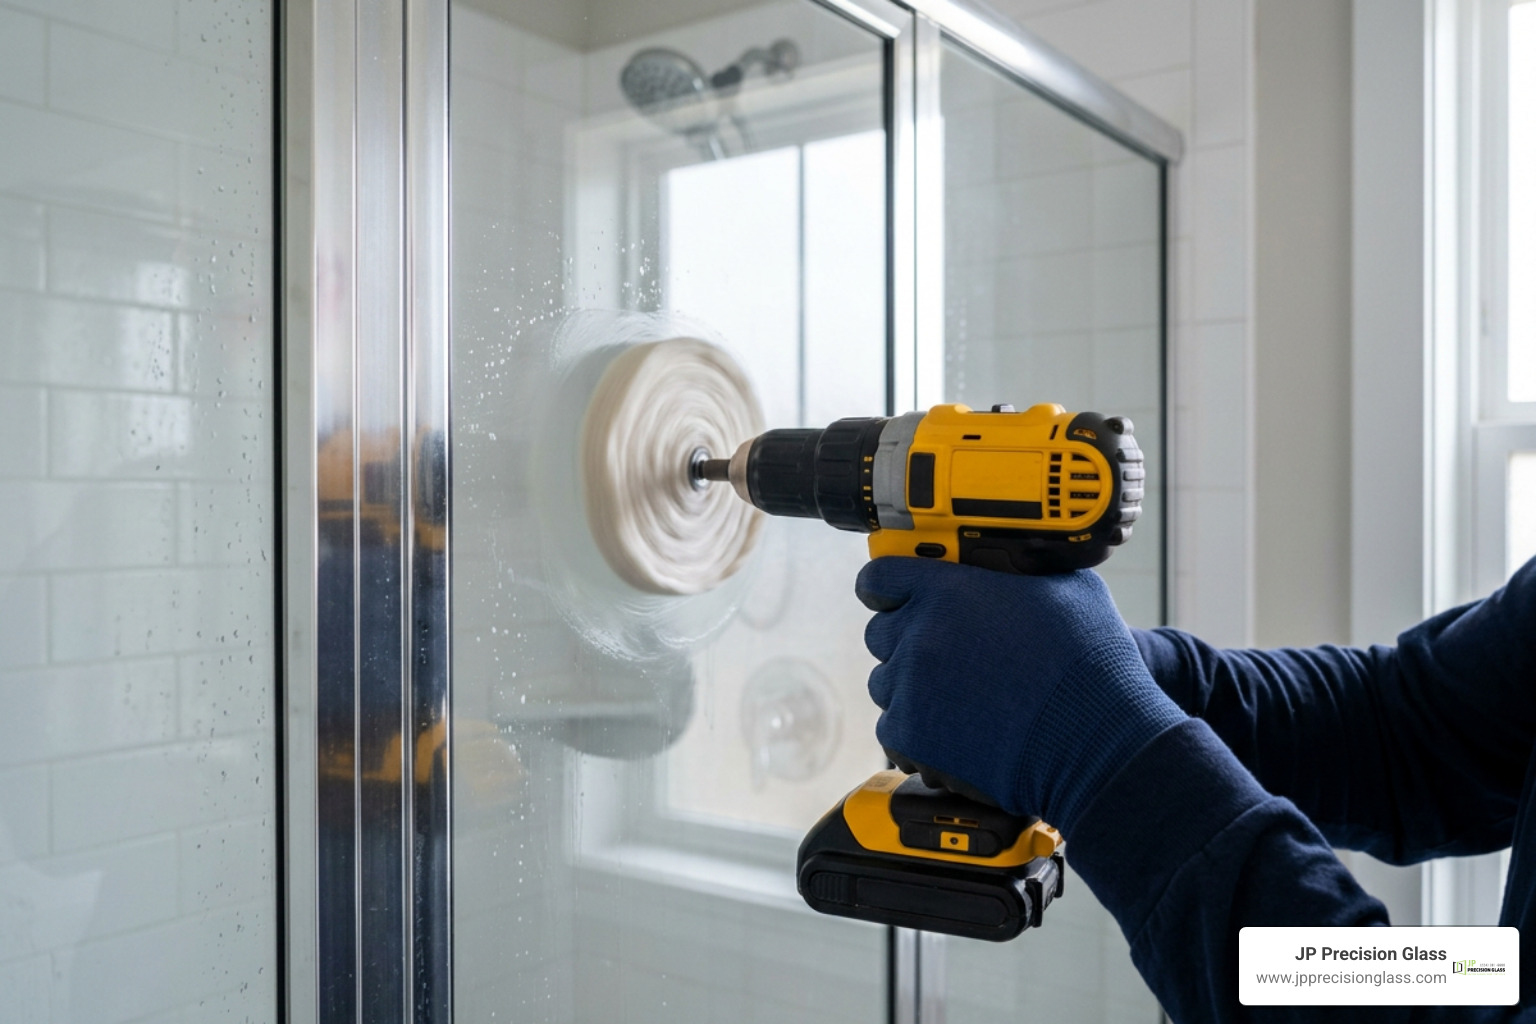
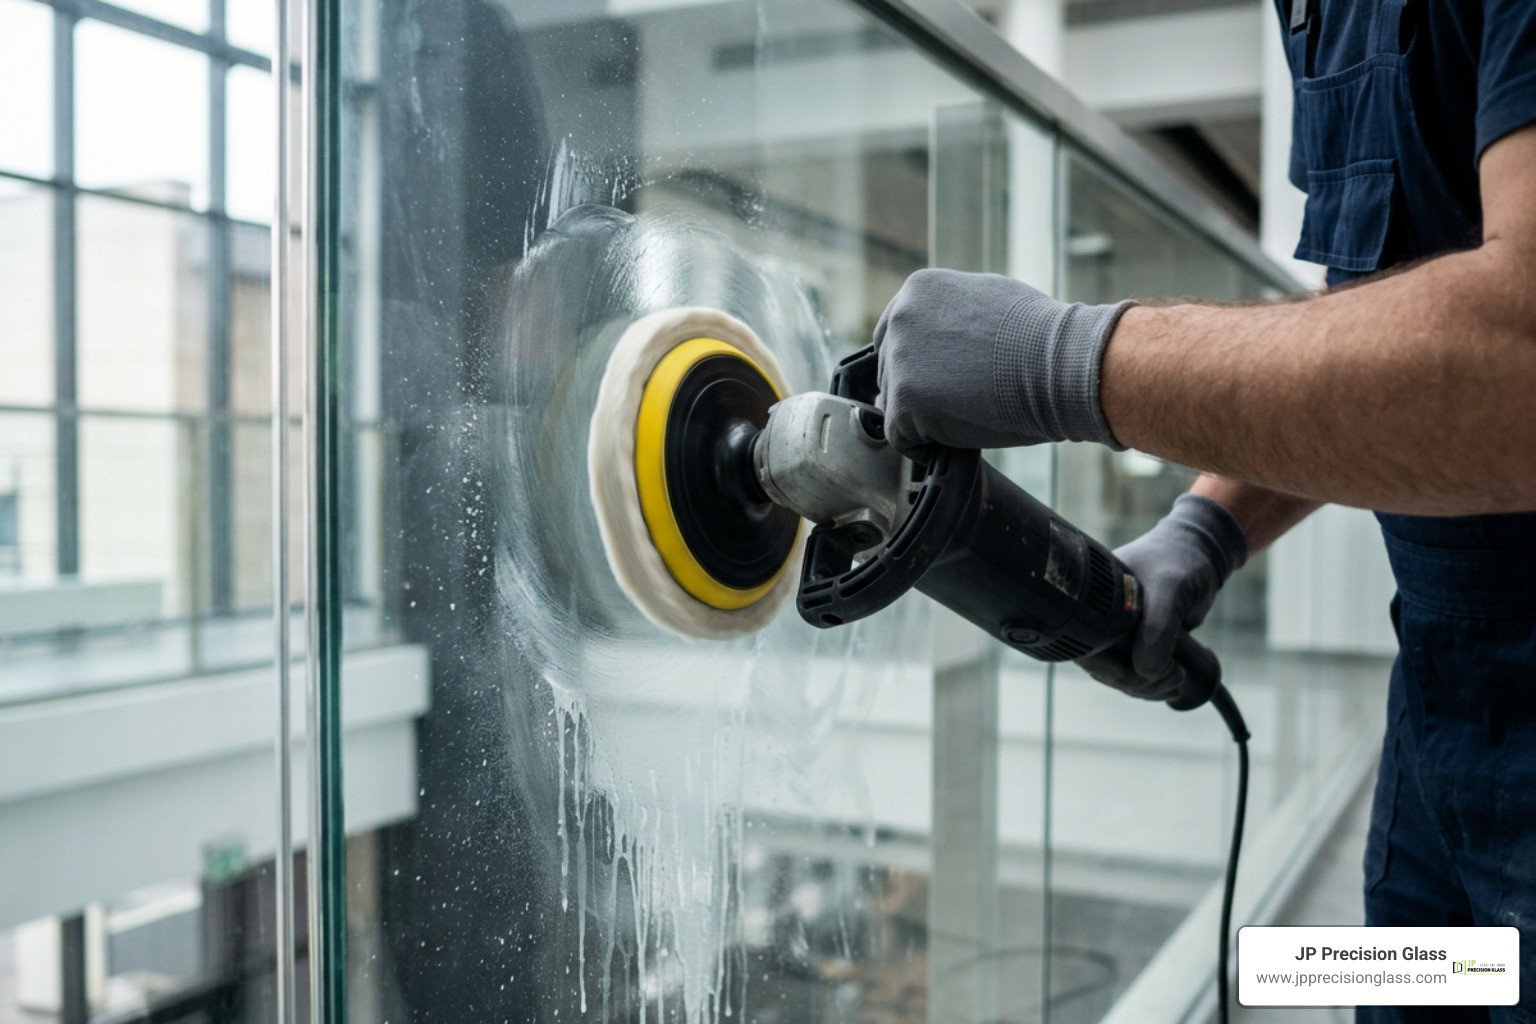
drill-mounted felt pad polishing a glass door panel

Taking on minor to moderate glass blemishes yourself can save significant time and keep your panels looking pristine. If you are also working on framing hardware or sliding assemblies, tackling sliding into savings with diy aluminum glass door repair alongside your glass work is a great way to completely refresh your door.

Preparing Tools and Materials for Glass Door Scratch Repair

Gather the proper equipment before starting so you never have to leave a wet slurry sitting on the glass mid-process:

  • Variable-Speed Drill: A standard 18V or 24V cordless drill (or corded electric drill) capable of holding 1500 to 2000 RPM under load. Avoid weak 12V tools that bog down when applying pressure.
  • Polishing Backing Pad & Spindle: A 2-inch (50mm) or 3-inch (75mm) backing plate fitted with hook-and-loop fasteners.
  • High-Density Rayon Felt Polishing Discs: Designed specifically for compounding glass without disintegrating.
  • Glass Polishing Compound: High-purity (99%+) cerium oxide powder or pre-mixed glass polish slurry. You can find ready-to-use solutions such as a dedicated drill-mounted glass polishing kit designed for domestic resurfacing.
  • Abrasive Discs (Optional): P500 and P800 grit micro-abrasive discs if addressing Level 2 scratches.
  • Spray Bottle: Filled with clean, room-temperature water.
  • Safety Equipment: Protective eye goggles, dust mask, and painter’s tape to shield surrounding metal frames or trim.

Executing Rotary Polishing and Feathering Techniques

Follow this structured workflow to safely remove scratches without creating haze or warping:

Glass door scratch repair steps

  1. Mask the Surrounding Frame: Apply painter’s tape around adjacent aluminum or wood frames to prevent accidental scuffing from the spinning disc.
  2. Mount the Backing Pad: Secure your backing pad into the drill chuck. Attach a clean felt pad to the plate.
  3. Apply Cerium Oxide Compound: Shake the compound well and apply a small dollop (about the size of a quarter) directly to the face of the felt pad. Lightly press the pad against the glass before turning on the tool to prevent splatter.
  4. Set Your RPM and Motion: Set the drill speed to roughly 1500–2000 RPM. Begin moving the pad across the scratch using smooth, overlapping circular patterns.
  5. Master the Feathering Technique: Never keep the polishing pad stationary. Holding the pad in one spot for longer than 15 to 20 seconds creates dangerous thermal hotspots. Expand your polishing area to three to four times the original length of the scratch. This gradual blend (feathering) prevents a localized dip in the glass that could otherwise cause noticeable visual distortion.
  6. Maintain Moisture: Glass polishing requires steady lubrication. As the cerium oxide begins to dry and become sticky, mist the panel lightly with clean water from your spray bottle to reactivate the abrasive properties.

Post-Repair Cleanup and Optical Clarity Check

Once the scratch appears visually resolved, wipe away all compound using clean water and a plush microfiber cloth.

To completely clear any remaining compound film or mineral haze, prepare a mild cleaning solution by mixing two ounces of household ammonia with two quarts of clean water. Spray the glass and wipe it clean with a fresh, lint-free towel while wearing protective gloves.

Step back and inspect the glass from multiple angles and under direct directional light (such as a bright work light or flashlight). Look for remaining scratch lines, swirl marks, or milky haze. If faint traces remain, reapply your felt pad with light pressure for an additional two-minute cycle.

Professional Equipment and Advanced Resurfacing Techniques

variable-speed rotary polisher resurfacing architectural glass

When scratches are exceptionally deep, cover large surface areas, or affect high-end architectural fixtures, professional-grade equipment offers controlled material removal that basic drill kits cannot match. For homeowners balancing project scope with cost, reading our guide on how to find glass door repair services on a budget provides great insight on prioritizing what needs restoration.

Choosing the Best Approach for Glass Door Scratch Repair

Professional glass resurfacing relies on specialized variable-speed rotary polishers fitted with multi-stage abrasive discs rather than basic handheld drills.

  • Dry Pad Multi-Stage Systems: Advanced dry abrasive systems use precisely graded silicon carbide or diamond abrasive pads (ranging from 180 grit down to fine 1000+ grit) to physically step down and level the glass plateau around a scratch.
  • Wet Cerium Slurry Polishing: Liquid polishing systems continuously flush the surface with a recirculated or misted cerium oxide slurry. This manages heat dispersion across extensive commercial panels.
  • Surface Reunification: Independent tests show that controlled mechanical resurfacing can unify the outer microscopic structure of the glass, eliminating micro-fissures and restoring surface integrity.

Common Mistakes to Avoid During Resurfacing

Achieving crystal-clear results requires avoiding several common DIY pitfalls:

  • Localized Overheating: Applying heavy downward pressure in one tight area builds extreme thermal friction. On tempered doors, excessive localized heat can trigger catastrophic panel breakage.
  • Focal Warping (The Lens Effect): Polishing only directly on top of the scratch groove creates a subtle valley in the glass. When looking through the door, objects on the other side will appear bent or wavy. Always blend your polishing motion outward.
  • Working Too Close to Frame Edges: Standard rotary pads struggle to maintain a flat profile within two inches of door frames. Forcing a spinning backing pad against metal or silicone gaskets will chew up the pad and risk chipping the vulnerable glass edge.
  • Skipping Abrasive Grits: If sanding deep scratches, jumping directly from an aggressive coarse grit to a fine finishing polish leaves behind micro-swirls that permanently dull the glass clarity.

Preventing Future Scratches and Knowing When to Replace

Once your glass door looks brand new again, taking proactive steps will keep it clear for years to come. In bathrooms and high-traffic entryways, routine care keeps grit from turning into fresh scratches. If an existing door has reached the end of its lifespan, exploring our breakdown on glass shower doors replacement made easy helps outline straightforward modern upgrades.

Damage Characteristic DIY Polishing Viable? Professional Resurfacing? Full Panel Replacement Needed?
Light Surface Scuff (<20 microns) Yes (Cerium oxide & felt pad) Optional No
Moderate Scratch (20–60 microns) Possible (Multi-stage kit) Yes (Recommended) No
Deep Gouge (>60 microns) No (High risk of distortion) Yes Only if structural integrity is compromised
Edge Chip or Corner Crack No No Yes (Immediate safety risk)
Failed Double-Pane Seal No No Yes (Internal fogging cannot be polished)

Applying Protective Nano-Coatings on Glass Enclosures

One of the most effective ways to preserve shower doors and exterior glass is applying a hydrophobic nanotechnology coating.

These sealers bond microscopically with the silica surface, filling in microscopic pores to form an ultra-smooth, water-repellent barrier. Water beads up and rolls off, carrying away dirt, limescale, and soap scum before they can etch into the glass.

For ongoing maintenance:

  • Use a soft silicone squeegee after daily shower use.
  • Clean exclusively with non-abrasive, pH-neutral cleaners and clean microfiber cloths.
  • Never use green heavy-duty scouring pads, steel wool, or harsh scouring powders on treated glass.

When Scratches Require Panel Replacement

While resurfacing works wonders for surface damage, certain structural issues make restoration impossible:

  • Cracks Originating at the Frame Edge: Any crack running inward from the edge of a tempered panel poses an immediate safety hazard.
  • Deep Clustered Pitting or Slag: Deep burn pits from welding slag or heavy grinding sparks that penetrate through more than 10% of the pane thickness weaken the overall glass tension.
  • Extensive Surface Coverage: If severe scratches cover more than 30% of a large glass panel, the labor and time required to blend the surface often makes replacement more practical.

When damage exceeds the threshold of safe polishing, choosing to replace glass shower door assemblies ensures your bathroom remains safe, functional, and visually stunning.

Frequently Asked Questions About Glass Door Scratch Repair

Can scratches on tempered glass doors be safely repaired?

Yes. Tempered glass can be resurfaced and polished safely. Because standard residential door panels are around 6mm thick, removing 20 to 80 microns of surface glass to eliminate a scratch removes less than 2% of the total glass thickness.

The key requirement is careful temperature control: keep the tool moving in a wide feathering pattern, maintain steady water lubrication, and keep drill speeds between 1500 and 2000 RPM to prevent localized thermal shock.

How long does a glass door scratch repair take and how durable is it?

A typical repair for minor surface scuffs takes roughly 20 to 45 minutes of active polishing. Moderate scratches requiring staged sanding and polishing generally take 1 to 2 hours per damaged area.

Because glass scratch repair physically smooths and levels the natural silica surface rather than simply filling it with temporary resins, the results are permanent. Once polished and cleaned, the repaired area will never fade, peel, or cloud over time.

What causes optical distortion during scratch removal?

Optical distortion (often called the “funhouse mirror” or lens effect) happens when glass is removed too aggressively in an isolated spot without proper blending.

When you grind down a deep scratch without spreading the work across a broader radius, you create a shallow depression in the glass pane. Light passing through this uneven curve refracts at varying angles, making straight lines behind the glass appear bent. Feathering the work area outward to 3 to 4 times the scratch diameter prevents this distortion.

Conclusion

Scratches on your sliding glass doors or shower panels do not automatically mean you need a brand-new pane. By using the fingernail test to evaluate depth, equipping yourself with a quality variable-speed rotary setup, and using careful feathering techniques with cerium oxide, you can restore brilliant clarity to your glass surfaces safely and effectively.

For deeper gouges, widespread surface etching, or custom tempered enclosures that demand exacting precision, professional guidance guarantees a flawless, distortion-free finish. At JP Precision Glass, we specialize in delivering custom, made-to-size solutions and premium glass installations tailored to your home. If you are dealing with challenging door damage or considering a full bathroom upgrade, reach out to our expert team for dedicated shower door repair chicago homeowners trust for lasting quality.

modern bathroom glass shower door

How to Find Glass Door Repair Services on a Budget

Saving Money on Glass Door Repair: What You Need to Know

If you are looking for glass door repair for your home, you do not have to spend a fortune to get your door working like new again. Most glass door issues—like sticking tracks, broken seals, or cracked glass—can be solved without replacing the entire door frame.

Here is a quick guide to getting your glass door fixed on a budget:

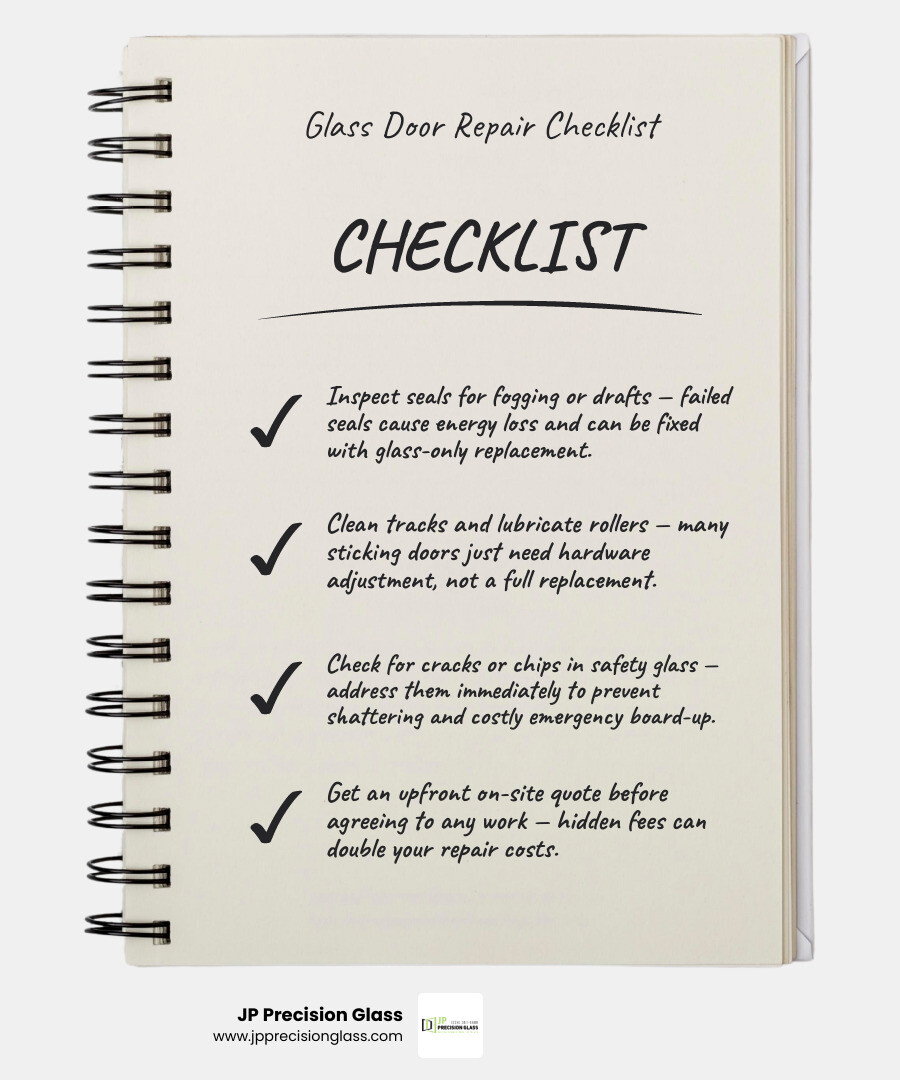
  • Choose Glass-Only Replacement: If the frame is in good shape, you only need to replace the glass pane. This is highly cost-effective compared to buying a whole new door system.
  • Fix the Hardware First: Many sliding doors and shower doors get stuck because of dirty tracks, worn sweeps, or misaligned rollers. Replacing these small parts is cheap and fast.
  • Address Broken Seals Quickly: Foggy glass means the seal between double-pane glass has failed. Replacing the double-pane glass unit restores your view and stops drafts.
  • Get an Upfront Quote: Look for local experts who offer honest on-site evaluations so you do not get hit with hidden fees.

Dealing with a broken or sticky glass door is stressful. You worry about your family’s safety, high energy bills, or water leaking onto your bathroom floor.

But here is the good news: you rarely need a brand-new door. Many homeowners are told they need a full replacement when a simple component repair or a custom glass swap-out is all it takes. By focusing on the specific problem—whether it is a worn hinge on your shower door or a cracked pane on your patio door—you can keep your home beautiful while keeping your budget intact.

signs of glass door damage infographic infographic

Signs Your Home Needs Professional Glass Door Repair

As homeowners, we often ignore the subtle warnings our doors give us. A slight squeak here, a tiny puddle there—we tell ourselves we will handle it next weekend. However, catching these issues early is the key to keeping your glass door repair budget-friendly. Waiting too long can turn a simple hardware adjustment into an emergency emergency board-up or structural overhaul.

Here are the most common signs that it is time to call in the professionals:

  • Seal Failure (The “Foggy Glass” Effect): If your double-pane patio doors or insulated glass units look perpetually cloudy, steamy, or have water droplets trapped inside, the airtight seal has failed. This allows external moisture to seep between the panes. Not only does this ruin your view, but it also compromises your home’s energy efficiency.
  • Permanent Hard Water Etching: In the bathroom, shower glass is subjected to constant mineral exposure. Over time, hard water deposits can chemically bond with the glass, creating a chalky, white haze. If standard cleaners cannot remove this, the glass has suffered permanent mineral etching and may need professional restoration or replacement.
  • Misaligned Rollers and Squeaking Tracks: Does opening your sliding glass door feel like a heavy workout? If the door jumps off its track, grinds loudly, or requires immense physical effort to slide, your rollers are likely misaligned, rusted, or flat-spotted.
  • Water Leaks around the Frame: If you notice water pooling on your bathroom floor after a shower, or rainwater seeping past your exterior patio doors, your vinyl seals, sweeps, or weatherstripping have degraded.
  • Cracked or Chipped Safety Glass: Any physical damage to safety glass—whether a hairline crack from an accidental bump or a chip on the edge of a frameless shower door—is a ticking time bomb. Safety glass is designed to shatter into tiny, relatively harmless pieces rather than sharp shards, but a single crack means the structural integrity of the entire pane is gone.

If you are noticing any of these issues on your bathroom doors, you might want to read our guide on 6 Glass Shower Door Questions to understand how these problems develop and how we diagnose them.

Repair vs. Replacement: Which Is More Budget-Friendly?

One of the biggest misconceptions in the glass industry is that a broken or foggy glass door requires a complete, brand-new door assembly. Many retail contractors will push for a full-frame replacement because it is a larger project. However, a “repair-first” approach is almost always the most budget-friendly choice.

If your door frame is structurally sound, square, and free of rot or heavy corrosion, you do not need to replace it. Instead, you can opt for a glass-only replacement or a targeted hardware adjustment. Replacing only the glass pane inside your existing frame keeps waste out of landfills, takes a fraction of the time, and saves you thousands of dollars compared to a full-frame installation.

Let us look at how these choices compare:

Service Option What It Involves Budget Impact Best For
Hardware Adjustment & Tuning Realigning rollers, lubricating tracks, tightening hinges, replacing worn sweeps or weatherstripping. Very Low Sticky doors, minor water leaks, squeaking mechanisms, sagging doors.
Glass-Only Replacement Removing the broken, cracked, or foggy glass pane and installing a custom-cut new pane in the existing frame. Moderate Cracked panes, failed double-pane seals (foggy glass), severe mineral etching.
Full Door & Frame Replacement Completely tearing out the old frame, track, and glass, and installing an entirely new door system. High Rotted wood frames, severely warped metal tracks, or major home remodeling.

To help you decide which path makes the most sense for your home, we have mapped out the decision-making process below:

By working with professional glass replacement services that specialize in glass-only swaps, you can restore your home’s security and energy efficiency without paying for materials and labor you do not actually need. Choosing a local specialist ensures you get tailored advice and efficient service to keep your repair costs as low as possible.

Common Types of Glass Doors and Their Repair Needs

custom glass shower door

Every glass door in your home serves a unique aesthetic and functional purpose. Because they are constructed differently, their maintenance and repair needs vary widely. Modern residential bathroom layouts increasingly rely on glass to maximize light and create an open, airy feel. This is especially true for space-saving designs, where bulky wooden doors are replaced with sleek glass partitions.

When it comes to the bathroom, the debate usually centers on frameless vs. framed shower doors. Framed doors rely on a metal structure to support thinner glass, which can trap water and grime in the tracks over time. Frameless doors use thick, heavy safety glass secured by heavy-duty brass hinges directly to the wall. While frameless doors are incredibly durable and easy to clean, they put a massive amount of weight on their hinges, making precise alignment absolutely critical.

Troubleshooting Sliding Glass Door Repair Issues

Sliding glass doors are wonderful space-savers because they do not require any swing clearance. However, their mechanical nature means they are prone to specific wear and tear.

The most common issues we see include:

  • Sticking tracks: Dust, pet hair, and dirt accumulate in the bottom track, creating a thick grime that stops the rollers from spinning.
  • Squeaking or flat-spotted rollers: Over time, the metal or nylon wheels inside the bottom of the door wear down, causing a grinding noise and making the door feel incredibly heavy.
  • Worn vinyl seals: The weatherstripping and vinyl sweeps that keep drafts and water out will dry out and crack under sun exposure or humidity, leading to energy loss.

If you are dealing with a sticky bathroom slider, exploring specialized Sliding Shower Doors can give you a better understanding of how modern sliding mechanisms are designed to prevent these exact issues.

Addressing Frameless and Pivot Glass Shower Door Repair Needs

Frameless and pivot shower doors are the crown jewels of modern bathrooms, but their minimalist design means there is no metal frame to hide minor structural shifts.

If your frameless door is acting up, the repair process usually involves:

  • Hinge Alignment: Heavy glass panels can pull on wall anchors over time, causing the door to sag. If the door is rubbing against the floor tiles or the adjacent glass panel, a professional needs to loosen, realign, and securely retighten the heavy-duty hinges.
  • Replacing Worn Sweeps: The clear plastic drip sweep at the bottom of your pivot door keeps water inside your shower. Because it constantly rubs against the curb, it will wear down, discolor, or tear every few years. Replacing this sweep is a quick, highly affordable fix that prevents water damage to your subfloor.
  • Inspecting Safety Glass: Because frameless doors rely on tempered safety glass, any chips along the exposed polished edges must be inspected immediately to ensure the glass does not spontaneously shatter.

How to Choose a Budget-Friendly Glass Service Provider

technician inspecting a glass door

When you need a glass door repair, finding a contractor who aligns with your budget is all about asking the right questions upfront. You want to avoid companies that give vague pricing over the phone only to surprise you with travel fees, cleanup surcharges, or emergency premiums once they arrive at your home.

Here is what you should look for when choosing a budget-friendly glass partner:

  • Free Estimates and On-Site Quotes: A reputable glass company should offer clear, honest evaluations. Look for providers who offer detailed local consultations and upfront pricing so you know exactly what the job entails before signing any contract.
  • A “Repair-First” Philosophy: Choose a service provider that actively looks for ways to save you money. If a technician immediately tells you that you must buy a completely new door without even inspecting the rollers or checking if a glass-only swap is possible, get a second opinion.
  • Licensed, Bonded, and Insured Technicians: Never hire an uninsured handyman to handle heavy safety glass. If a pane shatters during installation or a heavy door falls off its hinges, you could face costly property damage or medical bills.
  • Clear Warranties: A budget-friendly repair is only budget-friendly if it lasts. Ensure the company stands behind their work with a solid warranty on both the glass panels and the installation labor.

If you want to see what a comprehensive, customer-first service menu looks like, browse Our Services to see how we approach residential glass care and find the right solutions for your home.

Frequently Asked Questions About Glass Doors

Can you repair a scratched or etched glass shower door?

It depends on the depth of the damage. Light surface scratches and mild hard water stains can often be polished out using professional-grade glass restoration compounds and rotary polishing pads. However, if the scratch is deep enough that your fingernail catches in it, or if the glass has suffered deep, permanent mineral etching from years of neglected hard water buildup, polishing will not restore its clarity. In those cases, replacing the glass pane itself is the most effective and visually satisfying solution.

What types of safety glass are used for shower door replacement?

For residential doors, especially in wet environments like bathrooms, building codes strictly require safety glass to prevent serious injury. The two primary types are:

  • Tempered Glass: This glass undergoes a high-heat manufacturing process followed by rapid cooling, making it up to four times stronger than standard glass. If it breaks, it crumbles into small, dull pebbles rather than sharp, jagged shards. For additional background on how this material works, see this overview of tempered glass.
  • Laminated Glass: This consists of two glass sheets bonded together by a tough plastic interlayer. If the glass breaks, the fragments stick to the plastic interlayer, keeping the barrier intact.

For high-moisture coastal regions or areas prone to severe weather, some homeowners also look into impact-rated or hurricane-rated options to ensure maximum durability and safety.

How long does a professional glass shower door repair take?

Most standard hardware repairs, such as replacing sliding door rollers, adjusting saggy hinges, or swapping out worn sweeps, can be completed in a single visit lasting under two hours. If you require a custom glass-only replacement, the process takes a bit longer.

First, a technician will perform an exact measurement of your door frame. Because safety glass cannot be cut or drilled once it is tempered, the new pane must be custom-fabricated to those exact specifications at a specialized tempering facility. This fabrication process typically takes a few business weeks. Once the custom glass unit is ready, the final installation is completed in a single, efficient visit.

Conclusion

Keeping your home’s glass doors in pristine condition does not have to drain your savings. By focusing on targeted repairs, swapping out only the glass when the frame is solid, and maintaining your hardware, you can enjoy a beautiful, safe, and energy-efficient home on a sensible budget.

At JP Precision Glass, we pride ourselves on being Chicago’s leading glass specialists. We bring precision, high-quality materials, and made-to-size custom solutions to every home we visit. Whether you are dealing with a sagging frameless shower door, a sticky slider, or cloudy glass, we are here to help you find the most practical, cost-effective solution.

Ready to restore your bathroom’s sparkle? Contact us today to schedule your professional Shower Door Repair Chicago and experience the difference that true precision craftsmanship makes!

aluminum glass door repair

Sliding into Savings with DIY Aluminum Glass Door Repair

Why Aluminum Glass Door Repair Is Worth Doing Right

Aluminum glass door repair is one of the most rewarding home maintenance tasks you can tackle yourself — if you know what you’re dealing with.

Here’s a quick overview of what’s involved:

  • Common issues: sticking doors, worn rollers, damaged tracks, air leaks, foggy glass, loose hardware
  • DIY-friendly fixes: track cleaning, roller replacement, lubrication, screw tightening, weatherstripping swap
  • When to call a pro: shattered glass, warped frames, broken locks, structural damage, or safety glass replacement
  • Key benefit: catching small problems early prevents expensive full replacements down the road

Aluminum and glass doors take a beating from daily use. Vibrations, weather exposure, and constant movement slowly wear down every component — from the rollers and tracks to the seals and hinges. Left unchecked, a door that sticks slightly today can become a full security or energy problem tomorrow.

The good news? Most common issues are fixable with basic tools and a little know-how. This guide walks you through exactly what to look for, what you can fix yourself, and when it’s smarter to bring in a professional.

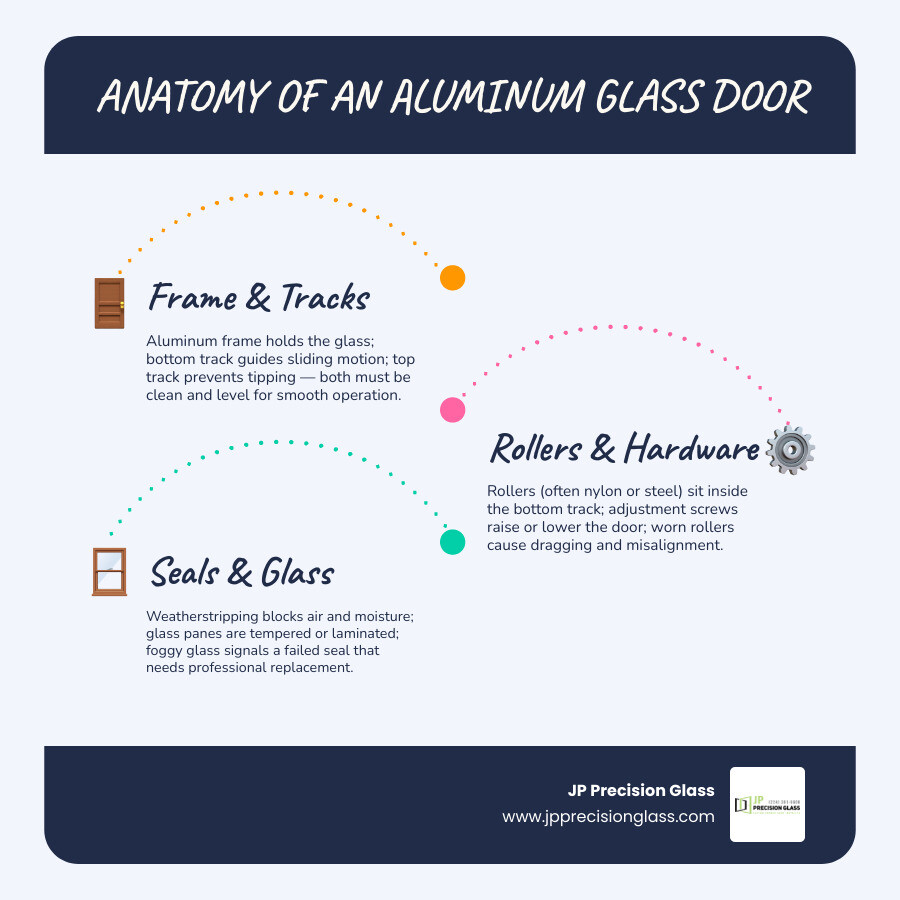
Whether you’re dealing with a sliding patio door that drags or a shower door that won’t seal properly, understanding the anatomy of your door system is the first step.

Anatomy of an aluminum glass door system with labeled components infographic

Common Issues with Aluminum and Glass Doors

Before rolling up your sleeves, you need to play detective. Aluminum glass doors are incredibly durable, but they are not invincible. Over years of daily use, physical stress and environmental exposure will leave their mark.

Let’s look at the most common issues you are likely to encounter:

Door Drags and Sticking Frames

If you have to put your back into opening your sliding patio door, you are dealing with a classic case of dragging. This is typically caused by worn-out rollers, dirt buildup in the tracks, or a frame that has settled out of alignment. For swing doors, a dragging door usually points to worn pivots or warped hinges.

Air Leaks and Water Infiltration

Have you noticed a draft when standing near your door? Or worse, a small puddle after a heavy downpour? Worn weatherstripping and degraded sealants are the culprits here. Over time, the rubber or felt seals dry out, crack, and peel away, leaving visible gaps between the door and the frame.

Corrosion and Oxidation

While aluminum does not rust like steel, it does oxidize. In high-humidity environments, aluminum components can develop a powdery white residue or pitting. This corrosion can freeze up hinges, damage lock mechanisms, and ruin the clean aesthetic of your entryway.

Warped Hinges and Degraded Sealants

Daily door slams and structural shifts can warp hinges and break the seal around your glass panels. This not only makes the door difficult to lock, but it also compromises its energy efficiency and security.

To help you visualize how these issues impact your daily life, we have broken down the most common problems and their consequences:

Common Door Issue Primary Cause Operational Impact Risk Level
Sticking or Dragging Dirt buildup, worn rollers, or bent tracks Hard to open, damages the track further Medium
Visible Gaps & Drafts Worn weatherstripping, dried sealants High energy bills, water leaks, pest entry Low to Medium
Unusual Grinding Noises Damaged rollers, unlubricated hardware Accelerated hardware wear and tear Medium
Difficulty Locking Door misalignment, warped hinges Severe security vulnerability High
Foggy Glass Panes Blown insulated glass unit (IGU) seal Lost insulation value, ruined view Low

Addressing these issues early prevents minor inconveniences from turning into major security risks or expensive structural failures.

Step-by-Step Guide to DIY Aluminum Glass Door Repair

Taking care of your doors does not have to be an overwhelming chore. In fact, regular preventative maintenance is far cheaper over the long term than replacing an entire door system. Let’s look at how you can restore smooth operation to your door with a few simple steps.

Cleaning the Tracks

The number one enemy of sliding doors is dirt. Pet hair, dust, and outdoor debris settle into the track, creating a gritty paste that destroys rollers.

  1. Vacuum the track thoroughly using a crevice tool.
  2. Scrub the track with a stiff brush and a mild, non-abrasive cleaner.
  3. Wipe it dry with a clean rag.

Lubricating the Hardware

Never use heavy grease or WD-40 on your tracks, as they act like dirt magnets. Instead, apply a thin layer of dry silicone spray lubricant to the tracks and rollers. This keeps things sliding smoothly without attracting grime.

Tightening Loose Screws

Because doors experience constant vibrations from daily use, screws and bolts can slowly back out over time. Grab a screwdriver and check the hinges, lock plates, and handle assemblies. Tightening these up can instantly resolve minor alignment issues.

If you are dealing with more severe frame issues, professional frame restoration is the best way to realign and repair damaged aluminum structures to ensure a perfect seal.

Essential Tools and Safety Gear for Aluminum Glass Door Repair

Before starting any hands-on work, make sure you have the right gear. Safety is paramount when working with heavy glass panels and metal frames.

Make sure you have the following items ready:

  • Safety glasses: Protect your eyes from flying metal shavings, dirt, or accidental glass splinters.
  • Heavy-duty work gloves: Essential for handling glass panels and protecting your hands from sharp aluminum edges.
  • Screwdrivers: Both flathead and Phillips head for adjusting rollers and tightening hardware.
  • Silicone lubricant: A high-quality dry silicone spray.
  • Replacement rollers: If your current rollers are flat-spotted or broken.
  • Non-abrasive cleaners: Safe for both aluminum finishes and glass surfaces.

Troubleshooting Tracks, Rollers, and Hardware

If your door is still sticking after a thorough cleaning, it is time to look closer at the hardware. For sliding systems, this usually means adjusting or replacing the rollers.

How to Adjust Sliding Door Rollers

Most sliding aluminum doors have adjustment screws located at the bottom corners of the door frame (sometimes hidden behind plastic caps).

  1. Insert a screwdriver into the adjustment hole.
  2. Turn clockwise to raise the door, or counterclockwise to lower it.
  3. Adjust both sides until the door sits perfectly level in the frame and slides without dragging.

Replacing Worn Rollers

If adjusting the screws does not help, the rollers are likely broken. You will need to carefully remove the sliding door panel from the frame, lay it flat on a protected surface, and unscrew the roller assemblies from the bottom rail to install replacements.

This hardware troubleshooting is highly similar to what we perform when servicing sliding shower doors in residential bathrooms. Whether it is a patio door or a heavy glass shower enclosure, keeping the rollers aligned and clean is the secret to effortless operation.

For swing doors, check the pivot hinges and door closers. If the door slams or fails to close completely, the hydraulic fluid in the closer may be low, or the sweep at the bottom of the door may be worn out and catching on the threshold. Replacing these components is straightforward and immediately restores the door’s performance.

When to Repair vs. Replace Your Door System

One of the biggest questions homeowners face is whether they can get away with a simple repair or if they need to invest in a brand-new door system. The answer usually depends on the structural integrity of the frame and the condition of the glass.

If your aluminum frame is straight, structurally sound, and free of severe corrosion, you should almost always prioritize repair over replacement. This approach saves you a significant amount of time and money.

For instance, if your double-pane glass is foggy or cracked, you do not need to replace the entire door frame. Instead, you can opt for an Insulated Glass Unit (IGU) replacement, which involves swapping out only the glass insert. Replacing only the affected glass panels restores visibility and insulation, and you can learn more about how insulated glazing works to improve home efficiency.

If you live in a storm-prone area, upgrading your glass can even save you money on your home insurance. Installing approved impact glass units can lead to a 20% to 45% reduction in wind coverage premiums while keeping your existing frames intact.

When to Choose DIY vs. Professional Aluminum Glass Door Repair

While cleaning tracks and replacing rollers are excellent weekend DIY projects, some tasks require a level of precision and equipment that only a professional can provide.

You should call a professional glass company chicago when:

  • The glass is cracked or shattered: Standard glass is incredibly dangerous to handle without specialized suction cups and disposal gear.
  • You need safety-rated glazing: Modern building codes require tempered glass or laminated glass for doors and adjacent sidelites to prevent injuries.
  • The frame is structurally warped: If the aluminum frame has bent due to structural settling or an impact, it cannot be easily hammered back into shape without specialized tools.

If you are dealing with bathroom-specific glass, such as wanting to replace glass shower door, installing new glass shower panels, or designing a custom shower door chicago, professional measurement is absolutely critical to prevent leaks.

Signs Your Patio or Shower Door Needs Immediate Professional Attention

Some situations cannot wait for a convenient weekend project. You need to call for professional assistance immediately if you notice any of the following warning signs:

  • Shattered or deeply cracked glass: This presents an immediate safety hazard to children and pets, as well as a severe security vulnerability.
  • The door is completely stuck or off-track: A heavy glass door that is unstable can fall out of its frame, causing severe injury or property damage.
  • Broken locking mechanisms: If you cannot secure your exterior door, your home is vulnerable to break-ins.

In these high-stress situations, emergency services are incredibly valuable. Many commercial and residential glass companies offer rapid emergency board-up services and same-day glass replacement to secure your property, ensuring your home remains safe and protected until a permanent solution is installed.

Frequently Asked Questions about Aluminum Door Maintenance

To help you keep your door operating perfectly, we have gathered answers to some of the most common questions regarding aluminum door care.

How do weatherstripping and sealant issues affect door performance?

Worn weatherstripping and degraded sealants allow outside air and moisture to infiltrate your home. This leads to uncomfortable drafts, higher energy bills, and moisture buildup that can ruin your drywall or flooring. In double-pane doors, a failed seal will let moisture seep between the panes, resulting in permanently fogged glass that ruins your view.

What professional services are available for broken glass doors?

Professional glass companies offer a wide range of services, including 24/7 emergency board-up services to secure your home after an accident or break-in. They also provide same-day glass replacement, track and roller rebuilding, and the installation of safety-rated tempered or laminated glass to meet modern building codes.

How often should aluminum door hardware be lubricated?

We recommend lubricating your door hardware at least once a year as part of your annual preventative maintenance. However, if your door is in a high-traffic area or exposed to harsh weather (such as coastal salt air or heavy Midwest winters), you should clean and lubricate the tracks and rollers every six months to ensure smooth, quiet operation.

Conclusion

Taking care of your aluminum glass doors does not have to be a stressful chore. By spending a little time cleaning tracks, tightening loose screws, and replacing worn rollers, you can keep your doors sliding smoothly and save yourself from expensive replacement costs.

At JP Precision Glass, we know how important flawless glass and hardware are to the comfort, beauty, and safety of your home. While we specialize in creating gorgeous, custom bathroom spaces—offering top-tier shower doors chicago and affordable shower door installation—we believe that every glass element in your home deserves expert care.

If you are dealing with a stubborn, heavy glass door that is past the point of a DIY fix, we are here to help. Explore our services today, or reach out to us directly for professional shower door repair chicago and custom glass solutions. Let us help you bring precision, safety, and style back to your home’s glass features!