• JP Precision Glass is the leading glass shower doors company in Chicago

Tag Archives: Shower Door

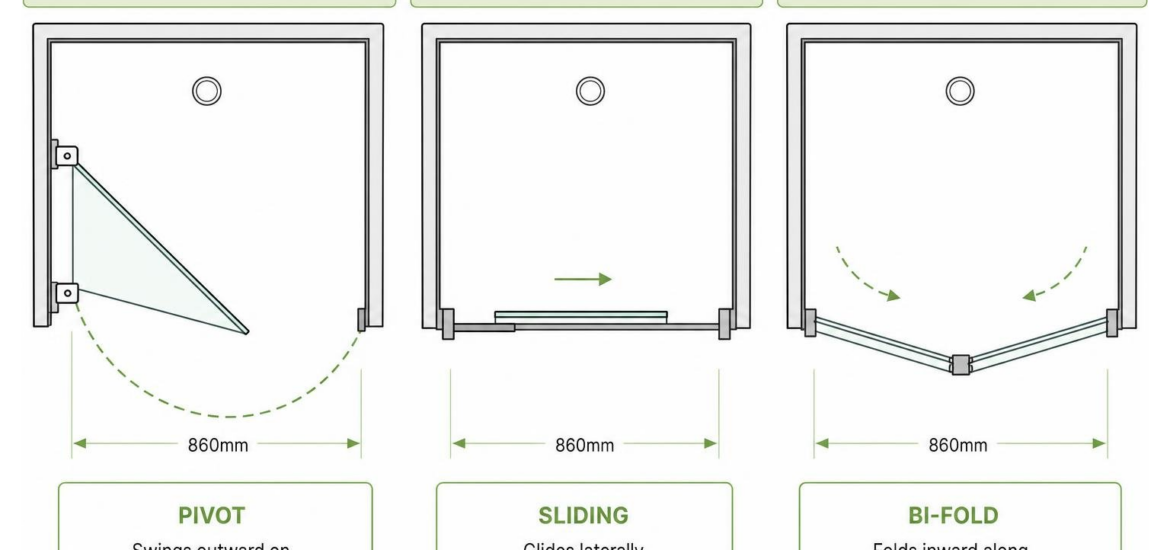
Comparison of shower enclosure opening mechanisms diagram

Find the Perfect 860 Pivot Shower Door for Your Space

Key Features and Benefits of an 860 Pivot Shower Door

An 860 pivot shower door is designed to maximize entry space while maintaining a sleek, modern architectural aesthetic. The defining feature of a pivot door is its hinge mechanism. Unlike continuous piano hinges that run the full height of the frame, pivot hinges mount at the top and bottom corners of the door panel. This design transfers the door’s weight directly into the top and bottom wall profiles or floor structure, creating an exceptionally smooth, quiet swing.

The 860mm width offers remarkable flexibility. It is an ideal middle ground for standard bathroom layouts—significantly more spacious than narrow 700mm doors, yet compact enough to fit comfortably into tight floor plans where a massive 900mm or 1000mm door would create spatial conflicts.

Key advantages of choosing an 860mm pivot enclosure include:

  • Generous Door Opening Width: Because pivot hinges can be offset slightly inward from the side frame, they open wide to provide a comfortable, clear entryway (often over 500mm of usable clearance).
  • Flexible Layout Configuration: Pivot doors work exceptionally well in three-wall alcove setups. When paired with a matching glass side panel, they easily transform into a stunning corner shower enclosure.
  • Superior Water Containment: Precision-engineered magnetic closing strips and durable bottom drip seal strips create a tight barrier against escaping water, keeping your bathroom floor dry even when paired with high-flow showerheads.
  • Reversible Design: Most quality 860mm pivot frames feature symmetrical wall profiles, allowing us to install the door to swing open from left-to-right or right-to-left depending on your room layout and fixture placement.

To help you decide whether a pivot door is the right mechanism for your layout, here is how an 860mm pivot shower door compares to other common enclosure styles:

Feature / Benefit 860mm Pivot Shower Door Sliding Shower Door Bi-Fold Shower Door
Opening Mechanism Swings outward on top/bottom pivot pins Glides laterally on tracks Folds inward along a center hinge
Entryway Width Very Wide (maximizes opening relative to frame) Moderate (limited by overlapping glass panels) Wide (folds neatly away)
Mechanical Durability High (few moving parts to wear out) Moderate (rollers and tracks require cleaning) Moderate (multiple hinge pivots and guides)
Cleaning Ease Extremely Easy (flat glass surface, no bottom tracks) Moderate (dirt can accumulate in bottom guide tracks) Moderate (multiple hinge seal joints to clean)
Outward Clearance Needed Yes (requires space in front of shower) None (operates entirely within frame envelope) None (folds inside the enclosure footprint)

Standard Dimensions and Glass Thickness for an 860 Pivot Shower Door

When specifying an 860 pivot shower door, height and glass thickness are two essential factors that dictate both safety and performance.

Standard heights for pivot enclosures typically range between 1850mm and 1900mm. Selecting a taller 1900mm profile provides enhanced splash protection, keeping elevated water spray contained within the cubicle—a particularly useful feature if you prefer ceiling-mounted rain showerheads.

For the glass itself, 6mm thermally toughened safety glass represents the optimal structural balance for an 860mm door. Thermally toughened glass undergoes a specialized heating and rapid cooling process that makes it up to five times stronger than standard annealed glass.

Using 6mm glass ensures:

  1. Structural Balance: It provides structural integrity and a solid, premium weight feel without overloading the pivot pin hinges.
  2. Effortless Operation: Heavier 8mm or 10mm glass panels require heavy-duty architectural hardware; 6mm glass keeps the swing lightweight and smooth for family members of all ages.
  3. Safety First: In the rare event of damage, toughened safety glass fractures into tiny, blunt granular pieces rather than dangerous sharp shards.

Frame Finishes and Glass Coatings for an 860 Pivot Shower Door

The overall look and long-term maintenance of your shower enclosure depend heavily on the frame finish and surface treatments applied to the glass.

Modern pivot shower doors come in several high-durability hardware finishes to complement your bathroom taps and fixtures:

  • Polished Chrome: A classic, timeless mirror-like finish that reflects light and matches traditional or contemporary brassware.
  • Matt Black: A bold, modern finish crafted via powder coating or electroplating. It creates sharp architectural contrast against white tiling or marble walls.
  • Brushed Brass: A warm, luxurious finish that introduces subtle texture and pairs beautifully with earthy stone tiles and neutral color palettes.

Beyond visual appeal, pay attention to practical surface protection. High-quality 860mm pivot glass panels come treated with an anti-limescale glass coating (often referred to as an easy-clean protective shield). This hydrophobic coating seals the microscopic pores of the glass surface, repelling water droplets, soap scum, and limescale buildup. Instead of clinging to the door, water glides off effortlessly, drastically reducing cleaning frequency and eliminating stubborn water spots.

Comparing 860mm Pivot Doors to Alternative Enclosure Styles

Understanding how spatial dynamics differ across door types helps ensure you select the best fit for your room.

The primary operational detail of a pivot door is its outward swing radius. When the door opens, it swings into the bathroom space. You must ensure that nearby fixtures—such as a vanity, towel radiator, or toilet—do not block the swing path.

When compared directly to Sliding Shower Doors, pivot doors offer a much wider physical opening for the exact same width. Sliding doors require one fixed glass panel for the door panel to glide behind, effectively halving your usable entry space. On an 860mm frame width, a sliding door might only yield 350mm to 400mm of entry clearance, whereas an 860mm pivot door provides a roomy entry opening exceeding 500mm.

Compared to bi-fold mechanisms, pivot doors feature fewer moving mechanical joints. Bi-fold doors fold inward on themselves, which is excellent for spaces with zero outward floor clearance, but the additional hinges, plastic seal joints, and top/bottom runner channels require more frequent cleaning.

If you are looking to maximize visual openness and eliminate bulky metal framing altogether, exploring the Benefits of Frameless Glass Shower Doors is a fantastic option. Frameless or semi-frameless pivot designs allow natural light to flow uninterrupted across the bathroom, making smaller ensuites feel significantly larger.

Choosing the Right Shower Tray and Key Safety Features

Pairing your 860 pivot shower door with the right shower tray ensures long-lasting watertight performance and reliable underfoot safety.
Textured low-profile shower base with rapid drain system

When selecting a shower tray, consider these technical factors:

  • Built-in Anti-Slip Surface: Wet tile surfaces and smooth tray bases can become slick. Premium shower bases feature textured non-slip surface technology. Look for trays tested under official safety standards, such as the BS 7976:2 Pendulum Slip Test. While standard building regulations require a minimum slip-resistance score of 35, high-performance anti-slip trays can achieve pendulum scores over 70, offering extraordinary traction underfoot.
  • Composite Tray Materials: Modern shower trays utilize advanced mineral resins or aerospace-grade composite materials. These composite trays are up to 60% lighter than traditional stone resin bases while maintaining immense structural rigidity and impact resistance.
  • Low-Profile vs. Raised Mounting: A low-profile tray (typically 25mm to 40mm high) offers a modern, step-free threshold that integrates seamlessly into timber floors. However, if you are installing on a solid concrete floor where plumbing pipes cannot be recessed beneath the floorboards, choose a raised tray kit with leg sets and removable plinths to comfortably accommodate under-tray waste pipework.
  • High-Flow Waste Systems: Pivot shower doors allow full water flow across the enclosure footprint. To prevent water pooling inside the tray, pair the tray with a rapid high-flow waste system capable of clearing at least 32 liters per minute.

Installation Considerations and Maintenance Best Practices

Proper installation guarantees a watertight enclosure and smooth, quiet door operation for years to come. Whether you are installing a standard kit or choosing custom solutions like our Shower Door Replacement Chicago services, paying close attention to site preparation is key.

Essential Installation Adjustments

  1. Alcove Alignment and Adjustment Ranges: Bathrooms are rarely perfectly square. High-quality shower door wall profiles offer built-in lateral adjustment (typically 15mm to 20mm per side) within the vertical channels. This allows us to compensate for out-of-plumb walls without leaving unsightly gaps.
  2. Tiling Allowance: Always measure your opening after tiling is completely finished. Tile thickness and adhesive layers can easily reduce an 860mm rough opening by 15mm to 25mm.
  3. Reversible Hanging: Verify the swing orientation before securing the wall profiles. Depending on towel bar locations and light switches, reversing the pivot block placement lets you choose whether the door swings left or right.
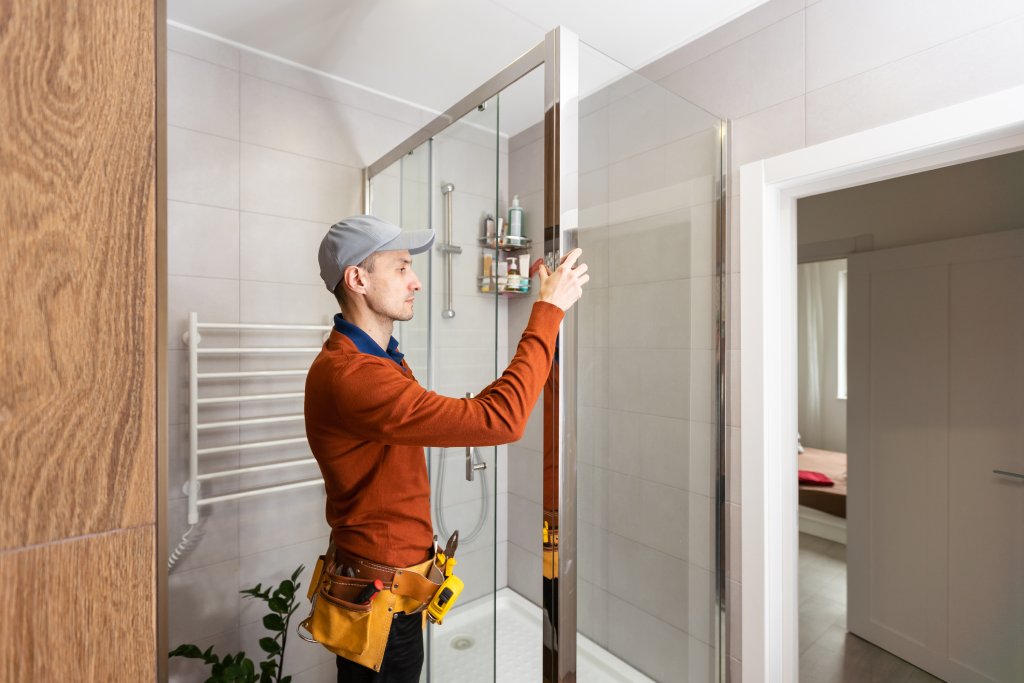
Hinge adjustment on glass shower door

Maintenance Best Practices

To keep your pivot door operating smoothly and looking crystal-clear, adopt a quick maintenance routine:

  • Daily Squeegee Routine: Wipe down the inner glass face with a soft rubber squeegee after every shower to prevent mineral deposits from drying on the glass.
  • Microfibre Care Routine: Clean the aluminum wall profiles and hardware with warm water and a soft microfibre cloth. Avoid harsh abrasive chemicals, bleach, or scouring pads, which can degrade protective anodized or electroplated hardware finishes.
  • Inspect Magnetic Seals: Clean the bottom drip vinyl fins and magnetic door closures monthly to prevent soap residue buildup. If seals eventually harden or discolor after years of heavy use, you can easily Replace Glass Shower Door vinyl seals to restore a factory-fresh watertight fit.
  • Check Pivot Pins: Periodically check the top and bottom pivot hinge screws to ensure they remain tightened to spec, guaranteeing perfect alignment over time.

Frequently Asked Questions About 860mm Pivot Shower Doors

How much opening clearance is needed for an 860mm pivot shower door?

Because an 860mm pivot door swings outward into the room, you should allow at least 500mm to 600mm of clear, unobstructed floor space directly in front of the shower door. Always check that the door will not strike vanities, toilets, heated towel rails, or bathroom entry doors when fully opened.

Can an 860mm pivot shower door be installed in an alcove?

Yes! Alcove installation (a three-solid-wall setup) is the most popular installation method for an 860mm pivot door. The door frame mounts securely between two opposite tiled walls, utilizing adjustable wall channels and vertical continuous magnetic seals to create a completely watertight shower room.

What factors influence the cost and quality of an 860mm pivot door?

Key quality factors include:

  • Glass Specification: Thermally toughened safety glass with pre-applied anti-limescale coatings.
  • Hardware Materials: Heavy-duty brass or aluminum pivot blocks versus plastic core hinges.
  • Frame Engineering: Thickness and adjustability of wall profiles, as well as high-grade magnetic vinyl seals.
  • Customization: Standard off-the-shelf sizes versus precision custom-cut glass designed to fit custom openings perfectly.

Conclusion

An 860 pivot shower door combines spatial efficiency, smooth mechanical operation, and sleek modern design. Whether you are building an alcove shower setup or replacing an old enclosure, choosing quality 6mm toughened safety glass, durable metal finishes, and a high-performance anti-slip base ensures your bathroom remains safe, comfortable, and stylish for years to come.

At JP Precision Glass, we pride ourselves on precision craftsmanship, made-to-size custom glass solutions, and flawless professional installation. If you are planning a bathroom renovation or need expert advice on sizing and glass specifications, explore our full range of custom solutions for Shower Doors Chicago today!
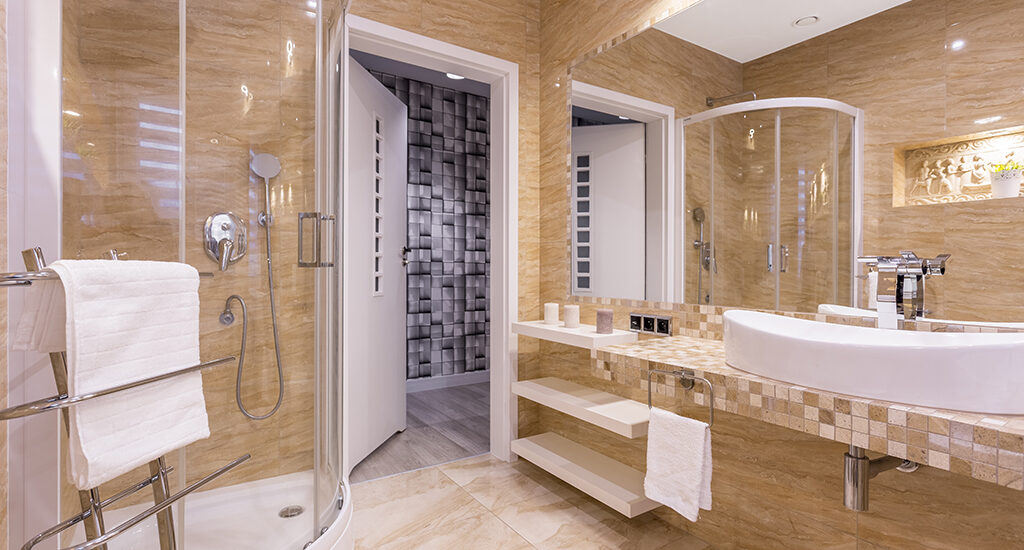
bathroom sliding shower doors

How to Install and Maintain Sliding Glass Shower Doors

Bathroom Sliding Shower Doors: A Space-Saving Upgrade

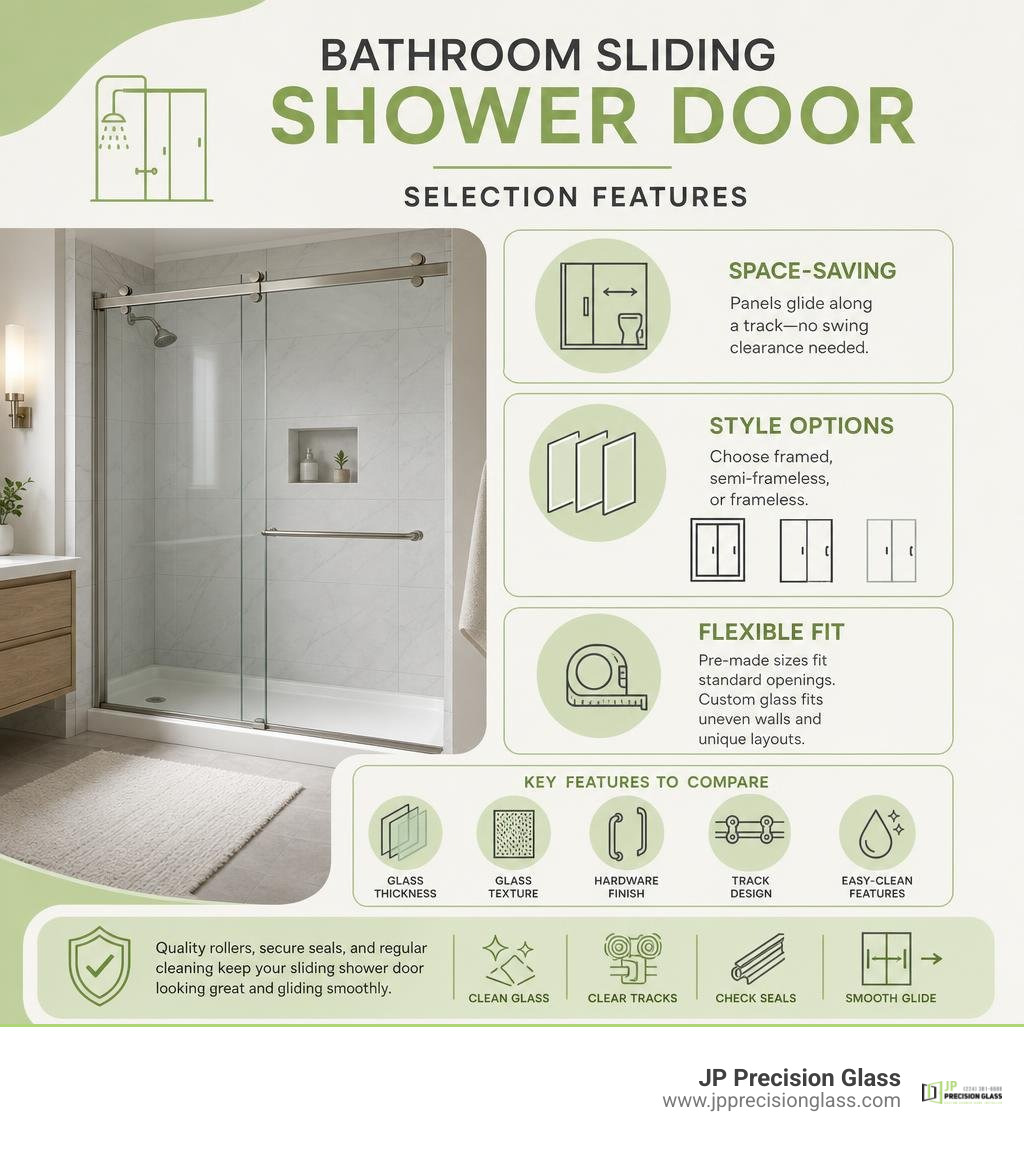
Bathroom sliding shower doors are a smart choice for alcove showers, tub-shower combinations, and compact Chicago bathrooms because the panels glide along a track instead of swinging into the room.

  • Best for tight layouts: No door-swing clearance is needed.
  • Main styles: Choose framed, semi-frameless, or frameless designs.
  • Common fits: Pre-made doors cover many standard openings, while custom glass handles uneven walls and unusual dimensions.
  • Key choices: Compare glass thickness, texture, hardware finish, track design, and cleaning features before ordering.

A well-fitted sliding glass door can make a bathroom feel more open while helping contain shower spray. The right result depends on accurate measurements, level walls, quality rollers and seals, and a maintenance routine that keeps the glass and tracks clear.

Bathroom sliding shower door selection features infographic

Essential bathroom sliding shower doors terms:

Choosing the Right Bathroom Sliding Shower Doors

Selecting the ideal bathroom sliding shower doors involves balancing architectural layout, daily performance, and interior aesthetic preferences. Sliding doors (frequently called bypass doors) consist of two or more panels sliding on parallel tracks or top-mounted roller systems. This configuration eliminates the clearance radius required by swinging pivot doors, making them the premier choice for narrow alcoves or master baths where vanities and toilets sit close to the shower unit.

When evaluating glass shower doors, home upgrades generally center around four core parameters: frame architecture, glass thickness, metal finishes, and glass texture or privacy patterns.

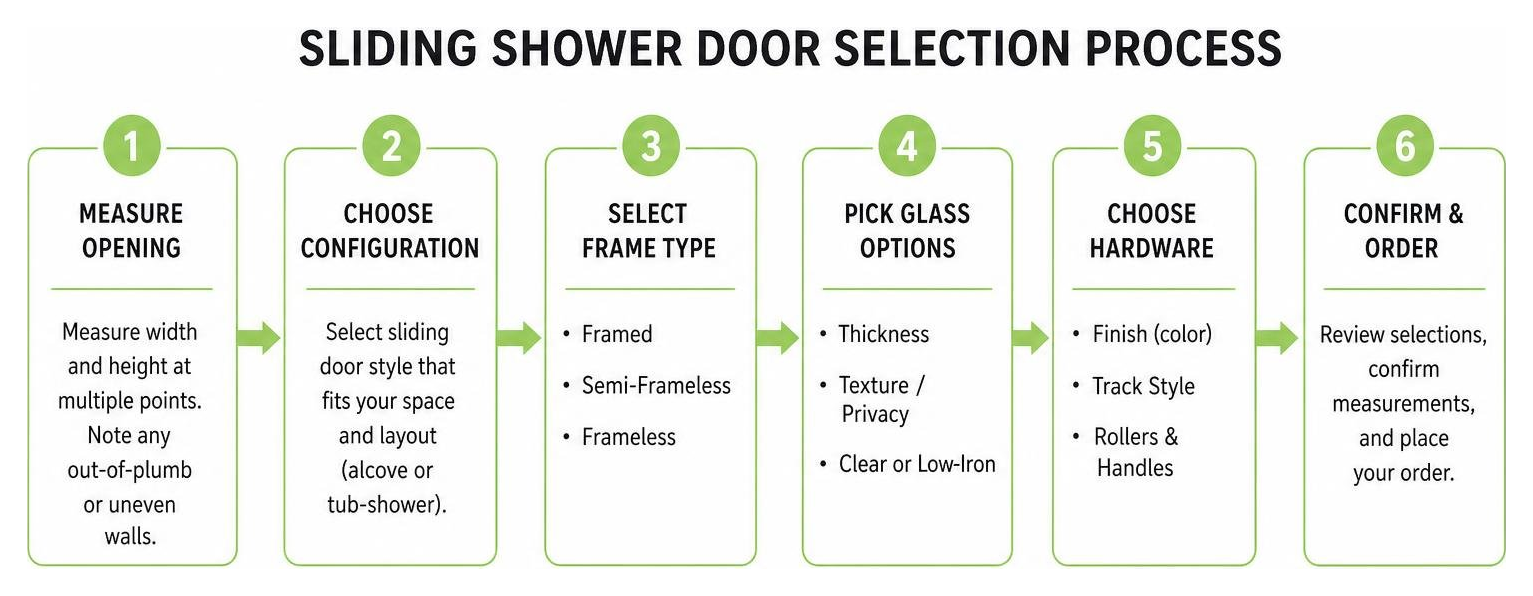
Sliding shower door selection process flow

Frame Types for Bathroom Sliding Shower Doors

The structure supporting your glass panels defines the visual weight and durability of the installation. We group these systems into three main structural types:

  1. Framed Sliding Doors: Aluminum frames completely border every edge of the glass panels, including top rails, side jambs, and bottom tracks. These doors utilize thinner tempered glass (typically 1/8-inch, 3/16-inch, or 1/4-inch) because the surrounding metal frame supplies structural support. They provide traditional water containment and budget flexibility, though cleaning soap residue around the metal channels requires extra care.
  2. Semi-Framed / Semi-Frameless Doors: These systems reduce perimeter metal while maintaining functional tracks and top headers. Glass edges inside the enclosure remain exposed, giving a lighter visual profile. They typically feature 1/4-inch or 5/16-inch tempered glass, blending modern style with structured track operation.
  3. Frameless Sliding Doors: Heavy glass doors engineered with minimal perimeter metal create an airy, spa-like environment. Utilizing substantial 5/16-inch, 3/8-inch, or 1/2-inch tempered safety glass, these systems rely on precision-machined top guide bars, exposed modern rollers (barn-door style), and minimal floor guides. Discover more about open visual design through our detailed review of Frameless Shower Doors Benefits.
Feature Framed Sliding Doors Semi-Frameless Sliding Doors Frameless Sliding Doors
Glass Thickness 1/8″, 3/16″, or 1/4″ 1/4″ or 5/16″ 5/16″, 3/8″, or 1/2″
Structural Support Full perimeter aluminum frame Top header rail & side jambs Top guide bar & exposed rollers
Visual Appearance Classic, structured borders Streamlined, lower metal profile Ultra-modern, spacious, floating look
Ease of Cleaning Requires track maintenance Moderate wiping around seams Easy surface cleaning, minimal metal joints
Out-of-Plumb Flexibility High adjustment range inside channels Moderate built-in frame adjustability Requires accurate wall plumb & custom cuts

Glass Options and Finishes for Bathroom Sliding Shower Doors

Beyond the metal framework, the aesthetic appeal of bathroom sliding shower doors relies heavily on glass transparency and metal finish details.

Glass Thickness & Safety

Tempered safety glass is required for all shower applications. The thickness directly impacts weight, glide feel, and structural rigidity:

  • 1/4-inch (6mm): Standard lightweight glass utilized across framed and entry-level bypass designs.
  • 5/16-inch (8mm): Balanced weight offering a sturdy glide feel in modern semi-frameless systems.
  • 3/8-inch (10mm) to 1/2-inch (12mm): Heavy, architectural-grade glass delivering whisper-quiet gliding operation in premium frameless slider configurations.

Hardware Finishes

Matching hardware with vanity faucets and light fixtures establishes visual unity throughout your bathroom:

  • Chrome: High-shine reflective finish offering traditional brilliance and moisture resistance.
  • Brushed Nickel: Warm, muted tone excellent at minimizing water spotting and fingerprints.
  • Matte Black: Bold modern choice providing strong contrast against light tile backdrops, popular in industrial and farmhouse modern styles.
  • Bright Polished Silver & Gold/Brass: Vibrant metal options that elevate classic luxury aesthetics.

Explore current trends in hardware through modern options like matte black frameless sliding shower doors or elegant nickel frameless sliding shower doors.

Glass Textures and Privacy

  • Clear Glass: Maximizes natural light, displays custom tile work, and opens small bathrooms visually.
  • Frosted & Etched Glass: Provides full privacy while diffusing light throughout the enclosure.
  • Rain & Fluted Glass: Textured patterns that distort visibility, hide light water spots, and add artistic depth to the bathroom design.

Check out our full collection of hardware textures and configurations at our dedicated Sliding Shower Doors page.

How to Measure and Install Sliding Glass Shower Doors

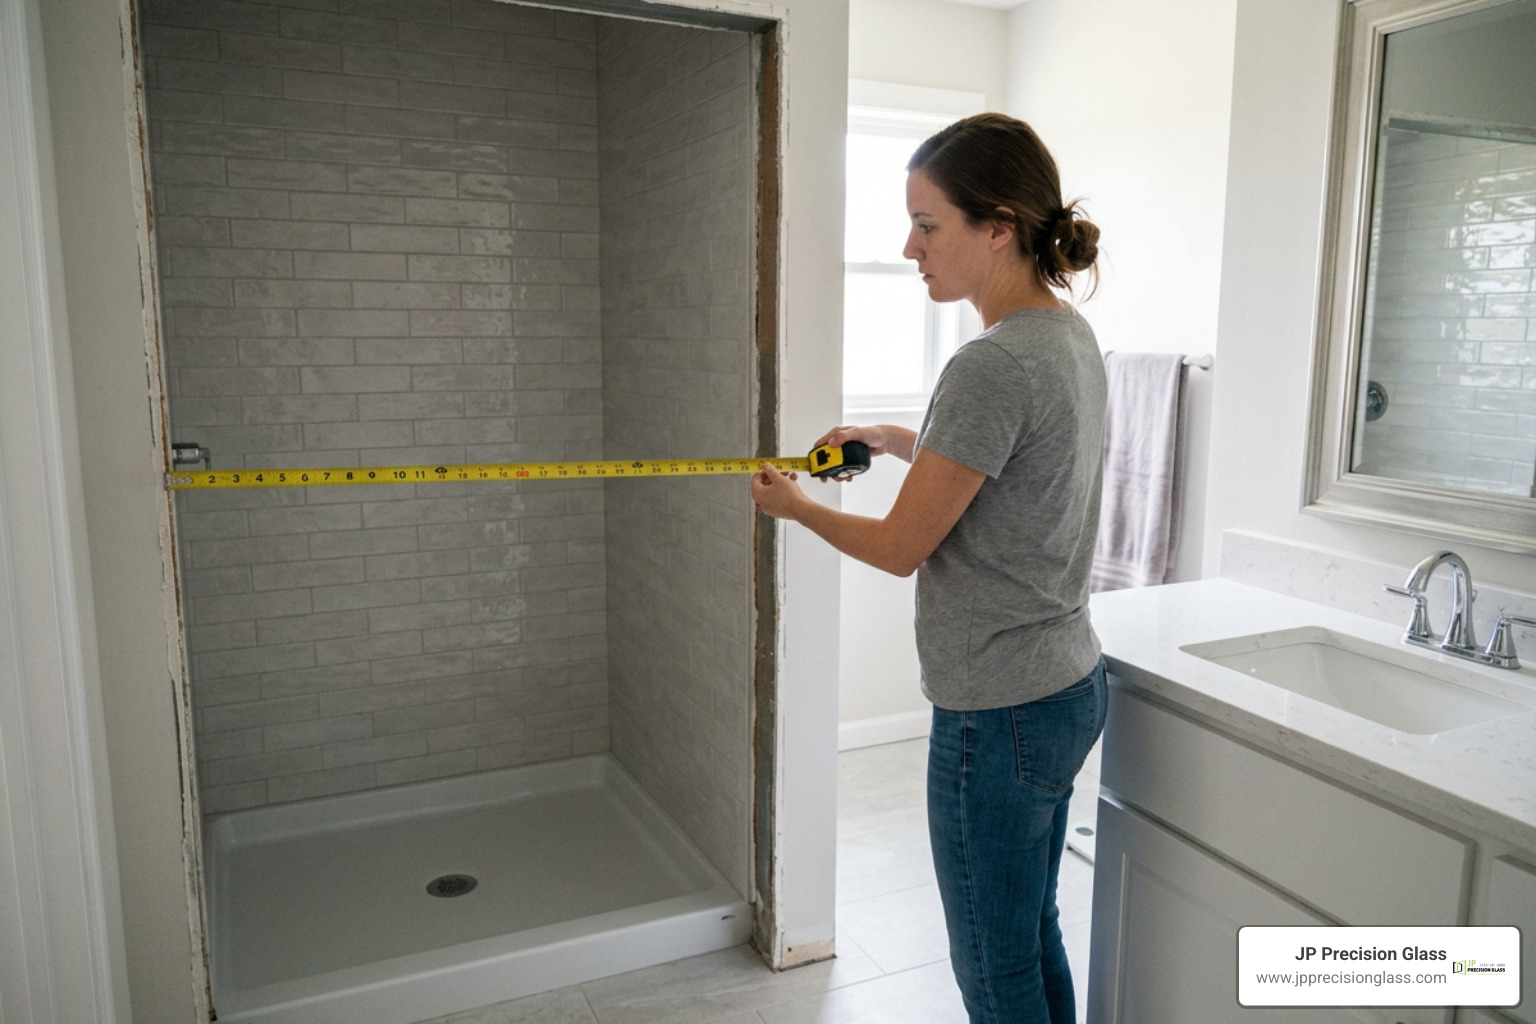
measuring shower opening width with tape measure

Successful installation of bathroom sliding shower doors relies on accurate physical measurement. While standard pre-fabricated sliding door kits work well for modern homes with standard openings, non-plumb walls or non-standard dimensions benefit from custom glass cutting and professional installation.

Learn more about mechanical comparisons and installation approaches in our Glass Shower Doors Comprehensive Guide.

Measuring Alcove Opening and Wall Plumb

Before ordering any door system, take horizontal and vertical measurements using a reliable steel measuring tape and a 4-foot spirit level.

Essential Measurement Tools Checklist

  • Steel tape measure (measure to the nearest 1/16 inch)
  • 4-foot spirit level or digital level
  • Pencil and measuring pad
  • Plumb line or laser level

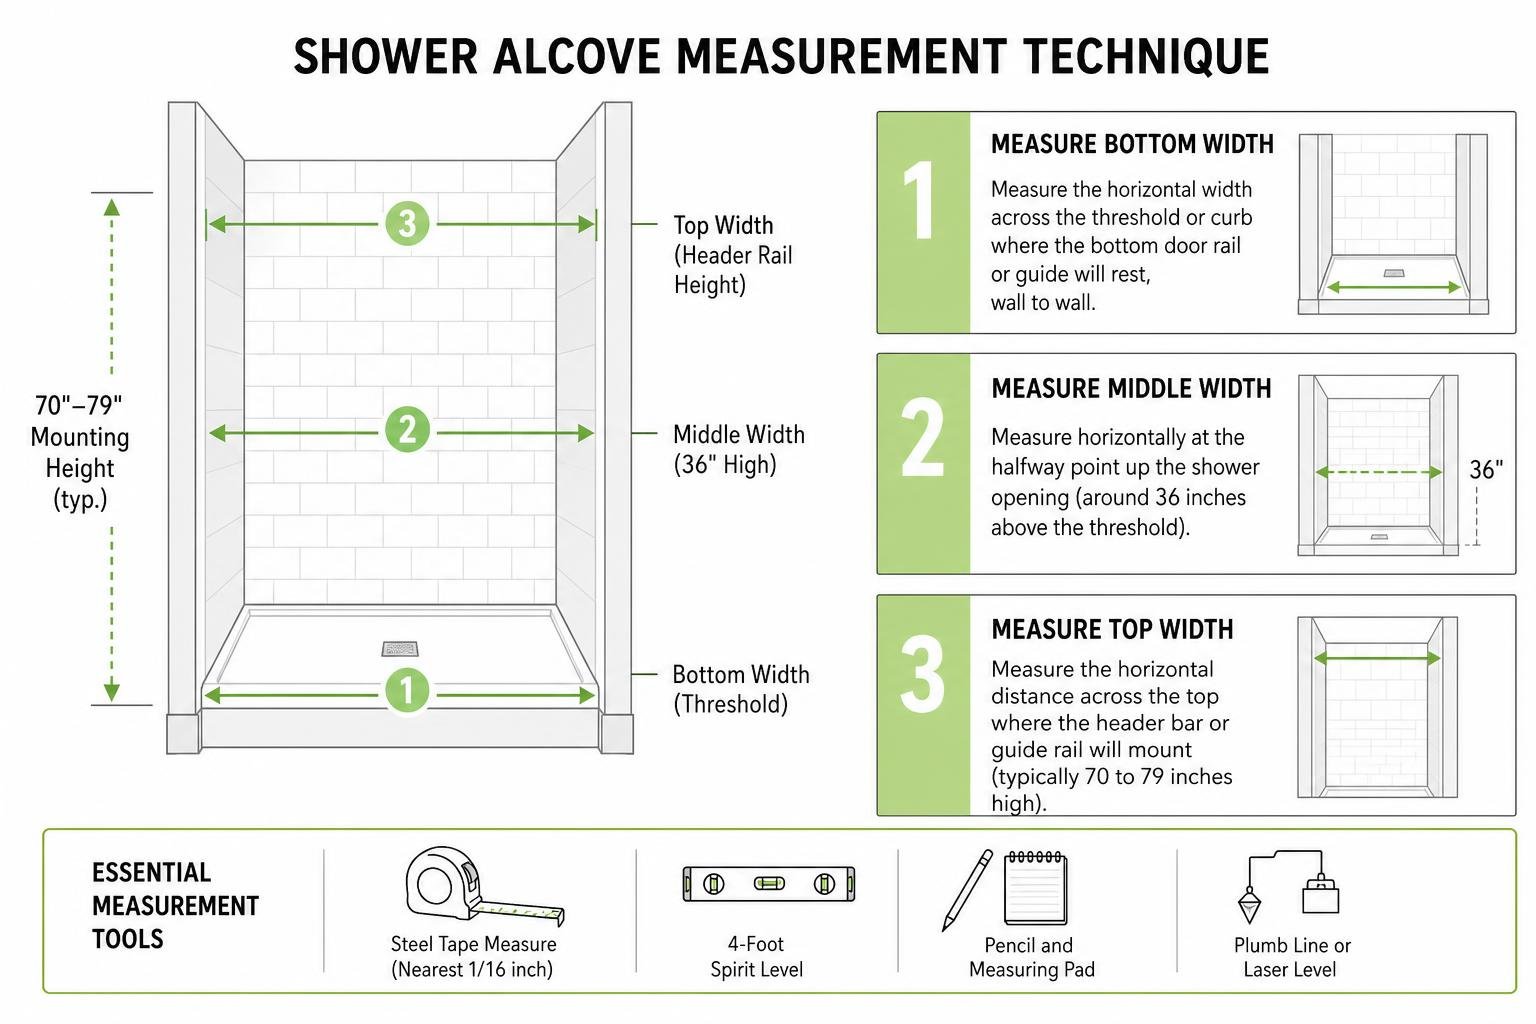
Shower alcove measurement technique

Step-by-Step Measurement Procedure

  1. Measure Bottom Width: Measure the horizontal width across the threshold or curb where the bottom door rail or guide will rest, wall to wall.
  2. Measure Middle Width: Measure horizontally at the halfway point up the shower opening (around 36 inches above the threshold).
  3. Measure Top Width: Measure the horizontal distance across the top where the header bar or guide rail will mount (typically 70 to 79 inches high).
  4. Determine Maximum Height: Measure vertical height from the curb to the top of the tile or ceiling line to ensure adequate headroom clearance.
  5. Check Wall Plumb: Hold a 4-foot level flush against both side walls. If the bubble is not centered, measure the gap at the top or bottom. Walls varying by more than 3/8 inch out of plumb require custom tapered glass panels or high-adjustability jamb mechanisms to prevent leakage and bind points.

Explore advanced structural glass fitting techniques at Shower Glass Innovations.

Door Assembly and Hardware Fitting

Proper hardware assembly guarantees smooth, quiet sliding action and long-term water containment.

Installing Tracks and Wall Jambs

For framed and semi-frameless configurations, cut the bottom threshold track and top header bar to width using a fine-tooth hacksaw. Secure side wall jambs vertically, plumbing them with your level, and anchor them using wall anchors and stainless steel screws. Apply silicone sealant behind wall channels before fastening to stop water intrusion behind tiles.

Fitting Frameless Top Rails and Rollers

Frameless sliding doors replace full tracks with overhead support bars. Drill anchor points into tile or glass studs, install rail mounts securely, and level the overhead rail. Attach smooth-rolling brass or stainless steel roller assemblies onto the heavy tempered glass panels.

Aligning Bypass Panels and Seals

Hang the glass panels onto the top track or rail system. Adjust wheel cams to bring panels parallel with side walls. Install vinyl side sweeps, magnetic vertical closure seals, and bottom anti-splash guards. For premium installations, soft-close dampening mechanisms prevent doors from slamming into side jambs, protecting glass edges. Integrated towel bars attached directly through pre-drilled glass holes provide added convenience.

For tall frameless openings, options such as bright polished silver frameless door options show how upper structural rails keep tall glass sheets stable.

Cleaning, Maintenance, and Preventative Glass Care

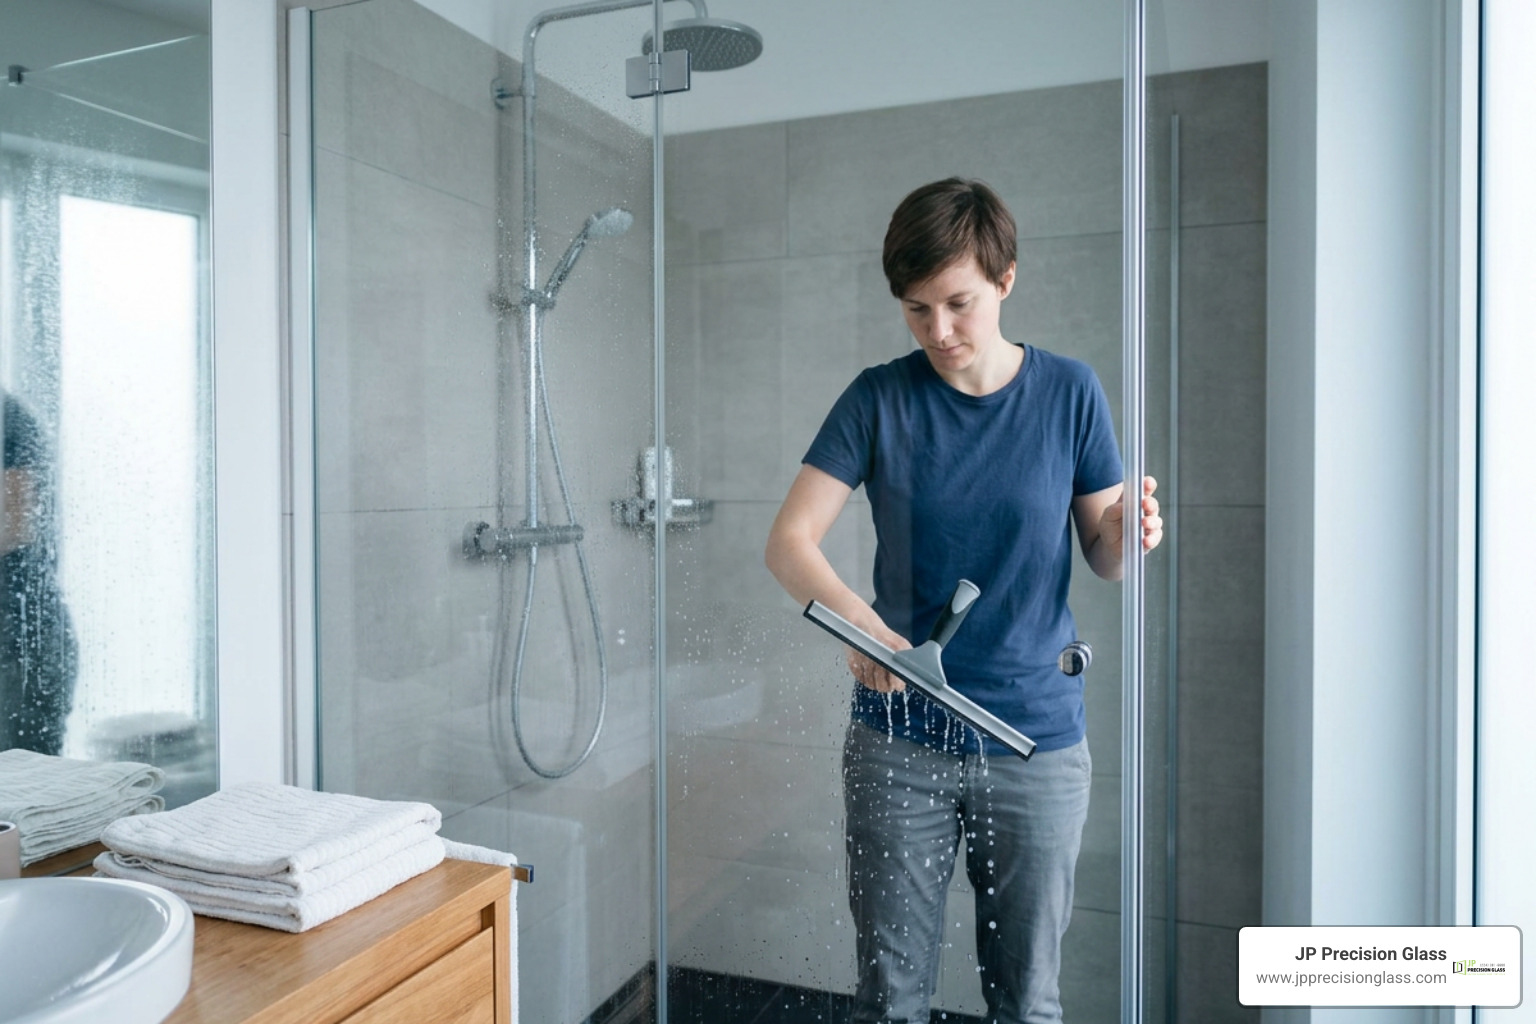
cleaning glass shower door panel with squeegee

Maintaining crystal-clear clarity on bathroom sliding shower doors requires routine preventive care paired with deep cleaning practices. Hard water mineral deposits (calcium and magnesium) can bond to glass surfaces if water drops evaporate on untreated panels.

  • Quality rubber blade squeegee
  • Microfiber cloths
  • Non-abrasive spray cleaner or diluted white vinegar solution (50/50 water and vinegar)
  • Soft nylon track brush or toothbrush
  • Hydrophobic protective glass treatment product

Daily Maintenance Routine

The most effective way to eliminate soap scum buildup and water spots is establishing a 30-second daily squeegee habit. After showering, use a rubber blade squeegee to wipe water droplets off the interior glass from top to bottom. Wipe excess water off lower metal tracks and vinyl bottom sweeps using a dry microfiber cloth.

Deep Cleaning and Mold Prevention

  • Glass Cleaning: Spray non-abrasive vinegar solution onto the glass, let sit for 3 to 5 minutes, then wipe clean with a microfiber towel. Avoid harsh scouring pads or abrasive powder cleaners that can scratch glass surfaces or degrade protective factory coatings.
  • Bottom Track Care: Shower tracks can trap water, soap residue, and hair. Brush out bottom grooves weekly with a soft nylon track brush to keep drain weep holes open. Clear weep holes allow trapped track water to drain safely back into the shower tray rather than pooling onto bathroom floors.
  • Vinyl Seal Maintenance: Remove vinyl bulb seals and sweeps periodically to scrub away trapped mildew with soap and warm water before snapping them back into place.

Find more operational and product care guides at Sliding Shower Doors Category.

Frequently Asked Questions

What is the advantage of sliding doors over hinged shower doors?

Sliding shower doors maximize floor space because the panels stay within the shower footprint. In tight bathroom floor plans where a swinging hinged door would strike a vanity, toilet, or towel bar, sliding doors offer effortless entry without clearance concerns. Additionally, dual-sliding bypass doors allow access from either side of the shower enclosure.

Can I install a sliding glass shower door as a DIY project?

Simple framed or semi-frameless bypass kits fitting standard square openings can be completed as a DIY project by experienced homeowners with proper tools (tile drill bits, level, hacksaw, caulking gun). However, installing heavy frameless sliding glass doors (utilizing 3/8-inch or 1/2-inch glass) requires precision handling, exact wall plumb evaluation, and heavy lifting. Professional installation guarantees structural safety, perfect track alignment, and leak-free operation.

What are standard sizes for sliding glass shower doors?

Pre-fabricated sliding shower doors typically serve common rough opening widths:

  • Alcove Shower Widths: 48 inches, 54 inches, and 56 to 60 inches.
  • Tub-Shower Combination Widths: Standard 60-inch bath openings (typically 56 to 60 inches wide by 58 to 60 inches high).
  • Height Options: Standard shower doors measure between 70 and 79 inches tall.

For non-standard sizes, custom-cut glass panels provide a tailor-made fit without ugly filler strips or wide caulking joints.

Conclusion

Upgrading your bathroom with bathroom sliding shower doors combines practical space savings with sleek modern design. Whether choosing a modern frameless bypass door with exposed hardware or a semi-frameless sliding design, selecting proper glass thickness, hardware finishes, and protective coatings ensures high performance for years to come.

When standard off-the-shelf doors fall short on out-of-plumb walls or unusual layouts, our team delivers custom precision. We design, measure, fabricate, and install custom shower glass built for your exact home dimensions.

Ready to transform your bathroom enclosure? Explore our custom design options at Shower Doors Chicago or schedule your home consultation through Custom Shower Door Chicago.

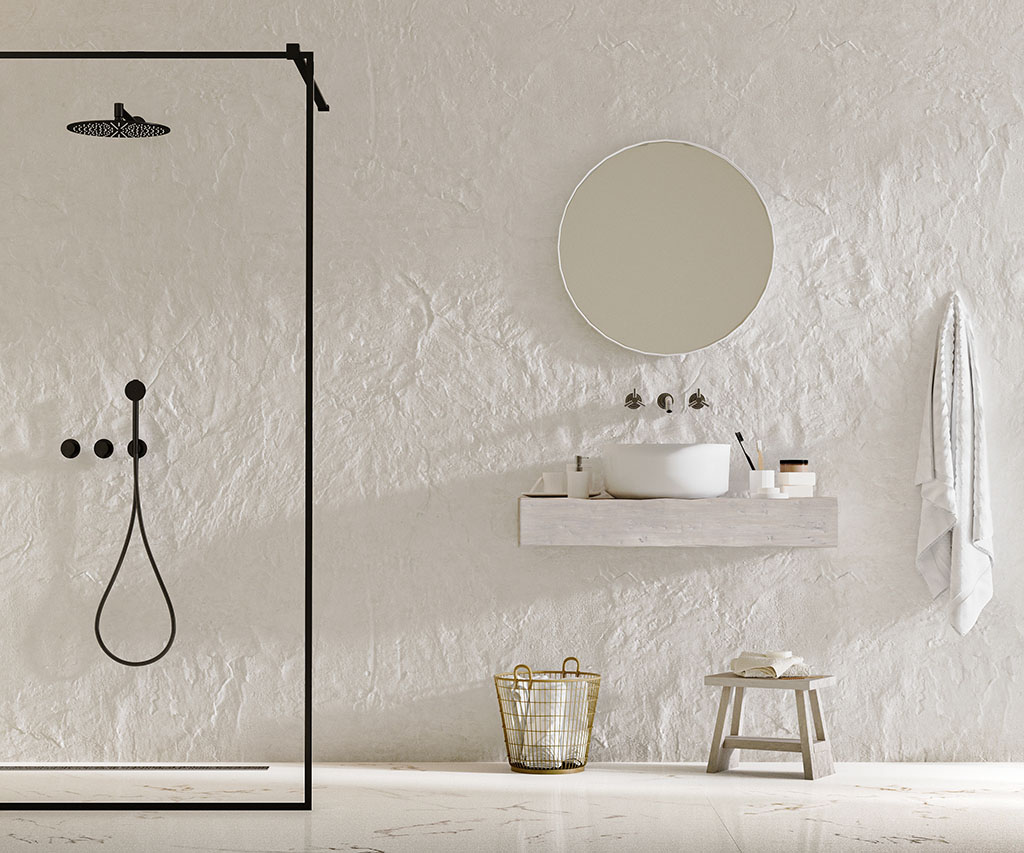
modern 3x5 walk in shower

Big Style, Small Footprint: 8 Inspiring 3×5 Walk-In Shower Designs

3×5 Walk-In Shower Ideas That Make a Small Bathroom Feel Bigger

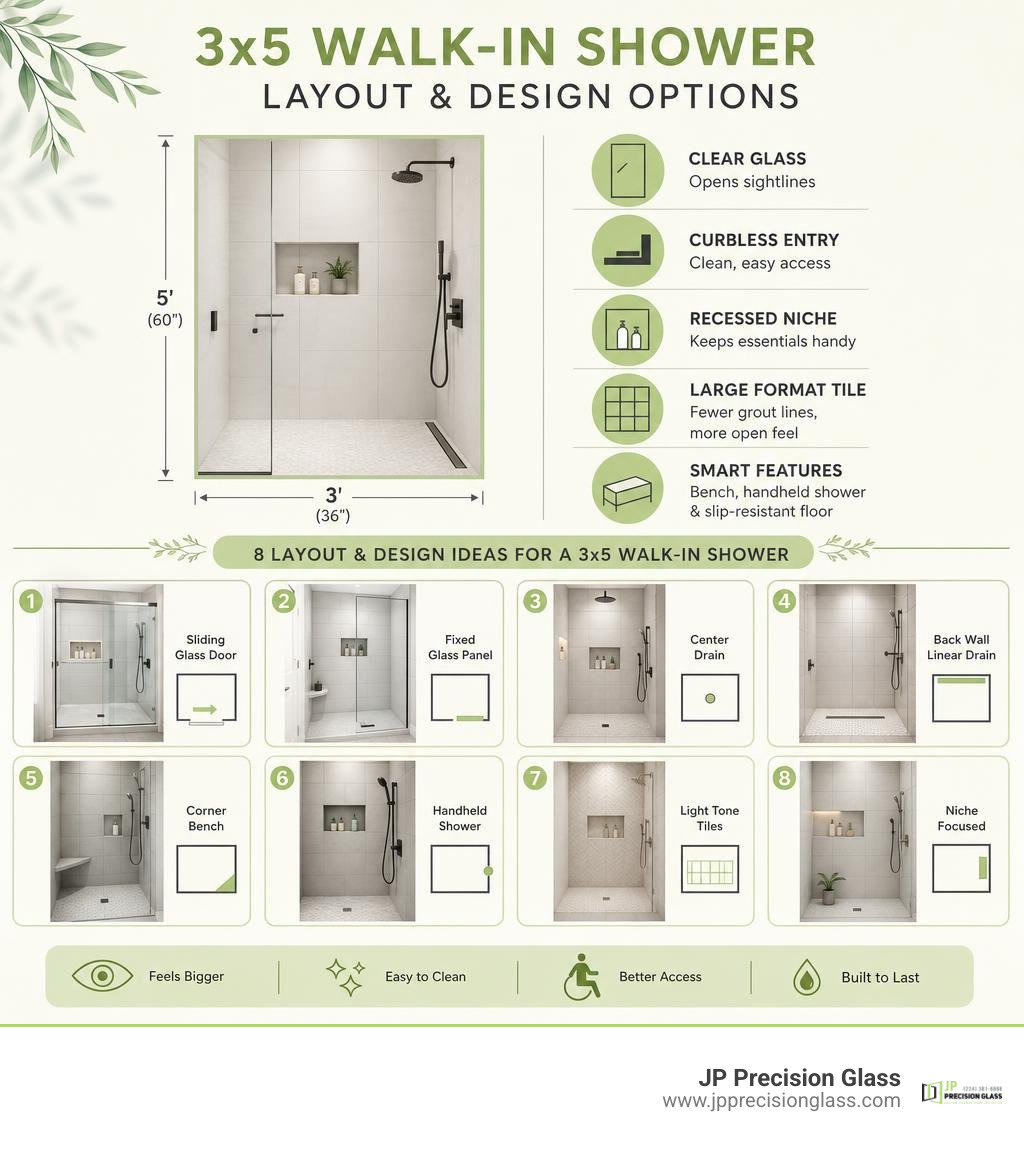
A 3×5 walk-in shower gives you a full 36-by-60-inch bathing area, the same footprint as many standard tubs. The strongest 3×5 walk in shower ideas use clear glass, a recessed niche, light tile, and a smart drain plan to make those 15 square feet feel open rather than cramped.

For a sleek, practical remodel, start with these proven directions:

  1. Choose a frameless sliding door or fixed glass panel to preserve sightlines and avoid swing-door clearance issues.
  2. Use a curbless entry and linear drain for a clean, modern look with better aging-in-place potential.
  3. Install a recessed niche between studs so bottles stay off the floor and out of your elbow room.
  4. Run large-format wall tile to the ceiling, or continue the bathroom floor tile into the shower, to reduce visual breaks.
  5. Add a compact corner bench, handheld shower, and slip-resistant mosaic floor for comfort without crowding the space.

A 3×5 footprint also meets common rectangular accessibility guidance of 60 by 30 inches, though the final layout must account for local code, drainage slope, wall framing, and bathroom clearances. The eight designs below show how to turn a former tub alcove or compact shower bay into a polished, easy-to-use glass shower.

3x5 walk in shower layout and design options infographic

3×5 walk in shower ideas word roundup:

Dimensional Planning: Why the 3×5 Footprint Maximizes Compact Bathrooms

The 3×5-foot shower footprint (36 inches by 60 inches) is a gold standard in modern bathroom remodeling. Why? Because it represents the exact dimensional footprint of the standard alcove bathtub found across North American homes. When converting a tub into a standalone shower, keeping this existing 15-square-foot floor area avoids the immense structural costs of relocating load-bearing partition walls or rerouting primary drain stacks.

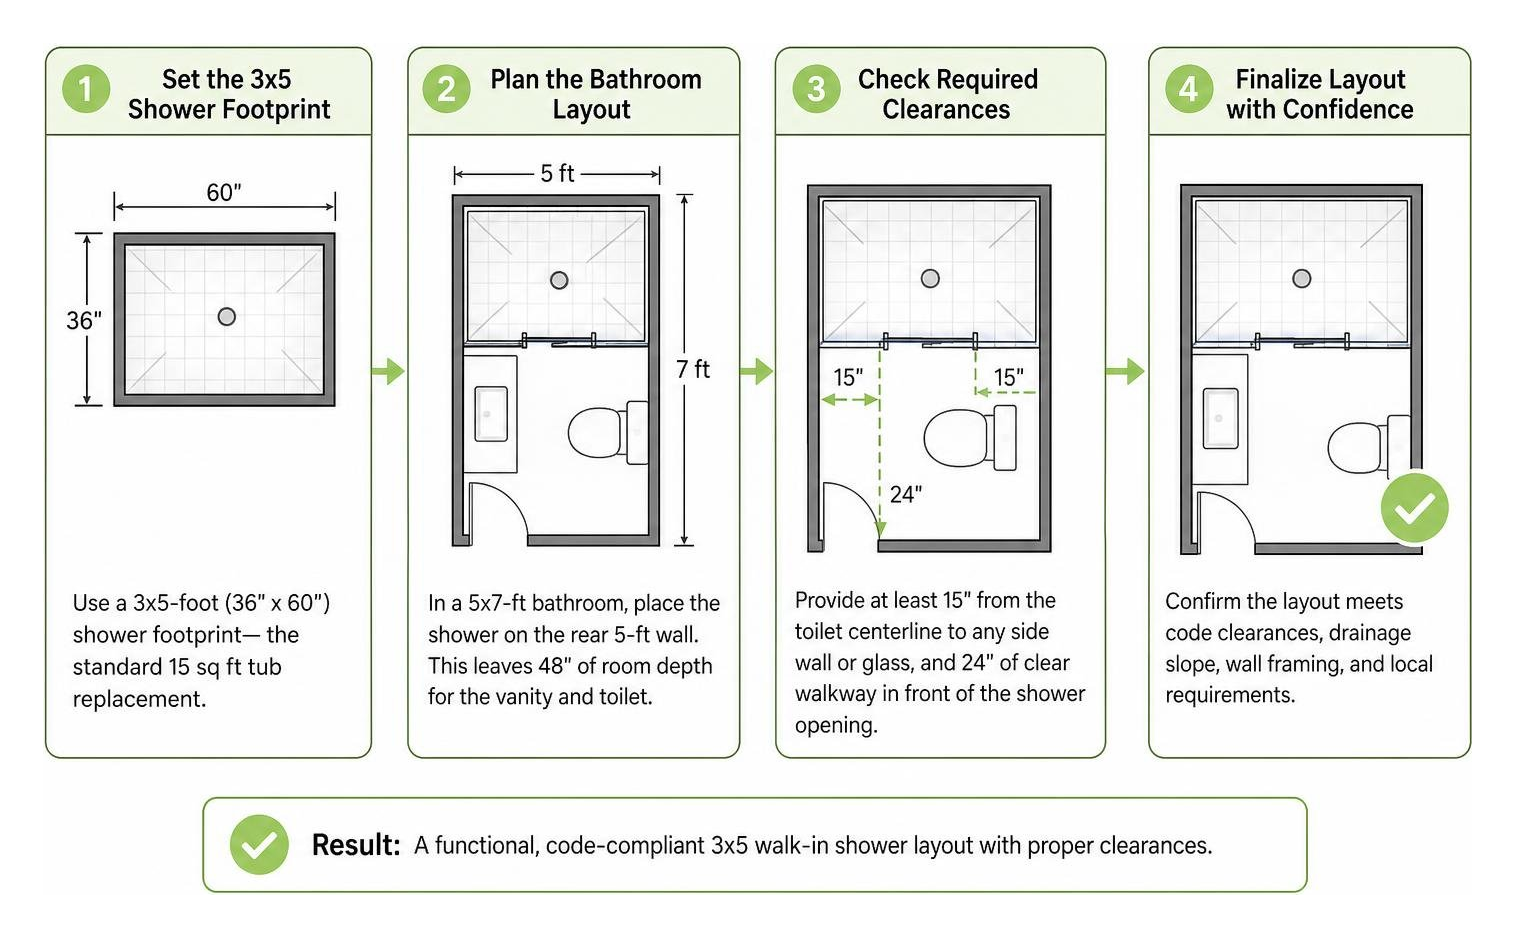
Smart spatial planning in compact bathrooms allows a 3×5 layout to fit comfortably even within a modest 5×7-foot overall bathroom. In this setup, placing the shower along the rear 5-foot wall leaves 48 inches of room depth for a vanity and toilet.

bathroom space planning clearance process

When planning your layout, it is essential to review building code clearances. Standard plumbing regulations require a minimum of 15 inches of clear space measured from the centerline of the toilet to any adjacent side wall or glass partition, providing a dedicated 30-inch-wide clearance zone. Ensuring at least 24 inches of clear walkway space in front of the shower opening keeps the room functional and accessible.

Before finalizing your layout, comparing walk-in shower options helps balance physical clearance with everyday comfort.

Shower Dimensions and Minimum Space Guidelines

Building codes set the absolute bare minimum shower footprint at 32×32 inches. However, a 32-inch square shower often feels restrictive during daily use. The standard comfort benchmark for square units is 36×36 inches, while ADA accessibility guidelines recommend a minimum of 60×30 inches for rectangular showers.

A 36×60-inch enclosure exceeds these baseline requirements:

  • Total Floor Area: 15 square feet (36 inches deep by 60 inches wide)
  • ADA Guidelines: Surpasses the 60×30-inch minimum for roll-in accessibility and seated bathing
  • Elbow Clearance: Ample 36-inch depth prevents accidental bumping against glass panels or controls
  • Mobility and Adaptability: Offers sufficient room for a caregiver or mobility aids without crowding the bather

Material and Tile Calculation Breakdown

Accurately calculating tile for standard shower footprints prevents costly delays and over-purchasing. For a standard 3×5 shower with 8-foot-tall walls, the math breaks down systematically:

  • Floor Surface Area: 3 ft × 5 ft = 15 sq. ft.
  • Gross Wall Surface Area: Two 3×8 walls (48 sq. ft.) + two 5×8 walls (80 sq. ft.) = 128 sq. ft.
  • Entryway Deduction: Subtracting an average glass door cutout of 28 inches by 72 inches (~14 sq. ft.) yields a net wall area of 114 sq. ft.
  • Subtotal: 15 sq. ft. (floor) + 114 sq. ft. (net walls) = 129 sq. ft.
  • Waste Factor: Professional tilers recommend adding a 10% to 15% waste factor for straight-lay patterns (or 15% to 20% for herringbone and diagonal layouts) to accommodate cuts, corner alignment, and breakage.
  • Total Tile Required: 129 sq. ft. × 1.12 (12% average waste) = ~145 square feet of tile.

Beyond tile, a 145-square-foot installation typically requires 2 to 3 50-lb bags of modified thinset mortar (each covering 60 to 80 sq. ft.), 1 to 2 units of grout (epoxy is recommended for wet areas), and sufficient liquid or sheet waterproofing membrane to ensure complete moisture defense. Adding built-in niches typically introduces another 2 to 4 square feet of tiled surface.

8 Inspiring 3×5 Walk In Shower Ideas for Compact Bathrooms

frameless sliding glass shower enclosure

Transforming a 3×5 space into a spa-like retreat requires the right balance of light, line work, and transparency. Here are 8 distinct design concepts to elevate your compact shower.

Space-Saving 3×5 Walk In Shower Ideas for Small Layouts

  1. The Seamless Glass Slider: In compact bathrooms where an outward-swinging door would collide with a vanity or toilet, a top-hung sliding glass system is unbeatable. Discovering the benefits of frameless glass shower doors reveals how clear glass preserves unbroken sightlines, visually doubling the perceived square footage of the room.
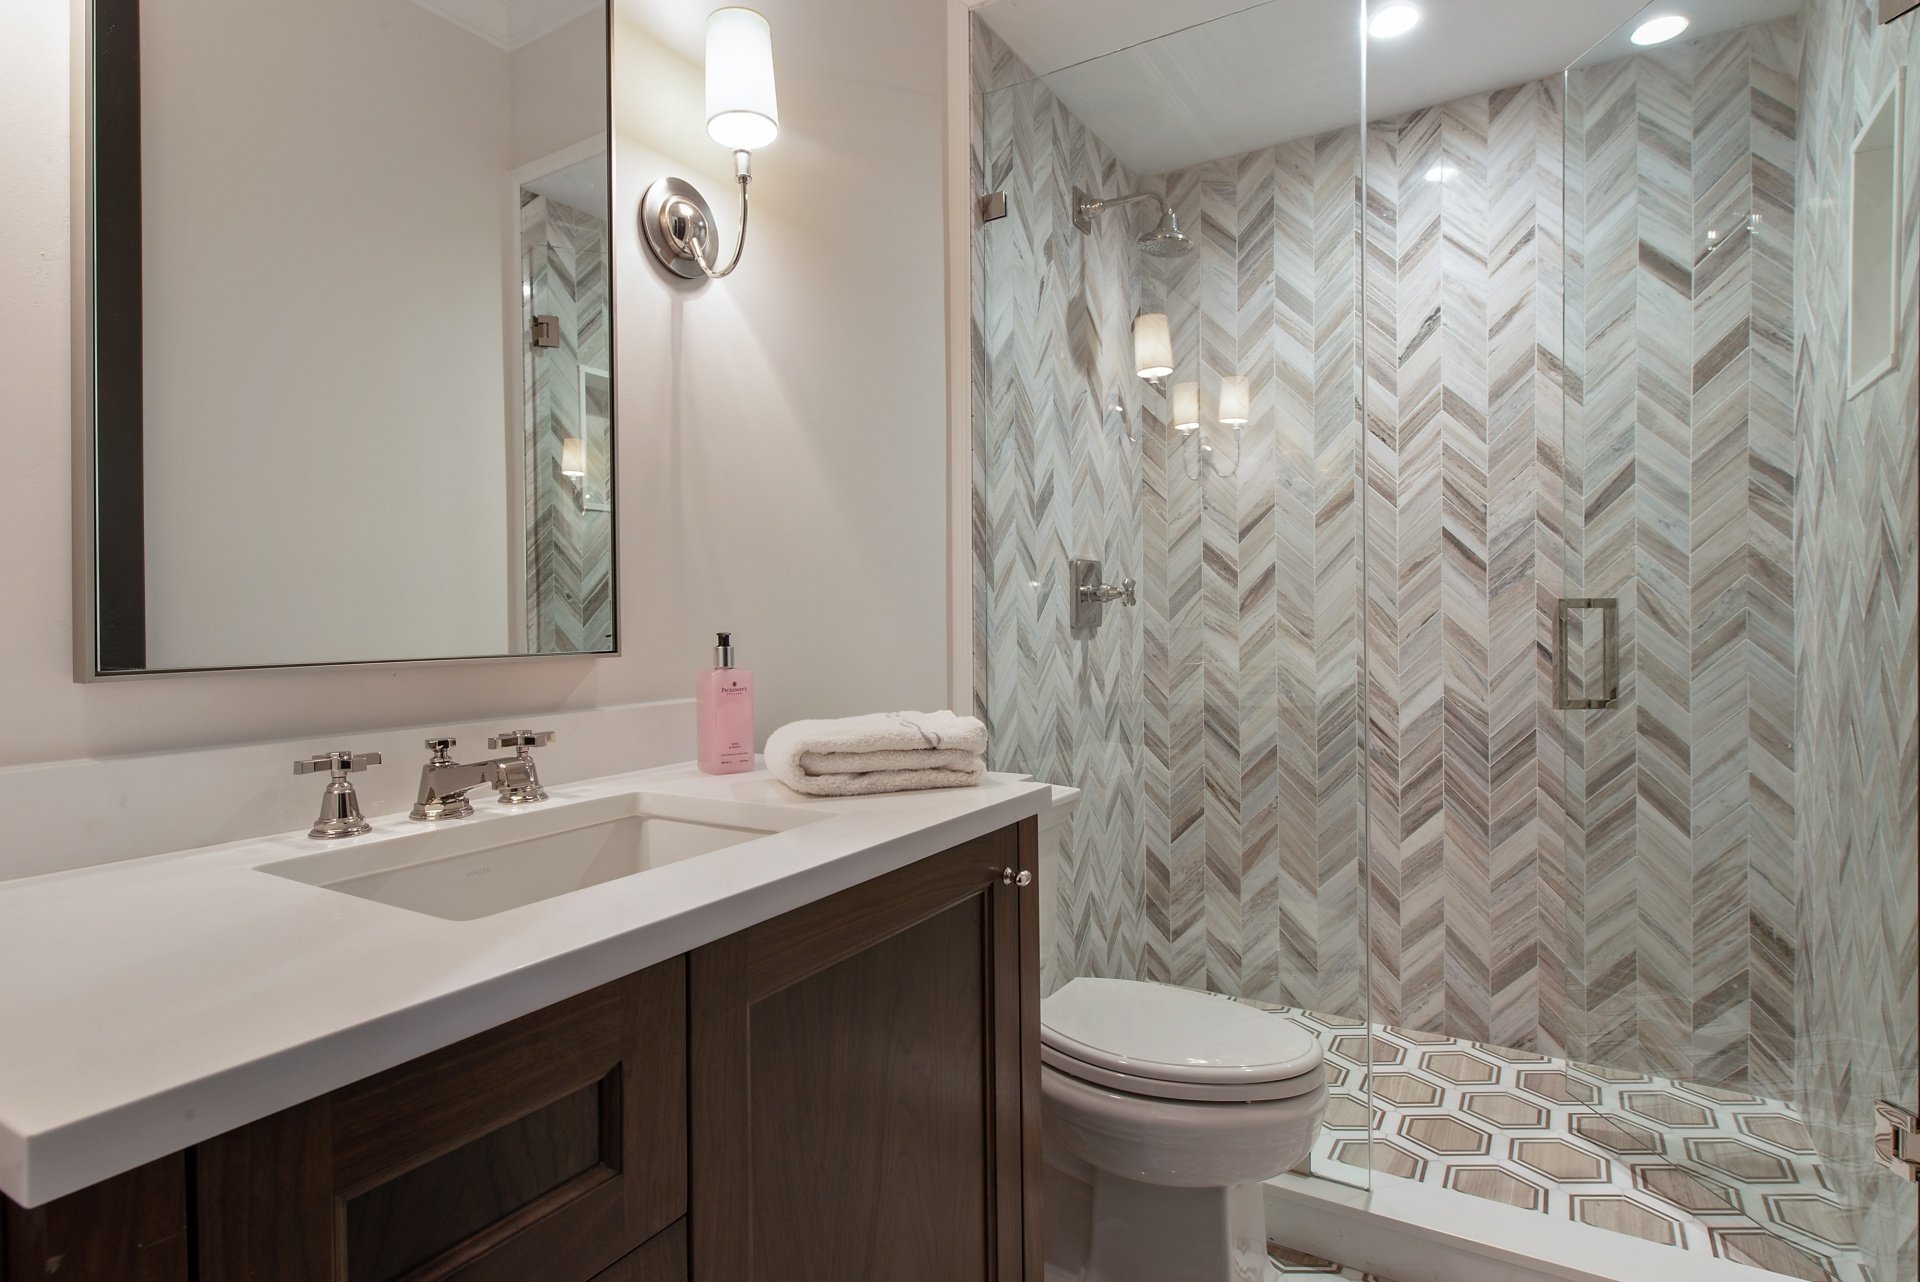
  2. Vertical Herringbone Accent Walls: Installing slender subway tiles in a vertical herringbone configuration draws the eye upward toward the ceiling, creating an optical illusion of higher walls and greater vertical volume.
  3. Monochromatic Color Washing: Using soft neutral or pastel tiles that match the main bathroom paint color eliminates harsh visual borders. This uniform palette allows the entire bathroom to read as one continuous space.
  4. Natural Skylight and Clerestory Integration: Introducing overhead daylight through a ceiling skylight or a high frosted clerestory window fills the shower with diffuse natural light while preserving absolute privacy.
  5. The Suspended Vanity Pairing: Pairing your walk-in shower with a wall-hung floating vanity outside the glass panel keeps continuous flooring visible beneath the cabinetry, enhancing the sense of open floor area throughout the room.
  6. Large-Format Slab Enclosures: Selecting 12×24-inch or larger porcelain tiles drastically reduces grout joints. This delivers a minimalist, uninterrupted aesthetic that is exceptionally easy to clean.
  7. Japanese Onsen-Inspired Organic Textures: Incorporate natural stone elements, charcoal slate wall slabs, and subtle matte finishes to create an organic, spa-like sanctuary within a standard 15-square-foot footprint.
  8. Integrated High-Contrast Hardware: Pairing ultra-clear architectural glass with matte black or brushed brass hardware gives a custom, designer touch without adding physical clutter. To explore additional layout and glass configurations, check out our custom shower door Chicago solutions and browse through our shower doors Chicago options.

Integrating modern bathroom shower glass enclosures ensures your 3×5 shower achieves maximum visual openness and functional beauty.

Accessible and Universal 3×5 Walk In Shower Ideas

Universal design principles ensure a walk-in shower remains safe, accessible, and comfortable for bathers of all mobility levels:

  • Curbless Zero-Threshold Entry: Removing the traditional 4-inch raised curb creates a flush floor transition from the main bathroom into the shower pan, eliminating trip hazards and allowing easy roll-in access.
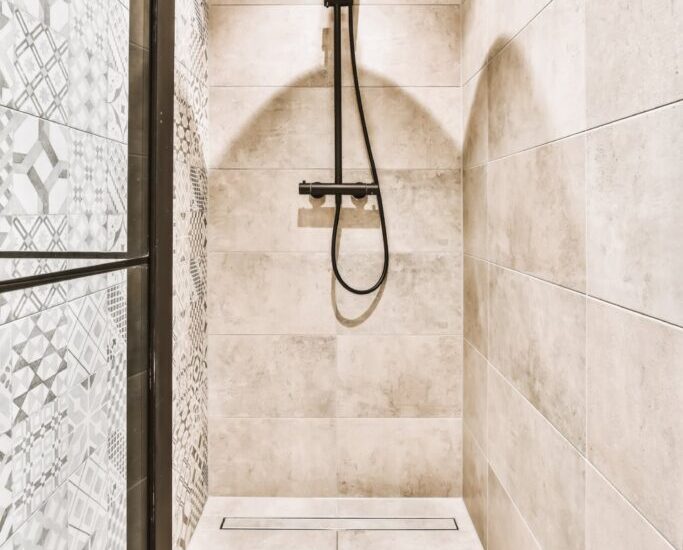
  • Integrated Linear Drains: Installing a single-slope floor directed toward a sleek linear drain along the rear or side wall allows for the use of large floor tiles while delivering rapid, efficient water drainage.
  • Slip-Resistant Flooring: Small mosaic floor tiles (such as 2×2 porcelain or honed penny rounds) provide dense grout grids that significantly enhance foot traction.
  • Ergonomic Built-In or Teak Seating: Integrating a compact corner bench or a moisture-resistant wall-mounted folding teak seat provides a secure resting spot for washing without consuming precious standing room.
  • Recessed Stud-Cavity Niches: Framing recessed niches between standard 16-inch on-center wall studs keeps soaps and shampoo bottles recessed flush into the wall rather than protruding into your showering space.

Glass Doors vs. Doorless Walk-In Showers: Which Works Best?

When planning a 3×5 walk-in shower, choosing between an open doorless design and an enclosed glass door system is a critical decision. In a 5-foot-long enclosure, an open doorless entrance leaves a 24- to 30-inch opening, requiring a planned water splash perimeter.

doorless curbless shower with linear drain

Understanding the distinctions outlined in our guide to glass shower door types will help you select the ideal enclosure for your room’s airflow and layout.

Feature Doorless Walk-In Shower (Open Walk-In) Glass-Enclosed Walk-In Shower (Sliding/Hinged)
Water Containment Requires strategic showerhead aiming and careful floor pitching to prevent overspray. Excellent. Completely seals splashing inside the 3×5 enclosure.
Drafts & Warmth Cooler showering experience due to continuous airflow from the room. Superior heat and steam retention within the showering zone.
Spatial Requirement Demands a designated 24–72″ splash zone or wet-room waterproofing. Compact footprint; works effortlessly in standard 5×7-foot bathrooms.
Cleaning & Upkeep Minimal glass to squeegee, but exterior floors may require regular drying. Enclosed panels require routine glass squeegeeing or protective coatings.
Accessibility Complete barrier-free, zero-clearance access. High accessibility when paired with sliding or wide-pivot glass panels.

For most compact bathrooms, a sliding frameless glass system offers the optimal compromise: it keeps water and warmth contained while maintaining 100% transparent sightlines across the room.

Critical Installation Details and Common Remodeling Mistakes

Flawless walk-in shower construction depends on precision waterproofing, precise slope calibration, and proper ventilation. Reviewing the core advantages of glass shower walls underscores why proper structural prep work is crucial before installing heavy architectural glass.

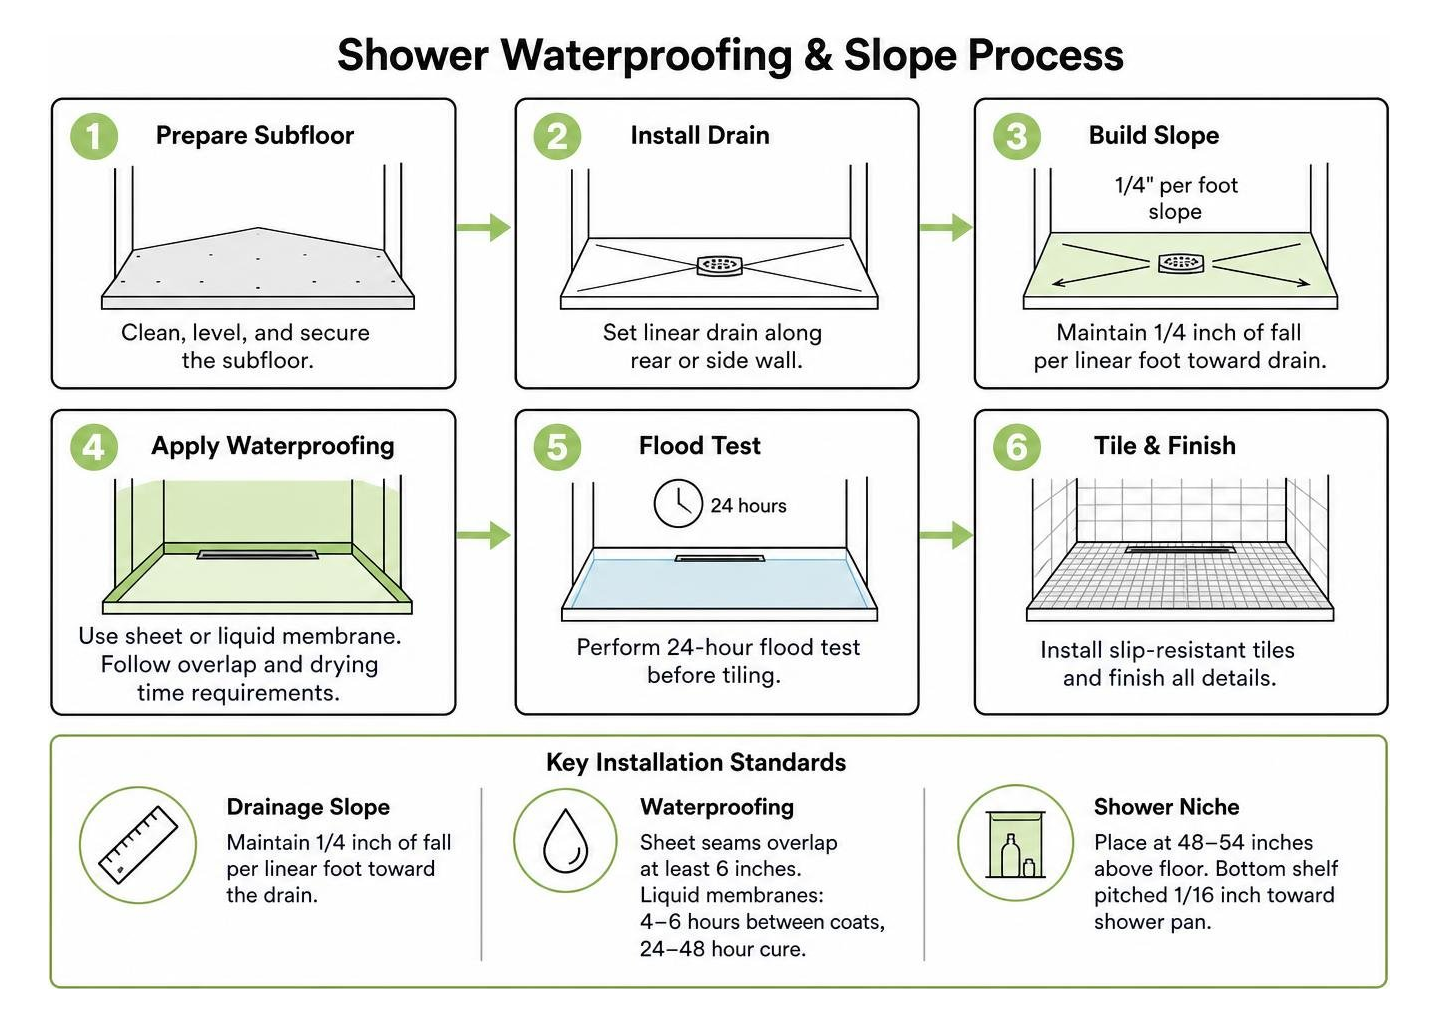
shower waterproofing and slope process

Key technical standards to enforce during construction include:

  • Drainage Slope Calibration: The shower pan must maintain a continuous pitch of exactly 1/4 inch of fall per linear foot directed toward the drain. Inadequate slope results in standing puddles, soap scum accumulation, and mold growth.
  • Waterproofing Applications: Choose between bonded sheet membranes or multi-coat liquid waterproofing membranes. Liquid membranes require 4 to 6 hours of drying time between coats and a full 24- to 48-hour cure. Ensure all sheet membrane seams overlap by at least 6 inches. Always perform a 24-hour flood test before setting tile.
  • Shower Niche Placement: Position recessed niches at an ergonomic height of 48 to 54 inches above the shower floor. Always frame the bottom shelf of the niche with a slight 1/16-inch downward pitch toward the shower pan to prevent standing water.
  • Ventilation Sizing: Small, enclosed shower areas require adequate mechanical exhaust ventilation to prevent moisture build-up. Size exhaust fans to provide at least 1 CFM per square foot of bathroom area (minimum 50 CFM for compact bathrooms).
  • Plumbing Rough-In Centering: Position primary showerheads on the short 3-foot wall directed along the 5-foot length, pointing away from the entry opening to prevent water overspray.

Frequently Asked Questions About 3×5 Walk-In Showers

Can a 3×5 walk-in shower fit a built-in bench?

Yes, a 3×5 walk-in shower can accommodate seating, but scale is everything. A full-width bench running along the 3-foot back wall consumes 12 to 15 inches of depth, reducing the standing floor area to 3×4 feet.

A more spatial-efficient choice is a compact triangular corner bench (measuring 12×12 inches) or a wall-mounted fold-down teak seat. These solutions provide convenient foot-propping for shaving and safe seating without cramping your elbow room.

What shower door style works best for a 3×5 layout?

A frameless sliding bypass or barn-door roller system is the top-performing style for a 3×5 footprint. Sliding doors glide parallel along an overhead header bar, requiring zero clearance outside or inside the enclosure.

If your bathroom layout features unobstructed floor clearance, a single fixed glass partition panel (creating a walk-in entry) or a precision-hinged pivot door that swings outward can also deliver an ultra-clean, minimalist aesthetic. Explore our photo gallery to see real-world installations of these door styles.

Does replacing a tub with a 3×5 walk-in shower hurt resale value?

Replacing an unused tub with an upscale walk-in shower typically increases buyer interest and boosts primary bathroom appeal.

The only exception is if the renovation removes the sole bathtub in a family-oriented home. Real estate standards recommend preserving at least one standard bathtub in a secondary or guest bathroom for bathing young children and pets, while prioritizing a walk-in shower in the primary suite.

Conclusion

A 3×5 walk-in shower proves that you do not need expansive square footage to create a spa-caliber bathroom. By combining smart spatial planning, continuous large-format tile, recessed storage, and premium glass enclosures, you can turn a modest 15-square-foot footprint into a bright, open focal point.

At JP Precision Glass, we specialize in precision-engineered, custom-fabricated glass enclosures designed to elevate your home. Whether you are seeking a minimalist sliding door system, a zero-threshold barrier-free partition, or custom architectural glass tailored to exact measurements, our team delivers unmatched craftsmanship. Explore our full range of custom frameless showers to start designing your ideal walk-in shower today.

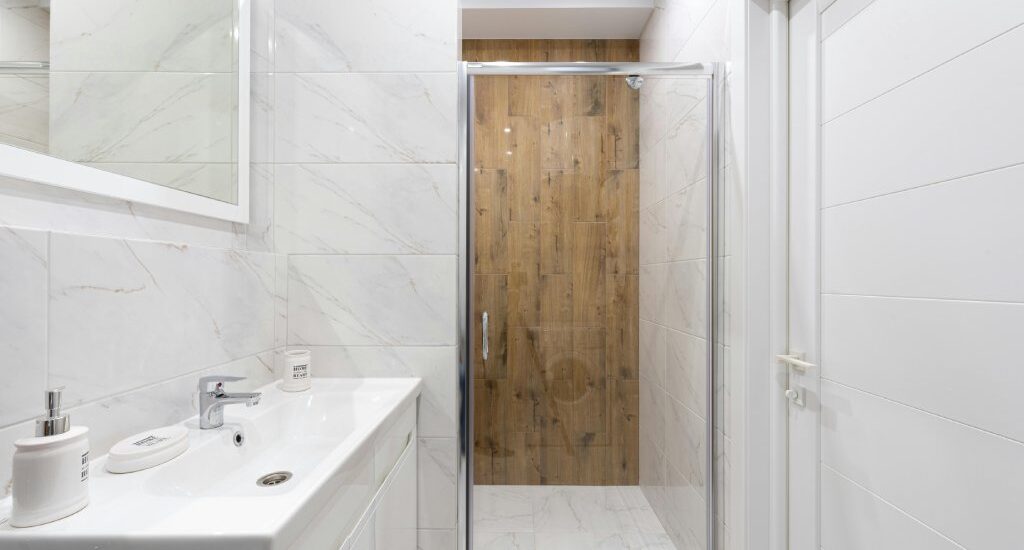
1200 x 800 sliding door shower enclosure in a modern bathroom

The Ultimate Guide to 1200 x 800 Sliding Door Shower Enclosures

Is a 1200 x 800 Sliding Door Shower Enclosure Right for Your Bathroom?

A 1200 x 800 sliding door shower enclosure is one of the most practical choices for bathrooms where space is tight but style still matters. It gives you a generous shower footprint — 1200mm wide and 800mm deep — without a swinging door that eats into your floor space.

Quick answer: Here’s what to know before you buy:

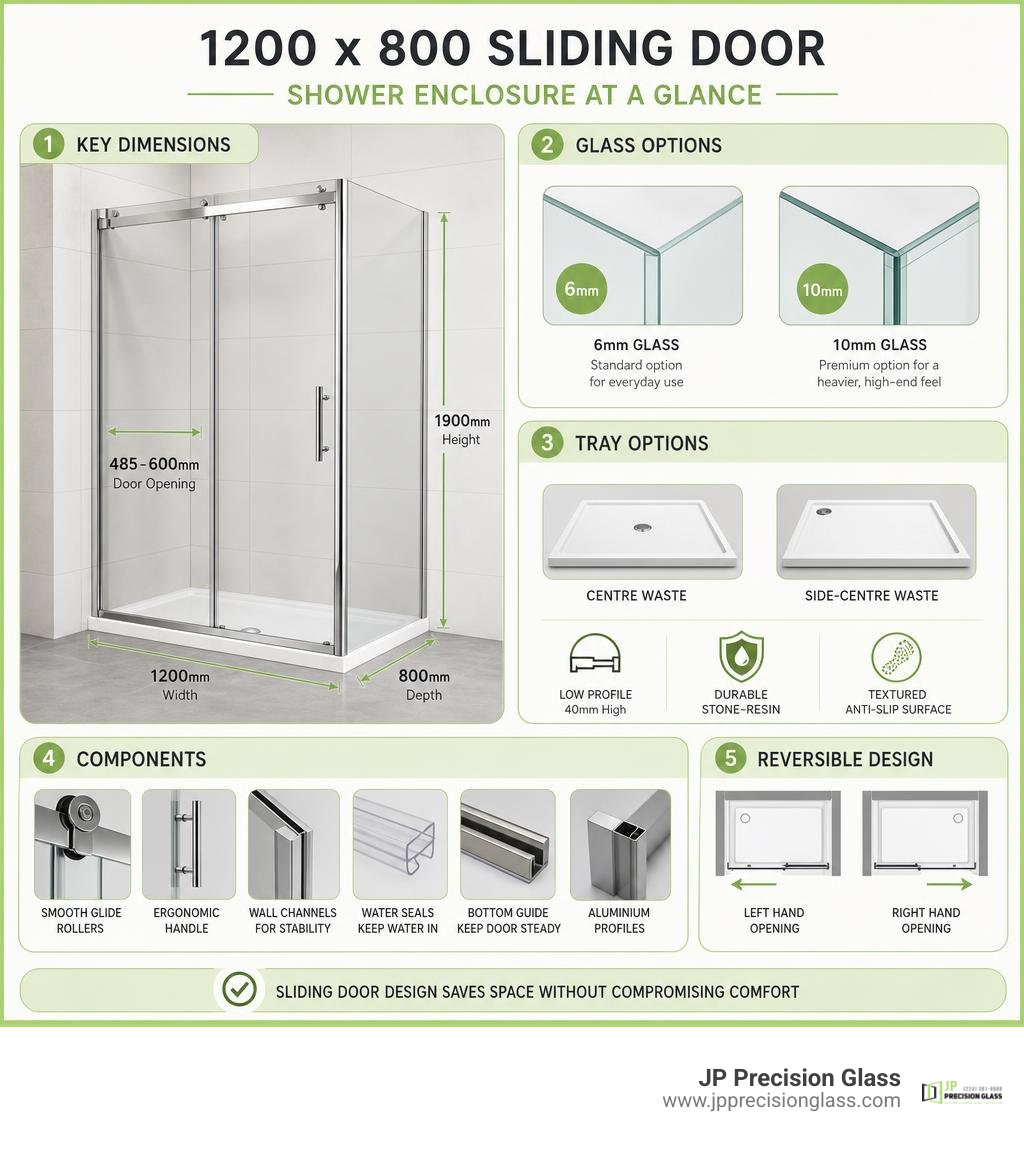
  • Size: 1200mm (W) x 800mm (D) x 1900mm (H) is the standard configuration
  • Door opening: Typically 485mm–600mm wide depending on the model
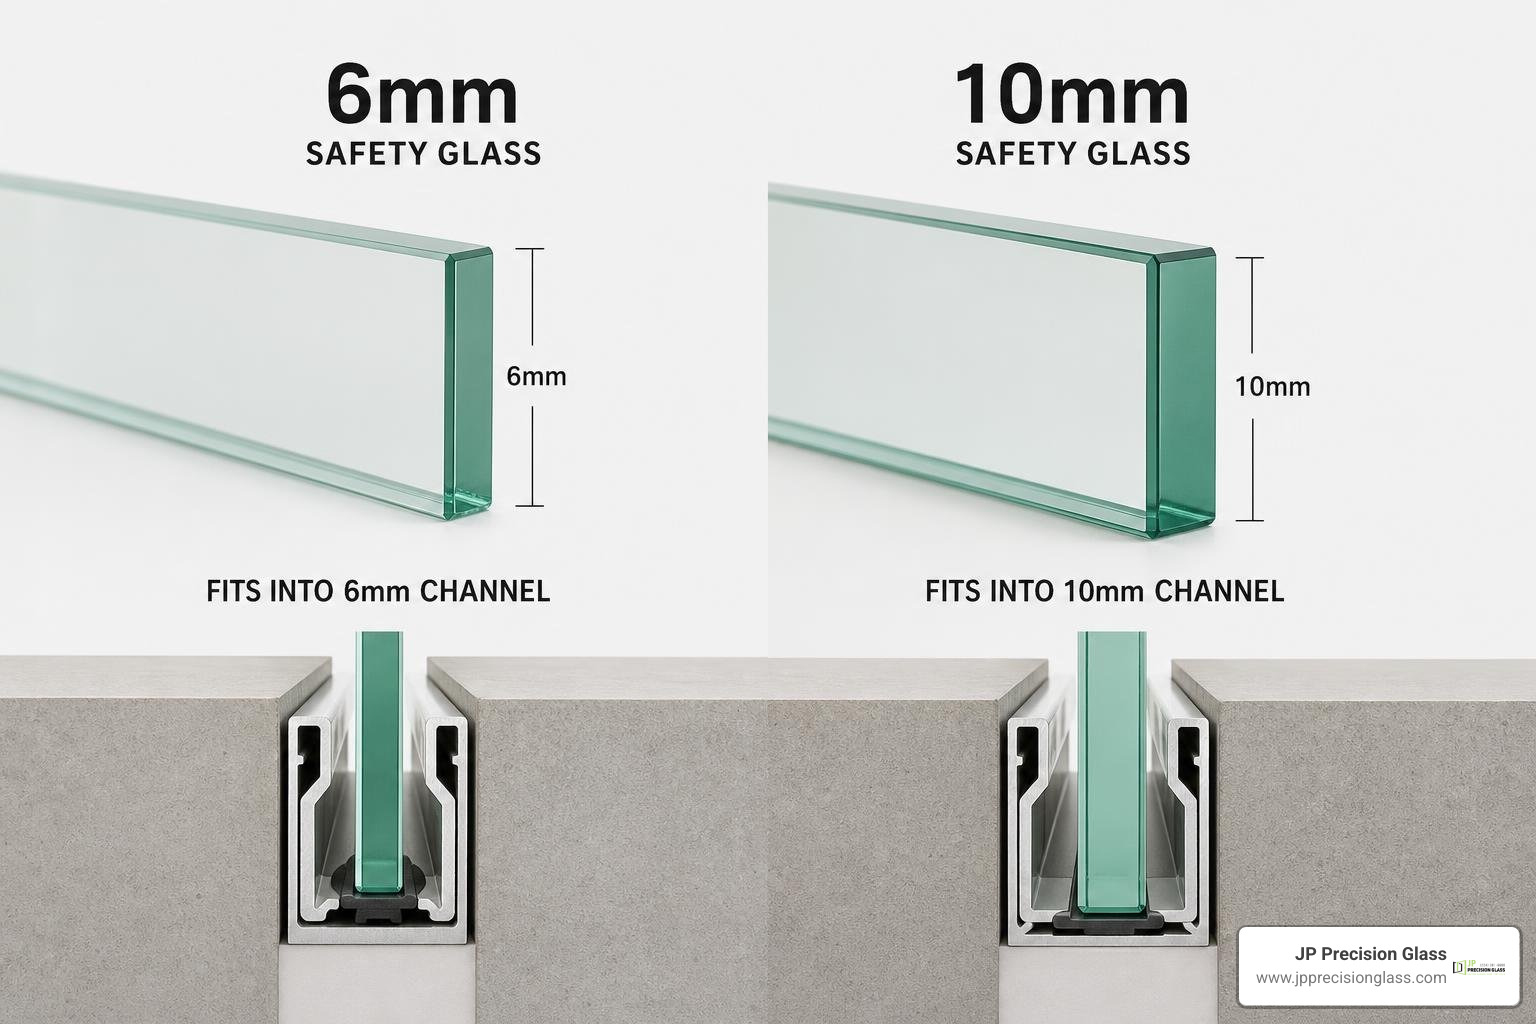
  • Glass thickness: 6mm (standard) or 10mm (premium frameless)
  • Door style: Sliding, reversible left or right opening
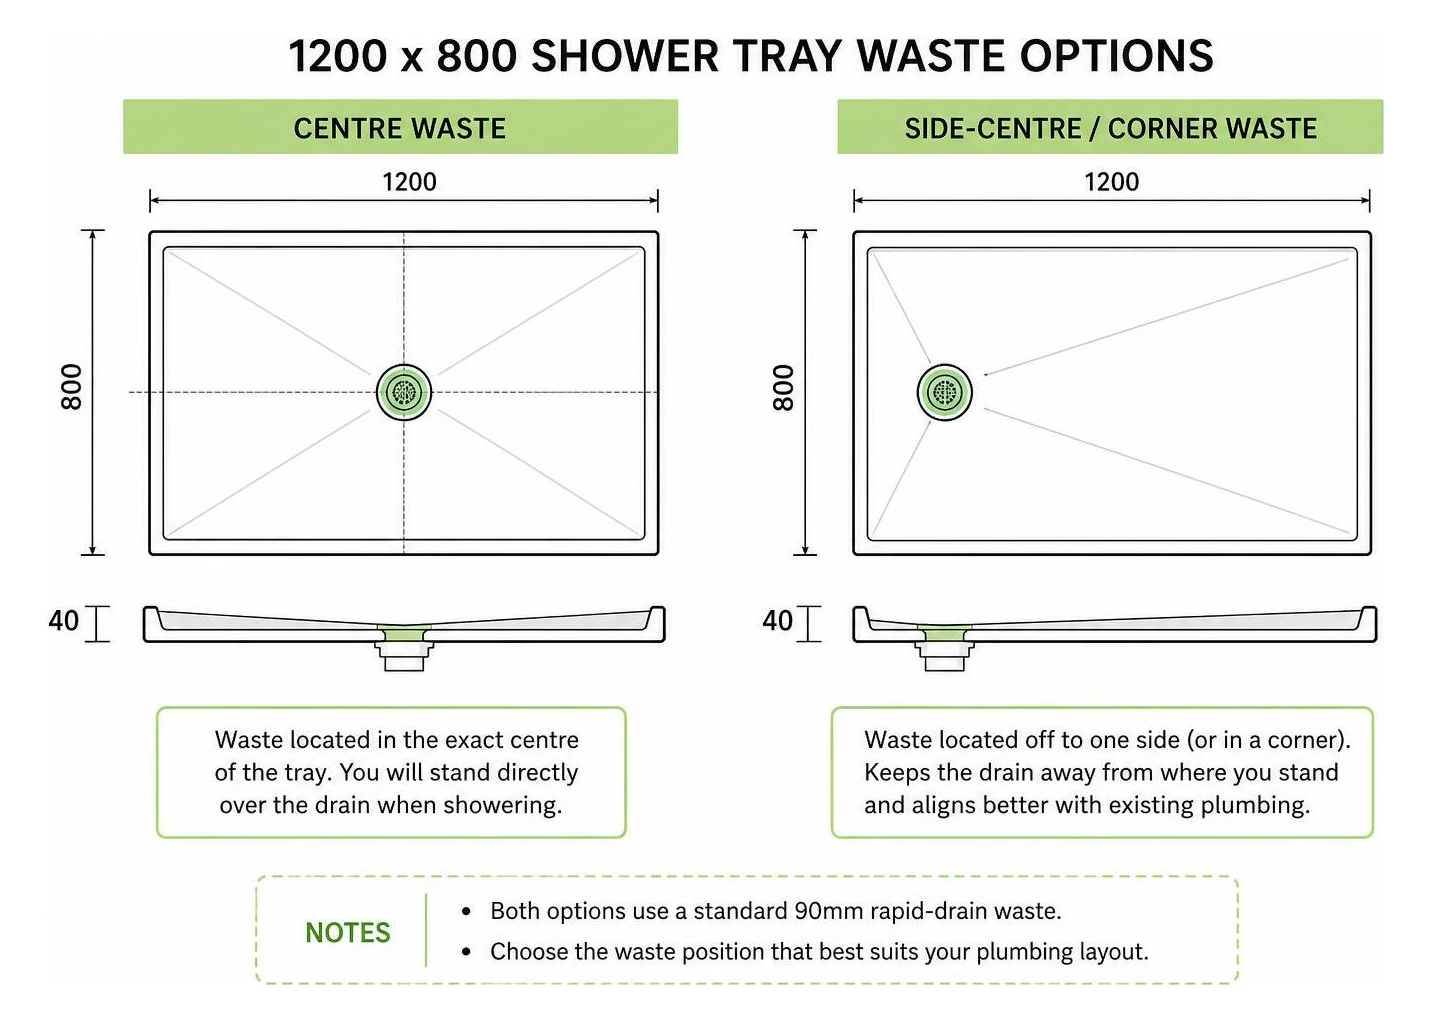
  • Tray options: Usually a low-profile stone-resin tray, 40mm high, with centre or side-centre waste
  • Price range: From budget framed kits to premium frameless sets around $1,299 NZD and up
  • What’s often not included: Waste fitting, sealant, adhesive, and tapware

This size works especially well in narrow or awkward bathrooms. A pivot or hinged door in the same space would swing into a toilet or vanity — a sliding door sidesteps that problem entirely.

One real-world note worth keeping in mind: even a well-reviewed enclosure can surprise you during installation. Reviewers of popular models have flagged that heavy glass panels genuinely require two people to handle safely, and that assembly instructions can sometimes be frustratingly vague. Knowing what you’re getting into upfront saves headaches later.

This guide breaks down everything — frameless vs. framed, glass thickness, tray options, installation realities, and what to watch out for — so you can make a confident decision.

Infographic showing key dimensions, glass options, and components of a 1200 x 800 sliding door shower enclosure infographic

Frameless vs. Framed 1200 x 800 Sliding Door Shower Enclosure

When shopping for a 1200 x 800 sliding door shower enclosure, one of the very first design decisions you will face is choosing between a framed and a frameless setup. While both perform the exact same basic function—keeping water inside the shower and off your bathroom floor—they do so with completely different structural designs and aesthetic vibes.

A framed shower enclosure relies on a complete aluminum outer casing that wraps around every single edge of the glass panels. This frame provides the necessary structural support, allowing the manufacturer to use thinner, lighter glass (typically 6mm).

On the other hand, a frameless enclosure does away with the heavy metal borders. Instead, it relies on thicker, heavier glass panels (often 10mm) secured by heavy-duty wall brackets, slim U-channels, and minimalist structural headers. By eliminating the bulky metal borders, frameless designs create a seamless transition between the shower and the rest of the room. This makes even a compact bathroom feel significantly larger and brighter. If you want to dive deeper into why this style has taken over modern home design, check out our guide on the benefits of frameless glass shower doors.

Here is a quick comparison to help you weigh the two styles side-by-side:

Feature Framed Enclosure (Standard) Frameless Enclosure (Premium)
Typical Glass Thickness 6mm toughened safety glass 10mm toughened safety glass
Average Door Opening ~485mm ~600mm
Visual Profile Defined metal borders; traditional look Minimalist, open, and modern
Ease of Cleaning Metal tracks and frames can trap soap scum Flat glass surfaces are much easier to wipe down
Typical Price Range Budget-friendly to mid-range Premium pricing (e.g., ~$1,299 NZD)
Structural Support Full perimeter aluminum frame Heavy glass secured by brackets and slim rails

Aesthetic Differences and Visual Appeal

The visual impact of your shower door style cannot be overstated. A framed enclosure, while classic and highly functional, creates a distinct visual boundary in your bathroom. If you choose a framed model with a bright chrome finish, that metal frame becomes a key design element. In contrast, a frameless enclosure acts almost like an invisible wall. It allows your bathroom tile work, premium fixtures, and overall design to take center stage. This transparency is one of the main 3 advantages of glass shower walls, as it keeps sightlines open and prevents the room from feeling chopped up.

For those who want a touch of metal without the bulk of a traditional frame, modern frameless and semi-frameless enclosures offer incredibly stylish hardware finishes. Chrome remains a timeless favorite for its bright, light-reflective properties that match standard tapware. However, matte black hardware has skyrocketed in popularity, offering a bold, industrial-chic contrast that frames the glass like a work of art.

Structural Integrity and Maintenance

From a practical standpoint, the way these enclosures are built directly impacts how long they last and how hard they are to clean. Framed enclosures use aluminum profiles to distribute weight. Because the frame does the heavy lifting, the sliding door rollers are often smaller and housed inside a metal track. Over time, these tracks can become magnets for dust, hair, and soap scum, requiring diligent scrubbing to keep the door sliding smoothly.

Premium frameless sliding doors use heavy-duty stainless steel rollers that sit on top of a solid metal bar or slide within a minimalist upper track. Because the components are exposed and made of high-grade materials, they are far less likely to rust or bind. Many modern sliding doors also feature quick-release bottom wheels. This clever design allows you to pop the bottom of the sliding panel out of its track with a simple click, giving you unobstructed access to clean those hard-to-reach areas. Keeping these high-wear shower glass accessories clean and well-lubricated is the secret to keeping your door sliding silently for years.

Technical Specifications: Glass Thickness, Dimensions, and Layouts

Understanding the technical specifications of a 1200 x 800 sliding door shower enclosure is crucial to ensuring you buy a product that is both safe and compatible with your specific bathroom space.

All reputable shower enclosures utilize toughened safety glass (also known as tempered glass). This glass is specially treated so that if it does happen to break under extreme impact, it crumbles into small, relatively harmless granular chunks rather than shattering into dangerous, jagged shards.

Comparison diagram showing the thickness of 6mm vs 10mm safety glass and how they fit into wall channels

When browsing glass shower panels, you will want to look for certifications that prove the glass has been tested to rigorous safety standards. For example, in Australia and New Zealand, premium glass panels are certified to AS/NZS 2208 safety standards, while in North America, they comply with ANSI Z97.1 safety standards. These certifications guarantee that the glass can withstand the daily bumps and temperature swings of a busy family bathroom.

Glass Thickness and Safety Standards for a 1200 x 800 Sliding Door Shower Enclosure

The thickness of the glass you choose affects the overall feel, weight, and price of your shower.

  • 6mm Glass: This is the standard baseline thickness for residential sliding doors. It is lightweight, making the door easy to slide and place less stress on the rollers and wall studs. It is a fantastic, cost-effective option for family bathrooms, though the panels will have a slight amount of flex when pushed.
  • 10mm Glass: This is the gold standard for premium, frameless installations. It feels incredibly solid, does not flex, and glides with a satisfying, heavy smoothness. However, 10mm glass is exceptionally heavy, meaning your walls must be structurally sound, and the installation will require robust hardware.

If you are trying to decide which option fits your home’s needs and budget, reading through these 6 glass shower door questions can help clarify your priorities.

Dimensions, Adjustment Ranges, and Door Openings

While the nominal size of the enclosure is 1200mm x 800mm, the actual physical dimensions of the glass panels are designed with built-in “adjustment ranges” (sometimes called tolerances). This is because very few bathrooms have perfectly flat walls or perfectly square corners.

For a standard 1200 x 800mm model, you will typically see specifications like these:

  • Door Width Adjustment Range: 1163mm to 1203mm
  • Side Panel Adjustment Range: 772mm to 790mm
  • Standard Height: 1900mm (excluding the shower tray)

These adjustment ranges allow the installer to slide the glass panels slightly in or out of the wall-mounted aluminum U-channels to compensate for out-of-plumb walls.

The door opening size is another critical dimension. A standard framed 1200mm sliding door usually yields a door opening width of around 485mm, which is plenty of room for comfortable entry. Premium frameless models, which often use more advanced roller hardware and wider glass spans, can achieve a generous door opening of up to 600mm, making the shower feel much more accessible.

Shower Trays, Waste Options, and Installation Realities

A great glass enclosure is only half of the equation; the shower tray (or base) is what actually manages the water flow and keeps your bathroom dry. When purchasing a kit, it is highly recommended to look for an acrylic-capped stone resin tray. These trays combine the best of both worlds: the solid, sturdy, non-flexing feel of cast stone with the warm, scratch-resistant, and easy-to-clean surface of acrylic. Before pulling the trigger on a purchase, make sure to review these 3 things to do before buying a glass shower door to ensure your plumbing layout is fully prepared.

Choosing the Right Tray and Waste Configuration

Most modern shower trays designed for a 1200 x 800 sliding door shower enclosure feature a low-profile design, typically sitting just 40mm high. This low step-over height creates a clean, minimalist look and makes getting in and out of the shower easier.

These trays generally feature a rapid-drain 90mm waste hole to prevent water from backing up. However, you must choose the correct waste location to match your bathroom’s existing underfloor plumbing:

  • Centre Waste: Located in the exact middle of the tray. This is great for new builds where plumbing can be run anywhere, but it means you will be standing directly on top of the drain cover during your shower.
  • Side-Centre / Corner Waste: Located off to one side or in a corner. This keeps the drain out from under your feet and is often much easier to align with existing plumbing during a bathroom renovation.

Diagram showing the difference between a centre waste and side-centre waste on a 1200 x 800 shower tray

One critical installation reality that catches many DIYers off guard is the “tiling tolerance.” A 1200 x 800mm shower enclosure is intentionally designed not to sit completely flush with the absolute outer edges of a 1200 x 800mm tray. Manufacturers purposefully design the glass frame to sit slightly recessed (usually 10mm to 20mm inward). This design choice leaves a physical ledge on the tray to accommodate the thickness of your wall tiles and adhesive. If you try to mount the glass flush to the edge before tiling, your tiles will push the enclosure too far forward, and it won’t fit the tray!

Installation Challenges and DIY vs. Professional Setup

Installing a sliding shower enclosure is a highly precise task. Because the door relies on a perfectly level track to slide smoothly and seal tightly, even a 2mm error in leveling can cause the door to slide open on its own or leak water.

Furthermore, handling large sheets of toughened glass is a mandatory two-person job. A single 10mm glass panel can weigh over 40kg (90 lbs) and is incredibly vulnerable to shattering if a corner is bumped hard against a tiled floor during installation.

Fortunately, most modern 1200 x 800 enclosures feature “universal handing.” This means the glass panels and sliding mechanisms are fully reversible, allowing you to configure the door to slide open from either the left or the right side depending on your bathroom’s layout. If the thought of lifting heavy glass and calculating tiling tolerances makes you break a sweat, it is highly recommended to opt for a professional, affordable shower door installation to ensure the job is done safely and comes with a leak-free guarantee.

Frequently Asked Questions About the 1200 x 800 Sliding Door Shower Enclosure

What is the ideal glass thickness for a 1200 x 800 sliding door shower enclosure?

For most standard residential bathrooms, 6mm toughened glass is the ideal balance of durability, ease of use, and affordability. It is light enough that the sliding rollers will operate smoothly for years without excessive wear, and it keeps the overall cost of the enclosure down. However, if you are looking to create a high-end, luxury hotel feel in your home, upgrading to 10mm glass is the way to go. The thicker glass eliminates all flex and provides an incredibly premium, solid feel. If you are ready to elevate your bathroom’s style, you can explore our premium options with a shower glass upgrade.

Can this enclosure be installed on tiled walls without a tray?

Yes! You can absolutely install a 1200 x 800 sliding glass enclosure directly onto a tiled floor (often called a wetroom layout). This creates a seamless, barrier-free walk-in look. However, this setup requires a professionally sloped floor with a built-in tile-in drain to ensure water flows directly to the waste rather than pooling in the corners of your bathroom. If your existing shower glass is looking tired or you are ready to convert your old tub into a sleek walk-in tiled shower, you may want to look into a complete replace glass shower door service to ensure a perfectly watertight fit.

How do you clean and maintain the sliding door tracks?

The secret to keeping sliding shower doors operating like new is preventing soap scum and limescale buildup in the bottom tracks.

  1. Use a squeegee: Wipe down the glass panels and bottom track after every single shower.
  2. Utilize quick-release rollers: If your door has quick-release bottom wheels, pop them out once a month to wipe down the track underneath.
  3. Avoid harsh chemicals: Use mild soap or a 50/50 water and white vinegar solution to clean the metal tracks. Harsh abrasive cleaners can strip the protective anodized coating off the aluminum frames.

If your doors have stopped sliding smoothly or the rollers have seized up entirely, don’t worry—most issues can be fixed with professional shower door repair chicago services to get your doors gliding effortlessly once again.

Conclusion

Choosing a 1200 x 800 sliding door shower enclosure is a brilliant way to maximize space, bring a touch of modern elegance to your home, and enjoy a comfortable, spacious shower experience. Whether you choose a highly practical, budget-friendly 6mm framed model or invest in a stunning, heavy-duty 10mm frameless showpiece, this rectangular layout is a proven winner for modern bathroom renovations.

As you finalize your purchase, just remember to double-check the fine print. Most standard retail kits come with a reassuring product warranty (often up to 5 years), but they rarely include the essential installation extras. Make sure you have purchased your waste kit, high-quality silicone sealant, wall adhesive, and your actual shower tapware separately so you aren’t left stranded mid-installation.

If you want to skip the DIY stress, clear-as-mud instruction manuals, and heavy lifting, let us handle it for you. At JP Precision Glass, we specialize in designing, customizing, and installing beautiful, made-to-measure sliding shower doors that fit your bathroom’s exact dimensions perfectly.

A beautifully completed custom sliding glass shower door installation by JP Precision Glass

Ready to transform your bathroom into a modern oasis? Contact us today for a professional consultation, and let our team of experts bring your vision to life with precision and style!_

bath shower screen extension panel

The Ultimate Guide to Bath Shower Screen Extension Panels

Extend Your Bath Screen for Better Splash Protection

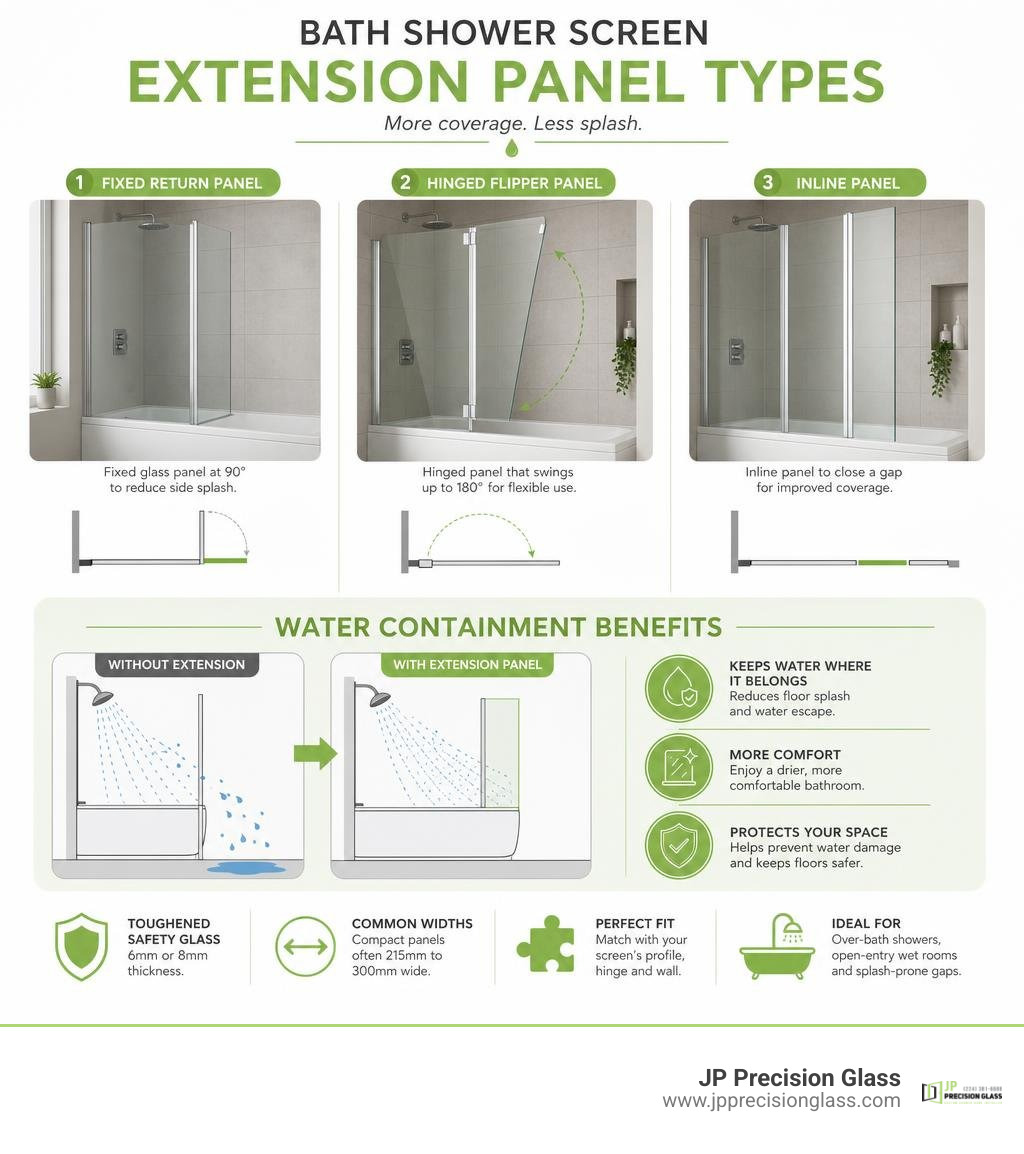
A bath shower screen extension panel is an extra glass section that adds coverage to an existing over-bath screen, helping keep shower spray inside the bath area. It may be a fixed return panel, a hinged flipper panel that swings up to 180 degrees, or an inline panel that closes a small gap beside a compatible screen or enclosure.

Quick answer What it means
Main purpose Extends the screen’s reach to reduce splashing onto the floor
Common widths Compact flipper and return panels are often about 215mm to 300mm wide
Common glass Toughened safety glass, usually 6mm or 8mm thick
Best use Over-bath showers, open-entry wet rooms, and layouts with a splash-prone gap

A well-matched extension can make a bath shower feel more enclosed without adding the bulk of a full shower cubicle. The right fit depends on the screen’s glass thickness, hinge or profile system, wall condition, and the amount of extra coverage the space needs.

Bath shower screen extension panel types and water containment benefits infographic

Bath shower screen extension panel vocabulary:

Understanding the Bath Shower Screen Extension Panel: Types and Dimensions

When standard bath screens fall just short of containing vigorous morning shower sprays, a bath shower screen extension panel steps in as an elegant line of defense. Instead of replacing an entire glass installation or settling for soggy bathmats, adding an extension panel creates a tailored barrier against escapee water droplets.

Extension panels come in three main configurations:

  1. Flipper / Deflector Panels: These hinged panels attach directly to the outer edge of your primary glass screen. Rotating up to 180 degrees, a flipper panel can be angled inward to catch high-velocity spray while showering, then folded away cleanly when you want to step out or take a relaxing bath.
  2. Fixed Return Panels: Fixed perpendicular or inline with your main glass sheet, return panels form a stationary corner barrier. They are ideal for wet room setups or open-ended over-bath showers where extra coverage is permanently required.
  3. Inline Wall Extension Profiles: Designed to close awkward gaps between a shower screen profile and a wall, inline extension pieces add structured width (often between 15mm and 215mm) to bridge non-standard alcoves or compensate for uneven, out-of-plumb walls.

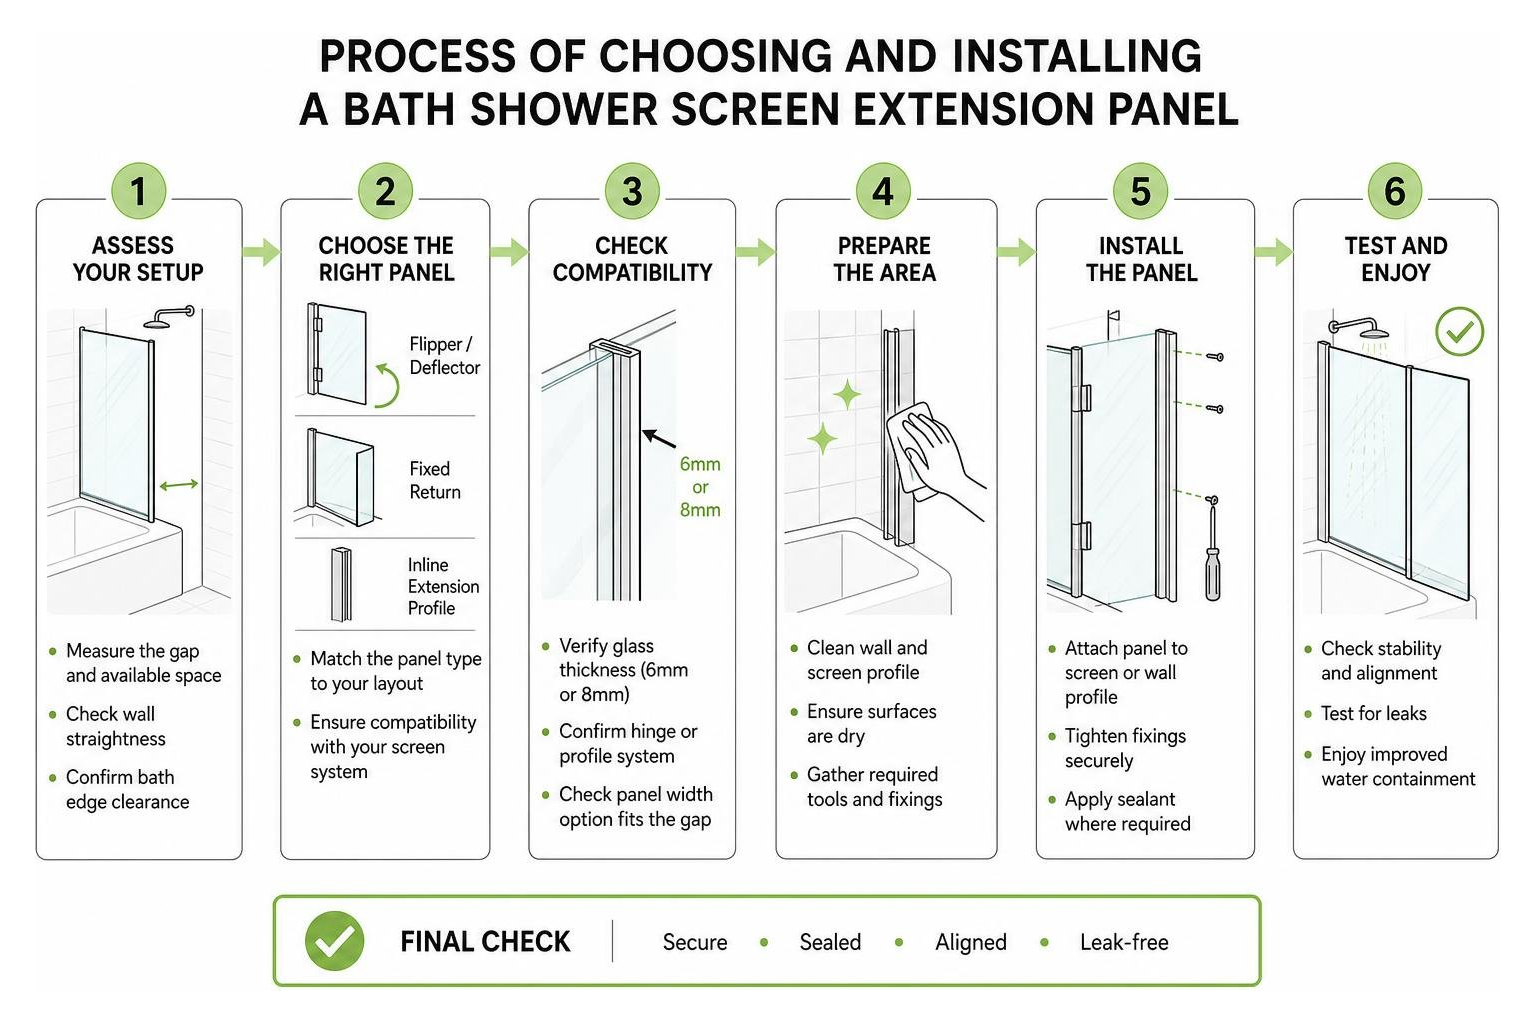
Process of choosing and installing a bath shower screen extension panel

Key Benefits of Adding a Bath Shower Screen Extension Panel

Why install an extension panel instead of buying an entirely new enclosure? The primary advantage comes down to smart water containment without sacrificing open space. Standard single-panel bath screens often measure between 700mm and 800mm in width. For high-pressure power showers or over-bath setups, this length frequently leaves an open splash zone where water bounces off shoulders directly onto vulnerable bathroom flooring.

Adding an extension panel delivers clear practical benefits:

  • Superior Floor Protection: Keeps bath mats dry and preserves floorboards or joists from long-term moisture decay.
  • Enhanced Wet Room Aesthetics: Offers a sleek, modern architectural aesthetic while retaining an airy feel.
  • Flexible Splash Control: Swivel flipper panels allow you to direct water run-off back toward the drain while maintaining easy access to bath taps.
  • Cost-Effective Upgrade: Extends your current setup’s lifespan without requiring extensive bathroom demolition or retiling.

For homeowners exploring wider layout upgrades, combining an extension piece with modern glass shower panels creates a seamless, hotel-quality showering zone.

Common Sizes and Specifications for Extension Panels

Finding the right physical footprint requires understanding standard architectural glass sizing. Because over-bath screens and wet room panels must align visually, extension components follow precise standardized dimensions.

  • Flipper Panel Widths: The most ubiquitous width for hinged deflector extensions is 300mm, though compact 215mm options are widely available for tighter spaces.
  • Inline Extension Widths: Narrow inline profiles typically add modest adjustments—such as standard 150mm or 215mm inline panels—providing 15mm to 25mm of built-in fine-tuning to overcome tight alcove constraints.
  • Vertical Heights: Standard panel heights range from 1400mm to 1500mm for traditional bath-top screens, stretching up to 1850mm, 1900mm, or 1950mm for floor-to-ceiling or full-height walk-in configurations (such as 1850mm extension pieces designed for taller enclosures).

While glass panel extensions handle above-bath splash control, don’t overlook below-tub cladding; flexible bath panel extension packs help complete the exterior lower tub surround when custom dimensions are required.

Materials, Hardware, and Key Features to Consider

A bath shower screen extension panel must withstand constant exposure to water, soap scum, and mechanical movement. Choosing high-grade materials ensures both long-term safety and effortless daily operation.

The core structure relies on toughened safety glass, also known as tempered glass, paired with corrosion-resistant metallic hardware like anodized aluminium or marine-grade stainless steel.

Choosing the Right Glass Thickness and Frame Finish

Glass thickness impacts structural rigidity, weight, and visual appearance. Most extension panels utilize either 6mm or 8mm toughened glass, though 4mm and 5mm options exist in budget-focused framed ranges.

Feature / Specification 6mm Toughened Glass 8mm Toughened Glass
Structural Feel Lightweight, ideal for smooth hinge movement Substantial, premium feel with minimal flex
Weight Moderate; easier on wall anchors Heavy; requires sturdy framing and support bars
Best Application Swivel flipper screens and folding bath screens Large fixed return panels and frameless walk-in setups
Standard Heights 1400mm to 1900mm 1850mm to 1950mm
Ease of DIY Assembly Straightforward handling Requires extra support during fitting

Hardware finishes allow you to tie your extension seamlessly into existing fixture themes. Matching matte black profiles, polished chrome, brushed nickel, or warm brushed brass creates a unified style. Look for 180-degree heavy-duty swivel hinges fitted with internal rise-and-fall mechanisms; these slightly elevate the panel when turned, preventing bottom rubber seals from dragging harshly across the bathtub rim.

To keep hardware running smoothly over time, matching high-quality fittings with specialized shower glass accessories helps preserve smooth pivot motions and leak-tight seals.

Retrofitting an Extension Panel to Existing Shower Enclosures

Can you retroactively add an extension panel to a screen installed years ago? In most cases, yes! Retrofitting depends heavily on matching glass thickness and wall profile geometry.

When retrofitting an extension:

  1. Check Glass Alignment: Ensure your existing main panel and the new extension share the exact same glass thickness (e.g., matching 6mm glass to 6mm glass). Mismatched glass thicknesses prevent hinges and horizontal bottom seals from seating flat.
  2. Evaluate Wall Adjustment Ranges: Built-in channel profiles typically offer 15mm to 25mm of adjustment to compensate for out-of-plumb walls.
  3. Inspect Hinge Compatibility: Verify whether your main glass edge is pre-drilled or configured for clip-on frameless hinges.

If your older bath enclosure suffers from worn-out tracking, hardware corrosion, or damaged main glass, it may be wiser to replace glass shower door hardware entirely to ensure structural safety.

How to Install a Bath Shower Screen Extension Panel Step-by-Step

Measuring and installing a bath shower screen extension panel

Installing a bath shower screen extension is a manageable DIY job for confident homeowners, though working with tempered glass demands care. Glass cannot be trimmed, drilled, or recut once tempered, so double-checking measurements before mounting is essential.

Preparing Your Bathroom Wall and Glass Enclosure

Before opening hardware packs, prepare your installation workspace:

  • Gather Required Tools: Spirit level, tape measure, masking tape, high-grade masonry drill bits, wall plugs, cordless drill, clear sanitary silicone sealant, and glass-safe suction cups.
  • Inspect Wall & Rim Surfaces: Clear away residual silicone, soap film, or limescale from the bathtub ledge and wall profile using isopropyl alcohol.
  • Measure Plumb: Use your spirit level to check vertical wall straightness. If the wall leans out by more than 10mm, ensure your chosen inline wall profile features enough built-in lateral adjustment.

Mounting and Waterproofing Your Bath Shower Screen Extension Panel

Follow this step-by-step sequence to mount and seal your extension panel cleanly:

  1. Position the Wall Profile or Hinge Channel: Place the vertical mounting channel against the tile wall or primary glass edge. Mark fixing holes through the profile using a pencil.
  2. Drill and Plug Tile Work: Apply masking tape over pencil marks to prevent drill bits from skating across ceramic or porcelain tiles. Drill slowly using a diamond-tipped or masonry bit, then insert high-grip wall plugs flush with the tile face.
  3. Secure the Hardware Profile: Run a thin bead of silicone along the back of the wall profile, line up the screw holes, and fasten it securely to the wall.
  4. Slot and Adjust the Glass Panel: Lift the glass extension panel carefully into the channel profile or clamp it into the 180-degree swivel hinges. Adjust the glass until plumb, ensuring equal clearance along the tub rim.
  5. Attach Rubber Bottom Wipe Seals: Press a clear vinyl wipe seal onto the bottom edge of the glass. The flexible fins should lightly brush against the top edge of the bathtub without binding when rotated.
  6. Apply Sanitary Silicone: Apply a neat, continuous bead of mould-resistant silicone sealant along the outer side of the vertical wall channel and bath joint.

Pro Tip: Never seal the inside vertical join of a shower profile. Sealing the interior traps water within the frame, forcing trapped moisture into wall fixings rather than draining harmlessly back into the tub!

Allow silicone to cure completely for 24 hours before turning on the shower.

Maintenance, Care, and Cost Determinants

Cleaning a clear glass shower screen extension panel

A high-performing bath shower screen extension panel requires routine care to remain crystal clear and leak-free.

Modern glass extensions frequently feature factory-applied nano-coatings (often referred to as easy-clean or anti-limescale treatments). This invisible protective layer repels water droplets, preventing mineral deposits, soap scum, and hard water stains from bonding directly to the silica surface.

How to Clean and Protect Your Glass Extension Panel

Maintaining clear toughened glass requires minimal effort when using correct habits:

  • Daily Squeegee Routine: After every shower, wipe down the interior glass surface using a soft rubber squeegee. Removing water droplets before they dry stops limescale spots before they begin.
  • Use Non-Abrasive Cleaners: Avoid harsh scouring pads, bleach, or ammonia-based sprays that can erode protective nano-coatings or etch aluminium finishes. Clean glass using warm water mixed with mild dish soap or a diluted white vinegar solution.
  • Inspect Bottom Seals: Clear vinyl bottom seals naturally degrade over time due to soap buildup and friction. Pull off bottom seals every few months, clean them in warm soapy water, and replace them every 12 to 18 months to maintain a tight water seal.
  • Tighten Swivel Hinge Screws: Periodically check hinge clamp screws to ensure smooth, sag-free rotation.

Frequently Asked Questions About Shower Screen Extensions

Can a shower screen extension panel be fitted to any existing bath screen?

Not automatically. An extension panel must match your existing setup’s mechanical design. Fixed return panels require a steady support bar anchor, while clip-on flipper extensions require your primary glass panel edge to feature compatible hinge profiles or straight frameless glass edges of identical thickness (e.g., matching 6mm to 6mm or 8mm to 8mm). Always check hinge clamping tolerances prior to purchasing.

Do I need a plumber or professional installer to fit a shower glass extension?

Installing a standard extension panel rarely requires a plumber because no pipework alterations are involved. DIYers comfortable using drills, spirit levels, and silicone applicators can complete straightforward installations. However, if your bathroom wall requires structural reinforcement, features fragile glass tiles, or involves heavy custom architectural glass, hiring a specialist installer ensures a safe, watertight fit.

For complex architectural glass challenges, partnering with regional specialists like those offering custom shower door chicago solutions guarantees exact fitment for out-of-plumb walls.

What factors influence the cost of a shower screen extension panel?

Several structural and manufacturing variables affect the overall value of an extension panel:

  • Glass Thickness & Grade: Thick 8mm architectural glass requires heavier structural tempering and precision edge-polishing compared to basic 4mm or 6mm variants.
  • Factory Surface Coatings: Pre-treated easy-clean nano-coated glass retains value long-term by reducing cleaning effort.
  • Hardware Finish & Engineering: Precision-engineered brass or stainless steel hinges with smooth 180-degree rise-and-fall rotation cost more to produce than basic fixed aluminium clips.
  • Custom Sizing vs. Off-the-Shelf: Standard 300mm stock panels are economical, while custom-cut glass tailored to irregular ceilings or complex cutouts requires specialized fabrication.

Conclusion

A bath shower screen extension panel offers a clever, space-efficient solution to common splash problems in modern bathrooms. By extending your screen’s reach with a flexible flipper, fixed return, or inline profile, you protect your floors, enhance shower comfort, and preserve an open, airy bathroom layout.

Whether retrofitting an existing screen or creating a new over-bath design, selecting the right glass thickness, hardware finishes, and sealing methods ensures long-lasting performance.

At JP Precision Glass, we specialize in precision, made-to-size custom glass solutions tailored to your unique bathroom layout. If you’re ready to upgrade your bathroom with leak-free performance and elegant glass design, explore our wide range of custom glass shower panels today to discover the ideal fit for your home.