• JP Precision Glass is the leading glass shower doors company in Chicago

Tag Archives: Shower Door

1200 x 800 sliding door shower enclosure in a modern bathroom

The Ultimate Guide to 1200 x 800 Sliding Door Shower Enclosures

Is a 1200 x 800 Sliding Door Shower Enclosure Right for Your Bathroom?

A 1200 x 800 sliding door shower enclosure is one of the most practical choices for bathrooms where space is tight but style still matters. It gives you a generous shower footprint — 1200mm wide and 800mm deep — without a swinging door that eats into your floor space.

Quick answer: Here’s what to know before you buy:

  • Size: 1200mm (W) x 800mm (D) x 1900mm (H) is the standard configuration
  • Door opening: Typically 485mm–600mm wide depending on the model
  • Glass thickness: 6mm (standard) or 10mm (premium frameless)
  • Door style: Sliding, reversible left or right opening
  • Tray options: Usually a low-profile stone-resin tray, 40mm high, with centre or side-centre waste
  • Price range: From budget framed kits to premium frameless sets around $1,299 NZD and up
  • What’s often not included: Waste fitting, sealant, adhesive, and tapware

This size works especially well in narrow or awkward bathrooms. A pivot or hinged door in the same space would swing into a toilet or vanity — a sliding door sidesteps that problem entirely.

One real-world note worth keeping in mind: even a well-reviewed enclosure can surprise you during installation. Reviewers of popular models have flagged that heavy glass panels genuinely require two people to handle safely, and that assembly instructions can sometimes be frustratingly vague. Knowing what you’re getting into upfront saves headaches later.

This guide breaks down everything — frameless vs. framed, glass thickness, tray options, installation realities, and what to watch out for — so you can make a confident decision.

Infographic showing key dimensions, glass options, and components of a 1200 x 800 sliding door shower enclosure infographic

Frameless vs. Framed 1200 x 800 Sliding Door Shower Enclosure

When shopping for a 1200 x 800 sliding door shower enclosure, one of the very first design decisions you will face is choosing between a framed and a frameless setup. While both perform the exact same basic function—keeping water inside the shower and off your bathroom floor—they do so with completely different structural designs and aesthetic vibes.

A framed shower enclosure relies on a complete aluminum outer casing that wraps around every single edge of the glass panels. This frame provides the necessary structural support, allowing the manufacturer to use thinner, lighter glass (typically 6mm).

On the other hand, a frameless enclosure does away with the heavy metal borders. Instead, it relies on thicker, heavier glass panels (often 10mm) secured by heavy-duty wall brackets, slim U-channels, and minimalist structural headers. By eliminating the bulky metal borders, frameless designs create a seamless transition between the shower and the rest of the room. This makes even a compact bathroom feel significantly larger and brighter. If you want to dive deeper into why this style has taken over modern home design, check out our guide on the benefits of frameless glass shower doors.

Here is a quick comparison to help you weigh the two styles side-by-side:

Feature Framed Enclosure (Standard) Frameless Enclosure (Premium)
Typical Glass Thickness 6mm toughened safety glass 10mm toughened safety glass
Average Door Opening ~485mm ~600mm
Visual Profile Defined metal borders; traditional look Minimalist, open, and modern
Ease of Cleaning Metal tracks and frames can trap soap scum Flat glass surfaces are much easier to wipe down
Typical Price Range Budget-friendly to mid-range Premium pricing (e.g., ~$1,299 NZD)
Structural Support Full perimeter aluminum frame Heavy glass secured by brackets and slim rails

Aesthetic Differences and Visual Appeal

The visual impact of your shower door style cannot be overstated. A framed enclosure, while classic and highly functional, creates a distinct visual boundary in your bathroom. If you choose a framed model with a bright chrome finish, that metal frame becomes a key design element. In contrast, a frameless enclosure acts almost like an invisible wall. It allows your bathroom tile work, premium fixtures, and overall design to take center stage. This transparency is one of the main 3 advantages of glass shower walls, as it keeps sightlines open and prevents the room from feeling chopped up.

For those who want a touch of metal without the bulk of a traditional frame, modern frameless and semi-frameless enclosures offer incredibly stylish hardware finishes. Chrome remains a timeless favorite for its bright, light-reflective properties that match standard tapware. However, matte black hardware has skyrocketed in popularity, offering a bold, industrial-chic contrast that frames the glass like a work of art.

Structural Integrity and Maintenance

From a practical standpoint, the way these enclosures are built directly impacts how long they last and how hard they are to clean. Framed enclosures use aluminum profiles to distribute weight. Because the frame does the heavy lifting, the sliding door rollers are often smaller and housed inside a metal track. Over time, these tracks can become magnets for dust, hair, and soap scum, requiring diligent scrubbing to keep the door sliding smoothly.

Premium frameless sliding doors use heavy-duty stainless steel rollers that sit on top of a solid metal bar or slide within a minimalist upper track. Because the components are exposed and made of high-grade materials, they are far less likely to rust or bind. Many modern sliding doors also feature quick-release bottom wheels. This clever design allows you to pop the bottom of the sliding panel out of its track with a simple click, giving you unobstructed access to clean those hard-to-reach areas. Keeping these high-wear shower glass accessories clean and well-lubricated is the secret to keeping your door sliding silently for years.

Technical Specifications: Glass Thickness, Dimensions, and Layouts

Understanding the technical specifications of a 1200 x 800 sliding door shower enclosure is crucial to ensuring you buy a product that is both safe and compatible with your specific bathroom space.

All reputable shower enclosures utilize toughened safety glass (also known as tempered glass). This glass is specially treated so that if it does happen to break under extreme impact, it crumbles into small, relatively harmless granular chunks rather than shattering into dangerous, jagged shards.

Comparison diagram showing the thickness of 6mm vs 10mm safety glass and how they fit into wall channels

When browsing glass shower panels, you will want to look for certifications that prove the glass has been tested to rigorous safety standards. For example, in Australia and New Zealand, premium glass panels are certified to AS/NZS 2208 safety standards, while in North America, they comply with ANSI Z97.1 safety standards. These certifications guarantee that the glass can withstand the daily bumps and temperature swings of a busy family bathroom.

Glass Thickness and Safety Standards for a 1200 x 800 Sliding Door Shower Enclosure

The thickness of the glass you choose affects the overall feel, weight, and price of your shower.

  • 6mm Glass: This is the standard baseline thickness for residential sliding doors. It is lightweight, making the door easy to slide and place less stress on the rollers and wall studs. It is a fantastic, cost-effective option for family bathrooms, though the panels will have a slight amount of flex when pushed.
  • 10mm Glass: This is the gold standard for premium, frameless installations. It feels incredibly solid, does not flex, and glides with a satisfying, heavy smoothness. However, 10mm glass is exceptionally heavy, meaning your walls must be structurally sound, and the installation will require robust hardware.

If you are trying to decide which option fits your home’s needs and budget, reading through these 6 glass shower door questions can help clarify your priorities.

Dimensions, Adjustment Ranges, and Door Openings

While the nominal size of the enclosure is 1200mm x 800mm, the actual physical dimensions of the glass panels are designed with built-in “adjustment ranges” (sometimes called tolerances). This is because very few bathrooms have perfectly flat walls or perfectly square corners.

For a standard 1200 x 800mm model, you will typically see specifications like these:

  • Door Width Adjustment Range: 1163mm to 1203mm
  • Side Panel Adjustment Range: 772mm to 790mm
  • Standard Height: 1900mm (excluding the shower tray)

These adjustment ranges allow the installer to slide the glass panels slightly in or out of the wall-mounted aluminum U-channels to compensate for out-of-plumb walls.

The door opening size is another critical dimension. A standard framed 1200mm sliding door usually yields a door opening width of around 485mm, which is plenty of room for comfortable entry. Premium frameless models, which often use more advanced roller hardware and wider glass spans, can achieve a generous door opening of up to 600mm, making the shower feel much more accessible.

Shower Trays, Waste Options, and Installation Realities

A great glass enclosure is only half of the equation; the shower tray (or base) is what actually manages the water flow and keeps your bathroom dry. When purchasing a kit, it is highly recommended to look for an acrylic-capped stone resin tray. These trays combine the best of both worlds: the solid, sturdy, non-flexing feel of cast stone with the warm, scratch-resistant, and easy-to-clean surface of acrylic. Before pulling the trigger on a purchase, make sure to review these 3 things to do before buying a glass shower door to ensure your plumbing layout is fully prepared.

Choosing the Right Tray and Waste Configuration

Most modern shower trays designed for a 1200 x 800 sliding door shower enclosure feature a low-profile design, typically sitting just 40mm high. This low step-over height creates a clean, minimalist look and makes getting in and out of the shower easier.

These trays generally feature a rapid-drain 90mm waste hole to prevent water from backing up. However, you must choose the correct waste location to match your bathroom’s existing underfloor plumbing:

  • Centre Waste: Located in the exact middle of the tray. This is great for new builds where plumbing can be run anywhere, but it means you will be standing directly on top of the drain cover during your shower.
  • Side-Centre / Corner Waste: Located off to one side or in a corner. This keeps the drain out from under your feet and is often much easier to align with existing plumbing during a bathroom renovation.

Diagram showing the difference between a centre waste and side-centre waste on a 1200 x 800 shower tray

One critical installation reality that catches many DIYers off guard is the “tiling tolerance.” A 1200 x 800mm shower enclosure is intentionally designed not to sit completely flush with the absolute outer edges of a 1200 x 800mm tray. Manufacturers purposefully design the glass frame to sit slightly recessed (usually 10mm to 20mm inward). This design choice leaves a physical ledge on the tray to accommodate the thickness of your wall tiles and adhesive. If you try to mount the glass flush to the edge before tiling, your tiles will push the enclosure too far forward, and it won’t fit the tray!

Installation Challenges and DIY vs. Professional Setup

Installing a sliding shower enclosure is a highly precise task. Because the door relies on a perfectly level track to slide smoothly and seal tightly, even a 2mm error in leveling can cause the door to slide open on its own or leak water.

Furthermore, handling large sheets of toughened glass is a mandatory two-person job. A single 10mm glass panel can weigh over 40kg (90 lbs) and is incredibly vulnerable to shattering if a corner is bumped hard against a tiled floor during installation.

Fortunately, most modern 1200 x 800 enclosures feature “universal handing.” This means the glass panels and sliding mechanisms are fully reversible, allowing you to configure the door to slide open from either the left or the right side depending on your bathroom’s layout. If the thought of lifting heavy glass and calculating tiling tolerances makes you break a sweat, it is highly recommended to opt for a professional, affordable shower door installation to ensure the job is done safely and comes with a leak-free guarantee.

Frequently Asked Questions About the 1200 x 800 Sliding Door Shower Enclosure

What is the ideal glass thickness for a 1200 x 800 sliding door shower enclosure?

For most standard residential bathrooms, 6mm toughened glass is the ideal balance of durability, ease of use, and affordability. It is light enough that the sliding rollers will operate smoothly for years without excessive wear, and it keeps the overall cost of the enclosure down. However, if you are looking to create a high-end, luxury hotel feel in your home, upgrading to 10mm glass is the way to go. The thicker glass eliminates all flex and provides an incredibly premium, solid feel. If you are ready to elevate your bathroom’s style, you can explore our premium options with a shower glass upgrade.

Can this enclosure be installed on tiled walls without a tray?

Yes! You can absolutely install a 1200 x 800 sliding glass enclosure directly onto a tiled floor (often called a wetroom layout). This creates a seamless, barrier-free walk-in look. However, this setup requires a professionally sloped floor with a built-in tile-in drain to ensure water flows directly to the waste rather than pooling in the corners of your bathroom. If your existing shower glass is looking tired or you are ready to convert your old tub into a sleek walk-in tiled shower, you may want to look into a complete replace glass shower door service to ensure a perfectly watertight fit.

How do you clean and maintain the sliding door tracks?

The secret to keeping sliding shower doors operating like new is preventing soap scum and limescale buildup in the bottom tracks.

  1. Use a squeegee: Wipe down the glass panels and bottom track after every single shower.
  2. Utilize quick-release rollers: If your door has quick-release bottom wheels, pop them out once a month to wipe down the track underneath.
  3. Avoid harsh chemicals: Use mild soap or a 50/50 water and white vinegar solution to clean the metal tracks. Harsh abrasive cleaners can strip the protective anodized coating off the aluminum frames.

If your doors have stopped sliding smoothly or the rollers have seized up entirely, don’t worry—most issues can be fixed with professional shower door repair chicago services to get your doors gliding effortlessly once again.

Conclusion

Choosing a 1200 x 800 sliding door shower enclosure is a brilliant way to maximize space, bring a touch of modern elegance to your home, and enjoy a comfortable, spacious shower experience. Whether you choose a highly practical, budget-friendly 6mm framed model or invest in a stunning, heavy-duty 10mm frameless showpiece, this rectangular layout is a proven winner for modern bathroom renovations.

As you finalize your purchase, just remember to double-check the fine print. Most standard retail kits come with a reassuring product warranty (often up to 5 years), but they rarely include the essential installation extras. Make sure you have purchased your waste kit, high-quality silicone sealant, wall adhesive, and your actual shower tapware separately so you aren’t left stranded mid-installation.

If you want to skip the DIY stress, clear-as-mud instruction manuals, and heavy lifting, let us handle it for you. At JP Precision Glass, we specialize in designing, customizing, and installing beautiful, made-to-measure sliding shower doors that fit your bathroom’s exact dimensions perfectly.

A beautifully completed custom sliding glass shower door installation by JP Precision Glass

Ready to transform your bathroom into a modern oasis? Contact us today for a professional consultation, and let our team of experts bring your vision to life with precision and style!_

bath shower screen extension panel

The Ultimate Guide to Bath Shower Screen Extension Panels

Extend Your Bath Screen for Better Splash Protection

A bath shower screen extension panel is an extra glass section that adds coverage to an existing over-bath screen, helping keep shower spray inside the bath area. It may be a fixed return panel, a hinged flipper panel that swings up to 180 degrees, or an inline panel that closes a small gap beside a compatible screen or enclosure.

Quick answer What it means
Main purpose Extends the screen’s reach to reduce splashing onto the floor
Common widths Compact flipper and return panels are often about 215mm to 300mm wide
Common glass Toughened safety glass, usually 6mm or 8mm thick
Best use Over-bath showers, open-entry wet rooms, and layouts with a splash-prone gap

A well-matched extension can make a bath shower feel more enclosed without adding the bulk of a full shower cubicle. The right fit depends on the screen’s glass thickness, hinge or profile system, wall condition, and the amount of extra coverage the space needs.

Bath shower screen extension panel types and water containment benefits infographic

Bath shower screen extension panel vocabulary:

Understanding the Bath Shower Screen Extension Panel: Types and Dimensions

When standard bath screens fall just short of containing vigorous morning shower sprays, a bath shower screen extension panel steps in as an elegant line of defense. Instead of replacing an entire glass installation or settling for soggy bathmats, adding an extension panel creates a tailored barrier against escapee water droplets.

Extension panels come in three main configurations:

  1. Flipper / Deflector Panels: These hinged panels attach directly to the outer edge of your primary glass screen. Rotating up to 180 degrees, a flipper panel can be angled inward to catch high-velocity spray while showering, then folded away cleanly when you want to step out or take a relaxing bath.
  2. Fixed Return Panels: Fixed perpendicular or inline with your main glass sheet, return panels form a stationary corner barrier. They are ideal for wet room setups or open-ended over-bath showers where extra coverage is permanently required.
  3. Inline Wall Extension Profiles: Designed to close awkward gaps between a shower screen profile and a wall, inline extension pieces add structured width (often between 15mm and 215mm) to bridge non-standard alcoves or compensate for uneven, out-of-plumb walls.

Process of choosing and installing a bath shower screen extension panel

Key Benefits of Adding a Bath Shower Screen Extension Panel

Why install an extension panel instead of buying an entirely new enclosure? The primary advantage comes down to smart water containment without sacrificing open space. Standard single-panel bath screens often measure between 700mm and 800mm in width. For high-pressure power showers or over-bath setups, this length frequently leaves an open splash zone where water bounces off shoulders directly onto vulnerable bathroom flooring.

Adding an extension panel delivers clear practical benefits:

  • Superior Floor Protection: Keeps bath mats dry and preserves floorboards or joists from long-term moisture decay.
  • Enhanced Wet Room Aesthetics: Offers a sleek, modern architectural aesthetic while retaining an airy feel.
  • Flexible Splash Control: Swivel flipper panels allow you to direct water run-off back toward the drain while maintaining easy access to bath taps.
  • Cost-Effective Upgrade: Extends your current setup’s lifespan without requiring extensive bathroom demolition or retiling.

For homeowners exploring wider layout upgrades, combining an extension piece with modern glass shower panels creates a seamless, hotel-quality showering zone.

Common Sizes and Specifications for Extension Panels

Finding the right physical footprint requires understanding standard architectural glass sizing. Because over-bath screens and wet room panels must align visually, extension components follow precise standardized dimensions.

  • Flipper Panel Widths: The most ubiquitous width for hinged deflector extensions is 300mm, though compact 215mm options are widely available for tighter spaces.
  • Inline Extension Widths: Narrow inline profiles typically add modest adjustments—such as standard 150mm or 215mm inline panels—providing 15mm to 25mm of built-in fine-tuning to overcome tight alcove constraints.
  • Vertical Heights: Standard panel heights range from 1400mm to 1500mm for traditional bath-top screens, stretching up to 1850mm, 1900mm, or 1950mm for floor-to-ceiling or full-height walk-in configurations (such as 1850mm extension pieces designed for taller enclosures).

While glass panel extensions handle above-bath splash control, don’t overlook below-tub cladding; flexible bath panel extension packs help complete the exterior lower tub surround when custom dimensions are required.

Materials, Hardware, and Key Features to Consider

A bath shower screen extension panel must withstand constant exposure to water, soap scum, and mechanical movement. Choosing high-grade materials ensures both long-term safety and effortless daily operation.

The core structure relies on toughened safety glass, also known as tempered glass, paired with corrosion-resistant metallic hardware like anodized aluminium or marine-grade stainless steel.

Choosing the Right Glass Thickness and Frame Finish

Glass thickness impacts structural rigidity, weight, and visual appearance. Most extension panels utilize either 6mm or 8mm toughened glass, though 4mm and 5mm options exist in budget-focused framed ranges.

Feature / Specification 6mm Toughened Glass 8mm Toughened Glass
Structural Feel Lightweight, ideal for smooth hinge movement Substantial, premium feel with minimal flex
Weight Moderate; easier on wall anchors Heavy; requires sturdy framing and support bars
Best Application Swivel flipper screens and folding bath screens Large fixed return panels and frameless walk-in setups
Standard Heights 1400mm to 1900mm 1850mm to 1950mm
Ease of DIY Assembly Straightforward handling Requires extra support during fitting

Hardware finishes allow you to tie your extension seamlessly into existing fixture themes. Matching matte black profiles, polished chrome, brushed nickel, or warm brushed brass creates a unified style. Look for 180-degree heavy-duty swivel hinges fitted with internal rise-and-fall mechanisms; these slightly elevate the panel when turned, preventing bottom rubber seals from dragging harshly across the bathtub rim.

To keep hardware running smoothly over time, matching high-quality fittings with specialized shower glass accessories helps preserve smooth pivot motions and leak-tight seals.

Retrofitting an Extension Panel to Existing Shower Enclosures

Can you retroactively add an extension panel to a screen installed years ago? In most cases, yes! Retrofitting depends heavily on matching glass thickness and wall profile geometry.

When retrofitting an extension:

  1. Check Glass Alignment: Ensure your existing main panel and the new extension share the exact same glass thickness (e.g., matching 6mm glass to 6mm glass). Mismatched glass thicknesses prevent hinges and horizontal bottom seals from seating flat.
  2. Evaluate Wall Adjustment Ranges: Built-in channel profiles typically offer 15mm to 25mm of adjustment to compensate for out-of-plumb walls.
  3. Inspect Hinge Compatibility: Verify whether your main glass edge is pre-drilled or configured for clip-on frameless hinges.

If your older bath enclosure suffers from worn-out tracking, hardware corrosion, or damaged main glass, it may be wiser to replace glass shower door hardware entirely to ensure structural safety.

How to Install a Bath Shower Screen Extension Panel Step-by-Step

Measuring and installing a bath shower screen extension panel

Installing a bath shower screen extension is a manageable DIY job for confident homeowners, though working with tempered glass demands care. Glass cannot be trimmed, drilled, or recut once tempered, so double-checking measurements before mounting is essential.

Preparing Your Bathroom Wall and Glass Enclosure

Before opening hardware packs, prepare your installation workspace:

  • Gather Required Tools: Spirit level, tape measure, masking tape, high-grade masonry drill bits, wall plugs, cordless drill, clear sanitary silicone sealant, and glass-safe suction cups.
  • Inspect Wall & Rim Surfaces: Clear away residual silicone, soap film, or limescale from the bathtub ledge and wall profile using isopropyl alcohol.
  • Measure Plumb: Use your spirit level to check vertical wall straightness. If the wall leans out by more than 10mm, ensure your chosen inline wall profile features enough built-in lateral adjustment.

Mounting and Waterproofing Your Bath Shower Screen Extension Panel

Follow this step-by-step sequence to mount and seal your extension panel cleanly:

  1. Position the Wall Profile or Hinge Channel: Place the vertical mounting channel against the tile wall or primary glass edge. Mark fixing holes through the profile using a pencil.
  2. Drill and Plug Tile Work: Apply masking tape over pencil marks to prevent drill bits from skating across ceramic or porcelain tiles. Drill slowly using a diamond-tipped or masonry bit, then insert high-grip wall plugs flush with the tile face.
  3. Secure the Hardware Profile: Run a thin bead of silicone along the back of the wall profile, line up the screw holes, and fasten it securely to the wall.
  4. Slot and Adjust the Glass Panel: Lift the glass extension panel carefully into the channel profile or clamp it into the 180-degree swivel hinges. Adjust the glass until plumb, ensuring equal clearance along the tub rim.
  5. Attach Rubber Bottom Wipe Seals: Press a clear vinyl wipe seal onto the bottom edge of the glass. The flexible fins should lightly brush against the top edge of the bathtub without binding when rotated.
  6. Apply Sanitary Silicone: Apply a neat, continuous bead of mould-resistant silicone sealant along the outer side of the vertical wall channel and bath joint.

Pro Tip: Never seal the inside vertical join of a shower profile. Sealing the interior traps water within the frame, forcing trapped moisture into wall fixings rather than draining harmlessly back into the tub!

Allow silicone to cure completely for 24 hours before turning on the shower.

Maintenance, Care, and Cost Determinants

Cleaning a clear glass shower screen extension panel

A high-performing bath shower screen extension panel requires routine care to remain crystal clear and leak-free.

Modern glass extensions frequently feature factory-applied nano-coatings (often referred to as easy-clean or anti-limescale treatments). This invisible protective layer repels water droplets, preventing mineral deposits, soap scum, and hard water stains from bonding directly to the silica surface.

How to Clean and Protect Your Glass Extension Panel

Maintaining clear toughened glass requires minimal effort when using correct habits:

  • Daily Squeegee Routine: After every shower, wipe down the interior glass surface using a soft rubber squeegee. Removing water droplets before they dry stops limescale spots before they begin.
  • Use Non-Abrasive Cleaners: Avoid harsh scouring pads, bleach, or ammonia-based sprays that can erode protective nano-coatings or etch aluminium finishes. Clean glass using warm water mixed with mild dish soap or a diluted white vinegar solution.
  • Inspect Bottom Seals: Clear vinyl bottom seals naturally degrade over time due to soap buildup and friction. Pull off bottom seals every few months, clean them in warm soapy water, and replace them every 12 to 18 months to maintain a tight water seal.
  • Tighten Swivel Hinge Screws: Periodically check hinge clamp screws to ensure smooth, sag-free rotation.

Frequently Asked Questions About Shower Screen Extensions

Can a shower screen extension panel be fitted to any existing bath screen?

Not automatically. An extension panel must match your existing setup’s mechanical design. Fixed return panels require a steady support bar anchor, while clip-on flipper extensions require your primary glass panel edge to feature compatible hinge profiles or straight frameless glass edges of identical thickness (e.g., matching 6mm to 6mm or 8mm to 8mm). Always check hinge clamping tolerances prior to purchasing.

Do I need a plumber or professional installer to fit a shower glass extension?

Installing a standard extension panel rarely requires a plumber because no pipework alterations are involved. DIYers comfortable using drills, spirit levels, and silicone applicators can complete straightforward installations. However, if your bathroom wall requires structural reinforcement, features fragile glass tiles, or involves heavy custom architectural glass, hiring a specialist installer ensures a safe, watertight fit.

For complex architectural glass challenges, partnering with regional specialists like those offering custom shower door chicago solutions guarantees exact fitment for out-of-plumb walls.

What factors influence the cost of a shower screen extension panel?

Several structural and manufacturing variables affect the overall value of an extension panel:

  • Glass Thickness & Grade: Thick 8mm architectural glass requires heavier structural tempering and precision edge-polishing compared to basic 4mm or 6mm variants.
  • Factory Surface Coatings: Pre-treated easy-clean nano-coated glass retains value long-term by reducing cleaning effort.
  • Hardware Finish & Engineering: Precision-engineered brass or stainless steel hinges with smooth 180-degree rise-and-fall rotation cost more to produce than basic fixed aluminium clips.
  • Custom Sizing vs. Off-the-Shelf: Standard 300mm stock panels are economical, while custom-cut glass tailored to irregular ceilings or complex cutouts requires specialized fabrication.

Conclusion

A bath shower screen extension panel offers a clever, space-efficient solution to common splash problems in modern bathrooms. By extending your screen’s reach with a flexible flipper, fixed return, or inline profile, you protect your floors, enhance shower comfort, and preserve an open, airy bathroom layout.

Whether retrofitting an existing screen or creating a new over-bath design, selecting the right glass thickness, hardware finishes, and sealing methods ensures long-lasting performance.

At JP Precision Glass, we specialize in precision, made-to-size custom glass solutions tailored to your unique bathroom layout. If you’re ready to upgrade your bathroom with leak-free performance and elegant glass design, explore our wide range of custom glass shower panels today to discover the ideal fit for your home.

glass shower doors replacement

Glass Shower Doors Replacement Made Easy

Complete Guide to Glass Shower Doors Replacement

When standard bathroom cleaning no longer restores your enclosure, or when doors stick, drag, and leak onto your bath mats, a glass shower doors replacement is usually the most efficient remedy. Over years of daily use, hardware wears down, metal tracks trap moisture, and glass surfaces can develop etched mineral deposits that plain vinegar or soap cannot remove.

Understanding when to repair hardware versus replacing the full glass assembly helps you avoid repeat service issues and unnecessary disruption. Whether you live in a historic home with settled walls or a modern condo, taking time to learn about modern glass shower doors, seal degradation, and frame corrosion will prepare you for a smooth bathroom upgrade. If you are experiencing minor operational issues, you might first evaluate whether Shower Door Repair Chicago is an option or if a total Replace Glass Shower Door service is necessary to restore your bathroom’s safety and appearance.

Signs You Need a Glass Shower Doors Replacement vs. Repair

Deciding whether to repair minor hardware components or arrange a complete glass shower door replacement comes down to structural integrity, safety, and functionality. Here are the primary indicators that it is time to replace your unit:

  • Chipped or Cracked Tempered Glass: Tempered glass is safety glass designed under controlled internal tension. Any visible chip along the edge or stress crack across the face compromises the safety of the entire panel. Under temperature fluctuations or structural strain, cracked glass can break unexpectedly into small granules, creating an immediate safety risk that requires prompt replacement.
  • Corroded Metal Frames: Older framed enclosures often feature aluminum or brass frames that corrode after years of moisture exposure. When rust and oxidation eat through metal channels, hardware loosens and mold accumulates beneath the tracks where normal cleaning tools cannot reach.
  • Persistent Water Leakage: If water regularly escapes onto your bathroom floor despite replacing sweep seals or applying fresh silicone caulking, your opening may have shifted or the door assembly may be severely misaligned. Chronic water pooling damages subflooring and accelerates wood rot.
  • Track Jumping and Hardware Failure: Shower doors that jump off rollers, bind along bottom tracks, or drag against the shower curb indicate worn internal mechanisms or bent metal tracks.
  • Unhygienic Mold and Hard Water Etching: Over time, hard water minerals leach into microscopic pores in unprotected glass, causing permanent cloudiness or “etching.” When coupled with recurring black mold trapped deep inside rubber gaskets and metal tracks, replacement is often the only way to achieve a truly clean environment.

Glass-Only Replacement vs. Full Enclosure Swaps

Homeowners often ask whether they can replace only the glass sheets while leaving the existing aluminum frame untouched. A glass-only replacement is entirely feasible under specific conditions: the existing frame must be straight, structurally sound, free of heavy corrosion, and equipped with intact perimeter seals. In such cases, replacing broken or dated pattern glass while keeping the frame saves time and materials. This targeted panel replacement works well in retrofitting mid-century homes or standard tub configurations.

However, if your metal tracks are pitted, bent, or filled with stubborn grime, a full enclosure replacement is the superior choice. Swapping both frame and glass allows you to install modern, heavy-tempered panels with updated moisture barriers. If you are looking at broad geographical options or regional installation standards, local glass installation services across different regions showcase how full structural swaps elevate functionality across different structural styles.

Key Factors Affecting Replacement Scope

While individual project requirements vary based on design choices, several key technical factors influence the specifications for your new glass shower door:

  1. Glass Thickness: Thicker glass panels, such as 3/8-inch or 1/2-inch heavy tempered glass, require heavier structural support, specialized fabrication, and robust mounting hardware compared to basic 1/4-inch framed glass.
  2. Custom Fabrication: Standard stock sizes from retail stores are rigid. Custom-cut glass tailored to precise wall angles, bench cutouts, or out-of-square openings requires specialized shop fabrication.
  3. Hardware Finishes and Engineering: High-durability coatings like matte black, oil-rubbed bronze, or brushed brass require multi-stage plating processes to resist corrosion in high-humidity environments.
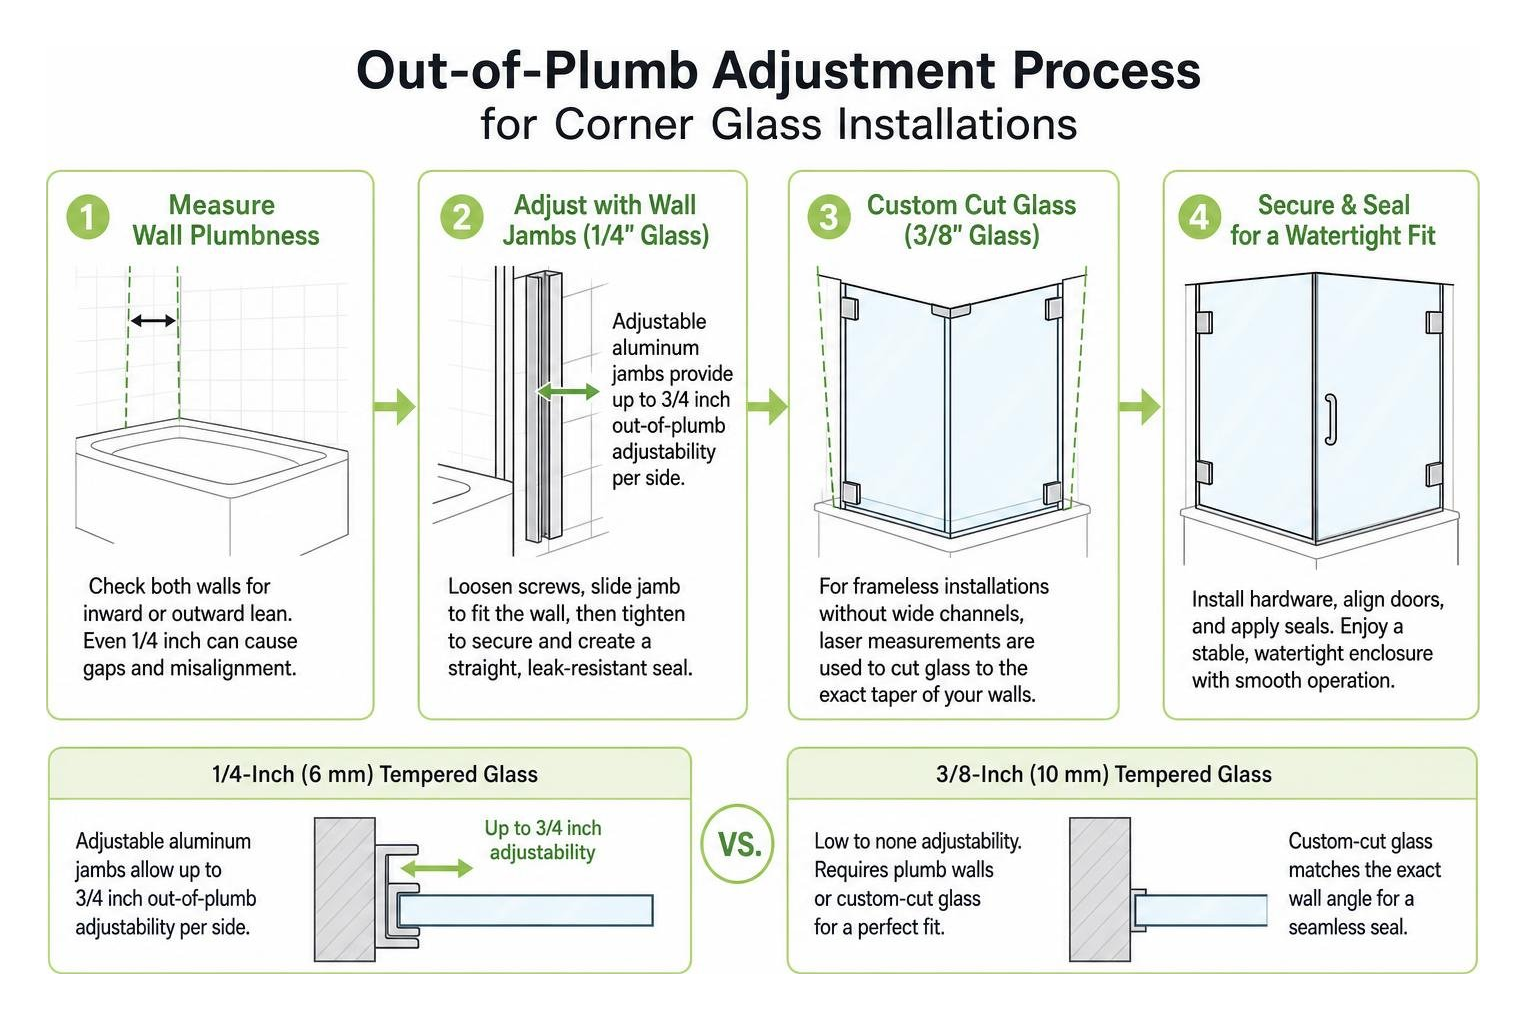
  4. Out-of-Plumb Adjustments: Bathrooms in older properties frequently feature walls that tilt outward or inward. Glass panels must be custom-beveled or supported by adjustable wall jambs to compensate for uneven surfaces without leaking.
  5. Installation Complexity: Heavy frameless glass panels require precise anchor points anchored directly into wall studs, while simple bypass sliding doors feature lightweight hardware that takes less time to align.

Shower Door Types, Glass Styles, and Hardware Options

frameless vs framed shower door types

Choosing the right door configuration, glass texture, and hardware design transforms your bathroom’s look while tailoring the unit to your daily routine. For a deeper breakdown of styles, check out our guide on Glass Shower Doors: A Comprehensive Guide to Types Comparison.

Door Type Frame Configuration Typical Glass Thickness Best Used For Cleaning Effort
Framed Full metal boundary around all glass edges 1/8″ to 1/4″ Standard tub openings and classic framed projects Moderate (tracks require detailed cleaning)
Semi-Framed Metal perimeter around opening; door panel edges frameless 3/16″ to 1/4″ Balancing a lighter frame with a modern look Low to Moderate
Frameless Minimal hardware (hinges, clamps, brackets) with no perimeter metal 3/8″ to 1/2″ Modern upgrades, maximum visual space Very Low (no channels to trap grime)

Main Types of Shower Doors

Understanding how different doors operate helps you select a style that accommodates your bathroom floor plan:

  • Framed Shower Doors: These feature aluminum or metal framing around each individual panel. They provide strong structural support for thinner glass options and use full-length magnetic seals to prevent splashing.
  • Semi-Frameless Enclosures: A top header track and side wall jambs hold the structure secure, but the swinging or sliding door glass itself lacks an outer metal border. This offers a sleeker appearance than full framing.
  • Frameless Glass Enclosures: Utilizing heavy tempered glass secured by discrete wall brackets and heavy-duty hinges, frameless doors eliminate bulky aluminum outlines altogether.
  • Hinged and Pivot Doors: Hinged doors mount directly to wall studs or fixed glass panels, swinging outward into the bathroom. Pivot doors feature top-and-bottom pin hinges that allow the door to rotate open smoothly.
  • Sliding and Bypass Doors: Perfect for tight spaces where a swinging door would strike a vanity or toilet, Sliding Shower Doors roll along an overhead rail. Modern roller designs feature smooth ball bearings and exposed wheel aesthetics.

Upgrading to Frameless Glass Shower Doors Replacement

Transitioning from an old, yellowed framed shower door to a custom frameless enclosure is often considered the single most effective aesthetic upgrade for a residential bathroom. By removing opaque metal frames, light flows freely across the room, making small bathrooms feel twice as large.

The primary structural benefit lies in the heavy safety glass. Because frameless enclosures lack external metal reinforcement, they utilize thick 3/8-inch or 1/2-inch glass panels that provide exceptional rigidity and weight. Beyond visual appeal, homeowners enjoy significant hygiene benefits. Without bottom metal tracks to collect stagnant water, soap scum, and mold, cleaning involves a simple wipe-down with a squeegee after showering. Explore more about these advantages in our detailed guide on the Benefits of Frameless Glass Shower Doors.

Shower door replacement installation step sequence

Glass Thickness and Pattern Options

Selecting the right glass involves balancing privacy, structural stability, and clarity:

  • Clear Glass: The standard choice for modern open-concept bathrooms, high-clarity clear glass showcases decorative tile work and accent lighting.
  • Frosted and Satin Etched Glass: Chemically treated glass provides full opacity for added privacy while allowing natural sunlight to filter into the enclosure.
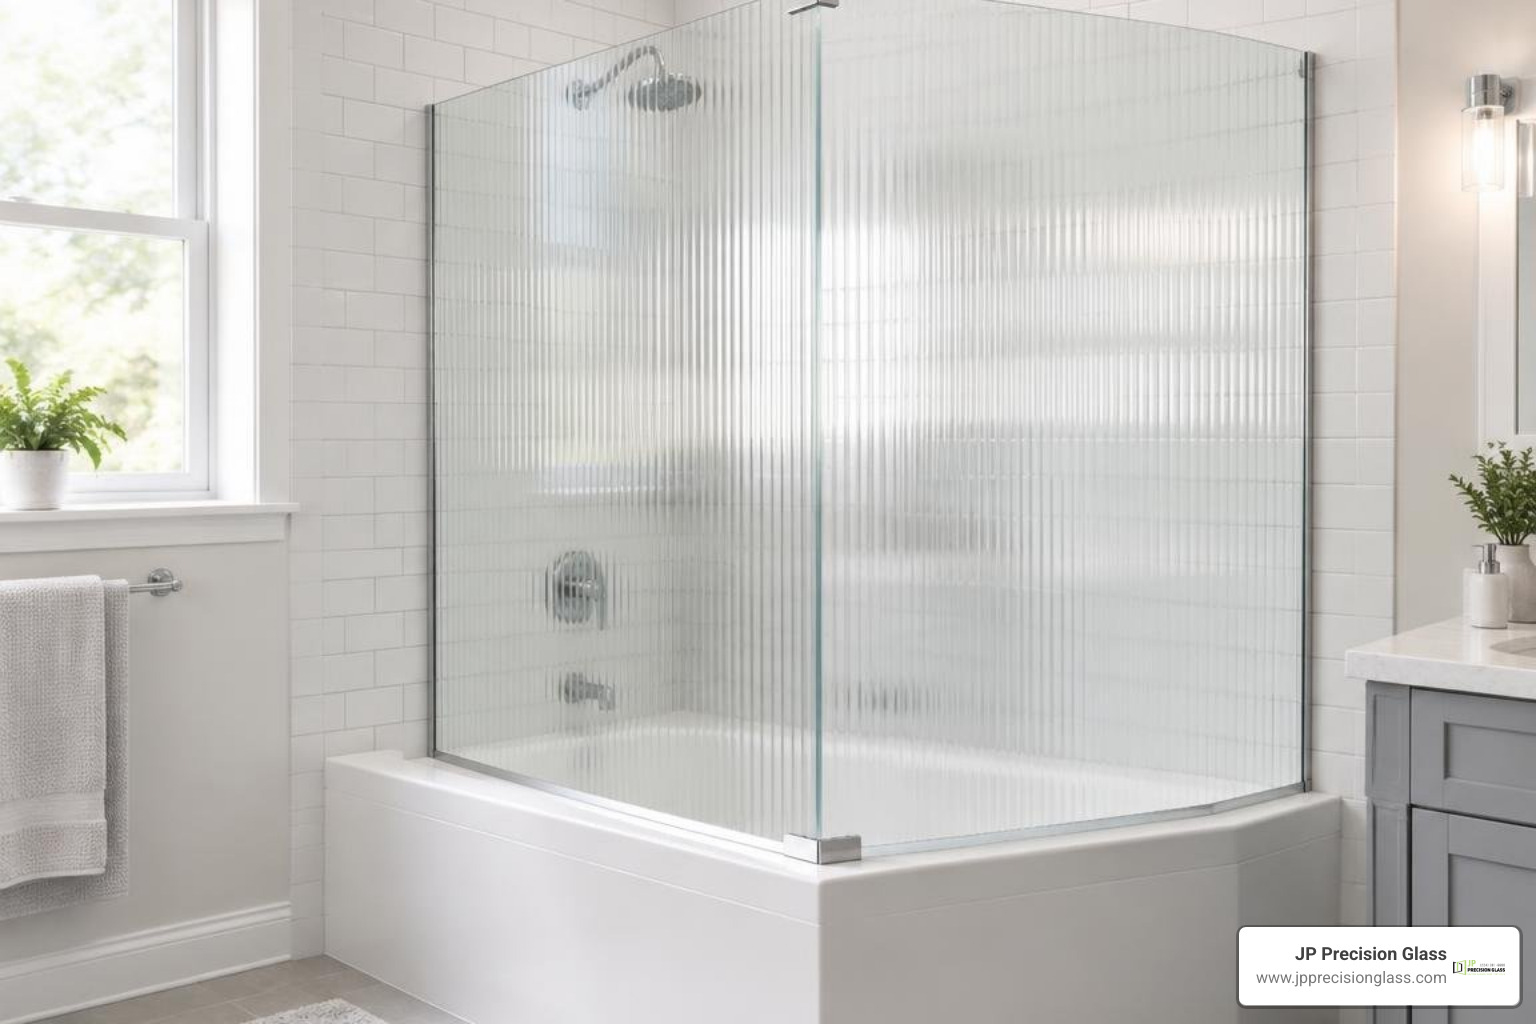
  • Patterned and Textured Glass: Styles such as Rain, Fluted, or Obscured glass obscure water spots while adding subtle architectural detail.
  • Protective Hydrophobic Coatings: Premium glass panels treated with clear protective coatings (such as factory-applied water-repellent seals) resist mineral staining, hard water etch marks, and soap scum buildup.
  • Heavy Glass Customization: Selecting thick Glass Shower Panels provides structural strength and sound absorption, creating a solid feel with every door operation.

Selecting Hardware Finishes

To create a cohesive interior design, hardware finishes should complement your bath fixtures, cabinet handles, and lighting. Popular durable choices include:

  • Polished Chrome: Reflective, durable, and easy to clean; ideal for traditional or modern classic bathrooms.
  • Brushed Nickel: Features warm undertones that resist fingerprint smudges and water spots, making it a low-maintenance option for family bathrooms.
  • Matte Black: Provides bold contrast against white subway tile or light marble surfaces, anchoring industrial and contemporary designs.
  • Oil-Rubbed Bronze & Warm Brass: Delivers old-world charm, rustic warmth, or high-end luxury, matching modern brushed brass plumbing fixtures.

Step-by-Step Replacement Process and Timeline

technician measuring shower opening

Replacing a glass shower door requires careful preparation, custom measurement, precise fabrication, and skilled installation. Mistakes in measurement can lead to binding doors or leaks. Before ordering materials, review these essential steps in 3 Things To Do Before Buying A Glass Shower Door.

How to Accurately Measure Your Shower Opening

Taking preliminary measurements helps you determine what layout works best for your space. However, final custom glass orders should always rely on completed, fully tiled field conditions.

  1. Verify Finished Wall Conditions: Never measure off rough studs or cement backing boards. Final measurements must be taken against fully installed tile, stone, or acrylic surrounds.
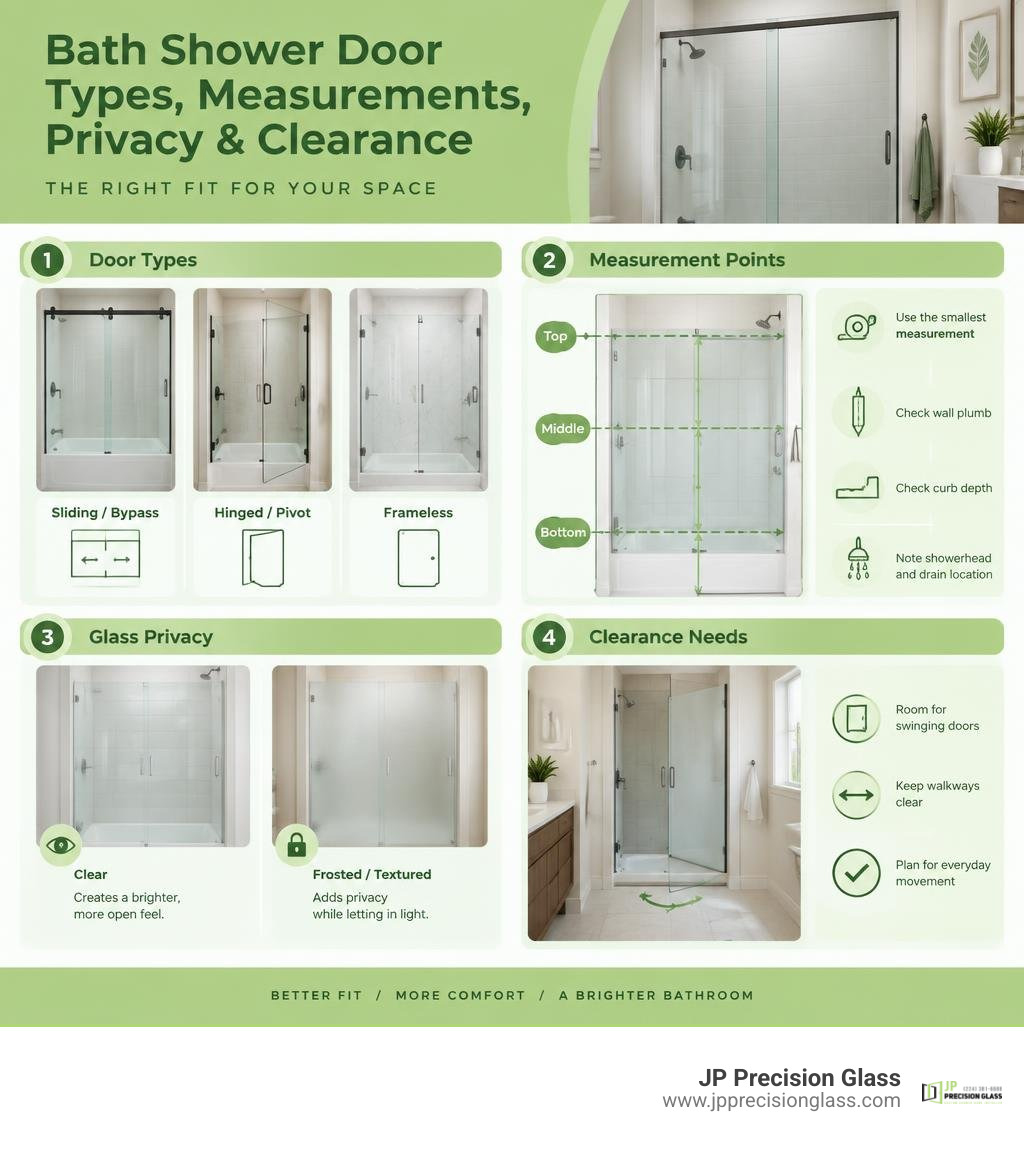
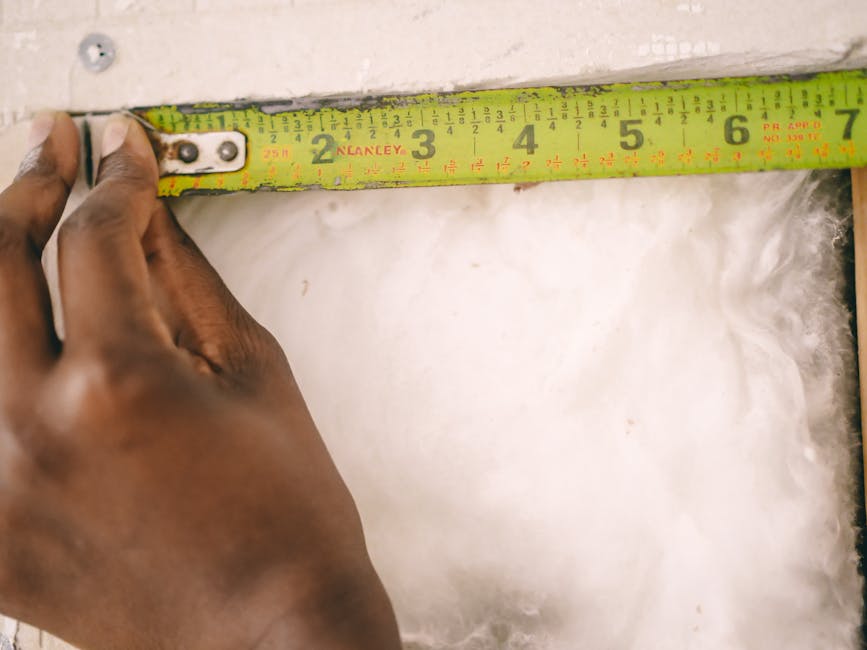
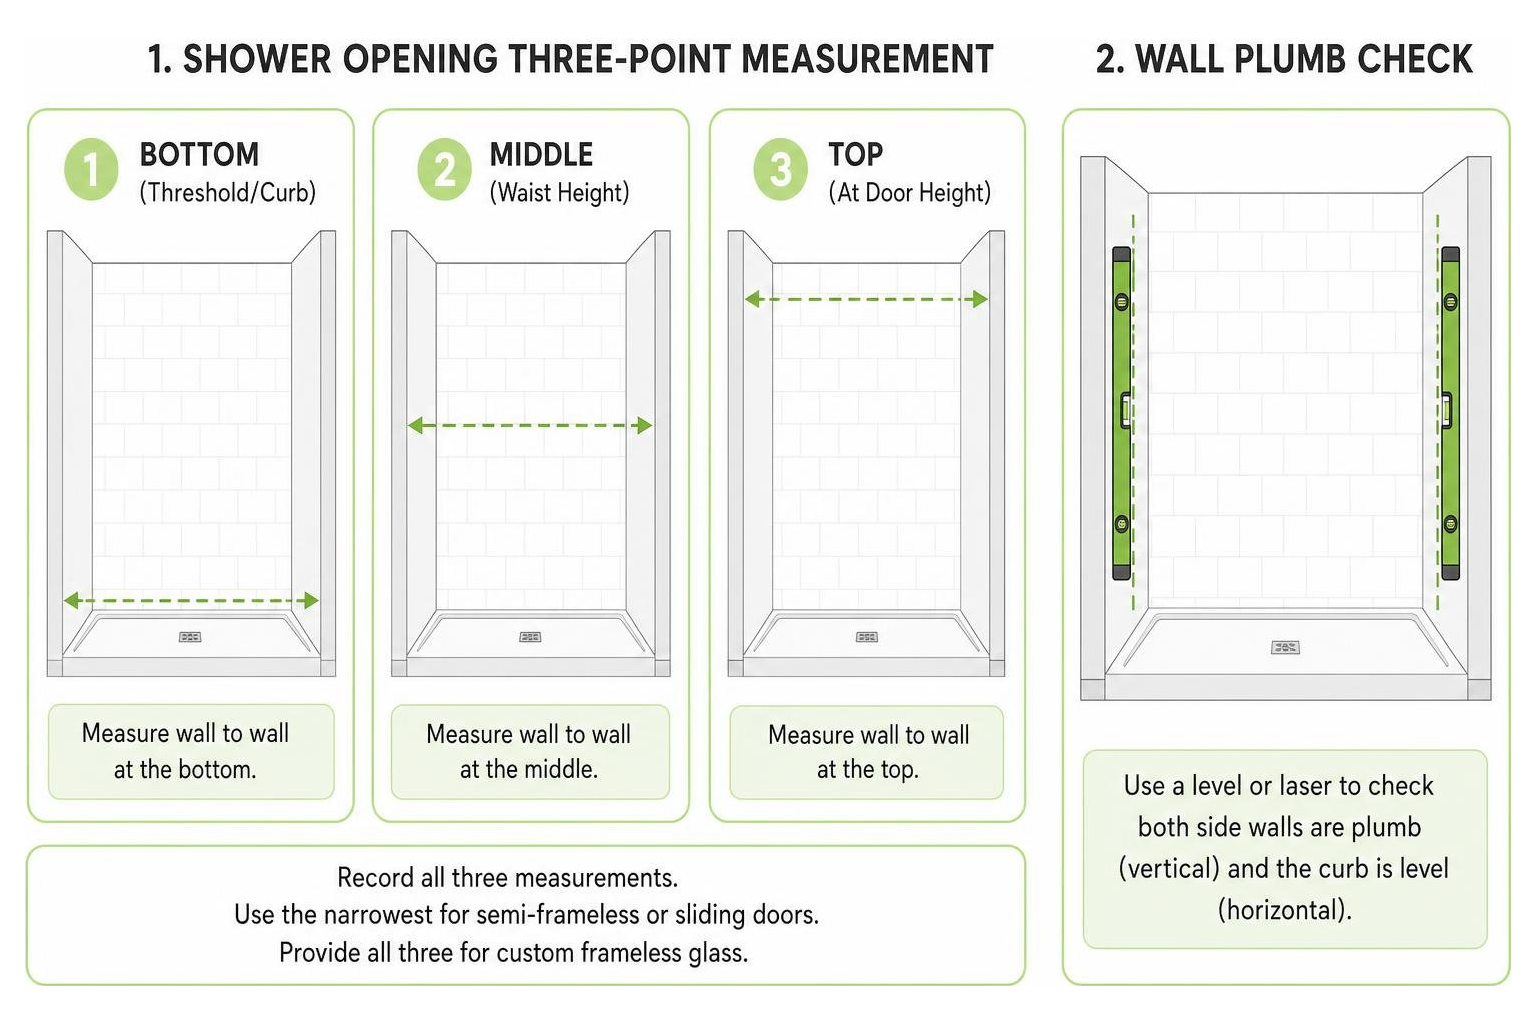
  2. Measure Opening Width: Using a quality tape measure, record the horizontal distance from wall to wall across the top, middle, and curb of the opening. Note the widest and narrowest dimensions.
  3. Measure Opening Height: Measure vertically from the top of the threshold or shower curb up to the top edge of your desired glass height or ceiling line.
  4. Check for Out-of-Plumb Walls: Place a long spirit level vertically against both side walls. If the bubble strays from center, your walls tilt inward or outward. Glass must be custom-cut with taper angles to match out-of-plumb walls seamlessly.
  5. Inspect Threshold Leveling: Ensure the curb or tub ledge is completely level from front to back. A sloping curb requires bottom glass notch cuts or custom seal sweeps to keep water inside.

Custom Fabrication and Timeline Expectations

Unlike off-the-shelf retail products, high-quality tempered glass cannot be cut, drilled, or trimmed once it leaves the tempering furnace. Every hinge hole, handle cutout, and bevel cut must be completed before the glass undergoes high-heat tempering.

From initial measure-up to final hardware polishing, the entire replacement timeline typically spans 7 to 10 business days (or roughly 1.5 to 2 weeks). Physical removal of the old assembly and mounting of the new door occurs in a single visit lasting only 2 to 4 hours. If you are comparing installation logistics in other metropolitan markets, regional custom glass services follow similar shop fabrication schedules.

Protecting Existing Tile and Shower Pans

A major concern among homeowners is whether removing an old metal frame will ruin decorative tile or scratch acrylic tub bases. When executed by experienced technicians, replacement is clean and non-destructive:

  • Surface Protection: Floor mats and protective blankets cover the shower basin, vanity tops, and surrounding floor tile to prevent accidental scuffs or dropping impact.
  • Careful Track Removal: Technicians carefully slice old silicone beads using specialized razor knives, detaching metal wall channels without chipping glaze or stone finishes.
  • Screw Hole Patching: Old mounting holes drilled into tile grout lines are cleaned and filled with color-matched waterproof caulking or grout repair compounds to seal the surface.
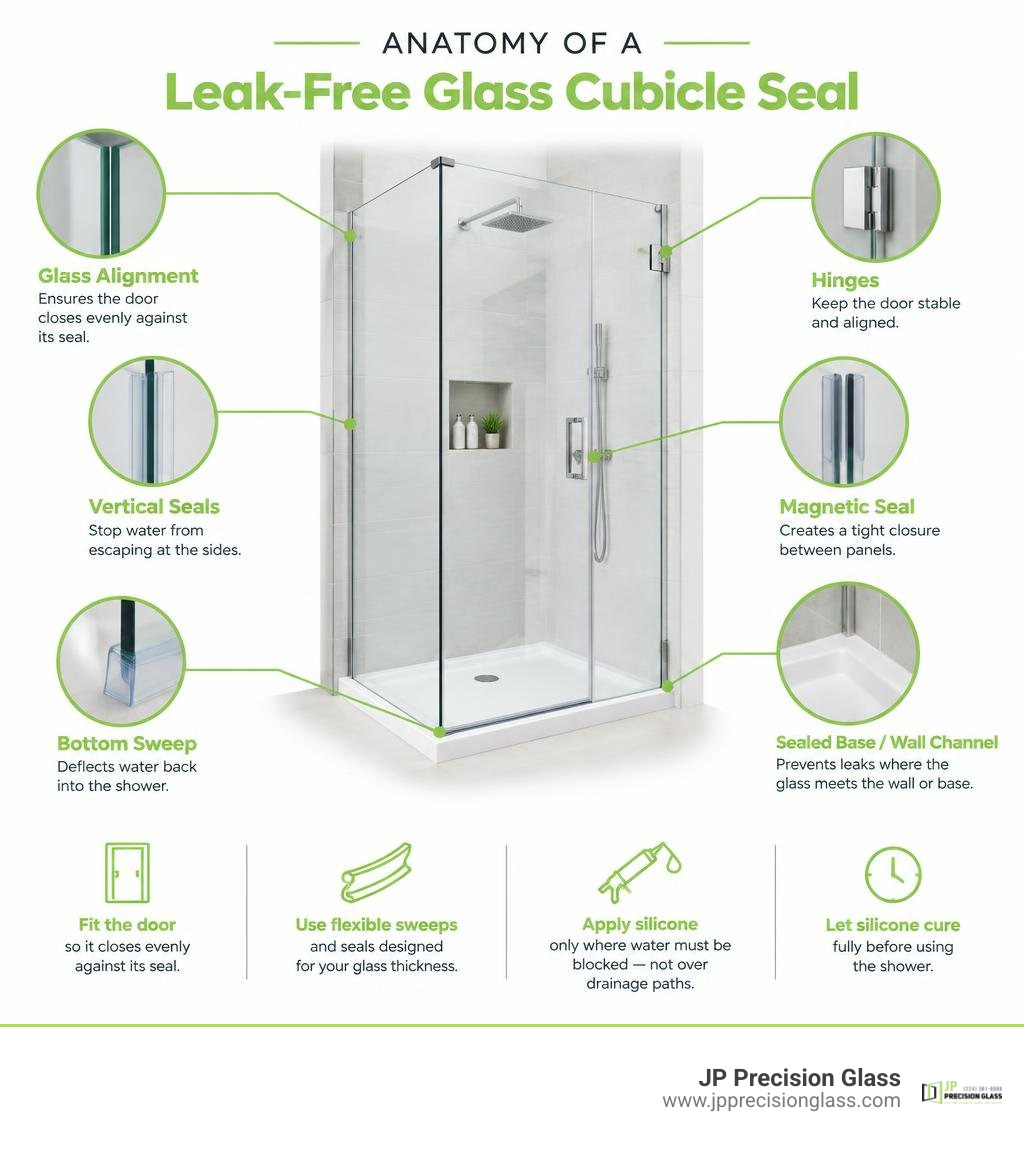
  • 100% Silicone Caulking: High-grade mildew-resistant clear silicone caulking is applied along all wall jambs and bottom curb joints to guarantee a watertight seal that holds for years.

Maintenance, Buyer Appeal, and DIY vs. Professional Installation

clean tempered glass shower enclosure

Investing in high-grade glass shower doors enhances daily convenience, supports long-term bathroom performance, and upgrades the look of your home. However, ensuring long-term satisfaction depends on choosing proper installation methods and maintaining protective coatings.

DIY vs. Professional Installation

While retail hardware stores sell prefabricated shower door kits, attempting a self-installation carries significant risks:

  • Weight and Structural Handling: Heavy frameless tempered glass panels are heavy and delicate before installation. Impacting a glass corner against hard tile can cause the panel to shatter instantly.
  • Wall Anchoring Requirements: Heavy swinging doors require structural blocking or heavy-duty anchors behind tile walls. Incorrect anchoring can cause hinges to sag over time, binding the door.
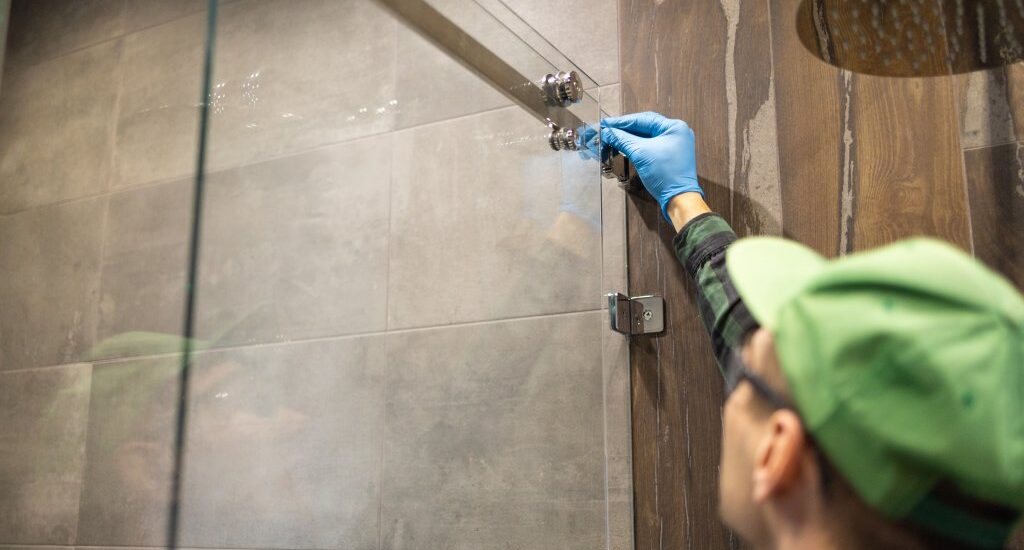
  • Precision Alignment: Professional installers utilize specialized shims, levels, and suction tools to dial in door gaps down to fractions of an inch, ensuring magnetic seals align perfectly.
  • Warranty Security: Professional glass installers offer workmanship warranties that cover seal leaks and hardware defects, giving you long-term peace of mind.

Buyer Appeal of New Glass Enclosures

Updating a bathroom enclosure can make a strong impression on prospective buyers. A modern glass shower door signals that the bathroom has been maintained, refreshed, and designed with long-term usability in mind.

Prospective buyers often view clear glass enclosures as evidence of a well-cared-for home. Replacing heavy, opaque curtains or rusted frames opens up visual sightlines, making compact bathrooms appear brighter, larger, and cleaner – a key selling point in competitive housing markets.

Cleaning and Long-Term Glass Maintenance

To keep your replacement glass sparkling and free of mineral buildup, follow these simple cleaning strategies:

  1. Daily Squeegee Routine: Keep a small rubber squeegee inside the shower. Taking 30 seconds to wipe down water droplets after every shower eliminates 90% of potential hard water spots.
  2. Vinegar and Baking Soda Cleaning Solution: To dissolve light water spots without harsh chemicals, mix equal parts white vinegar and warm water in a spray bottle. For stubborn spots, create a soft paste using baking soda and vinegar, apply gently with a soft microfiber cloth, let sit for 5 minutes, rinse, and dry.
  3. Avoid Abrasive Cleaners: Never use steel wool, scouring pads, or harsh bleach chemicals on coated shower glass or metal finishes, as these can scratch protective coatings and strip hardware finishes.
  4. Inspect Seals and Clear Tracks: Periodically check bottom vinyl sweeps and side magnetic gaskets for wear. Clean lower sliding tracks with a small brush to prevent soap residue from slowing roller motion.

Frequently Asked Questions

To clear up any lingering doubts about your project, explore these common questions alongside our helper guide, 6 Glass Shower Door Questions.

Can I replace just the glass panels of an old shower door without replacing the frame?

Yes, provided your existing aluminum frame is straight, plumb, free of heavy rust or pitting, and has sound perimeter seals. If the metal structure is in excellent condition, a glass technician can cut replacement safety glass panels to fit into the original tracks. However, if the frame is dated or corroded, installing a complete enclosure system is often the better long-term solution.

Will replacing my shower door damage existing tile or shower pan surfaces?

No. Skilled installers take precautions to protect tile glazes, stone surfaces, and shower curbs. Old silicone sealant is cleanly sliced away using non-marring tools, and existing screw mounting holes are patched with waterproof, mildew-resistant sealant or color-matched grout.

What are the signs of a poorly installed shower door?

Common indicators of improper installation include:

  • Water regularly pooling on the bathroom floor outside the door sweep.
  • A swinging door that drags against the curb or requires excessive force to latch shut.
  • Misaligned magnetic gaskets that leave uneven gaps along the closing edge.
  • Squeaking, popping, or binding sounds when operating sliding panels along overhead rails.

Conclusion

A successful glass shower doors replacement breathes new life into your entire bathroom, converting a dark, leak-prone shower into a bright, modern oasis. By choosing between framed, semi-frameless, or heavy frameless designs, picking complementary hardware finishes, and opting for custom-cut tempered glass, you ensure a safe and long-lasting fit tailored to your home’s unique layout.

Precise measurements, proper wall anchoring, and careful handling of heavy safety glass are essential for a leak-free outcome. At JP Precision Glass, our team handles every stage with expert craftsmanship—from initial laser measurement to final fit. Ready to elevate your home’s comfort and style? Contact us today to explore our complete range of custom shower door solutions!

bathtub shower sliding doors

Why 3 Panel Shower Doors for Bathtubs Are a Total Game Changer

The Smartest Upgrade You Can Make to Your Bathroom

Bathtub shower sliding doors are one of the most popular bathroom upgrades homeowners choose during a remodel — and for good reason.

Quick answer: What are bathtub shower sliding doors?

  • Sliding glass doors mounted on a track above your bathtub opening
  • Designed to replace a shower curtain or outdated framed door
  • Available in frameless, semi-frameless, and framed styles
  • Standard widths: 56–60 inches; standard heights: 58–62 inches
  • Common glass thicknesses: 1/4 in. (6mm), 5/16 in. (8mm), 3/8 in. (10mm)
  • Popular finishes: matte black, brushed nickel, chrome

If you’ve ever wrestled with a clingy shower curtain or lived with an old chrome-framed door that collects soap scum, you already know the problem. The bathroom feels smaller, harder to clean, and just dated.

Sliding tub doors fix all of that.

They open up the space visually, contain water better, and come in styles that can genuinely make a standard bathroom feel like a hotel suite. And unlike a full bathroom gut-renovation, swapping in a new sliding glass door is one of the more budget-friendly ways to get a dramatic result.

But choosing the right one isn’t as simple as picking a color. Width, glass thickness, frame style, finish, and installation method all matter — especially if your tub opening doesn’t match standard sizes, or your walls aren’t perfectly plumb (common in older Chicago homes).

This guide walks you through everything you need to know.

Key features and types of bathtub shower sliding doors compared in one visual overview infographic

Understanding Bathtub Shower Sliding Doors vs. Standard Shower Doors

When planning a bathroom remodel, it is easy to get “shower doors” and “bathtub doors” mixed up. While they operate using similar sliding mechanisms, they are built for entirely different structural setups.

The primary difference lies in the height of the opening and the surface upon which the door is installed. A standard sliding shower door is designed for walk-in shower pans or tiled floors. These doors are much taller, usually ranging from 70 to 80 inches in height, to allow adults to walk straight in without ducking.

Conversely, bathtub shower sliding doors are significantly shorter—typically between 58 and 62 inches tall. This is because they are designed to be mounted directly on top of a bathtub’s flat rim (known as the tub apron). Since the tub itself already stands about 14 to 20 inches off the floor, a shorter glass panel is required to keep the overall height proportional and safe.

Feature Sliding Tub Doors Sliding Shower Doors
Typical Height 58 to 62 inches 70 to 80 inches
Mounting Surface Bathtub apron / rim Flat shower pan or tiled floor
Access Style Step-over entry into tub Walk-in flat entry
Common Widths 56 to 60 inches 48 to 60 inches
Water Containment Bottom track sits on tub rim Bottom track sits on shower threshold

Water containment is another area where the two differ in practice. Because bathtubs are used for both soaking and showering, the sliding mechanics must be incredibly watertight. When we install sliding shower doors or tub doors, we pay close attention to the bypass panel positioning.

To prevent water from spraying through the small gap between the overlapping glass panels, the inside sliding glass panel must always be positioned closest to the showerhead faucet. This ensures that spraying water flows naturally across the inner glass face and back into the tub, rather than slipping through the middle seam.

Key Factors to Consider When Choosing a Sliding Door for Your Tub

Selecting the perfect sliding door for your tub requires balancing aesthetics, budget, and physical dimensions. The market is filled with retail options, but navigating them can be tricky.

Interestingly, if you browse online e-commerce platforms like Amazon, you might run into some amusing algorithmic quirks. For instance, the current #1 best-selling product listed under the “Bathtub Sliding Doors” category is actually an inflatable ice bath tub with a 5.0-star rating. While that is great for cold-plunge enthusiasts, it is not going to help you keep water inside your alcove bathtub!

When looking at actual glass doors, the price spectrum is wide. You can find highly affordable, mass-market options starting around $279.99, while premium, heavy-duty sliding enclosures can reach up to $1,259.99. Mid-range options from reputable brands generally hover between $400 and $600. For example, a standard frameless sliding door in nickel is priced around $542.00 at major home improvement retailers, whereas semi-frameless alternatives sit around $422.00.

Let’s break down the technical factors that will dictate which door is right for your home.

Standard Dimensions for Bathtub Shower Sliding Doors

Before you fall in love with a specific design, you must know your tub’s measurements. The vast majority of standard alcove bathtubs in the United States feature an opening width of 56 to 60 inches. In fact, market data shows that 18 out of the top 30 best-selling sliding tub doors fall within this adjustable 56-to-60-inch range.

Standard heights for these doors range from 58 to 62 inches. However, older homes or custom-built bathrooms frequently feature non-standard widths. If you have a smaller alcove, you might need a narrower setup, such as a Traditional 47-3/8 in. W x 70 in. H Semi-Frameless Sliding Shower Door in Nickel with 1/4 in. Tempered Rain Glass which accommodates narrower, taller spaces.

Another critical factor is “out-of-plumb” walls. In a perfect world, your bathroom walls would form a precise 90-degree angle with your bathtub. In reality, walls settle and shift. Many high-quality retail sliding doors are engineered to accommodate up to 3/8 of an inch of wall deviation, but anything beyond that will require custom glass cutting to prevent leaks and sticking tracks.

Glass Thickness and Safety Features for Bathtub Shower Sliding Doors

When it comes to glass, thicker generally means sturdier, heavier, and more premium. Sliding tub doors typically come in three tempered glass thicknesses:

  • 1/4-inch (6mm): Lightweight, budget-friendly, and easy to slide. Because the glass is thinner, these doors almost always require a frame or semi-frameless structure to keep them rigid.
  • 5/16-inch (8mm): The ideal middle ground. It offers a substantial, high-end feel without the extreme weight of thicker glass.
  • 3/8-inch (10mm): The premium standard. This thick, heavy-duty glass is used for luxury frameless installations. It feels incredibly solid and glides with a satisfying, heavy sweep.

Regardless of the thickness you choose, safety must be your top priority. You should always look for glass that features the SGCC (Safety Glazing Certification Council) certification. This certification ensures the glass is fully tempered safety glass, meaning that in the highly unlikely event of a break, it will crumble into small, harmless pebbles rather than shattering into dangerous shards.

To learn more about why thick, high-quality glass makes a difference, check out our guide on the benefits of frameless glass shower doors. For added peace of mind, many modern doors also feature an explosion-proof film applied directly to the glass, which holds the fragments together if a break ever occurs.

Frameless vs. Semi-Frameless vs. Framed Sliding Doors

The framing style you select will define the entire visual aesthetic of your bathroom:

  • Framed Doors: These feature metal framing around all four sides of each glass panel. While they are highly durable and excellent at containing water, the heavy metal borders can make a small bathroom feel closed off.
  • Semi-Frameless Doors: These offer a cleaner look by eliminating the metal frames around the individual glass panels, though they still rely on a top track, bottom track, and side jambs for structural support.
  • Frameless Doors: The ultimate modern aesthetic. Frameless doors use thick glass (typically 3/8-inch) and minimal hardware. Many modern frameless systems use a “barn-door” style with exposed rollers gliding along a heavy top bar.

If you are looking to replace glass shower door units or upgrade your old tub, opting for a frameless or semi-frameless look completely transforms the room. These styles allow you to showcase beautiful tile work through the clear glass shower panels.

For instance, a premium option like the Contemporary 58-1/2 in. W x 58-3/4 in. H Frameless Sliding Bathtub Door in Nickel with 1/4 in. Tempered Rain Glass blends modern barn-door styling with textured rain glass, giving you a beautiful balance of open design and privacy.

Hardware Finishes, Maintenance, and Advanced Features

The finish you choose for your rollers, tracks, and handles acts as the “jewelry” of your bathroom. Consumer purchasing trends show a massive shift in preferences:

  1. Matte Black: Currently the most popular choice, appearing on 10 out of the top 30 best-selling products. It offers a bold, modern, industrial contrast.
  2. Brushed Nickel: The runner-up (7 of the top 30 products), loved for its warm tones and remarkable ability to hide water spots and fingerprints.
  3. Chrome: The classic, highly reflective option (5 of the top 30 products) that works beautifully in traditional spaces.

To ensure your hardware stands up to the humid bathroom environment, look for components made from stainless steel or anodized aluminum, which provide superior corrosion resistance.

Keeping glass clean is another major consideration. Water spots, soap scum, and mold love to settle in tracks and on untreated glass. This is where modern shower glass innovations come to the rescue. Many premium doors feature factory-applied easy-clean coatings that repel water and oil, making maintenance as simple as a quick wipe down with a squeegee.

Additionally, high-end models offer soft-close mechanisms to prevent the doors from slamming, preserving both the glass and your peace of mind. You can also customize your setup with specialized shower glass accessories, such as integrated towel bars or sleek, oversized handles.

How to Measure and Install a Sliding Bathtub Door

A professional installer measuring the width of a bathtub opening with a tape measure

A beautiful glass door is only as good as its installation. If your measurements are off by even a fraction of an inch, your door may leak, squeak, or fail to slide smoothly.

While many retail kits are marketed as DIY-friendly, handling heavy glass panels and drilling into expensive tile can quickly become stressful. For a stress-free experience, professional and affordable shower door installation is often the safest route.

Step-by-Step Measurement Guide

If you are preparing to order a door, you must take precise measurements. Never assume your walls are perfectly straight! Follow this step-by-step sequence to get accurate numbers:

Diagram showing the three horizontal measurement points and vertical plumb check for a tub door

  1. Measure the Bottom Width: Place your tape measure directly on the top rim (apron) of the tub and measure from wall to wall.
  2. Measure the Middle Width: Measure horizontally from wall to wall at the midpoint of your opening (about 30 inches up from the tub rim).
  3. Measure the Top Width: Measure horizontally at your desired door height (usually 58 to 62 inches up).
  4. Measure the Height: Measure vertically from the tub rim to the top of your tile or surround on both the left and right sides.
  5. Check for Plumb: Place a level vertically against both walls. If the bubble is not centered, use a level and tape measure to determine how far “out of plumb” the walls are over the height of the door.

DIY Installation Challenges vs. Professional Expertise

Many homeowners attempt a DIY installation to save on labor costs, but they often run into several common roadblocks:

  • Handling Heavy Glass: A single 3/8-inch glass door panel can weigh upwards of 70 to 80 pounds. Maneuvering these slippery, heavy panels inside a cramped bathroom is a recipe for accidental drops.
  • Drilling Through Tile: To mount the top rail and side jambs, you must drill holes into your bathroom walls. Drilling through porcelain, glass, or natural stone tile requires specialized diamond-tipped drill bits and a very steady hand; one wrong move can crack an expensive tile.
  • Achieving Wathtight Seals: Applying silicone sealant correctly requires practice. Improperly sealed tracks are the primary cause of hidden water damage in bathroom floors and walls.
  • Perfect Alignment: Adjusting rollers so that the doors hang perfectly straight and slide without sticking requires patience and precision.

If you want to avoid these headaches, opting for a professional shower door replacement chicago service ensures that your custom glass is installed safely, sits perfectly level, and remains completely watertight for years to come.

Frequently Asked Questions About Sliding Tub Doors

What is the difference between a bypass door and a single sliding door?

A bypass door (also known as a double-sliding door) allows both glass panels to slide past one another. This means you can enter or exit the tub from either the left or the right side, and it makes cleaning the overlapping glass incredibly easy. A single sliding door features only one active sliding panel, while the other glass panel remains completely fixed and stationary.

How do you prevent water from leaking out of sliding tub doors?

Water containment relies on a combination of clever engineering and proper installation. Sliding doors use a metal bottom track to guide the panels and keep water inside the tub. Side jambs equipped with rubber bumpers prevent the doors from slamming and create a tight seal against the walls.

Additionally, the inner sliding panel must always be positioned on the side closest to the showerhead. This ensures that the water spraying from the faucet hits the inner panel and runs down into the tub rather than slipping through the gap between the two panels.

Can sliding bathtub doors be installed on out-of-plumb walls?

Yes, most standard sliding tub doors can accommodate up to 3/8 of an inch of wall deviation through adjustable rollers or wall jambs. However, if your walls are significantly out of alignment, a standard off-the-shelf door will not seal properly, leading to leaks. In these cases, you will need a custom-cut glass solution or professional shower door repair chicago to realign your tracking system.

Conclusion

Upgrading your bathroom with bathtub shower sliding doors is a fantastic way to elevate both the style and functionality of your space. By replacing a dingy, clingy shower curtain with sleek, modern glass, you instantly make your bathroom feel larger, brighter, and significantly more luxurious.

While standard retail kits work well for perfectly square, modern spaces, older homes and custom layouts often require a more precise touch. That is where we come in. At JP Precision Glass, we specialize in designing, customizing, and installing made-to-size glass doors that fit your unique bathroom perfectly. As Chicago’s leading glass shower door provider, we bring precision, high-quality materials, and unmatched craftsmanship to every single project.

Ready to transform your bathroom? Explore custom glass shower doors with us today, or get in touch to find the perfect shower doors chicago homeowners trust for durability and elegance!

bathtub glass half door modern bathroom

Splish Splash, No Bath: Pros and Cons of a Bathtub Glass Half Door

Is a Bathtub Glass Half Door Right for Your Bathroom Remodel?

A bathtub glass half door is a single fixed or hinged glass panel that covers part of your tub or shower opening — not the entire width. It acts as a splash guard while keeping the space open and easy to access.

Quick answer: here’s what you need to know at a glance:

Question Short Answer
What is it? A partial glass panel covering 1/3 to 1/2 of the shower or tub opening
Main benefit Open, modern look with easier access than full enclosures
Main drawback Less water containment and reduced heat retention
Best for Seniors, minimalists, small bathrooms, modern remodels
Common sizes 24″×72″, 36″×72″, 48″×76″
Glass type 3/8″ to 1/2″ tempered glass
Worth it? Yes — for many Chicago homeowners remodeling on a budget

Bathroom design in 2026 leans hard toward simplicity. Clean lines, open space, and less visual clutter are what buyers and homeowners want. A partial glass enclosure fits right into that trend — and it can work beautifully on an alcove bathtub or a walk-in shower.

But it’s not perfect for every situation. Water containment, privacy, and heat retention are real trade-offs you need to weigh before committing.

This guide breaks down the honest pros and cons so you can decide if a bathtub glass half door makes sense for your space and budget.

infographic showing half glass tub door layout, sizes, benefits, and limitations infographic

What is a Bathtub Glass Half Door and How Does It Work?

At its core, a bathtub glass half door (often called a partial glass shower screen or a splash guard) is a minimalist alternative to sliding glass doors or traditional shower curtains. Instead of sealing off the entire length of your tub from wall to wall, it covers only the portion of the tub closest to the showerhead.

This layout relies on a stationary design where a single fixed panel of glass is permanently anchored to the wall and the tub deck. Alternatively, some setups feature a hinged mechanism that allows the glass to swing inward or outward, making it easier to turn on the water valves before stepping in. By using sleek Glass Shower Panels, you eliminate the visual and physical weight of heavy metal frames and sliding tracks, opening up the entire visual plane of your bathroom.

While traditionally popularized in European hotels and compact flats, this style has taken off in American residential design. It offers a permanent, hygienic, and highly architectural solution for modern alcove bathtubs and walk-in wet rooms alike.

Defining the Half Glass vs. Full Glass Enclosure

The differences between a partial glass panel and a full glass enclosure come down to physical boundaries and spatial perception.

  • Physical and Visual Boundaries: A full glass door creates a completely sealed chamber. Steam, water, and air are locked inside. While a full frameless enclosure offers excellent water containment, it requires a complete set of tracks, headers, or heavy hinge systems. A half glass door, by contrast, removes the physical boundary on one side of the tub. It relies on open space, allowing the bathroom and the bathing area to merge into one continuous room.
  • Spatial Perception: In small bathrooms, a full enclosure—even one made of clear glass—can sometimes feel like a physical barrier because of the metal hardware required to support sliding or pivoting panels. A single, fixed half glass panel uses minimal hardware, making the bathroom feel twice as large by keeping sightlines completely uninterrupted.
  • Access and Usability: Full doors require sliding or swinging open a large barrier, which can feel restrictive. A half door offers barrier-free access, allowing you to simply walk or reach around the glass without moving a heavy door.

Mounting on a Tub Rim vs. Walk-In Shower Floor

While the design principles remain similar, the structural support and installation techniques differ significantly depending on whether you are mounting the panel on a bathtub rim or directly onto a walk-in shower floor.

  • Bathtub Rim Installation: When installing a bathtub glass half door, the bottom of the glass rests on the flat, horizontal ledge (the deck) of the tub. This requires a perfectly flat, wide tub rim—ideally at least 2 to 3 inches of flat surface—to ensure a stable seal. Because bathtubs are made of cast iron, acrylic, or steel, the fastening hardware must be carefully anchored to the surrounding wall studs while the bottom of the glass is sealed with high-grade silicone directly to the tub rim.
  • Walk-In Shower Floor Installation: For a walk-in shower, the glass panel mounts directly to the tile, stone, or acrylic shower pan. The primary difference here is the threshold and drainage alignment. Walk-in showers rely on a precise floor slope (usually a minimum of 1/4 inch per foot toward the drain) to ensure that water flowing toward the open half of the shower is pulled back down the drain rather than spilling onto the bathroom floor.

Pros and Cons of a Partial Tub Enclosure

modern frameless glass panel on an alcove tub

Before throwing out your old shower curtain, it is vital to weigh the aesthetic improvements against the daily practicalities of a partial glass setup. Understanding the Benefits of Frameless Glass Shower Doors can help put these pros and cons into context.

Key Benefits of Partial Glass Enclosures

  • Modern, High-End Aesthetic: There is no denying that a bathtub glass half door looks exceptionally sleek. It instantly elevates a standard alcove tub into a custom, spa-like feature.
  • Incredible Ease of Maintenance: Traditional sliding doors have bottom tracks that collect soap scum, hair, and hard water minerals. Shower curtains harbor mold and mildew. A fixed half glass panel has no tracks, no rollers, and no overlapping glass panes. It is incredibly fast and easy to clean.
  • Universal Design and Accessibility: Because there are no tracks to step over or heavy doors to slide, half glass panels align beautifully with aging-in-place and universal design principles. They make it much easier for parents to bathe young children or for individuals with limited mobility to access the tub controls.
  • Enhanced Natural Light: By eliminating dark curtains or frosted sliding panels, natural light from bathroom windows can flood the entire space, making the shower itself feel brighter and safer.

Limitations and Cons to Consider

  • Water Splashes and Overspray: This is the most common concern. Because the back half of the tub is completely open, water can splash out if the showerhead is pointed in the wrong direction or if you have high water pressure.
  • Drafty Showers and Heat Loss: A fully enclosed shower traps steam, creating a warm microclimate. With a half glass door, steam and warm air escape freely into the rest of the bathroom. If you live in a colder climate (like our chilly Chicago winters), your shower may feel noticeably draftier.
  • Reduced Privacy: Clear glass offers zero privacy. If you share a bathroom with family members who might need to use the space simultaneously, a completely clear partial panel might feel too exposed.
  • Bathroom Floor Protection: If your floor tiles are not properly sealed or if your bathroom lacks a floor drain, regular water escape from a partial door can eventually damage baseboards or subflooring if not wiped up promptly.

Materials, Glass Types, and Hardware Options

The durability, safety, and look of your partial door depend heavily on the materials you select. Because these panels do not have a full frame to support them, using premium glass and heavy-duty Shower Glass Accessories is non-negotiable.

Glass Styles: Clear, Frosted, and Textured

The type of glass you choose dictates both the visual impact and the privacy level of your bathroom.

  • Tempered Clear Glass: This is the gold standard for a modern, invisible look. It maximizes light transmission and makes the room feel as spacious as possible. To make clear glass practical, we highly recommend selecting glass pre-treated with a water-repellent coating like EnduroShield, which prevents hard water stains and soap scum from bonding to the surface.
  • Frosted Glass (Acid-Etched): If privacy is a concern, frosted glass is an excellent compromise. It diffuses light beautifully, hiding the interior of the shower while still allowing natural light to pass through. It is also excellent at hiding water spots.
  • Textured and Patterned Glass: Rain glass, ribbed glass, and fluted glass have surged in popularity in 2026. These textured styles add a rich, tactile design element to the bathroom, offering moderate privacy while creating beautiful light patterns across the room.

Regardless of style, always ensure your panel is constructed of tempered safety glass with a thickness of either 3/8 inch or 1/2 inch. Thinner retail glass (like 1/4 inch) will flex and vibrate when touched, which can feel cheap and unsafe.

Hardware Finishes and Attachment Methods

To secure a heavy sheet of tempered glass to your wall and tub rim, you must choose between two main structural attachment methods:

  1. U-Channels: A continuous metal channel that runs along the wall and the tub rim. It provides excellent structural support and can help mask slightly out-of-plumb walls, but it features a slightly more visible metal profile.
  2. Wall Clamps: Small, heavy-duty metal brackets that clamp the glass at specific points. This is the ultimate frameless look, showing off the clean, polished edges of the glass, but it requires perfectly plumb walls and precise professional installation.

For those looking for a premium retail option to install themselves, products like the 51 in. x 58 in. Frameless Glass Hinged Bathtub Door in Polished Brass demonstrate how high-quality hardware finishes can elevate a standard tub.

When choosing hardware, match your existing bathroom fixtures with these popular finishes:

  • Polished Brass: Warm, luxurious, and highly classical.
  • Matte Black: Bold, modern, and high-contrast.
  • Chrome / Polished Chrome: Highly reflective, clean, and timeless.
  • Brushed Nickel: Soft, muted, and excellent at hiding fingerprints.

Comparing Half Glass Doors to Other Styles

To understand if a partial door is truly the right fit, it helps to see how it stacks up directly against more traditional options like Sliding Shower Doors, pivot doors, and standard curtains.

Feature Half Glass Door (Fixed/Hinged) Sliding Shower Doors Pivot (Swing) Doors Traditional Curtains
Visual Openness Excellent (Minimal hardware) Moderate (Has metal tracks) Good (Requires swing clearance) Poor (Closes off the space)
Water Containment Moderate (Splashing possible) Excellent (Fully sealed) Excellent (Fully sealed) Good (If kept inside tub)
Cleaning Effort Very Low (No tracks/crevices) High (Tracks collect grime) Moderate (Hinges require wiping) High (Fabric molds easily)
Access Space Open (No physical door to slide) Restricted (Only opens 50%) Open (Requires floor space) Open (Pushed to the side)
Moving Parts None to One (Low wear) Many (Rollers, tracks, guides) Few (Wall hinges) None

Sliding and Pivot Doors vs. Fixed Panels

While sliding bypass systems and pivoting glass doors offer absolute water containment, they come with physical limitations. Sliding systems always restrict your entry space to exactly half of the tub width, and their metal tracks are notorious for trapping water, hair, and soap residue.

Pivot doors require a wide “swing zone” in the bathroom, meaning you cannot place a toilet, vanity, or towel bar directly next to the shower opening without risking a glass collision.

A fixed half glass panel eliminates all moving parts, tracks, and swing-space worries. It is a set-it-and-forget-it design that relies on physical layout rather than moving mechanical parts to keep your bathroom functional.

Cost and Value: Custom Fabrication vs. Standard Options

When shopping for a bathtub glass half door, you will find two paths: pre-fabricated retail kits or professional custom fabrication.

  • Pre-Fabricated Retail Kits: These are budget-friendly, off-the-shelf sizes designed to fit standard tub dimensions. While cost-effective, they assume your bathroom walls are perfectly plumb (90-degree angles) and your tub is completely level. In older homes, walls almost always bow or lean, which can leave ugly gaps between a pre-cut glass panel and your tile.
  • Custom Professional Fabrication: Working with a local specialist like us ensures that the glass is cut precisely to match the unique contours of your bathroom. We measure your walls using laser levels to account for any bowing, ensuring a flawless, airtight fit. While custom work carries a higher initial investment, it prevents leaks, eliminates ugly gaps, and adds genuine resale value to your home.

Sizing, Measuring, and Installation Guide

Getting the measurements right is the single most important step when planning a partial glass installation. A mistake of even 1/16 of an inch can result in water leaking onto your bathroom floor or a glass panel that simply won’t fit into place. If you are uncertain, seeking Affordable Shower Door Installation from professionals is always the safest bet.

diagram of step-by-step water containment and installation alignment

Standard Sizes for a Bathtub Glass Half Door

While custom sizing is always ideal, standard pre-fabricated sizes generally fall into three categories:

  • 24″ Width × 72″ Height: Best for highly compact bathrooms, tiny home layouts, or very short tubs where space is at an absolute premium.
  • 36″ Width × 72″ Height: The sweet spot for small to mid-sized standard alcove bathtubs. It covers enough of the tub to block direct spray from the showerhead while leaving plenty of room to step in and out.
  • 48″ Width × 76″ Height: Designed for spacious walk-in showers or large master bathroom wet rooms where deep water containment is desired.

To balance water containment and visual openness, the glass panel should cover at least one-third to one-half of your total shower opening width.

Step-by-Step Measuring and Leak Prevention

If you are preparing for an installation, keep these critical guidelines in mind to prevent future leaks:

  1. Check for Plumb and Level: Use a long level to check the vertical wall where the glass will mount, as well as the horizontal tub rim. If the wall is out-of-plumb by more than 1/4 inch, a standard retail kit will not seal properly, and you will need a custom-cut glass panel.
  2. Verify Floor and Tub Slope: Ensure your tub rim slopes slightly inward toward the tub drain. For walk-in showers, a floor slope of 1/4 inch per foot toward the drain is recommended to prevent water from pooling and running outward past the open side of the glass.
  3. Strategic Showerhead Placement: Position your showerhead so that it points directly down or toward the tiled back wall—never directly at the open gap of the half door.
  4. Use High-Grade Seals: Install a clear polycarbonate sweep or drip rail at the bottom edge of the glass where it meets the tub rim. Apply professional-grade, mold-resistant waterproof silicone along the outer edges of the wall and tub joints.
  5. Let it Cure: If you or a professional installer have recently completed a Shower Door Replacement Chicago, allow the silicone sealant to cure for a full 24 to 48 hours before running the water.

Who is the Ideal User for This Design?

A bathtub glass half door is a fantastic design choice, but it is tailored to specific lifestyles and layouts.

  • Seniors and those Aging-in-Place: Because it eliminates heavy sliding doors and tracks, a partial door offers barrier-free access. It makes stepping over a tub ledge safer and allows physical therapists or caregivers to assist without fighting a sliding glass panel.
  • Minimalists and Modern Design Lovers: If you love clean lines, hidden hardware, and open-concept living, this design is the ultimate expression of bathroom minimalism.
  • Small Apartment Dwellers: In compact bathrooms where a swinging door would hit the toilet or vanity, a fixed half glass panel provides a sleek, space-saving solution.
  • Luxury Hotels and Spas: Hospitality designers favor this style because it creates a high-end, airy guest experience that is incredibly fast for housekeeping staff to clean and sanitize between stays.

Maintenance and Care for Long-Lasting Clarity

The primary appeal of a half glass door is how easy it is to keep clean, but it still requires some basic care to maintain its crystal-clear look. To keep up with modern Shower Glass Innovations, follow these simple maintenance habits:

  • Embrace the Squeegee: Keep a small silicone squeegee hanging inside your shower. Spending 10 seconds wiping down the glass after your final shower of the day will eliminate 90% of water spots and hard water mineral buildup.
  • Use Water-Repellent Coatings: If your glass did not come pre-treated with a protective barrier, apply an aftermarket water-repellent coating (like Rain-X or EnduroShield) every few months. This causes water to bead up and roll off the glass, taking soap residue with it.
  • Avoid Abrasive Cleaners: Never use steel wool, harsh scrub brushes, or abrasive powder cleansers on your glass or hardware. These can create microscopic scratches that trap dirt and permanently dull the glass. Instead, opt for a simple mixture of distilled white vinegar and water, or a gentle liquid dish soap.

Frequently Asked Questions

Do half shower doors leak?

They do not “leak” in the traditional sense of a broken seal, but they can allow water to splash onto the bathroom floor if not configured correctly. Because the shower is partially open, water containment depends heavily on proper showerhead positioning, a correctly sloped tub rim or shower floor, and keeping the glass panel wide enough (covering 1/3 to 1/2 of the opening width) to block the primary spray zone.

Why do some showers only have half a door?

This design is a deliberate choice to balance style, accessibility, and cost-effectiveness. It is a staple of European design, created to make small bathrooms feel larger, eliminate hard-to-clean sliding door tracks, and provide a barrier-free entryway that accommodates universal design standards.

Is a Bathtub Glass Half Door Worth the Investment?

Absolutely. For homeowners looking to modernize their bathroom without the massive expense of a full-scale wet room remodel, a half glass door is a highly cost-effective upgrade. It instantly boosts visual appeal, increases natural light, and is far more hygienic than a traditional shower curtain. If your existing glass door is scratched, cloudy, or outdated, choosing to Replace Glass Shower Door with a partial glass panel is an excellent way to elevate your home’s value.

Conclusion

A bathtub glass half door is the perfect marriage of minimalist design and daily practicality. By eliminating heavy frames, hard-to-clean tracks, and dark shower curtains, it opens up your bathroom, floods the space with natural light, and offers a level of cleaning simplicity that traditional doors simply cannot match. While it requires a bit of mindfulness regarding water splashing and draftiness, the aesthetic and maintenance benefits make it a favorite for modern homeowners in 2026.

If you are ready to upgrade your Chicago bathroom with a precise, made-to-size custom glass solution, we are here to help. At JP Precision Glass, we specialize in designing, customizing, and installing high-quality frameless glass systems tailored perfectly to your home’s unique layout.

Ready to transform your bathroom? Contact us today to explore our custom Shower Doors Chicago and get a free, professional consultation for your home.