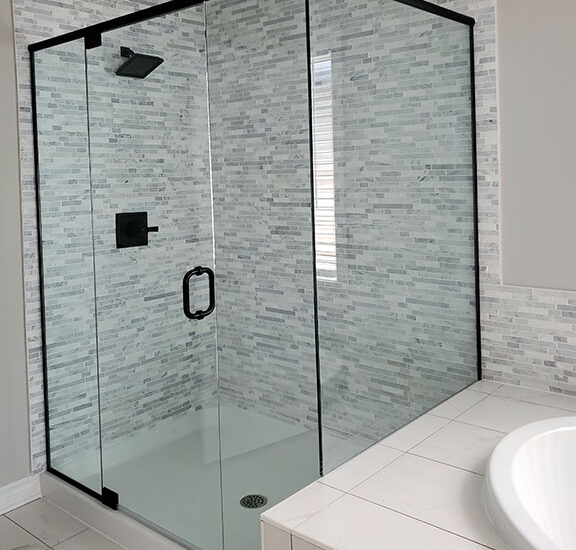
• JP Precision Glass is the leading glass shower doors company in Chicago
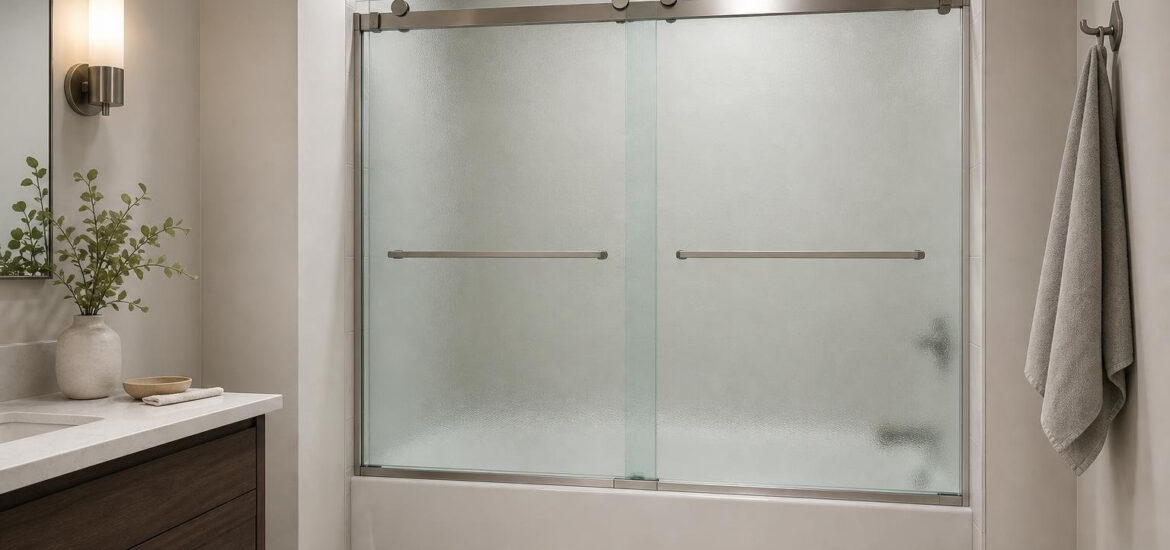
bathtub doors frosted glass

Upgrade Your Tub with the Best Frosted Glass Bathtub Doors

Why Frosted Glass Bathtub Doors Are Worth the Upgrade

Bathtub doors with frosted glass are one of the smartest upgrades you can make in a bathroom remodel. They look great, add privacy, and are far easier to maintain than a shower curtain.

Here’s a quick look at what you need to know before buying:

What You Want to Know Quick Answer
Best type for small bathrooms Sliding (bypass) frosted glass door
Best type for open layouts Hinged or pivot frosted glass door
Standard width range 44–60 inches
Standard height 56–72 inches
Common glass thickness 1/4 in. (6mm) standard; 3/8 in. (10mm) premium
Typical price range ~$300 to $850+ depending on size and style
Safety requirement SGCC-certified tempered glass
Top hardware finishes Brushed nickel, matte black, chrome

Whether you’re replacing a worn-out shower curtain or upgrading a dated glass enclosure, frosted glass tub doors offer a clean, modern look — and real privacy — that clear glass simply can’t match.

For Chicago homeowners planning a bathroom remodel, the right door isn’t just about style. It’s about finding something that fits your exact space, installs cleanly, and holds up over time.

Below, we cover everything you need to choose the right frosted glass tub door — from types and sizes to installation and maintenance.
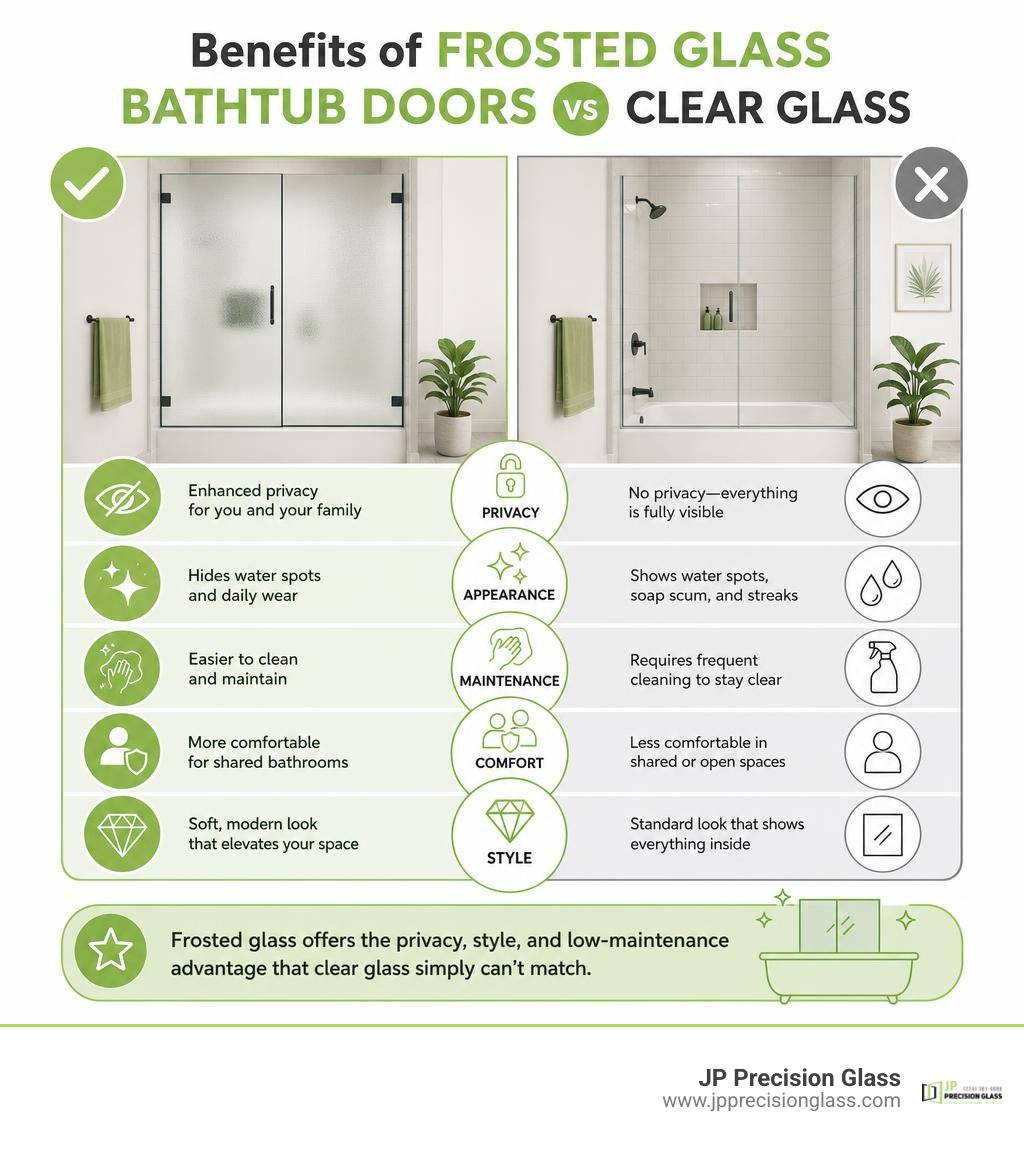
Benefits of frosted glass bathtub doors vs clear glass infographic infographic

Why Choose Bathtub Doors Frosted Glass Over Clear Glass?
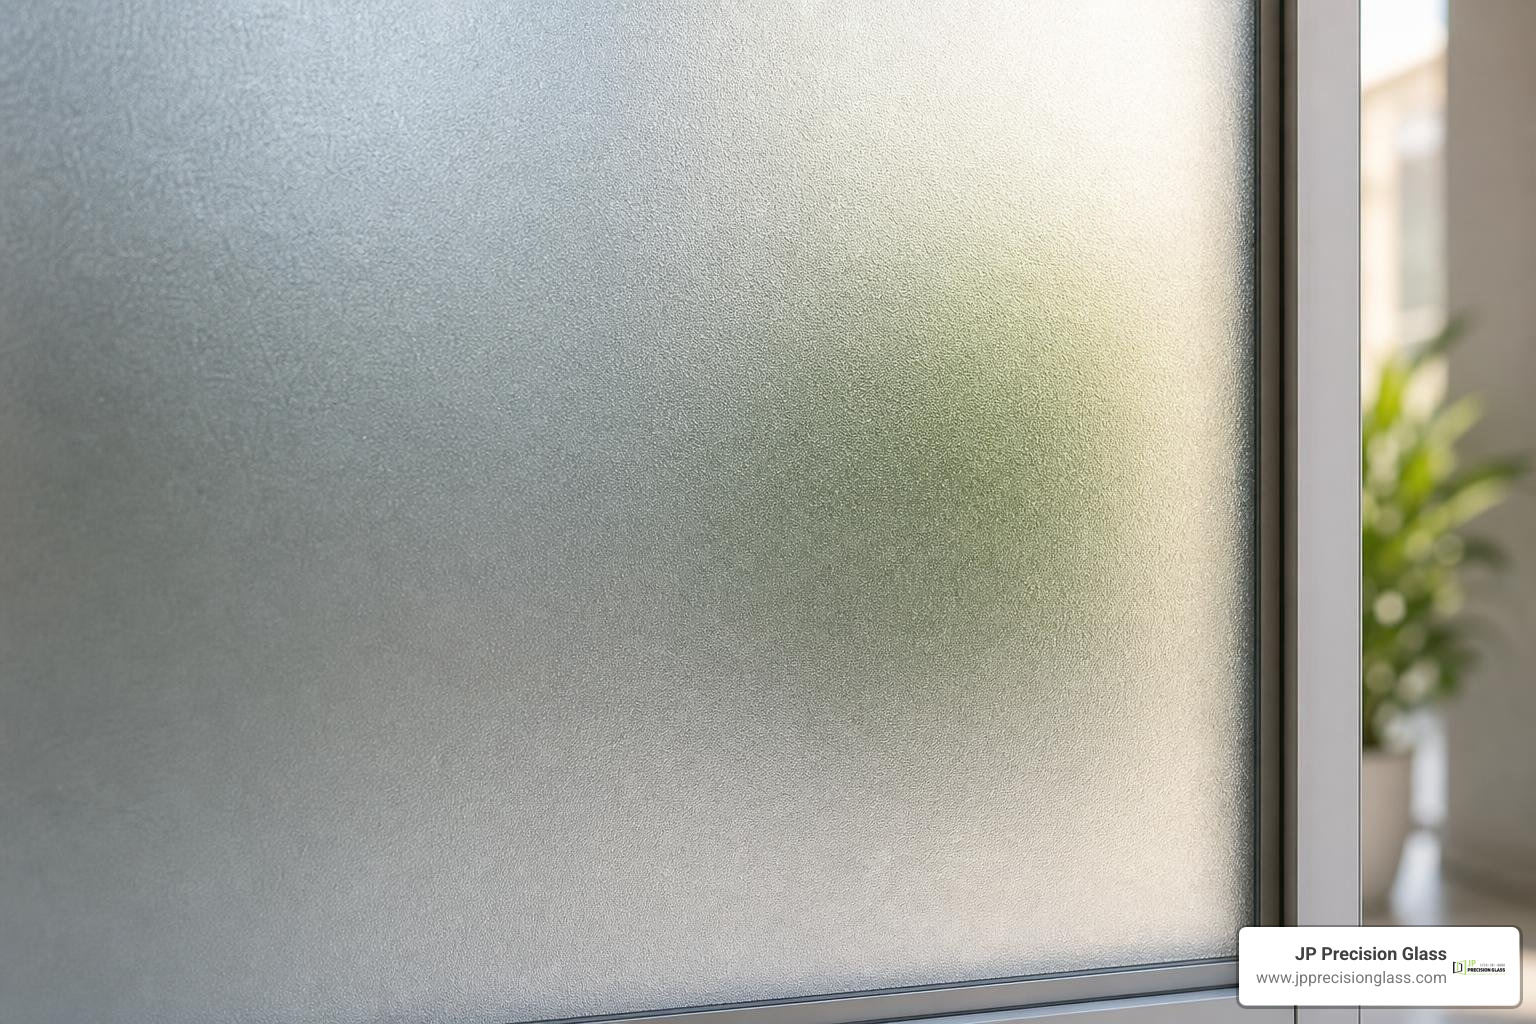
frosted glass texture close-up

When upgrading a bathtub enclosure, the debate between clear glass and frosted glass is one of the first design hurdles homeowners face. While clear glass is praised for making spaces feel larger, bathtub doors frosted glass options offer a unique set of practical and aesthetic advantages that make them a superior choice for many households.

Enhanced Privacy

The primary reason homeowners opt for frosted glass is privacy. If you live in a busy household where family members share a bathroom, a frosted door is a lifesaver. It allows one person to use the sink or mirror while another showers in complete privacy. The textured surface diffuses light beautifully, obscuring details while still letting natural light illuminate the tub area.

Effortless Maintenance

Let’s face it: clear glass is a full-time job. Every water droplet, soap scum streak, and fingerprint stands out immediately. Frosted glass is incredibly forgiving. Because of its textured, acid-etched or sandblasted surface, it naturally hides water spots, streaks, and mineral deposits. While you still need to clean it, you won’t have to squeegee the glass after every single shower just to keep your bathroom looking presentable.

Frosted vs. Obscure vs. Tinted Glass

It is easy to confuse the different types of specialty glass on the market:

  • Frosted Glass: Created via acid etching or sandblasting, this glass has a uniform, translucent, satin-like appearance. It diffuses light smoothly and offers high-level privacy.
  • Obscure Glass: This is a broad category that includes patterned, textured, or rain glass. Instead of a smooth frost, it might feature physical patterns pressed into the glass to distort the view.
  • Tinted Glass: This glass is colored during manufacturing (often bronze or gray). While it reduces glare and adds a modern aesthetic, it does not offer the same level of privacy as a fully frosted panel.

When exploring the 3 advantages of glass shower walls, privacy and light diffusion consistently rank at the top, making frosted finishes a standout choice for busy family bathrooms.

Types and Configurations of Frosted Glass Tub Doors

Selecting the right layout for your bathtub doors frosted glass project depends on your bathroom’s physical layout, the placement of your toilet and vanity, and your design preferences. Glass doors generally fall into three structural categories: frameless, semi-frameless, and framed.

  • Frameless: These doors rely on heavy, thick glass (usually 3/8-inch or 10mm) and minimal metal hardware. They offer a sleek, high-end look and are incredibly easy to clean because there are no metal tracks to trap grime. Understanding the benefits of frameless glass shower doors can help you decide if this premium look fits your budget.
  • Semi-Frameless: These feature metal framing around the main structure but have frameless edges on the moving door panels. They strike a great balance between structural support and a modern aesthetic.
  • Framed: Framed doors have metal wrapping around all edges of the glass panels. They are highly durable, cost-effective, and excellent at keeping water contained, though the metal tracks require more frequent cleaning.

Sliding Bathtub Doors Frosted Glass Options

Sliding (or bypass) doors are the ultimate space savers. They consist of two panels that slide parallel to one another within a track. This configuration is perfect for narrow bathrooms where a swinging door would hit a vanity, toilet, or wall.
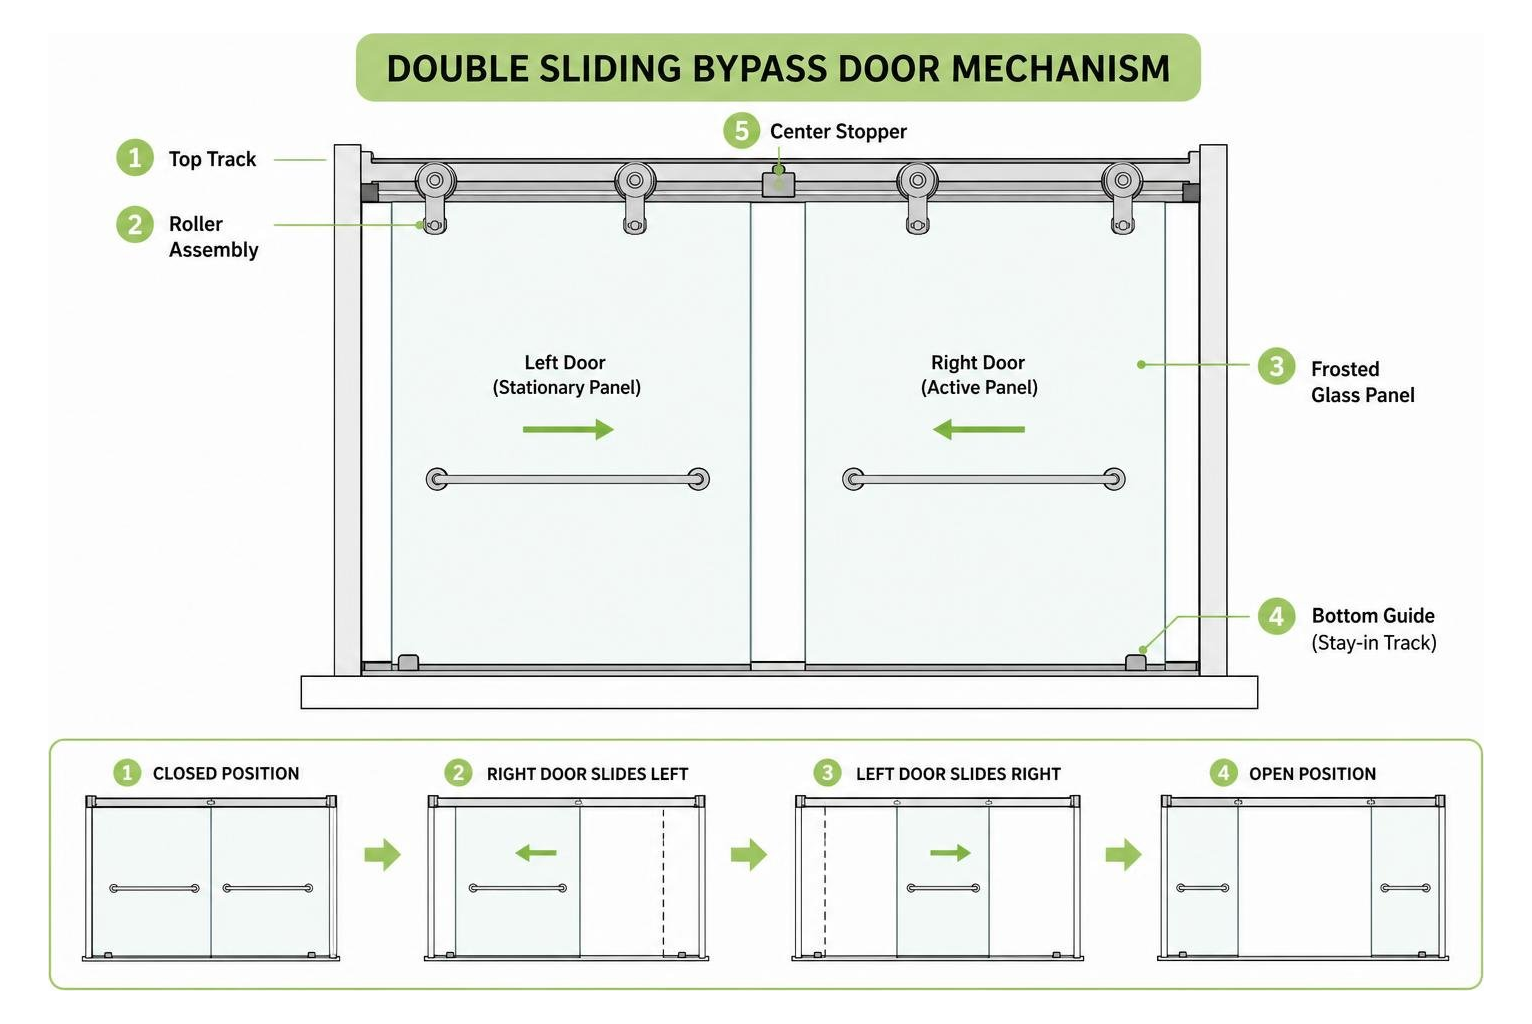
Diagram of double sliding bypass door mechanism

If you are looking for a reliable sliding option, there are several popular configurations on the market:

Sliding doors are highly sought after; in fact, retail favorites like the CKB Bathtub Sliding Door (56″–60″ W x 56″ H) with tempered frosted glass rank as best-sellers online. Choosing high-quality sliding shower doors ensures your tub remains functional and beautiful for years.

Hinged and Pivot Bathtub Doors Frosted Glass Designs

Hinged or pivot doors swing outward like a traditional room door. They are ideal for larger bathrooms where space is not a constraint. These designs offer a wide, welcoming opening and a very clean, European-inspired look.

  • Swinging Doors: Attached directly to the wall or a fixed glass panel using heavy-duty hinges.
  • Folding/Bi-Fold Panels: These panels fold inward or outward, making them excellent for tight spaces where a full swing isn’t possible.
  • Half-Glass Panels (Tub Shields): A modern trend where a single fixed or hinged panel covers only the front half of the tub (where the showerhead sprays), leaving the back half open.

If you are looking for a swing-style configuration, options like the 51 in. x 58 in. Frameless Glass Hinged Bathtub Door in Polished Brass bring a stunning, high-contrast look to your bath space. Using custom glass shower panels allows you to tailor the hinge placement and glass size to match your bathroom’s exact layout.

Sizing, Measuring, and Hardware Finishes for Your Tub

Getting a perfect fit is the most critical step of any glass door project. While retail kits are designed to fit “standard” alcoves, real-world bathrooms are rarely perfectly square.

How to Measure Your Tub Opening

Before ordering any door, you must take precise measurements. Do not assume your walls are straight! Follow these steps:

  1. Measure the Width: Measure the distance from wall to wall at the top of your tub opening and at the bottom (along the tub threshold).
  2. Check for Plumb: Use a level against both walls to see if they lean inward or outward. Even a 1/4-inch slope (out-of-plumb) can cause pre-fabricated retail doors to leak or bind.
  3. Measure the Height: Measure from the top lip of the tub ledge up to your desired door height. Ensure you have enough clearance from your showerhead and ceiling.

Taking these steps is essential, and reviewing 3 things to do before buying a glass shower door will save you from making costly measuring mistakes.

Choosing the Right Hardware Finish

Your door’s hardware should tie the entire bathroom design together. The most popular finishes for frosted glass doors include:

  • Brushed Nickel: A classic, warm silver tone that resists water spots and fingerprints beautifully.
  • Matte Black: Bold and modern, matte black provides a stunning high-contrast frame against the soft white of frosted glass.
  • Chrome: Highly reflective and traditional, chrome is bright, affordable, and easy to match with existing plumbing fixtures.
  • Polished Brass/Gold: Adds a touch of vintage luxury and warmth to contemporary bathrooms.

To elevate your design, select high-quality shower glass accessories like matching handles, towel bars, and hinges.

Standard Retail vs. Custom Sizing

Feature Standard Retail Doors Custom Precision Glass Doors
Width Adjustability Limited (usually via cutting top tracks) Made-to-measure down to the 1/16th of an inch
Out-of-Plumb Walls Cannot handle significant wall angles Glass is custom-cut to match the exact slope of your walls
Glass Thickness Typically 1/4 in. (6mm) Heavy-duty 3/8 in. (10mm) or 1/2 in. (12mm)
Height Options Fixed standard heights (56 in. to 60 in.) Completely customizable

Installation, Safety, and Maintenance of Frosted Glass
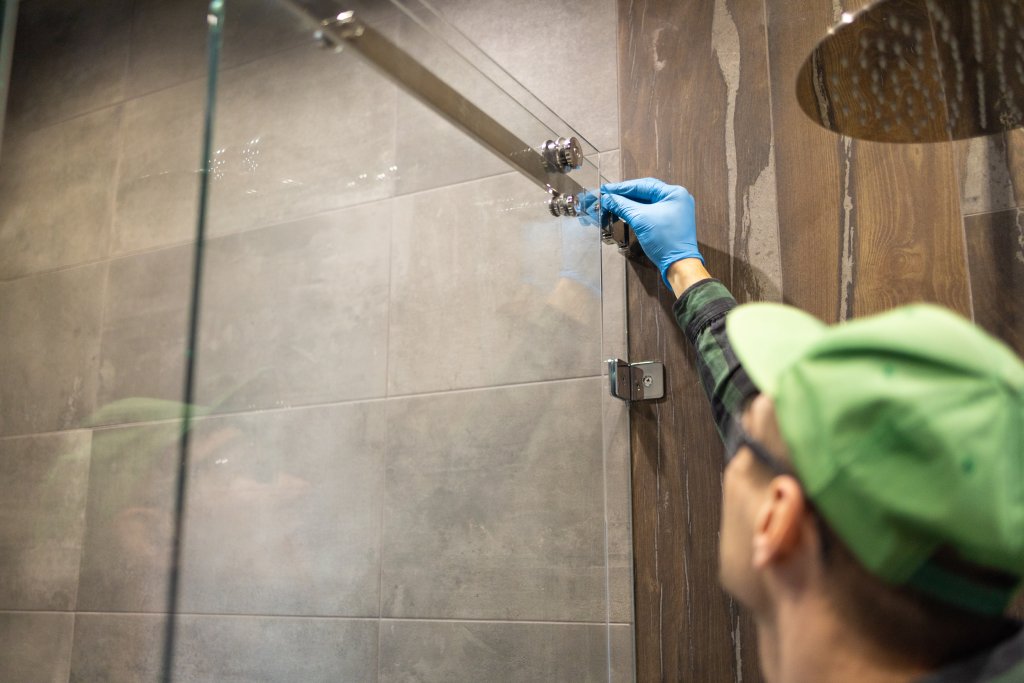
professional glass door installation

Installing a glass tub door requires patience, precision, and the right safety precautions. Because glass is heavy and fragile before installation, understanding safety standards is paramount.

Safety First: Tempered Glass and SGCC Certification

Never compromise on glass safety. Any glass door installed in a bathroom must be made of tempered safety glass. Tempered glass is heat-treated to be up to four times stronger than standard glass. If it does break, it crumbles into small, blunt pebbles rather than sharp, dangerous shards.

Always look for the SGCC (Safety Glass Certification Council) stamp on the corner of the glass. This certification guarantees the product meets strict American safety standards.

Cleaning and Maintenance Tips

While frosted glass hides dirt better than clear glass, it still requires proper care to prevent hard water spots and soap scum buildup:

  • Protective Coatings: Many premium glass doors feature factory-applied protective coatings like EnduroShield. These coatings seal the microscopic pores of the glass, causing water to bead up and slide off easily.
  • Avoid Abrasives: Never use harsh abrasive powders, steel wool, or heavy acid cleaners on the frosted side of the glass. The frosted texture can be permanently damaged or smoothed out by abrasive scrubbing.
  • The Vinegar Solution: For routine cleaning, use a mild mixture of warm water and white vinegar or a non-abrasive liquid dish soap. Spray, let sit for a few minutes, and wipe clean with a soft microfiber cloth.

Why Professional Installation Beats DIY

While some modular retail kits are marketed to DIYers, installing a heavy glass door is a high-risk project. Standard 3/8-inch glass panels are incredibly heavy and difficult to maneuver in tight bathroom spaces. If you bump a corner against a tile floor, the tempered glass can instantly shatter.

Furthermore, if your walls are out-of-plumb, a DIY kit will leave gaps where water can escape, leading to mold and subfloor water damage. Opting for professional, affordable shower door installation ensures a perfect, leak-free fit and keeps your home protected.

Frequently Asked Questions about Frosted Tub Doors

Choosing the right door often brings up a few common questions. We answer some of the most frequent queries below, and you can explore more in our guide on 6 glass shower door questions.

What is the difference between a tub door and a shower door?

The primary difference is height. Standard bathtub doors are designed to sit on the flat rim of a tub and typically stand between 56 and 60 inches tall. Shower doors, which are designed for walk-in shower pans that sit flush with the floor, are much taller, usually ranging from 70 to 76 inches. Additionally, tub doors must account for the wide ledge of the bathtub rim when tracking and sealing.

Can I use a privacy film on clear glass instead of buying frosted glass?

Yes, you can apply a stick-on vinyl privacy film to an existing clear glass door as a temporary DIY solution. However, film has several drawbacks compared to permanent frosted glass:

  • Durability: The high humidity and direct water exposure in a tub-shower combo will eventually cause the edges of the film to peel, bubble, and yellow.
  • Cleaning: Film is easily scratched by cleaning sponges and cannot be scrubbed.
  • Appearance: Film rarely looks as sleek or uniform as genuine acid-etched frosted glass.

Investing in permanent frosted glass is a highly durable, beautiful, and long-term solution.

Are there special considerations for corner bathtubs?

Yes. Corner bathtubs (which have two or three open sides exposed to the bathroom) require specialized glass configurations. Standard sliding doors will not work. Instead, corner tubs require custom-angled neo-angle panels, curved glass panels, or multi-panel return layouts. These installations require highly precise measurements and professional customization to ensure structural integrity and water tightness.

Conclusion

Upgrading your bathroom with a bathtub door with frosted glass is an investment that pays off daily in privacy, ease of cleaning, and modern style. Whether you prefer the space-saving utility of a sliding bypass door or the luxury feel of a frameless hinged panel, frosted glass provides the perfect balance of light and privacy.

While mass-market retail doors are available, they often fail to fit the real-world, out-of-plumb walls found in most homes. At JP Precision Glass, we specialize in designing, customizing, and installing beautiful, made-to-measure glass solutions that fit your bathroom perfectly.

Ready to transform your bathroom? Explore our services or check out our stunning photo gallery to see our work in action.

If you live in the Chicago area and want a flawless, professional installation, contact us today for a custom quote. Let us help you find the perfect door for your home from our complete shower door collection!
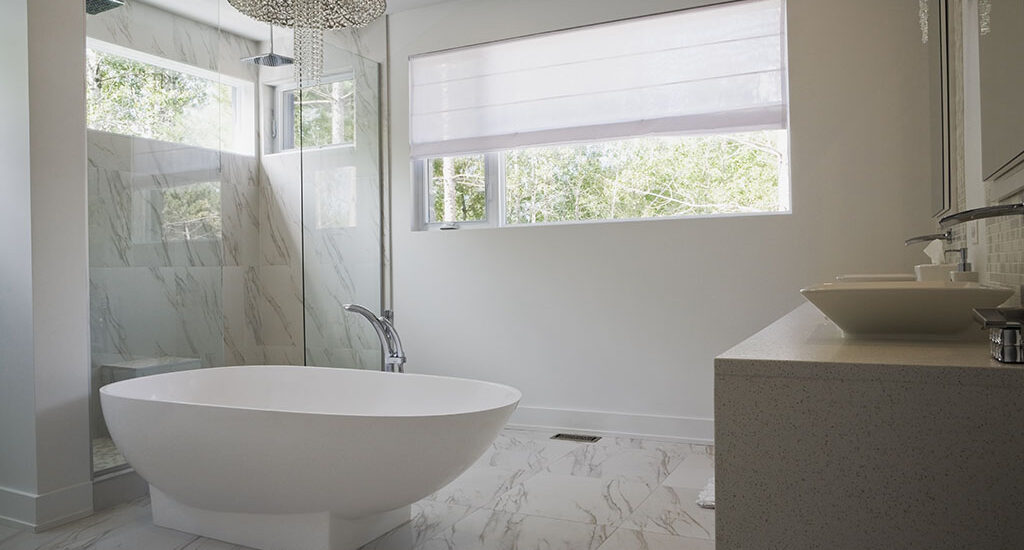
1700mm shower enclosure in a modern luxury bathroom

1700mm Shower Enclosure Guide: Maximizing Your Large Bathroom Space

Why a 1700mm Shower Enclosure Could Be the Best Upgrade for Your Bathroom

A 1700mm shower enclosure is one of the most popular large-format shower options for homeowners who want a spacious, comfortable showering experience — and it’s especially practical if you’re replacing a standard bathtub.

Quick answer: What is a 1700mm shower enclosure?

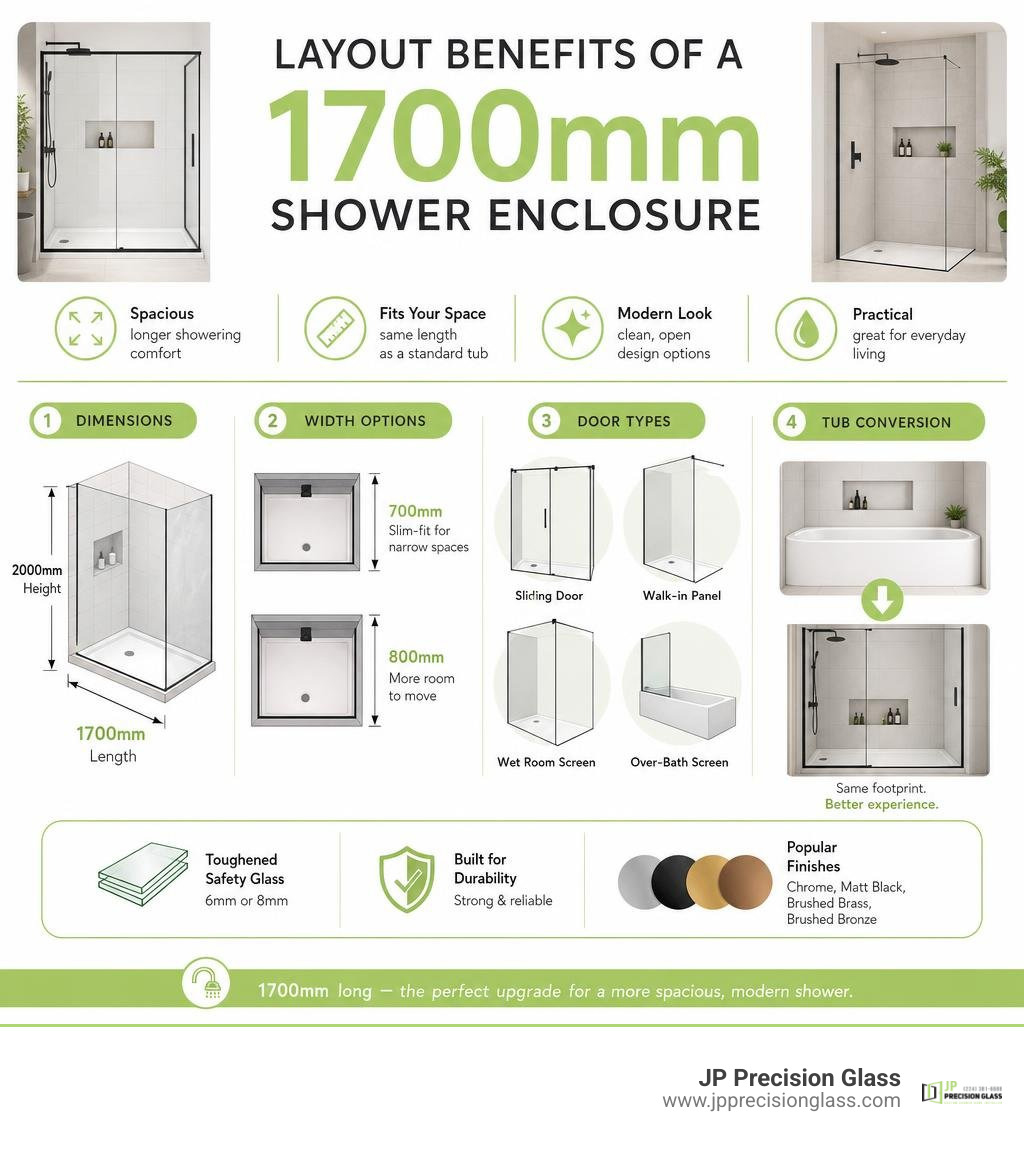
  • It’s a shower enclosure that is 1700mm long (roughly 67 inches), matching the length of a standard bathtub
  • Common widths are 700mm (slim-fit, great for narrow bathrooms) and 800mm (more generous showering space)
  • Available as sliding doors, walk-in panels, wet room screens, or over-bath screens
  • Glass is typically 6mm or 8mm toughened safety glass
  • Popular finishes include chrome, matt black, brushed brass, and brushed bronze

If your bathroom currently has a bathtub you rarely use, you’re not alone. Many homeowners are swapping out that underused tub for a generous walk-in shower — and a 1700mm enclosure is the perfect fit because it takes up exactly the same footprint.

Whether you’re working with a narrow ensuite in a Chicago home or a larger master bathroom, the 1700mm format gives you a long, comfortable shower space without blowing up your floor plan.

But not all 1700mm enclosures are built the same. Glass thickness, frame finish, door style, and whether you need a tray or a wet room setup all make a big difference — in both price and day-to-day experience.

This guide walks you through everything you need to know before buying or installing one.

Layout benefits of a 1700mm shower enclosure: dimensions, width options, door types, and tub conversion infographic

Key Benefits of a 1700mm Shower Enclosure

When planning a modern bathroom remodel in 2026, spatial efficiency and luxury aesthetics are top priorities. Opting for a 1700mm shower enclosure brings several distinct advantages to your home:

  • The Ultimate Tub-to-Shower Conversion: Because 1700mm is the standard length of a traditional bathtub in many homes, you can remove your old tub and drop a spacious shower enclosure into the exact same alcove. This minimizes the need to reroute major plumbing lines.
  • A Touch of Everyday Luxury: A shower of this size feels incredibly open. You will never feel cramped or bump your elbows against cold glass while washing your hair.
  • Minimalist Design Profile: Large glass structures create an unbroken line of sight across your bathroom. This makes the entire room feel significantly larger and brighter.
  • Enhanced Accessibility: Replacing a high-sided bathtub with a low-profile 1700mm tray or a completely flush wet room entry makes your bathroom safer and more accessible for family members of all ages.

By choosing a frameless or semi-frameless design, you can elevate these benefits even further. To understand how frameless styling maximizes light and visual space, explore our guide on the benefits of frameless glass shower doors.

Sleek 1700mm sliding glass shower in a modern bathroom renovation

Choosing the Right Width for Your 1700mm Shower Enclosure

While the 1700mm length is fixed, you have flexibility when it comes to the width of your enclosure. The two most common standard options are 700mm and 800mm, though custom sizes can be tailored to unique layouts.

  • 1700 x 700mm (The Space-Saving Slim Fit): This format is highly optimized for narrow, galley-style bathrooms or tight master ensuites where floor space is limited but length is available. It is widely considered the best layout for narrow spaces because its slim 700mm profile preserves valuable walkway clearance. If you are dealing with a particularly tight floor plan, you can explore the 1700 x 700mm Shower Enclosure | For Narrow Master Ensuite to see how this space-saving footprint works in real-world layouts.
  • 1700 x 800mm (The Balanced Classic): If your bathroom is at least 5.5 square meters or larger, upgrading to an 800mm width offers a noticeably more generous showering area. This extra 100mm of depth makes a substantial difference in comfort without overwhelming the room.
  • Custom Widths: If you have an awkward alcove or an older home with non-standard dimensions, custom-cut glass shower panels can be designed to fit your precise footprint.

Comparing Tray vs. Wet Room Installations

One of the biggest decisions you will make is whether to install your 1700mm enclosure on a dedicated shower tray or directly onto a tiled wet room floor.

A traditional shower tray provides a reliable, self-contained barrier against water. Modern slimline trays (ranging between 40mm and 45mm in height) maintain a clean, low-profile look without the complex subfloor preparation required for a wet room. For example, high-quality lightweight trays utilize advanced materials like a patented matrix of polyurethane resin and volcanic ash filler, capped with durable acrylic. This construction makes the tray up to 50% lighter than conventional stone resin while remaining incredibly strong.

On the other hand, a wet room installation offers a completely level, step-free transition from the bathroom floor to the shower zone. This is the ultimate minimalist aesthetic, though it requires professional tanking (waterproofing) and precise floor sloping to ensure proper drainage.

Feature Low-Profile Shower Tray Wet Room Installation
Aesthetic Modern, neat, defined border Seamless, ultra-minimalist, continuous flooring
Installation Complexity Moderate; straightforward plumbing and leveling High; requires professional tanking and subfloor sloping
Cost Budget-friendly to mid-range Higher upfront cost due to extensive waterproofing
Accessibility Low step-over height (40mm-45mm) Completely level, step-free entry
Maintenance Easy to clean acrylic capping Requires maintaining tile grout lines and seals

Types of 1700mm Enclosures and Glass Specifications

The physical layout of your bathroom and your personal style preferences will dictate the type of enclosure that works best for your space.

Walk-in shower featuring a fixed glass deflector panel

  • Sliding Door Enclosures: Because a 1700mm opening is exceptionally wide, a sliding door configuration is highly efficient. The door glides horizontally within the frame, meaning it requires zero outward clearance. This preserves the floor space in front of the shower, making it perfect for layouts where a toilet or vanity sits close to the enclosure. For a smooth, premium feel, look for sliding doors that feature low-friction roller mechanisms and minimalist internal fixings. You can learn more about these smooth-gliding systems by viewing our range of sliding shower doors.
  • Walk-In Showers: A walk-in design typically features a single, large fixed glass panel (often around 830mm wide) paired with an open entry area. This setup provides a highly modern, boutique-hotel aesthetic.
  • Wet Room Screens: Similar to walk-ins, wet room screens use simple, frameless glass panels anchored to the wall and floor with minimalist bracing bars. This style completely eliminates moving parts, reducing wear and tear over time.

Glass Thickness and Safety Features

When dealing with large spans of glass like those in a 1700mm shower enclosure, structural integrity and safety are paramount. Glass thickness generally ranges from 6mm to 8mm for premium residential installations.

  • 8mm Thermally Toughened Safety Glass: This is the standard for premium, high-durability enclosures. The added thickness gives the glass a heavy, solid feel when sliding or opening, and it resists flexing.
  • 6mm Toughened Glass: A lighter, more budget-friendly alternative that still meets strict safety standards. While it is highly reliable, it lacks the substantial, high-end feel of 8mm glass.
  • Easy-Clean Protective Coatings: Large glass panels are prone to showing water spots and soap scum. Premium enclosures feature specialized hydrophobic coatings (such as CleanCoat® technology) that repel water and dirt, making the glass incredibly easy to wipe clean with a squeegee. To explore the latest advancements in glass treatments and durability, check out our insights on shower glass innovations.

Frame Finishes and Hardware Options

The metal frame and hardware of your enclosure act as the “jewelry” of your bathroom. Selecting the right finish allows you to tie your shower design into your overall brassware and tap scheme.

  • Chrome: The classic choice. A polished chrome frame reflects light beautifully and matches almost any bathroom style.
  • Matt Black: Bold and contemporary. Matt black framing provides a striking contrast, especially when paired with light tiles or industrial-style decor.
  • Brushed Brass & Brushed Bronze: These warm, metallic tones have surged in popularity. They bring an understated, vintage-inspired luxury to modern bathroom designs.
  • Gun Metal Grey: A sophisticated, moody alternative to black that offers a sleek, metallic sheen.

To complete your space with matching handles, support bars, and seals, browse our collection of premium shower glass accessories.

Installation and Practical Considerations

Installing a large-format glass enclosure requires careful preparation and precision. Because a 1700mm glass panel or sliding door is heavy and rigid, there is very little room for error during the installation process.

To ensure a watertight seal and smooth mechanical operation, we always recommend utilizing a professional service. You can learn more about securing a perfect fit with our affordable shower door installation services.

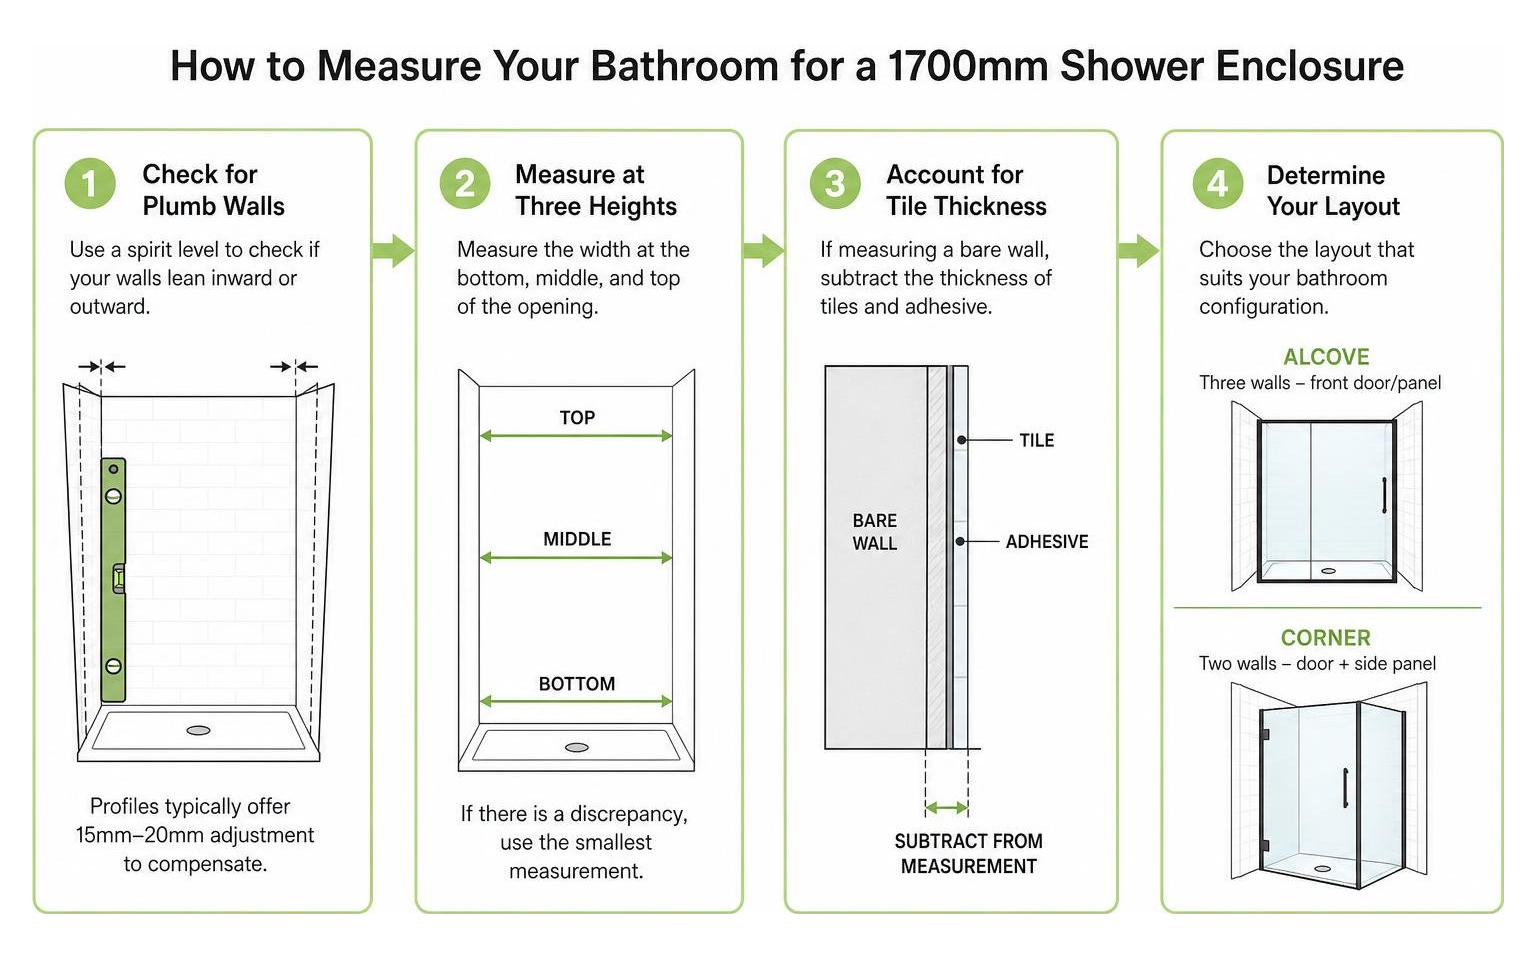
How to Measure Your Bathroom for a 1700mm Shower Enclosure

Before purchasing any materials, you must take precise measurements of your bathroom footprint. Even minor errors can lead to leaks or a door that won’t close properly.

Step-by-step process for measuring a 1700mm shower space

  1. Check for Plumb Walls: Rarely are bathroom walls perfectly straight. Use a spirit level to check if your walls lean inward or outward. High-quality shower profiles typically offer between 15mm and 20mm of built-in adjustment to compensate for out-of-plumb walls.
  2. Measure at Three Heights: Measure the width of your shower opening at the bottom, middle, and top. If there is a discrepancy, use the smallest measurement when ordering your door or panel.
  3. Account for Tile Thickness: If you are measuring a bare stud wall or plasterboard, remember to subtract the thickness of your tiles and adhesive from your final measurements.
  4. Determine Your Layout: Decide if your enclosure will be installed in an alcove (surrounded by three walls, requiring only a front door or panel) or a corner (surrounded by two walls, requiring a side panel).

Using a 1700mm Enclosure with a Shower Bath

If you love the idea of a spacious shower but simply cannot give up your bathtub, a 1700mm shower bath is the perfect compromise. This setup combines a deep bathing area with a dedicated, wider showering zone at one end.

A classic example is the Stafford 1700×700 Shower Bath & 4mm Screen with Rail , which is crafted from highly durable Lucite® acrylic and has a water capacity of 141 liters. It features a universal-handing design, allowing you to install the bath in either a left- or right-handed configuration depending on your plumbing layout.

When installing a shower bath, the screen you choose is critical:

  • Glass Thickness: While budget-friendly screens often use 4mm glass, upgrading to a 6mm or 8mm custom screen provides much greater stability and safety.
  • Pivotal Mechanisms: Look for a screen that swings both inward and outward. This makes it much easier to turn on the taps before getting in and simplifies cleaning.
  • Integrated Towel Rails: A built-in rail on the exterior of the glass screen keeps your towel dry and within arm’s reach when you finish showering.

Frequently Asked Questions about 1700mm Enclosures

What is the best glass thickness for a 1700mm shower enclosure?

For an enclosure of this size, 8mm thermally toughened safety glass is highly recommended. It offers the ideal balance of structural strength, safety, and a premium, heavy-duty feel. While 6mm glass is a reliable and lightweight alternative, 8mm glass reduces flexing over wide spans. If you currently have thin or damaged glass and want to upgrade, you can learn about your options to replace glass shower door panels.

Can I convert my standard 1700mm bathtub into a walk-in shower?

Yes! This is one of the most common bathroom renovations we perform. Because a 1700mm walk-in shower matches the exact footprint of a standard tub, the conversion is highly straightforward. It allows you to transform a cramped, underutilized tub into a bright, modern, and accessible walk-in shower. For homeowners in the Chicago area looking to make this change, our team specializes in seamless shower door replacement chicago services.

How do I prevent leaks in a 1700mm walk-in shower?

Because walk-in showers feature an open entry, preventing water splash-out requires a few smart design choices:

  • Use a Deflector Panel: A small, 300mm to 400mm fixed or hinged glass “flipper” panel attached to the end of your main walk-in screen helps redirect water spray back into the shower area.
  • Install a High-Flow Waste: A 90mm high-flow shower waste trap is essential. It drains water rapidly, preventing pooling on low-profile trays.
  • Ensure Proper Sealing: High-quality silicone and magnetic seals must be applied precisely along all joints. If your existing seals are failing, it may be time to look into professional shower door repair chicago to protect your bathroom floor from water damage.

Conclusion

Upgrading to a 1700mm shower enclosure is a fantastic way to bring a spacious, high-end spa experience into your home. Whether you choose a space-saving 1700 x 700mm sliding door for a narrow master ensuite or a bold, open-concept walk-in wet room, this generous layout completely transforms how your bathroom looks and functions.

At JP Precision Glass, we specialize in designing, customizing, and installing high-quality glass shower doors tailored to your exact space. As Chicago’s leading glass shower door provider, we pride ourselves on delivering precision, premium materials, and flawless installations.

Ready to design your dream shower? Explore our high-precision shower doors chicago or view our custom sliding shower doors to get started today!

sliding glass door rollers

How to Remove and Replace Sliding Glass Door Rollers Without Breaking the Bank

Change Sliding Door Rollers to Restore a Smooth Glide

If your patio door drags, grinds, wobbles, or will not latch cleanly, first vacuum the lower track and try small, even adjustments to the height screws near the bottom corners. If the wheels are cracked, rusted, flat-spotted, or still bind after cleaning and adjustment, change sliding door rollers by removing the panel with a helper, matching the old roller assembly exactly, replacing both sides, and then leveling the door again.

Most problems come from worn rollers, debris, or a bent track – not a door that needs to be replaced. Because glass panels can be heavy, protect the floor, use a second person for lifting, and stop if the track is crushed or the panel uses heavy impact glass.

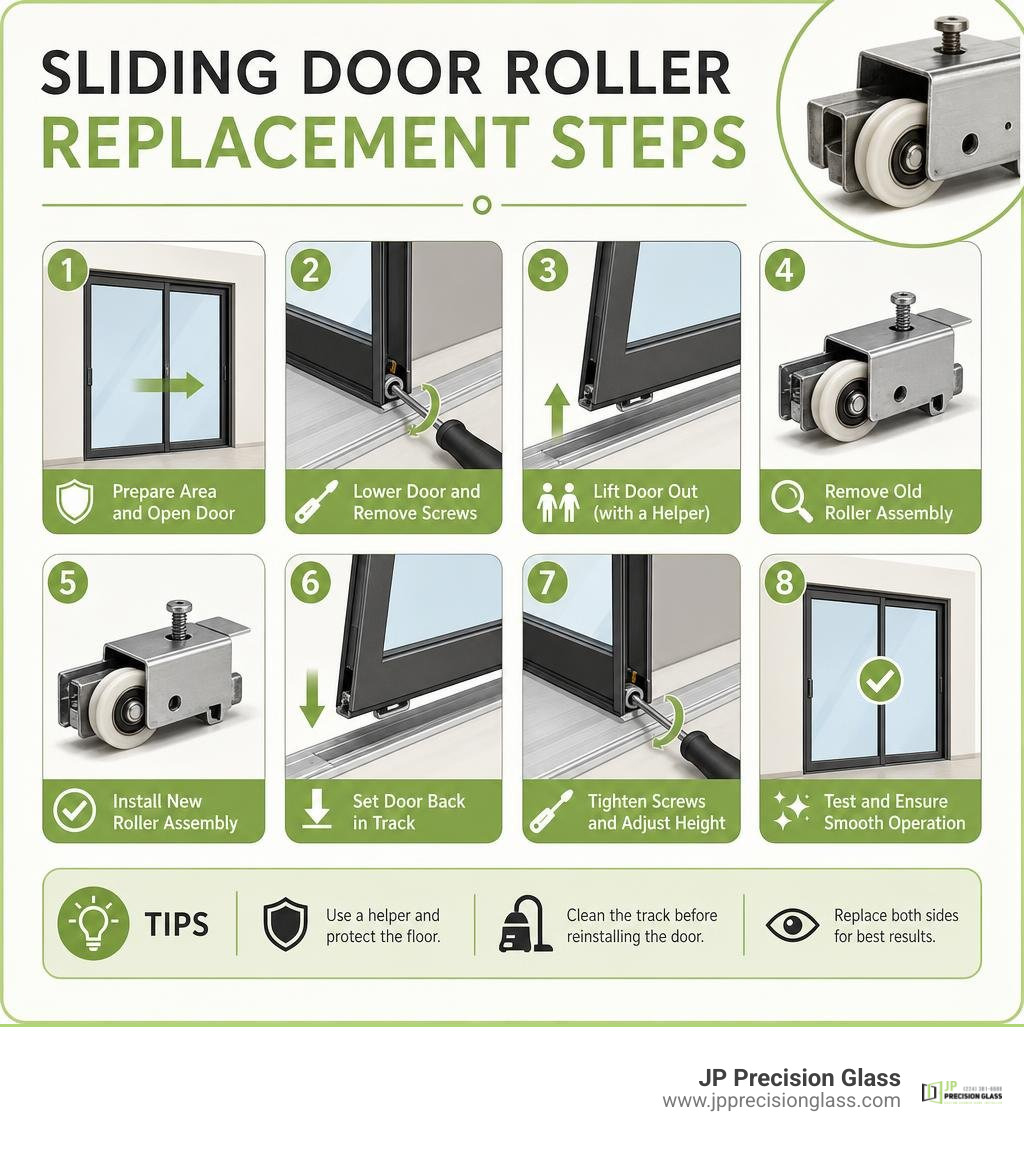
sliding door roller replacement steps infographic

Change sliding door rollers word list:

Diagnosing Sliding Door Issues: Adjustment vs Replacement

A sliding door should glide with minimal effort. When opening the door turns into a workout involving two hands and a hip check, the rolling mechanism is almost always screaming for help. Before tearing down your frame, it helps to distinguish between a simple height misalignment and mechanical failure.

Doors naturally settle over time. Daily use, structural shifting, and vibrations can cause the height adjustment screws at the base of the door to loosen. When this happens, the bottom aluminum rail drops down and drags directly across the raised metal track rib. This metal-on-metal contact produces a loud, harsh screech and shaves off aluminum dust.

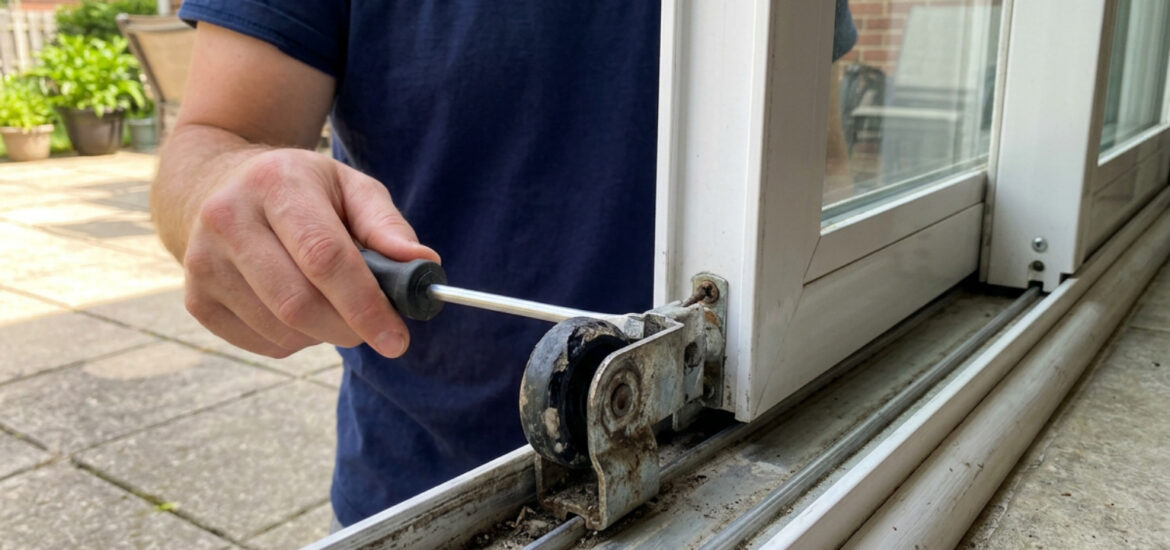
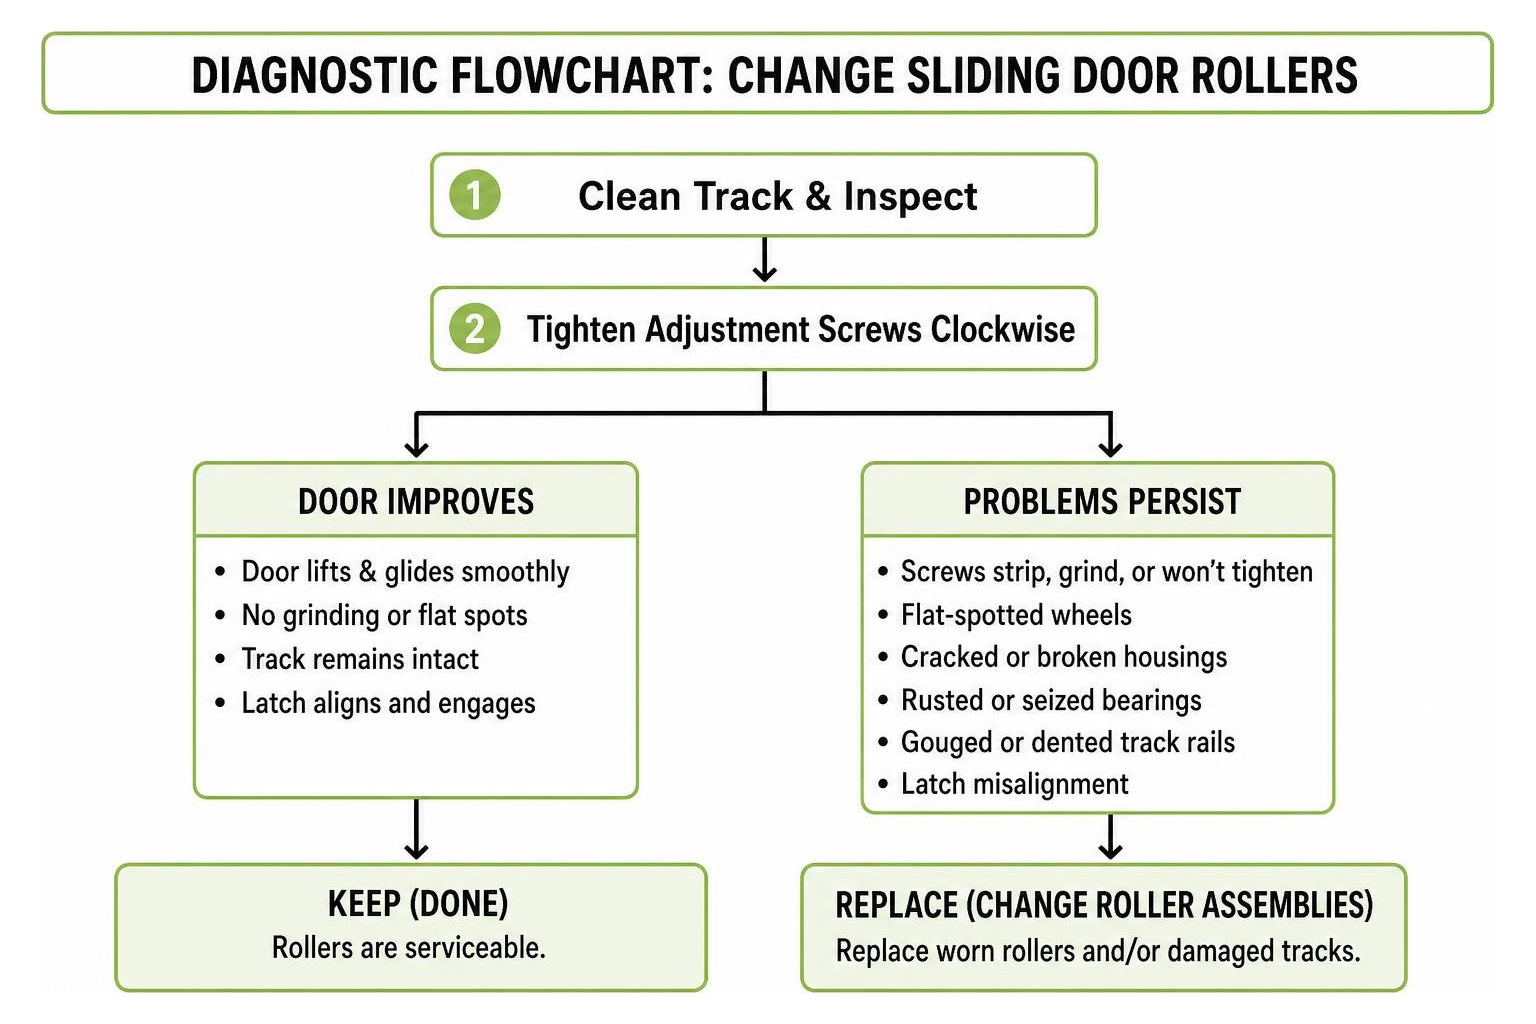
To determine if you only need an adjustment, locate the small access holes near the bottom edge of the door frame (often hidden under plastic snap-in caps). Using a screwdriver, turn the screws clockwise a quarter-turn to raise the panel. If raising the door lifts the rail clear off the track and restores a smooth, quiet glide, an adjustment was all you needed.

However, if turning the adjustment screws causes the screw head to spin freely without lifting the panel, or if the door continues to rumble, shudder, and bind, the roller internals are compromised. In that case, tackling a sliding-into-savings with diy aluminum glass door repair project by replacing the internal wheel assemblies is the proper course of action.

Signs of Worn Rollers and Damaged Tracks

When sliding door wheels reach the end of their service life, they leave clear physical symptoms:

  • Flat-Spotted Wheels: If a ball bearing seizes from corrosion or grit, the wheel stops rotating and slides across the metal track. Friction quickly grinds a flat spot onto the wheel circumference, creating a rhythmic bumping sensation whenever the door moves.
  • Cracked or Broken Nylon Housings: Constant downward pressure can fracture the wheel flange or split the outer roller housing, making the door wobble from side to side.
  • Internal Rust and Seized Bearings: Exposure to condensation, cleaning chemicals, or outdoor rain causes carbon steel bearings to rust solid.
  • Gouged or Dented Track Rails: Running flat-spotted or seized rollers over time will chew through the soft aluminum track crown, creating sharp gouges, metal burrs, or wavy valleys that catch the rollers.
  • Latch Misalignment: When one roller fails, that corner of the door sags. This creates an uneven reveal against the side jamb, preventing the door lock hook from engaging the strike plate properly.

diagnostic flowchart for sliding door roller repair

Roller Materials Compared: Steel, Nylon, and Stainless Steel

Selecting the proper roller material ensures longevity and protects your track from premature wear. Different materials offer unique trade-offs in weight capacity, operating sound, and environmental resistance:

Roller Material Load Capacity Operating Noise Corrosion Resistance Best Application
Standard Carbon Steel High (100–200+ lbs per pair) Moderate to High Low (Prone to rust in damp environments) Standard interior or mild-climate exterior patio doors
Molded Nylon / Delrin Medium (50–100 lbs per pair) Whisper Quiet (Reduces noise by up to 30%) High (Impervious to rust; chemically inert) Lightweight panels, screen doors, and interior partitions
Stainless Steel Very High (150–300+ lbs per pair) Moderate Superior (Resists salt spray, humidity, and standing water) Heavy patio doors, coastal zones, and high-moisture spaces

Builder-grade carbon steel rollers often last only 3 to 5 years before moisture causes their open bearings to degrade. For standard residential exterior doors, premium tandem rollers with sealed bearings and engineered Delrin or stainless steel wheels can deliver 10 to 15 years of smooth operation.

Pre-Repair Checklist: Tools and Roller Identification

A standard residential glass patio door panel weighs between 80 and 150 pounds, while double-pane thermal or impact-resistant panels can easily exceed 200 pounds. Proper preparation is essential to protect both your back and the glass panel.

Always conduct this repair with a helper. Never attempt to lift, maneuver, or balance a heavy glass sliding door panel alone. Make sure you have a clear, flat resting space ready before you start lifting.

Essential Tools Needed to Change Sliding Door Rollers

Gather these tools before beginning your project:

  • Screwdrivers: #2 and #3 Phillips head screwdrivers, along with a sturdy flathead screwdriver.
  • Prying and Tapping Tools: A non-marring rubber mallet, a wooden block (no thicker than 3/4 inch), and a stiff putty knife.
  • Pliers: Needle-nose pliers or a balance hook to extract internal roller cartridges.
  • Safety Equipment: Heavy-duty work gloves with grip palms and impact-rated safety glasses.
  • Track Maintenance Supplies: A shop vacuum with a narrow crevice attachment, a stiff nylon bristle brush, and a can of dry silicone spray lubricant (avoid oil-based lubricants like standard WD-40 or thick wheel grease, which attract dust).
  • Staging Materials: Two heavy moving blankets or a set of padded sawhorses to support the door panel horizontally during hardware swaps.

How to Measure and Identify Replacement Rollers

Hardware manufacturers have produced hundreds of distinct roller variations over the decades. Universal roller kits exist, but matching the original equipment manufacturer (OEM) dimensions ensures a drop-in fit without needing to drill new mounting holes.

measuring sliding door roller dimensions with calipers

Because subtle differences can affect fit, consult a comprehensive DIY roller replacement guide or take your old roller assembly directly to a local hardware specialist.

When measuring your existing roller assembly, check these four critical dimensions:

  1. Wheel Diameter: Measure the outside diameter of the wheel (common sizes include 1″, 1-1/8″, 1-1/4″, and 1-1/2″).
  2. Housing Dimensions: Measure the width, height, and overall length of the metal cartridge housing that slots into the door stile.
  3. Mounting Hole and Screw Locations: Note whether the assembly mounts through the side of the housing, the top, or the end, and measure the center-to-center distance between screw holes.
  4. Wheel Profile and Edge: Determine if the wheel has a concave (grooved) edge designed to sit on top of a raised track rail or a flat/convex edge.

Step-by-Step Guide: How to Change Sliding Door Rollers Safely

With your workspace cleared, moving blankets laid out on the floor, and tools within reach, you are ready to begin the replacement process.

Removing the Sliding Panel and Extracting Old Rollers

  1. Retract the Rollers Completely: Locate the adjustment screw access holes at the bottom outer corners of the door. Turn both adjustment screws counter-clockwise until the internal rollers retract fully into the bottom rail. This lowers the door frame and creates the maximum vertical clearance between the top of the door and the head track.
  2. Remove Head Stops or Anti-Lift Blocks: Inspect the upper track channel. Many modern sliding doors feature small aluminum or plastic anti-lift blocks screwed into the top channel to deter intruders. Unscrew and remove these blocks.
  3. Lift and Tilt the Panel: Stand facing the door with your helper, placing one person on each side of the panel. Firmly grip the vertical stiles. Lift the entire panel straight up into the deep upper track pocket until the bottom edge clears the raised bottom track rail. Swing the bottom of the door outward into the room and gently lower the panel down.
  4. Stage the Door Securely: Carry the panel carefully and set it down horizontally across your padded sawhorses or flat on the moving blankets. Never rest the bare glass directly on hard concrete or tile.
  5. Extract the Old Roller Assemblies: Inspect the bottom rail cavity. Depending on your door model, the roller may be secured by an end screw through the vertical stile or by a side mounting screw. Back out the retaining screws. If the roller is stuck from years of accumulated grime, insert a flathead screwdriver or hook tool into the housing notch and pry the assembly outward.

Installing New Roller Assemblies and Rehanging the Door

  1. Clean the Internal Pockets: Vacuum loose dirt, metal shavings, and insect debris out of the hollow bottom door rail pockets.
  2. Insert the New Assemblies: Slide the replacement roller cartridges into the cavity, ensuring the adjustment screw aligns perfectly with the access port on the door edge.
  3. Secure the Mounting Hardware: Thread the mounting screws into place. Hand-tighten them securely, taking care not to cross-thread or strip the aluminum channels.
  4. Pre-Set Roller Height: Before rehanging, turn the adjustment screws until both wheels are drawn halfway into their housings. This provides baseline clearance while allowing room for fine-tuning once the door is back in its frame.
  5. Inspect the Track System: Before lifting the door back into place, take a moment to vacuum, scrub, and wipe down the bottom track rail. Similar to how you how to install and maintain sliding glass shower doors, keeping sliding pathways clean prevents premature hardware wear.
  6. Rehang the Sliding Door: With your helper, lift the door panel, insert the top edge into the deep upper frame channel, swing the bottom inward until the wheels hover over the raised rail, and slowly lower the wheels directly onto the track crown.

Height Adjustment and Track Alignment

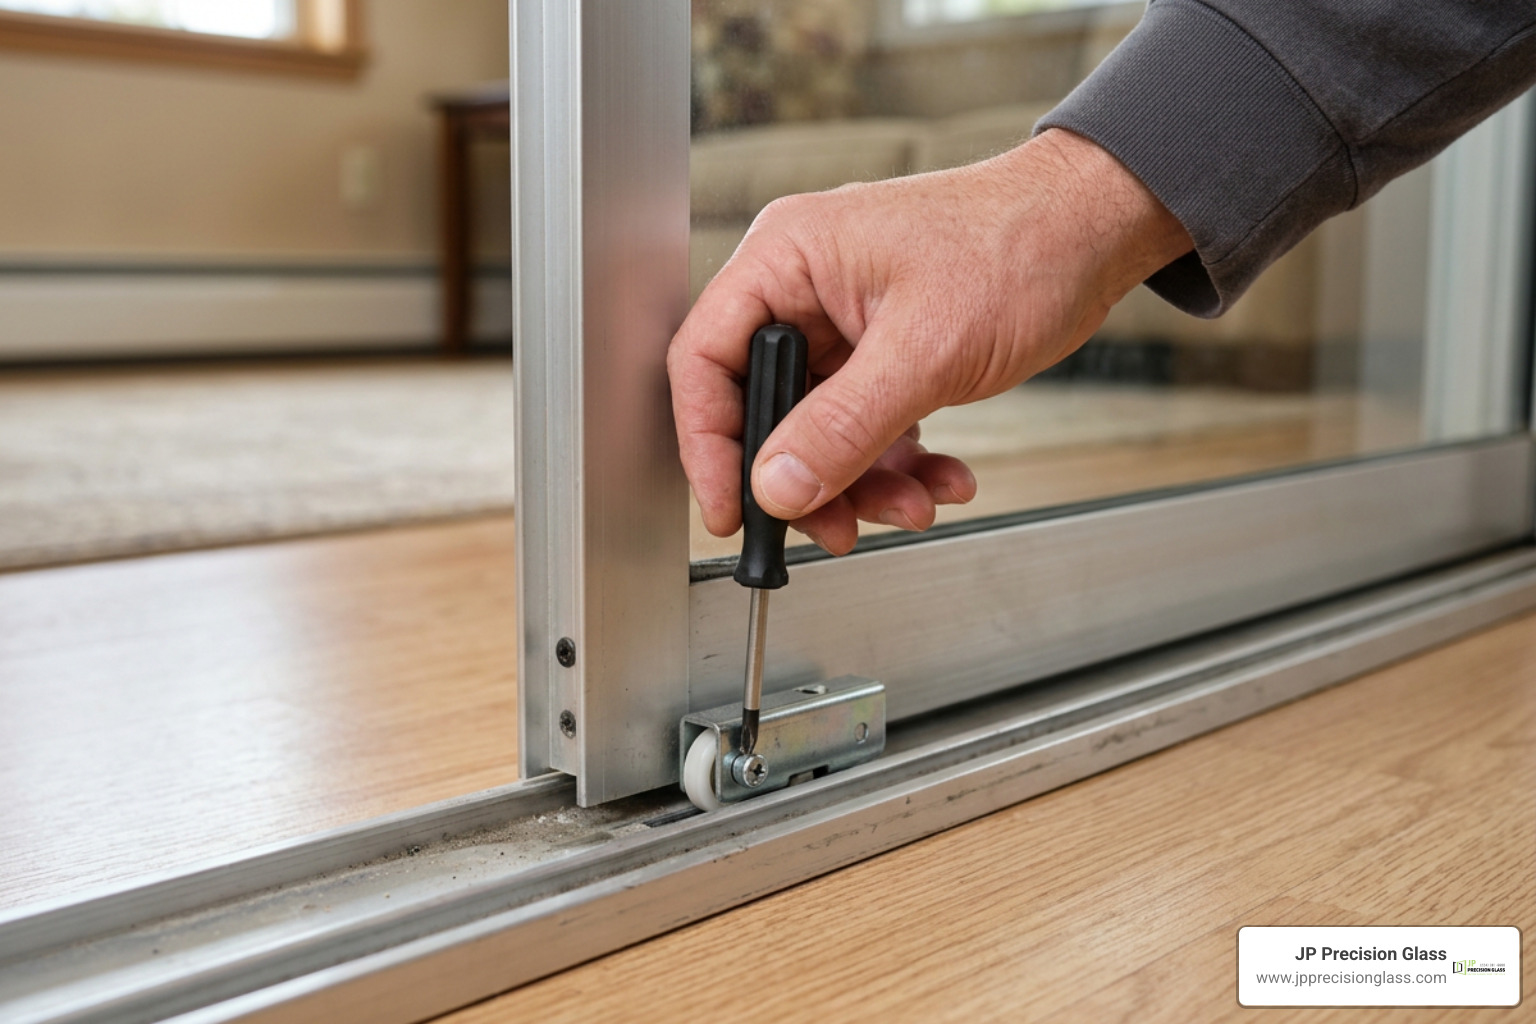
adjusting roller height screws with a screwdriver

Once the door sits securely in the track, you must level the panel to achieve an airtight seal:

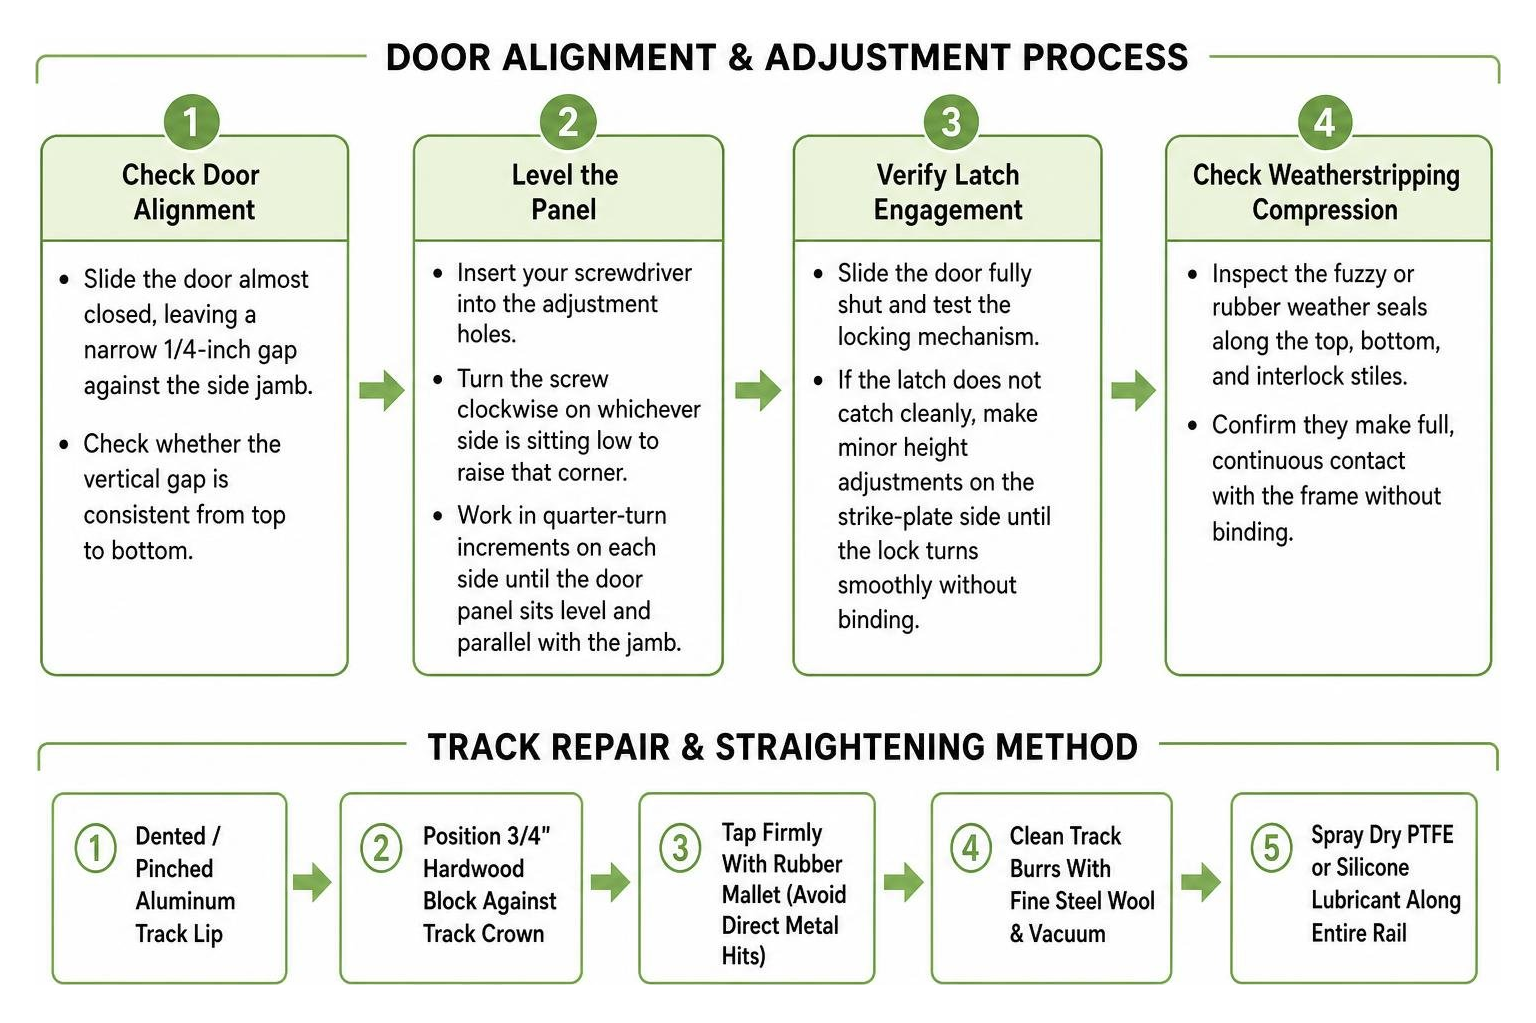
  • Check Door Alignment: Slide the door almost closed, leaving a narrow 1/4-inch gap against the side jamb. Check whether the vertical gap is consistent from top to bottom.
  • Level the Panel: Insert your screwdriver into the adjustment holes. Turn the screw clockwise on whichever side is sitting low to raise that corner. Work in quarter-turn increments on each side until the door panel sits level and parallel with the jamb.
  • Verify Latch Engagement: Slide the door fully shut and test the locking mechanism. If the latch does not catch cleanly, make minor height adjustments on the strike-plate side until the lock turns smoothly without binding.
  • Check Weatherstripping Compression: Inspect the fuzzy or rubber weather seals along the top, bottom, and interlock stiles to confirm they make full, continuous contact with the frame without binding.

Common Troubleshooting and Long-Term Maintenance

Even with brand-new hardware, surrounding track deformities or improper maintenance habits can cause premature roller failure. Addressing these common issues keeps your door gliding smoothly year-round.

track straightening and maintenance process

Correcting Sagging, Jumping Tracks, and Uneven Slides

If a door continues to jump the track or drag unevenly after roller replacement, check these trouble spots:

  • Straightening Bent or Pinched Track Rails: Heavy foot traffic can bend the raised aluminum track crown inward or outward. If the track is pinched, place a 3/4-inch block of wood against the damaged section and tap the wood firmly with a rubber mallet. This reshapes the metal without denting or cracking the aluminum rail. Detailed structural techniques can be found in this troubleshooting guide for sliding door repairs.
  • Installing a Track Cap / Cover: If previous seized rollers wore deep grooves into the track crown, new wheels will drop into those ruts and stick. You can snap a stainless steel track cover (repair cap) over the existing damaged rail to create a fresh, smooth surface without replacing the entire outer threshold.
  • Frame Misalignment: Misaligned frames cause approximately 70% of premature roller failures. If your home’s foundation or door frame has settled out of square, adjusting the rollers to their maximum height might not fully compensate. In that case, the outer frame may need shimming.

Cleaning and Lubrication Best Practices

To maximize the life of your new rollers, perform basic maintenance every six months:

  1. Deep Clean the Tracks: Vacuum pet hair, loose sand, and outdoor dirt from the sill. Use an old toothbrush and warm soapy water to break up hardened grime and mineral deposits, then dry the track thoroughly with a microfiber towel.
  2. Apply Dry Lubricants Only: Never spray standard penetrating oils, automotive grease, or cooking sprays into sliding tracks. Wet lubricants attract dirt and sand, forming an abrasive paste that grinds down bearing seals and wheel profiles. Always use a dry silicone spray or PTFE dry lubricant.
  3. Maintain Overhead Systems: Just as you regularly clean and protect sliding shower doors from soap scum and hard water scale, keeping patio tracks dry and free of debris prevents moisture from corroding lower wheel assemblies.

When to Call a Pro vs Change Sliding Door Rollers Yourself

While changing standard patio rollers is a manageable DIY task for handy homeowners, certain situations call for professional glass technicians:

  • Impact-Resistant Laminated Glass: Coastal impact doors feature thick, laminated glass panes that often weigh between 200 and 350 pounds. Lifting these panels requires specialized vacuum suction cups and mechanical equipment to avoid dropping the door or warping the structural frame.
  • Crushed or Split Frame Thresholds: If the bottom sill is crushed flat or structural rot has softened the subfloor beneath the track, simply replacing the rollers will not fix the issue. The door assembly must be removed to rebuild the structural foundation.
  • Seized Frame Stile Screws: Older aluminum or vinyl frames may have corroded assembly screws that strip or snap when loosened, requiring specialized extractors and re-tapping tools.

Frequently Asked Questions About Sliding Door Roller Replacement

How do I know if my rollers need adjustment or complete replacement?

If your door is difficult to slide, first clean the track and turn the adjustment screws to raise the panel. If the door lifts, stays level, and slides easily, an adjustment was all that was needed.

If the adjustment screw turns without lifting the door, the roller makes a continuous grinding sound, the wheels have flat spots, or the door continues to wobble and scrape the sill, the internal bearings are worn and the rollers must be replaced.

Can I replace sliding door rollers without removing the entire door panel?

On certain aluminum sliding door designs, you can access the rollers by loosening the bottom corner assembly screws and tapping the bottom rail down with a wood block and mallet while the door remains upright.

However, this method carries substantial risk. If you tap the frame unevenly, you can twist the metal stile or apply point-load stress to the tempered glass edge, shattering the entire panel. Removing the door panel onto a flat, padded surface is far safer and allows you to inspect the track and clean the roller pockets thoroughly.

Why does my sliding door still drag after installing new rollers?

If your door still drags after installing new rollers, check these four common culprits:

  1. Rollers Adjusted Too Low: The new rollers may be retracted too far into the housing, allowing the bottom aluminum frame to drag on the track. Turn the adjustment screws clockwise to raise the door.
  2. Damaged Track Crown: If the track has dips, deep gouges, or flat spots from previous failed rollers, the new wheels will drop into those depressions. Installing a stainless steel track cap will fix this.
  3. Debris in the Upper Guide Track: Dirt, spider webs, or failing top weatherstripping in the head channel can bind the top edge of the panel.
  4. Out-of-Square Door Frame: If the rough opening has settled, the top or side frame may pinch the panel as it slides open.

Conclusion

A sticky, stubborn sliding glass door does not mean you need to replace your entire door assembly. In most cases, removing the sliding panel, cleaning out years of track debris, and installing a fresh pair of matched tandem rollers will restore a smooth, quiet glide.

Taking the time to measure your replacement assemblies accurately, leveling the panel evenly with the corner adjustment screws, and applying dry silicone lubricant every season protects your hardware against premature wear.

When dealing with extra-heavy impact glass, structural subfloor settling, or intricate bathroom enclosures, working with professional glass specialists guarantees safe handling and precise alignment. If your home features specialized custom glass installations or requires professional shower door repair chicago services, precision-crafted hardware and professional expertise ensure your glass installations operate safely, cleanly, and effortlessly for years to come.

half glass tub enclosure

The Pros and Cons of Partial Glass Tub Enclosures

What Is a Half Glass Tub Enclosure and Is It Right for You?

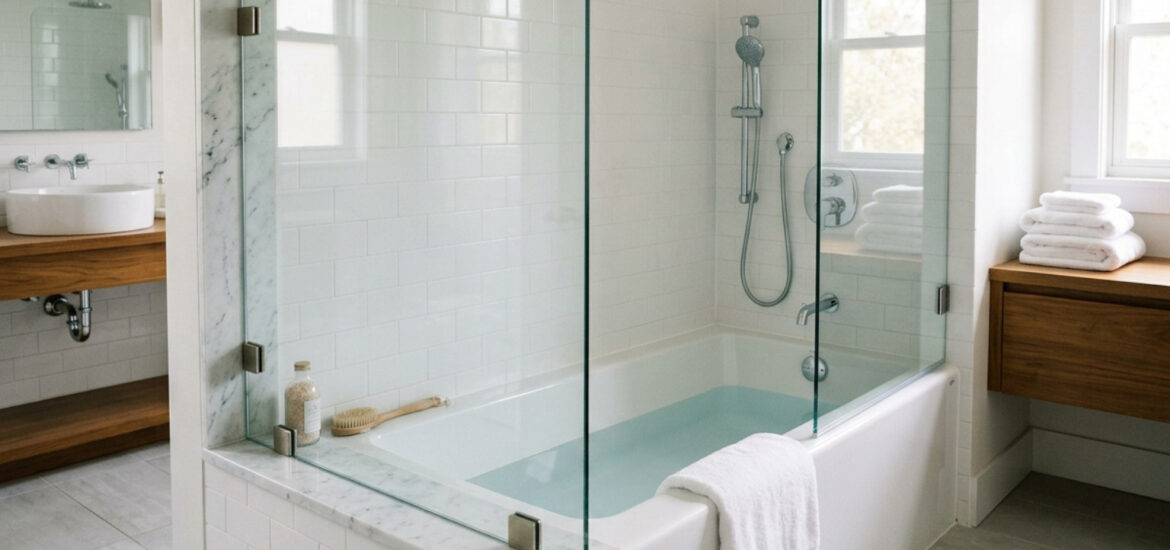
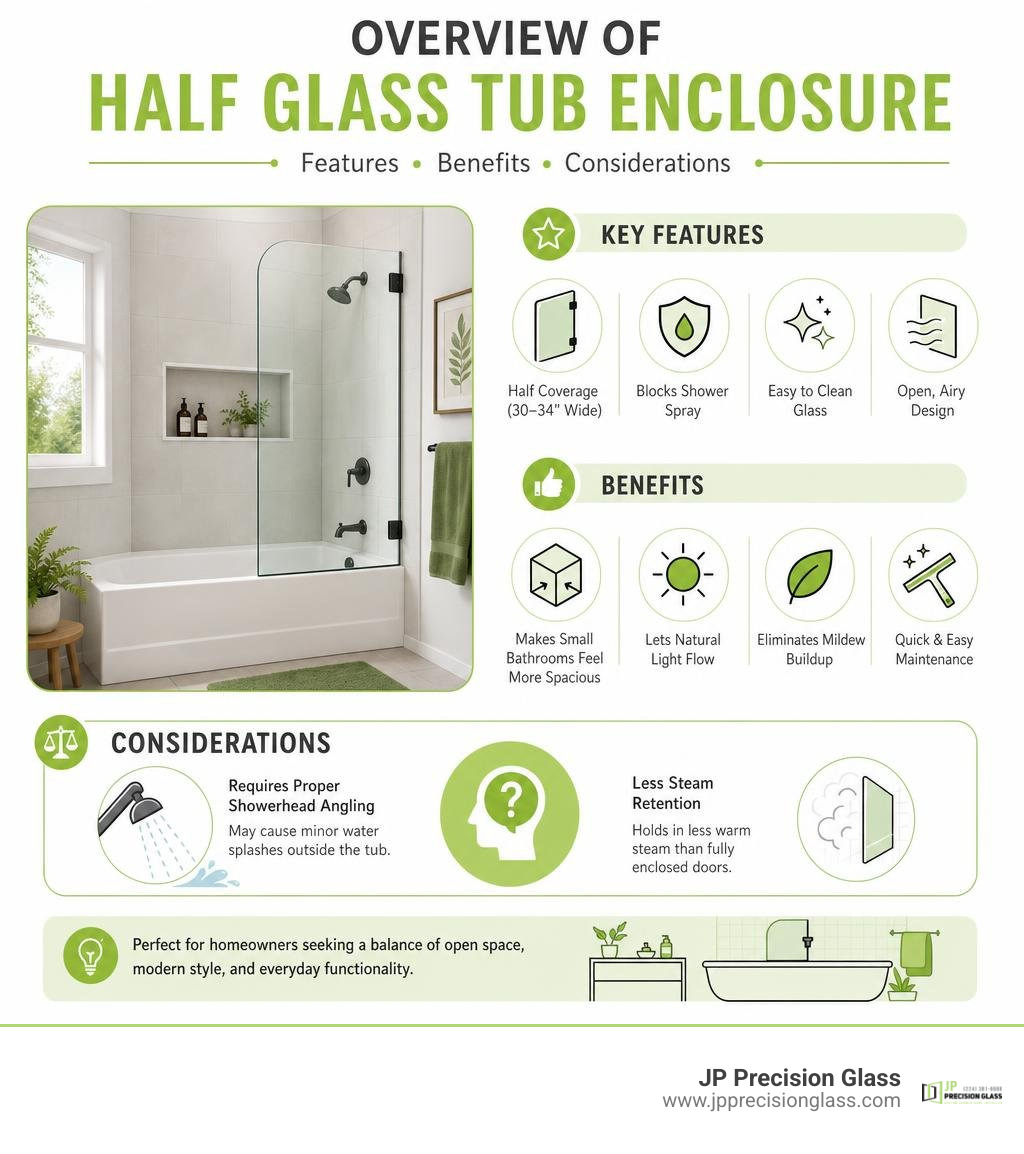
A half glass tub enclosure—often called a European tub screen or tub shield—is a fixed or hinged glass panel that covers roughly half your bathtub (typically 30 to 34 inches wide) to block shower spray while leaving the rest open. It replaces bulky sliding doors and mold-prone curtains with a sleek, open-concept look.

Here is a quick assessment to help you decide if it fits your space:

  • The Big Wins: Makes small bathrooms feel twice as large, lets natural light flow into the tub, eliminates mildew buildup, and cleans in seconds with a squeegee.
  • The Trade-Offs: Requires proper showerhead angling to prevent minor water splashes outside the tub, and it holds in less warm steam than fully enclosed doors.

For homeowners remodeling a standard alcove tub, a partial glass screen bridges the gap between open space and clean functionality.

overview of half glass tub enclosure features benefits and considerations infographic

Handy half glass tub enclosure terms:

Understanding the Half Glass Tub Enclosure Design

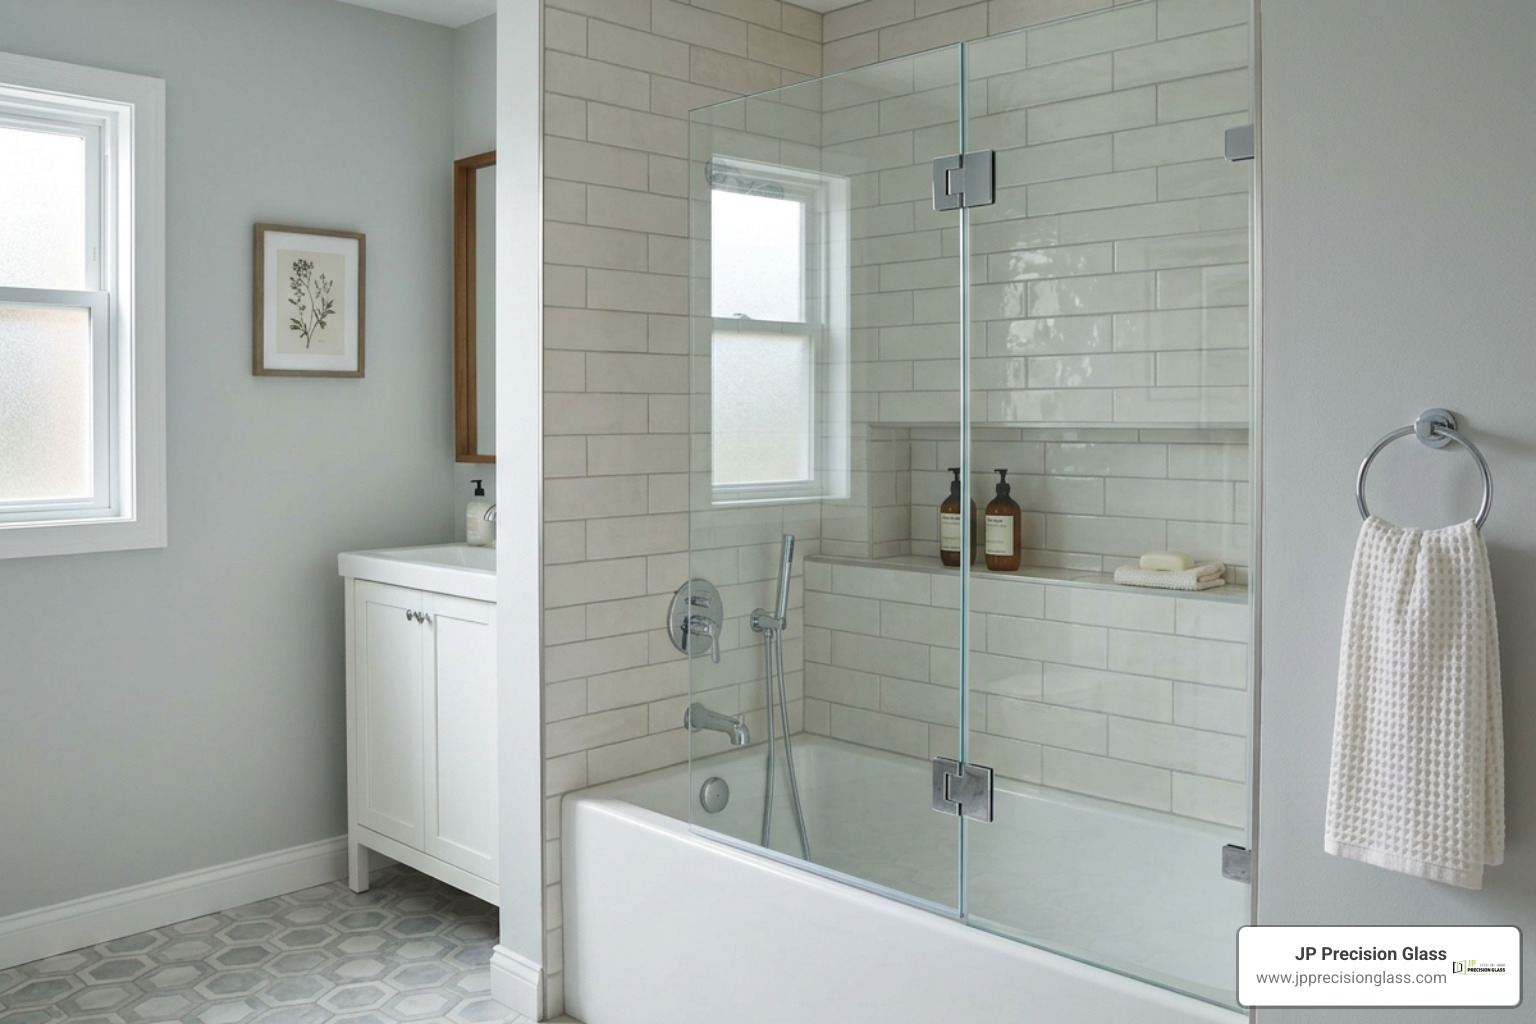
frameless hinged tub shield in an alcove bathroom

A partial glass setup redefines the boundary between the shower area and the rest of the bathroom. Instead of spanning the entire 60-inch width of an alcove tub opening, the glass covers just the critical splash zone right next to the showerhead. This design concept originated in European boutique hotels, where compact square footage demands creative, functional, and visually unobtrusive fixtures.

Understanding shower power why you need a glass bathtub shield begins with looking at the balance between openness and water control. Traditional bypass sliding enclosures require dual top-and-bottom metal tracks. These tracks often trap standing water, shed aluminum oxide dust over time, and create a visual barricade that cuts a bathroom in half. In contrast, partial glass panels mount cleanly to the wall and tub threshold with minimal hardware, letting sightlines pass straight through to decorative tilework.

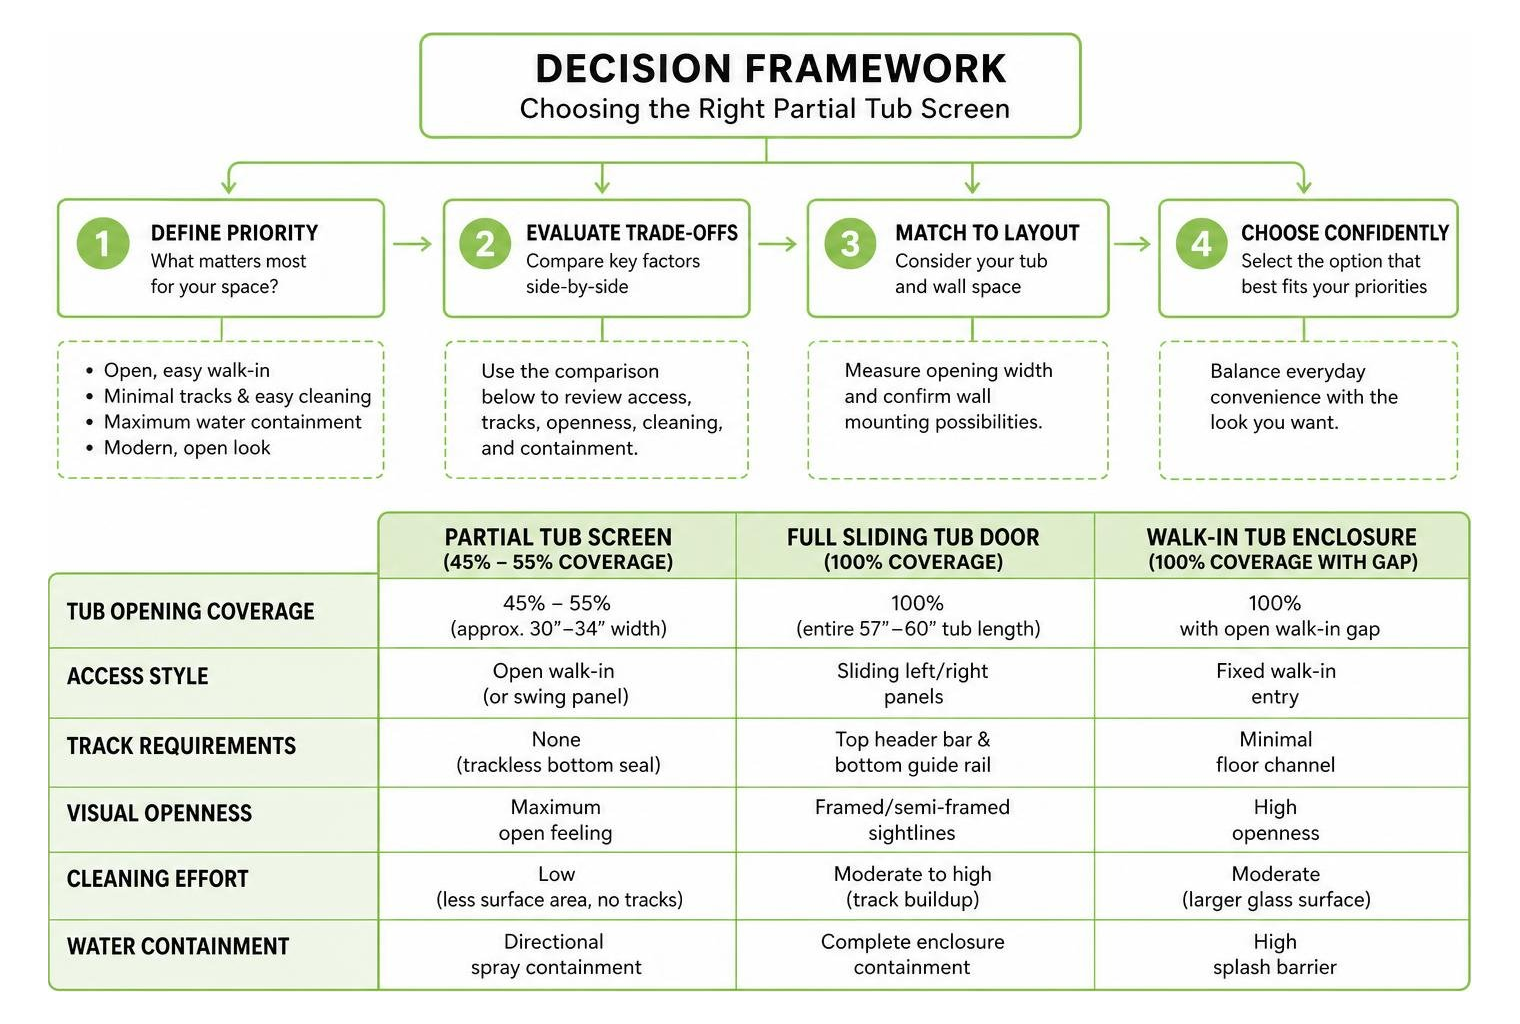
Feature Half Glass Enclosure / Shield Full Bypass Sliding Doors Stationary Full-Height Screen
Tub Opening Coverage 45% – 55% (approx. 30″–34″ width) 100% (entire 57″–60″ tub length) 100% with open walk-in gap
Access Style Open walk-in (or swing panel) Sliding left/right panels Fixed walk-in entry
Track Requirements None (trackless bottom seal) Top header bar & bottom guide rail Minimal floor channel
Visual Openness Maximum open feeling Framed/semi-framed sightlines High openness
Cleaning Effort Low (less surface area, no tracks) Moderate to high (track buildup) Moderate (larger glass surface)
Water Containment Directional spray containment Complete enclosure containment High splash barrier

Fixed Panels vs Hinged Splash Guards

When designing a partial tub screen, the first structural choice is whether the panel remains stationary or moves on hinges:

  • Stationary (Fixed) Panels: A single pane of safety glass is secured directly to the wall with low-profile metal clamps or a slim vertical U-channel, sealed to the tub rim with continuous mildew-resistant silicone. Because there are no moving parts, fixed panels offer rock-solid structural stability and zero mechanical wear.
  • Hinged Splash Guards: These panels utilize wall-mounted or glass-to-glass pivoting hinges that allow the panel to rotate smoothly up to 180 degrees. Swinging the glass outward lets you turn on the water controls without stepping inside, bathe children or pets comfortably, and clean the bathtub corners without contorting your body.
  • Combination Systems: Some layouts feature a narrow stationary panel (around 12 to 14 inches) fixed to the wall, paired with a hinged swinging door (around 18 to 20 inches) attached to its outer edge. This keeps the primary shower stream blocked while extending splash protection during use.

Many hinged models also include integrated horizontal towel bars or exterior handles, which provide a stable grip point for entering and exiting the tub while keeping towels within reach.

Structural Profiles and Hardware Finish Options

The hardware holding the glass sets the tone for your entire bathroom aesthetic:

  • Frameless Glass Styling: Uses heavy tempered glass secured by discrete solid brass or stainless steel wall brackets. With no bulky perimeter framing, frameless glass offers an ultra-clean, architectural finish that blends into modern spaces.
  • Semi-Frameless Designs: Utilizes a slim wall-mounted vertical profile to support slightly lighter glass panels. This profile offers subtle adjustability for out-of-plumb walls while keeping the top and outer edges exposed.
  • Hardware Finishes: You can match your glass hardware to your existing plumbing fixtures. Matte black delivers an industrial, high-contrast look that pairs well with subway or slate tiles. Brushed nickel and brushed stainless steel provide timeless warmth and hide water spots effortlessly. Polished chrome delivers a crisp, mirror-like shine, while brushed gold or champagne bronze adds a touch of modern luxury.

The Key Advantages and Disadvantages of Partial Bathtub Screens

Installing partial glass requires balancing contemporary design with everyday practicality. Examining the splish splash no bath pros and cons of a bathtub glass half door helps set realistic expectations for your daily routine.

decision framework for choosing a partial tub screen

Major Benefits of a Half Glass Tub Enclosure System

  • Expanded Spatial Perception: Shower curtains and frosted full doors create visual walls that make standard 5×8-foot bathrooms feel cramped. Clear glass lets your eye travel from wall to wall, making the room feel wider, brighter, and taller.
  • Elimination of Mold and Mildew: Fabric and vinyl shower curtains cling to wet skin and harbor soap scum and black mold along their bottom hems. Smooth tempered glass dries quickly, resists bacterial growth, and eliminates recurring curtain replacements.
  • Effortless Maintenance: With less glass surface area than a full bypass door system, keeping a half enclosure pristine takes under a minute. A quick wipe with a silicone squeegee after showering prevents mineral buildup.
  • Showcasing Custom Tilework: If you have invested in intricate herringbone tile, natural marble, or accent niches, a partial glass screen keeps those design investments fully visible.
  • Steam and Warmth Retention: While partially open, a properly placed glass shield captures and deflects the upward thermal draft of the shower stream, keeping the bathing zone pleasantly warm.

When planning a full bathroom refresh, choosing to upgrade your tub the best bathtub with half glass enclosures to buy gives an older alcove setup an instant facelift.

Potential Drawbacks and Splash Limitations

  • Water Escape Risks: Because roughly half the tub remains open, high-pressure horizontal body sprays or wild splashing can send droplets onto the bathroom floor. Angling your showerhead downward toward the opposite back corner is essential.
  • Draft Sensitivity: Because the enclosure does not seal off the ceiling and tub ledge completely, cooler air can circulate into the shower area if your bathroom is particularly drafty.
  • Privacy Limitations: Clear glass offers no visual barrier. If multiple family members share a bathroom simultaneously during morning rush hours, an opaque or textured glass treatment may be necessary.
  • Precise Installation Tolerances: Unlike flexible shower curtains that forgive uneven surfaces, rigid glass panels require flat tub ledges and plumb walls to maintain a watertight seal.

Choosing the Right Glass Type and Configurations

Selecting the correct glass involves evaluating structural thickness, safety compliance, and visual opacity. For a deeper look at glass fabrication options, consult our breakdown on how glass shower doors a comprehensive guide to types comparison covers safety and performance profiles.

Glass Thickness and Safety Treatments for a Half Glass Tub Enclosure

Glass panels for bathtub screens must withstand thermal changes, accidental bumps, and continuous moisture.

  • 1/4-Inch (6 mm) Tempered Glass: Standard for semi-framed designs and lighter swinging doors. It provides structural safety while keeping the overall panel weight light, reducing stress on wall anchors.
  • 5/16-Inch (8 mm) Tempered Glass: A popular mid-weight option for frameless hinged screens, providing a solid feel without excessive weight.
  • 3/8-Inch (10 mm) Tempered Glass: The gold standard for heavy frameless installations. It provides premium stability, eliminates panel wobble, and features smooth, polished beveled edges.
  • Laminated Safety Glass Options: Engineered by bonding two glass lites around a tear-resistant polyvinyl butyral (PVB) interlayer. In the rare event of impact breakage, the glass fragments remain bonded to the plastic interlayer rather than falling into the tub.
  • Factory-Applied Protective Coatings: High-performance hydrophobic surface treatments fill the microscopic pores of the glass. This causes water to bead up and roll off, carrying minerals and soap residues away before they can bond and cause etching.

Privacy Options: Frosted, Tinted, and Patterned Styles

  • Standard Clear Glass: The classic option. It features a faint greenish tint along the exposed polished edges due to natural iron oxide content.
  • Ultra-Clear (Low-Iron) Glass: Specially formulated to remove the greenish tint, offering crystal-clear optical clarity. This is ideal if you have pure white marble, bright subway tile, or colorful accents you want to display accurately.
  • Acid-Etched (Frosted) Glass: Chemically treated on one side to produce a smooth, satin translucent finish. It diffuses incoming light while providing complete privacy for the bather.
  • Cast and Patterned Glass: Features textured designs (such as rain, fluted, or reed patterns) rolled into the glass surface during manufacturing. It scatters light, hides water spots, and adds a decorative focal point.
  • Tinted Glass (Smoke Gray or Bronze): Infused with subtle metal oxides to provide a shaded, moody aesthetic that complements dark slate, brass accents, or modern industrial bathroom palettes.

Measuring, Installation, and Bathtub Compatibility

Installing glass onto an existing bathtub requires checking clearances, plumb lines, and structural backing. To explore complementary design layouts, reviewing how to choose the perfect glass tub enclosure for your bathroom ensures your selected panel matches your room’s traffic patterns.

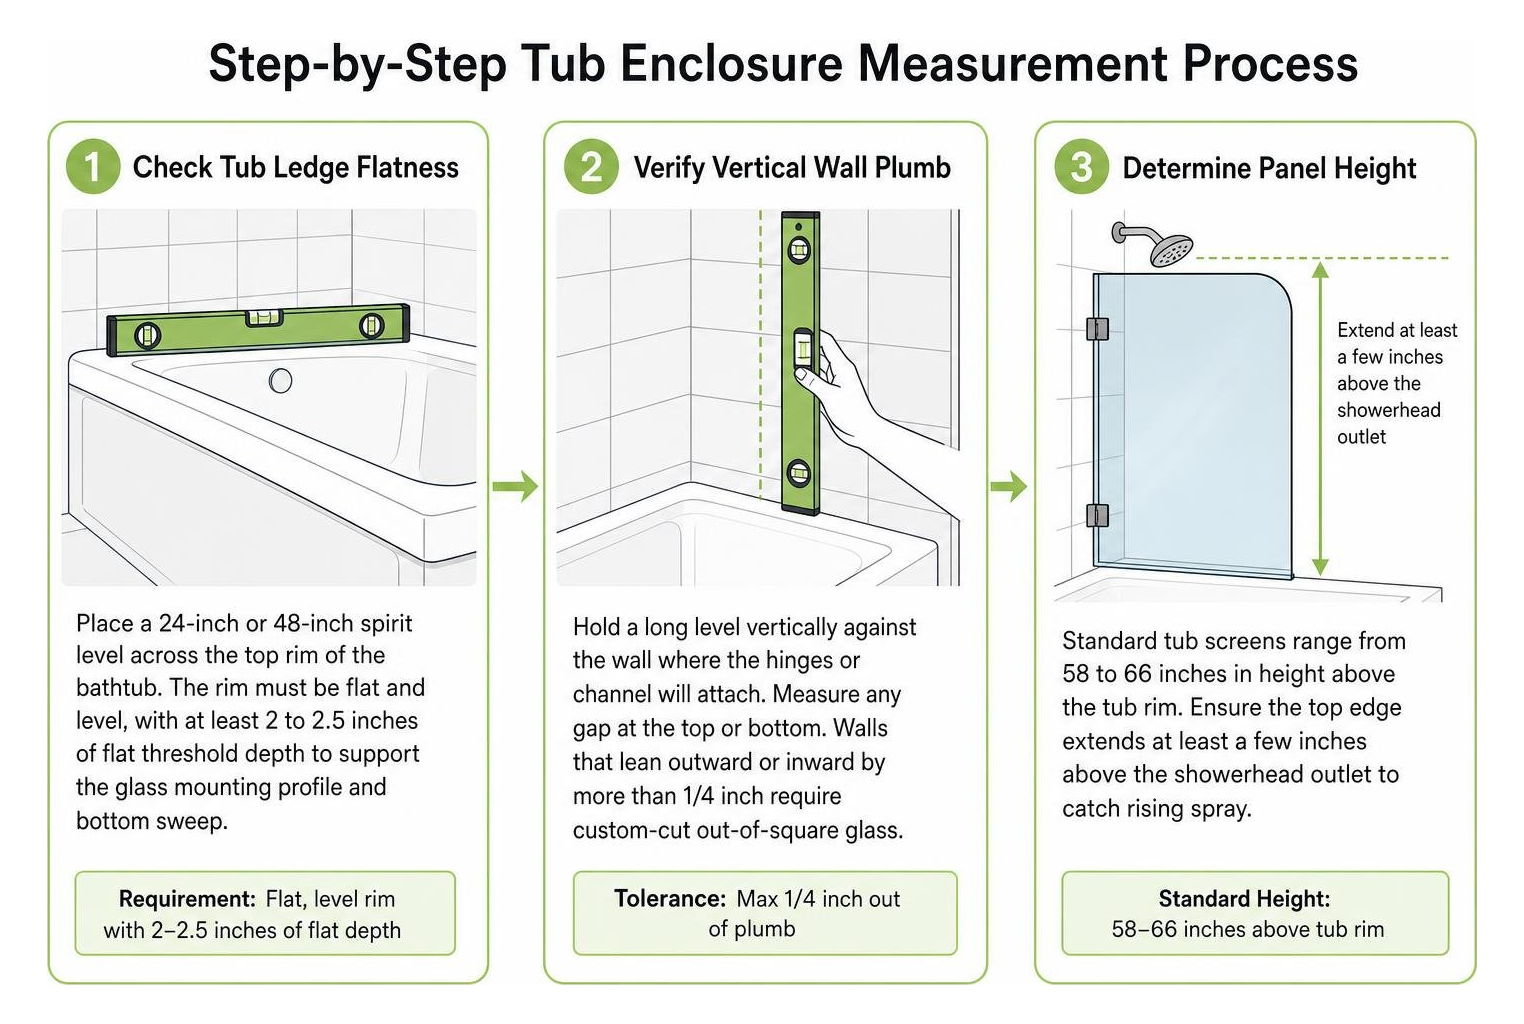
step-by-step tub enclosure measurement process

Measuring Existing Alcove Bathtubs Accurately

  1. Check Tub Ledge Flatness: Place a 24-inch or 48-inch spirit level across the top rim of the bathtub. The rim must be flat and level, with at least 2 to 2.5 inches of flat threshold depth to support the glass mounting profile and bottom sweep.
  2. Verify Vertical Wall Plumb: Hold a long level vertically against the wall where the hinges or channel will attach. Measure any gap at the top or bottom. Walls that lean outward or inward by more than 1/4 inch require custom-cut out-of-square glass to avoid large, unsightly silicone gaps.
  3. Determine Panel Height: Standard tub screens range from 58 to 66 inches in height above the tub rim. Ensure the top edge extends at least a few inches above the showerhead outlet to catch rising spray.
  4. Map Outswing Clearances: For hinged models, check the arc of the swing. Ensure the glass panel will not strike the vanity cabinet, toilet bowl, or towel bars when opened into the room.

Installation Requirements and Building Codes

  • Solid Wall Anchoring: Glass screens are heavy. Mounting screws must bite directly into solid wood wall studs behind the tile or use heavy-duty toggle anchors rated for masonry and cement backer board.
  • Tile Drilling Techniques: Drilling through porcelain, granite, or natural stone requires specialized diamond-tipped core drill bits lubricated with water to avoid cracking expensive tile.
  • Structural Silicone Application: High-grade 100% neutral-cure silicone sealant must be applied along the stationary panel joints. Allow a full 24 to 48 hours for curing before exposing the enclosure to shower water.
  • Safety Glazing Codes: All glass installed adjacent to bathtubs must comply with building codes and safety glazing standards (such as ANSI Z97.1 and CPSC 16 CFR 1201). Certified panels feature a permanent etched safety stamp in one corner.

Frequently Asked Questions About Tub Splash Guards

Can a partial glass screen be installed on any standard bathtub?

Most standard alcove bathtubs made of cast iron, enameled steel, or acrylic can accommodate a partial glass screen. The key requirement is a flat, level tub rim that measures at least 2 inches across. Tubs with heavily curved roll-top rims or steep internal slopes along the edge may not provide a stable, watertight seating surface for the bottom seal.

How do you prevent water from leaking past a partial tub shield?

To minimize water escaping past the open half of the tub:

  1. Direct the Showerhead: Angle your adjustable showerhead slightly downward and toward the wet wall or back corner rather than pointing it toward the open room.
  2. Use Bottom Sweep Seals: Install a tight, UV-resistant translucent vinyl bottom sweep with a built-in deflector fin that directs water running down the glass back into the tub basin.
  3. Position Correctly: Ensure your stationary glass panel extends at least 30 to 34 inches from the plumbing wall, fully covering the primary splash impact zone.

How do you clean and maintain glass tub panels?

Keeping your tub screen sparkling requires a simple routine:

  • Daily Care: Use a squeegee to wipe water droplets down the glass after your final shower of the day. This takes less than 30 seconds and stops hard water minerals from bonding to the surface.
  • Weekly Care: Wipe the hardware and bottom vinyl sweep with a soft microfiber cloth and a pH-neutral cleaner. Avoid abrasive scouring pads, bleach, or ammonia-based sprays, which can degrade protective coatings and corrode metal hinges.
  • Hard Water Removal: For mineral spots, apply a 50/50 mix of distilled water and white vinegar, let it sit for two minutes, and wipe clean with a microfiber cloth.

Conclusion

Upgrading your bathroom with a partial tub screen turns a standard shower-tub combo into a bright, modern, spa-inspired retreat. By swapping out cumbersome curtains or metal tracks for sleek, architectural glass, you open up sightlines, eliminate mildew, and showcase your tilework.

At JP Precision Glass, we specialize in designing, custom-fabricating, and installing precision-fit glass shower and bathtub enclosures across the greater Chicago area. Whether you need a custom-cut out-of-plumb stationary screen or a frameless hinged splash guard with designer hardware, our team ensures a seamless fit tailored to your home. Contact us today to start designing your ideal bathroom glass solution.

bathroom glass shower cabin

Why a Bathroom Glass Shower Cabin is the Ultimate Modern Upgrade

Why a Bathroom Glass Shower Cabin Is the Ultimate Modern Upgrade

A bathroom glass shower cabin is an enclosed shower structure made from tempered safety glass panels and sealed hardware designed to contain water while creating an open, bright space.

To choose the right glass shower cabin for your bathroom, focus on three main factors:

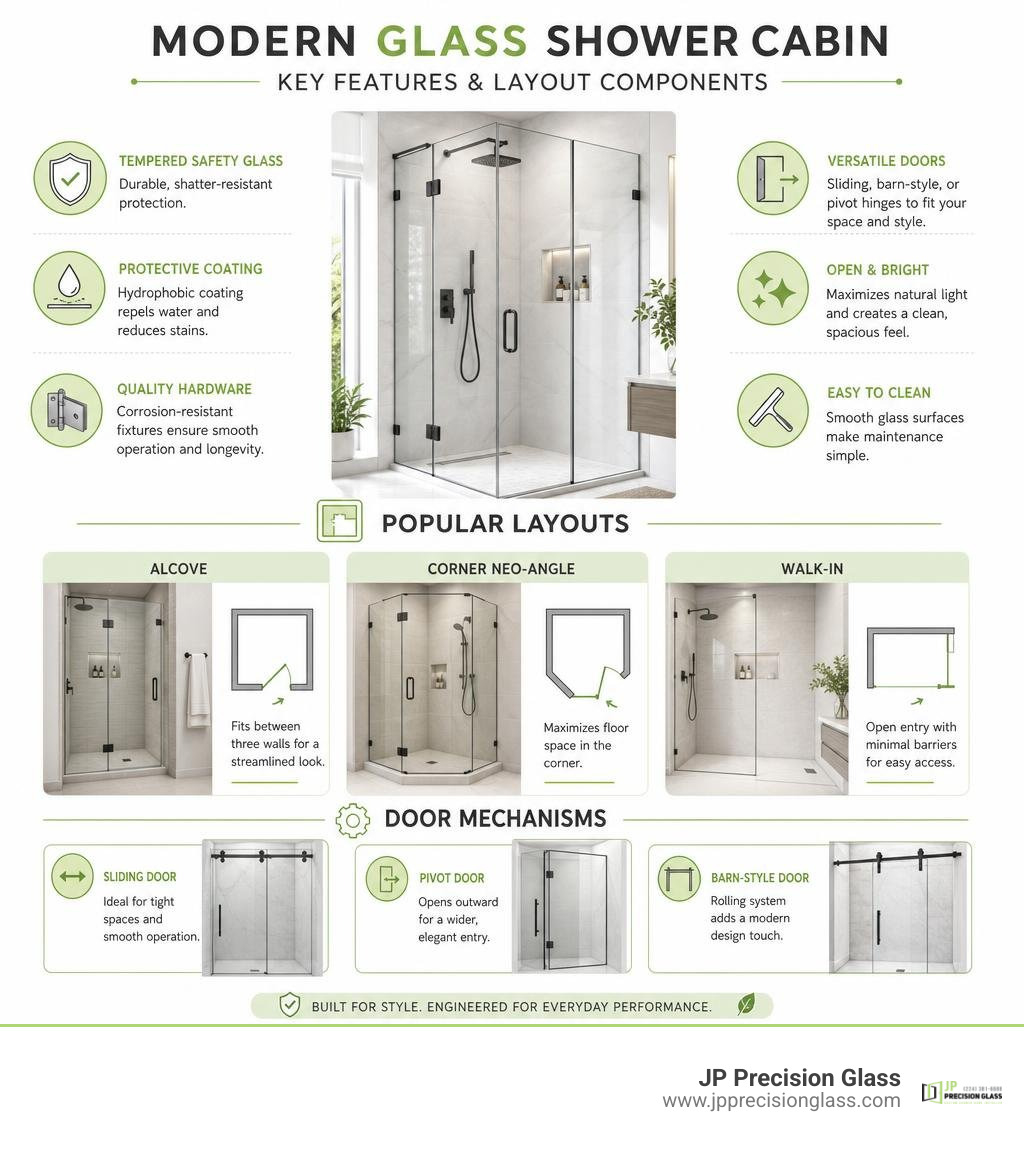
  • Layout type: Pick an alcove setup for three-wall spaces, a corner neo-angle unit to save floor space, or a walk-in design for barrier-free entry.
  • Door mechanism: Use sliding or rolling barn-style doors for tight clearance, or pivot hinges for wider openings.
  • Glass specifications: Look for 3/8-inch (10mm) tempered safety glass paired with a hydrophobic protective coating to resist hard water stains.

Traditional shower curtains trap moisture, block natural light, and make compact bathrooms feel closed in. Switching to glass transforms the room into a clean, modern space that highlights your tilework and keeps water securely contained.

Whether you are updating an existing alcove or fitting a custom enclosure into an older home with out-of-plumb walls, selecting the right door style and hardware makes all the difference.

Key features and layout components of a modern glass shower cabin infographic

Discover more about bathroom glass shower cabin:

Essential Configurations for a Bathroom Glass Shower Cabin

Every bathroom has its own spatial footprint, plumbing arrangement, and traffic flow. Choosing the right configuration ensures you do not end up bumping your knees against the vanity or fighting a swinging door every time you step out of the shower.

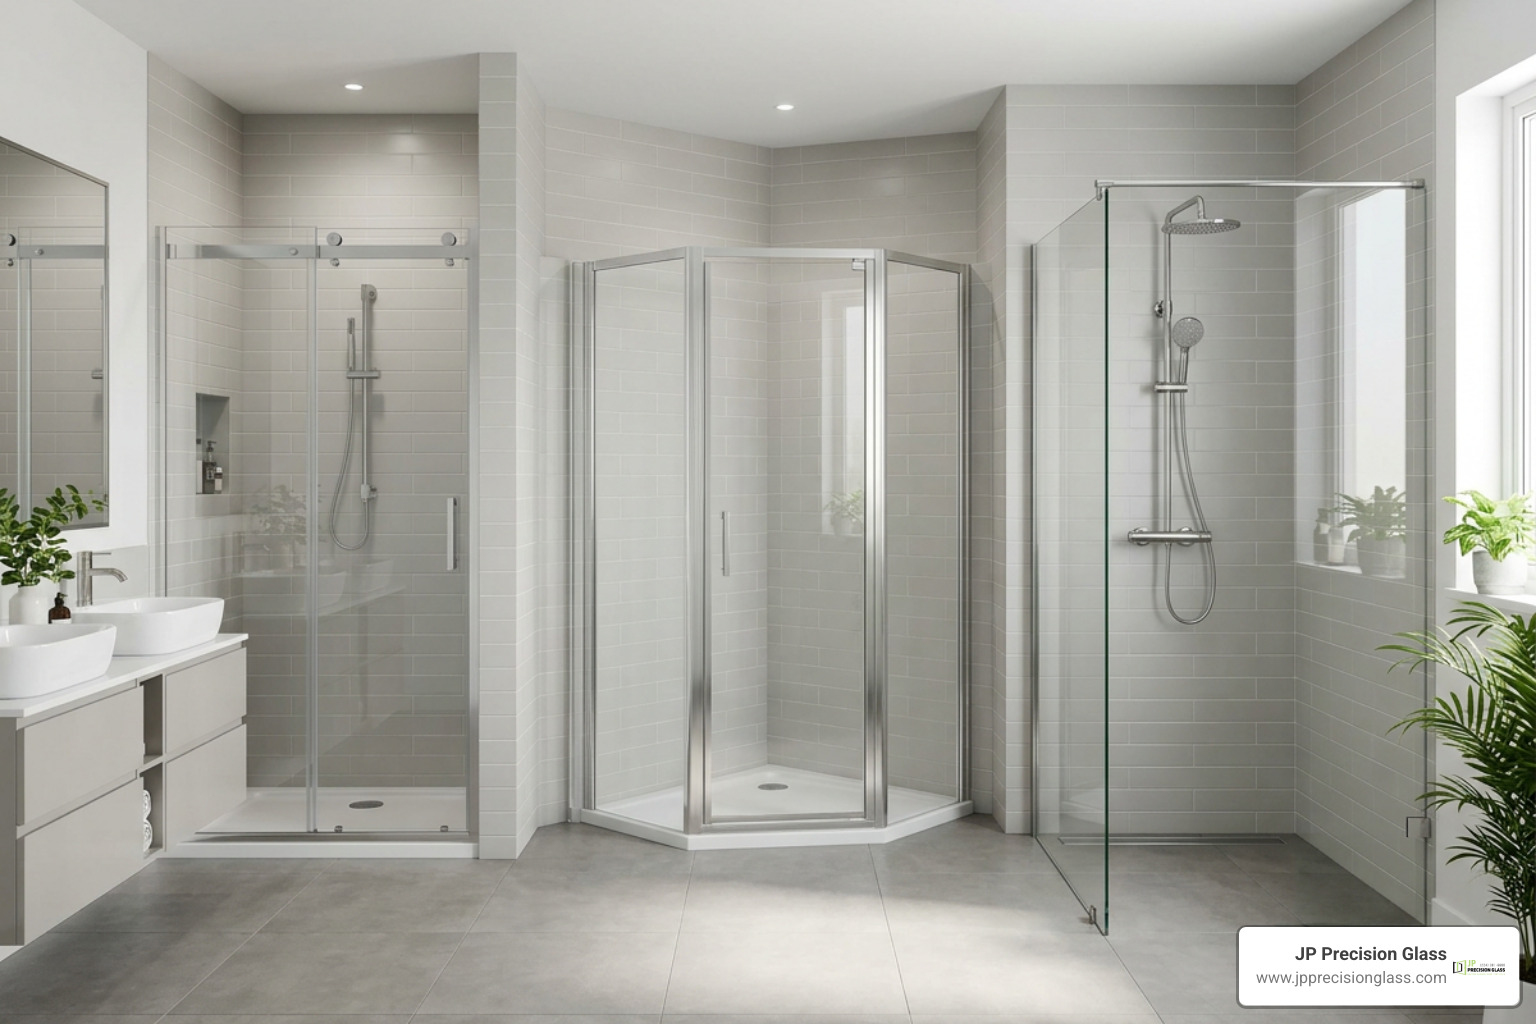
Comparison of alcove, corner, and walk-in shower enclosures

Whether you are remodeling a tight guest powder room or designing an expansive master suite, there is a dedicated layout designed to maximize your usable floor space and contain moisture effectively.

Shower Cabin Layout Spatial Footprint Best Door Mechanism Ideal Bathroom Size Primary Advantage
Alcove Enclosure Recessed between 3 existing walls Sliding, Rolling, or Pivot Medium to Large Seamless architectural fit
Corner Neo-Angle 2 walls with a clipped diamond corner Pivot / Hinged door Small to Medium Maximizes central floor clearance
Corner Quadrant 2 walls with a curved outer profile Dual curved sliding doors Compact / Small Zero exterior door swing needed
Walk-In / Wet Room 1–2 walls with open entry Fixed partition (No door) Large / Master suite Barrier-free, low-maintenance entry
Over-Tub Screen Mounted to bathtub rim Hinged or sliding panel Multi-functional bathrooms Modernizes tubs without remodeling walls

Walk-In and Alcove Shower Layouts

Alcove showers sit neatly between three finished walls, making them one of the most common residential layouts. In standard configurations, widths typically range from 48 inches to 72 inches. For these setups, you can opt for a swinging pivot door if floor clearance allows, or a sleek sliding bypass system if you want to keep the walkway completely clear.

For larger floor plans, open walk-in designs eliminate the door entirely. These setups rely on a single, fixed structural partition to shield the rest of the bathroom from overspray while leaving an open walk-through path. If you are debating between an enclosed cabin and a minimalist barrier-free space, reading A Comprehensive Guide to Comparing Walk-in Shower Options will help you evaluate water containment versus open spatial flow.

Corner and Neo-Angle Glass Cabin Enclosures

Corner spaces demand smart geometry. When you only have two structural walls available, a standard square enclosure can crowd nearby vanities or toilets. This is where neo-angle and curved quadrant enclosures excel.

A neo-angle enclosure cuts across the corner at a 45-degree angle, forming a diamond-like footprint with a central pivot door flanked by two stationary glass panels. This clipped-corner geometry instantly frees up valuable floor space in front of the shower.

Alternatively, quadrant shower cabins use curved sliding panels that glide along dedicated tracks, such as the curved engineered profiles found in the SKCP4 90×90 195, satin+transparent – Ravak COM system. If your layout favors rectangular corner dimensions rather than a symmetrical square, The Ultimate Guide to 1200 x 800 Sliding Door Shower Enclosures covers how offset sliding configurations keep tight bathrooms comfortable.

Glass Tub Combinations and Screen Extensions

If your home has a combined bathtub and shower unit, you do not have to settle for a clingy plastic shower curtain. Installing fixed or hinged glass screens directly along the tub deck elevates the space into a contemporary, spa-inspired feature.

You can select a single stationary panel, a bi-fold glass splash guard, or a full sliding system that runs the entire length of the tub. For homeowners looking into tub retrofits, our guide on How to Choose the Perfect Glass Tub Enclosure for Your Bathroom details how to measure tub decks accurately. If you need extra splash protection beyond a single pane, The Ultimate Guide to Bath Shower Screen Extension Panels walks through modular extensions that prevent puddle buildup outside the tub.

Key Structural Features and Premium Glass Specifications

A shower cabin must withstand daily temperature fluctuations, heavy moisture, and hundreds of door operations each year. The secret to long-term reliability lies in the thickness of the glass, the durability of the structural hardware, and protective surface treatments.

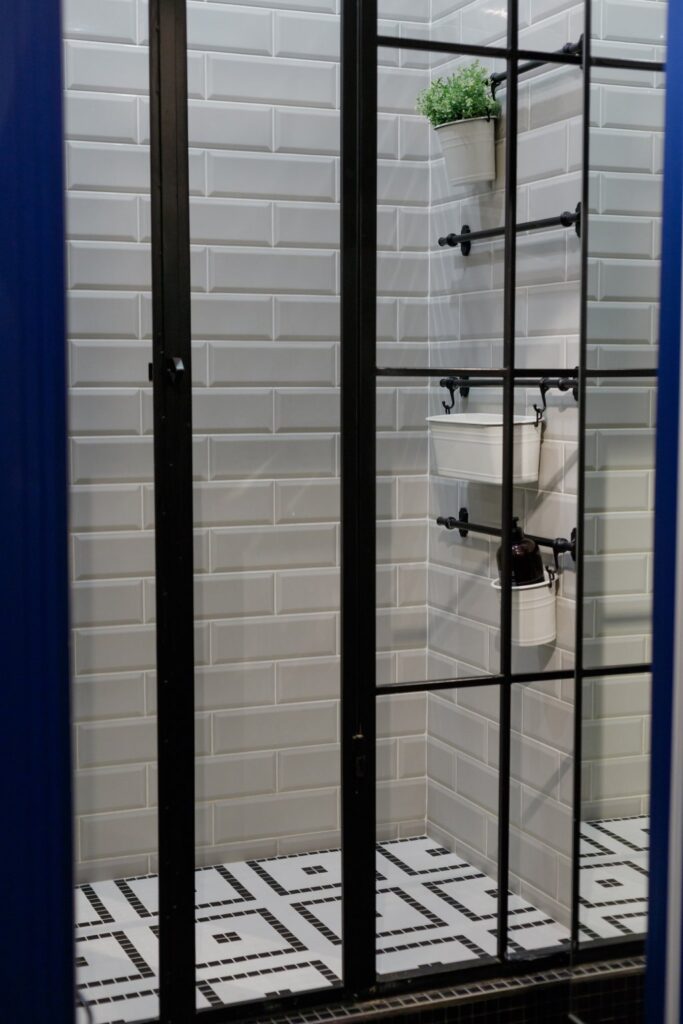
Close-up of heavy tempered glass edge and matte black roller hardware

Tempered Safety Glass Thickness and Quality

Safety glass is non-negotiable in modern bathrooms. Standard residential enclosures generally use glass thicknesses ranging from 6mm (1/4 inch) to 10mm (3/8 inch), with custom heavy glass installations sometimes reaching 12mm (1/2 inch).

  • 6mm to 8mm Glass: Common in framed and semi-frameless systems where metal channels provide perimeter structural support.
  • 10mm (3/8 inch) Glass: The industry gold standard for premium frameless showers. It delivers structural rigidity, eliminates panel wobble, and feels solid in hand.
  • 12mm (1/2 inch) Glass: Used for extra-tall architectural glass walls and large unsupported stationary screens.

Heavy architectural glass offers superior acoustic dampening and shatter resistance. If you want to understand how thick glass changes the structural feel of your bathroom, exploring the Benefits of Frameless Glass Shower Doors provides deep insight into structural integrity. When paired with securely mounted stationary Glass Shower Panels, thick glass creates a clean, open space without bulky perimeter framing.

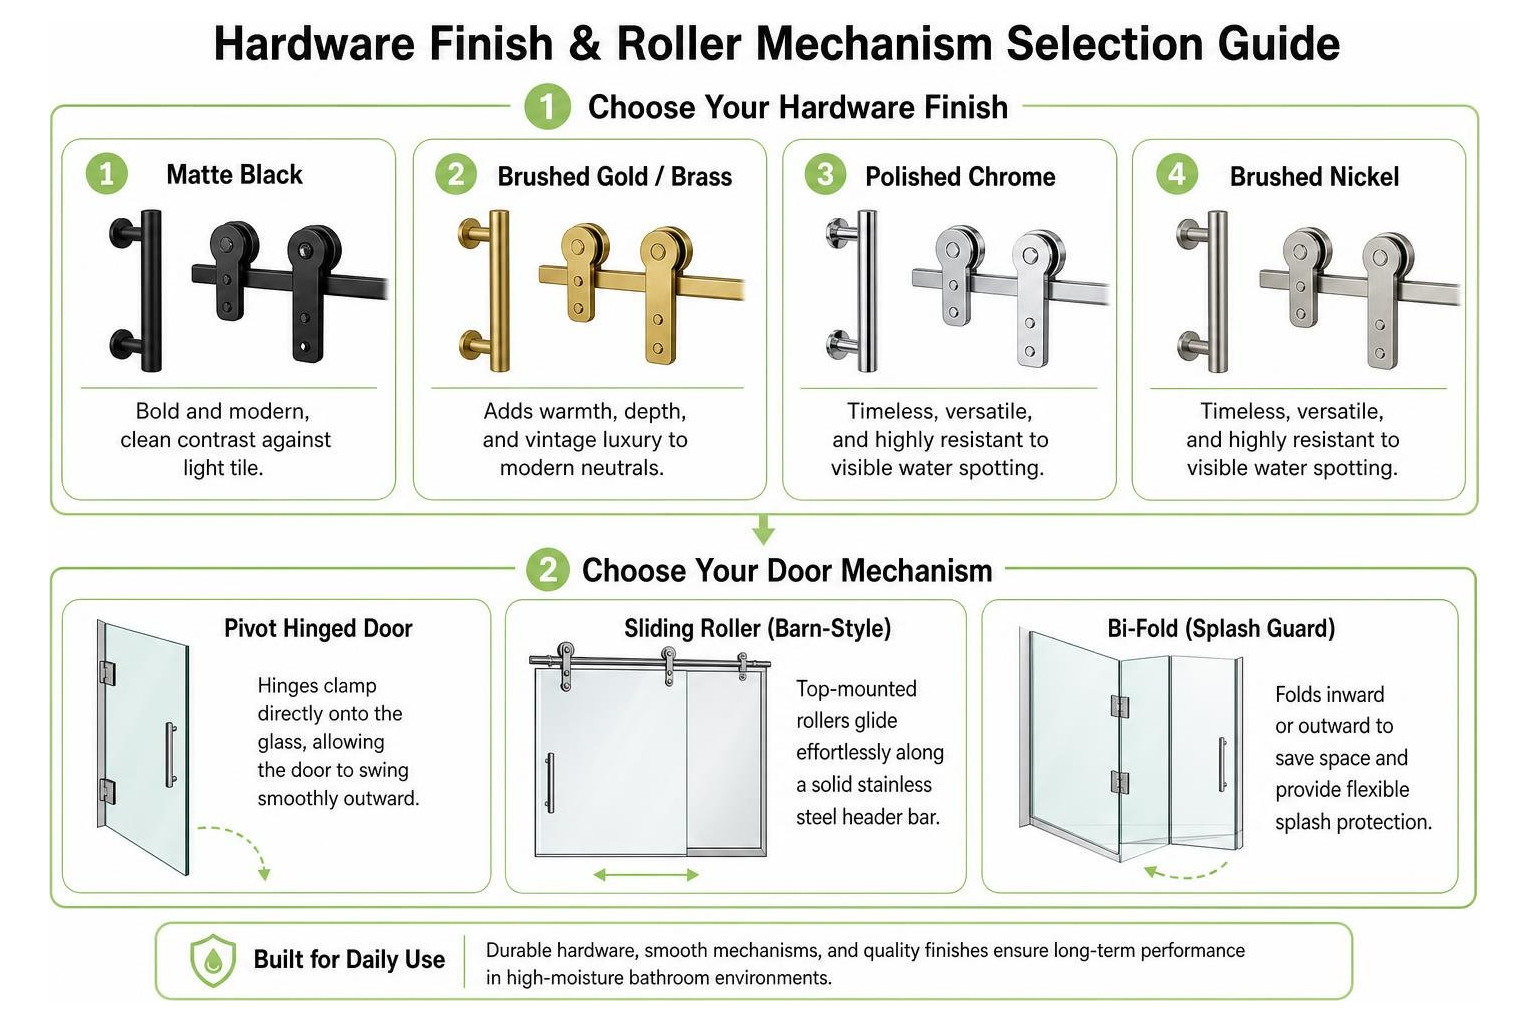
Hardware Finishes and Door Mechanisms

Your hardware finish ties the entire bathroom aesthetic together. Modern installations commonly feature:

  • Matte Black: Bold and modern, providing clean contrast against white marble or light subway tile.
  • Brushed Gold / Brass: Adds warmth, depth, and vintage luxury to modern neutral palettes.
  • Polished Chrome & Brushed Nickel: Timeless, versatile, and highly resistant to visible water spotting.

Hardware finish and roller mechanism selection guide

Beyond aesthetics, the door mechanism determines daily usability. Traditional pivot hinges clamp directly onto the glass, allowing the door to swing smoothly outward. For sliding enclosures, exposed roller barn-style systems feature top-mounted wheels that glide effortlessly along a solid stainless steel header bar. If you are comparing operating styles, read Glass Shower Doors: A Comprehensive Guide to Types Comparison and check out premium Shower Glass Accessories like solid brass pull handles and low-profile vinyl splash seals.

Hydrophobic Coatings and Anti-Jamming Track Systems

Unprotected glass is naturally porous. Over time, hard water minerals, soap scum, and body oils penetrate microscopic surface valleys, leading to stubborn cloudiness and etching. Factory-applied hydrophobic coatings fill these microscopic pores, creating an ultra-smooth, water-repellent barrier that forces water to bead up and roll away.

For sliding systems, track mechanics are equally crucial. Premium sliding cabins incorporate anti-jamming and anti-blocking track profiles designed to prevent sliding wheels from derailing. Top-tier glide mechanisms are cycle-tested up to 1,000,000 opening and closing cycles, ensuring effortless operation over decades. Learn more about the latest glass treatments and hardware engineering in Shower Glass Innovations.

Sizing, Layout Planning, and Installation Considerations

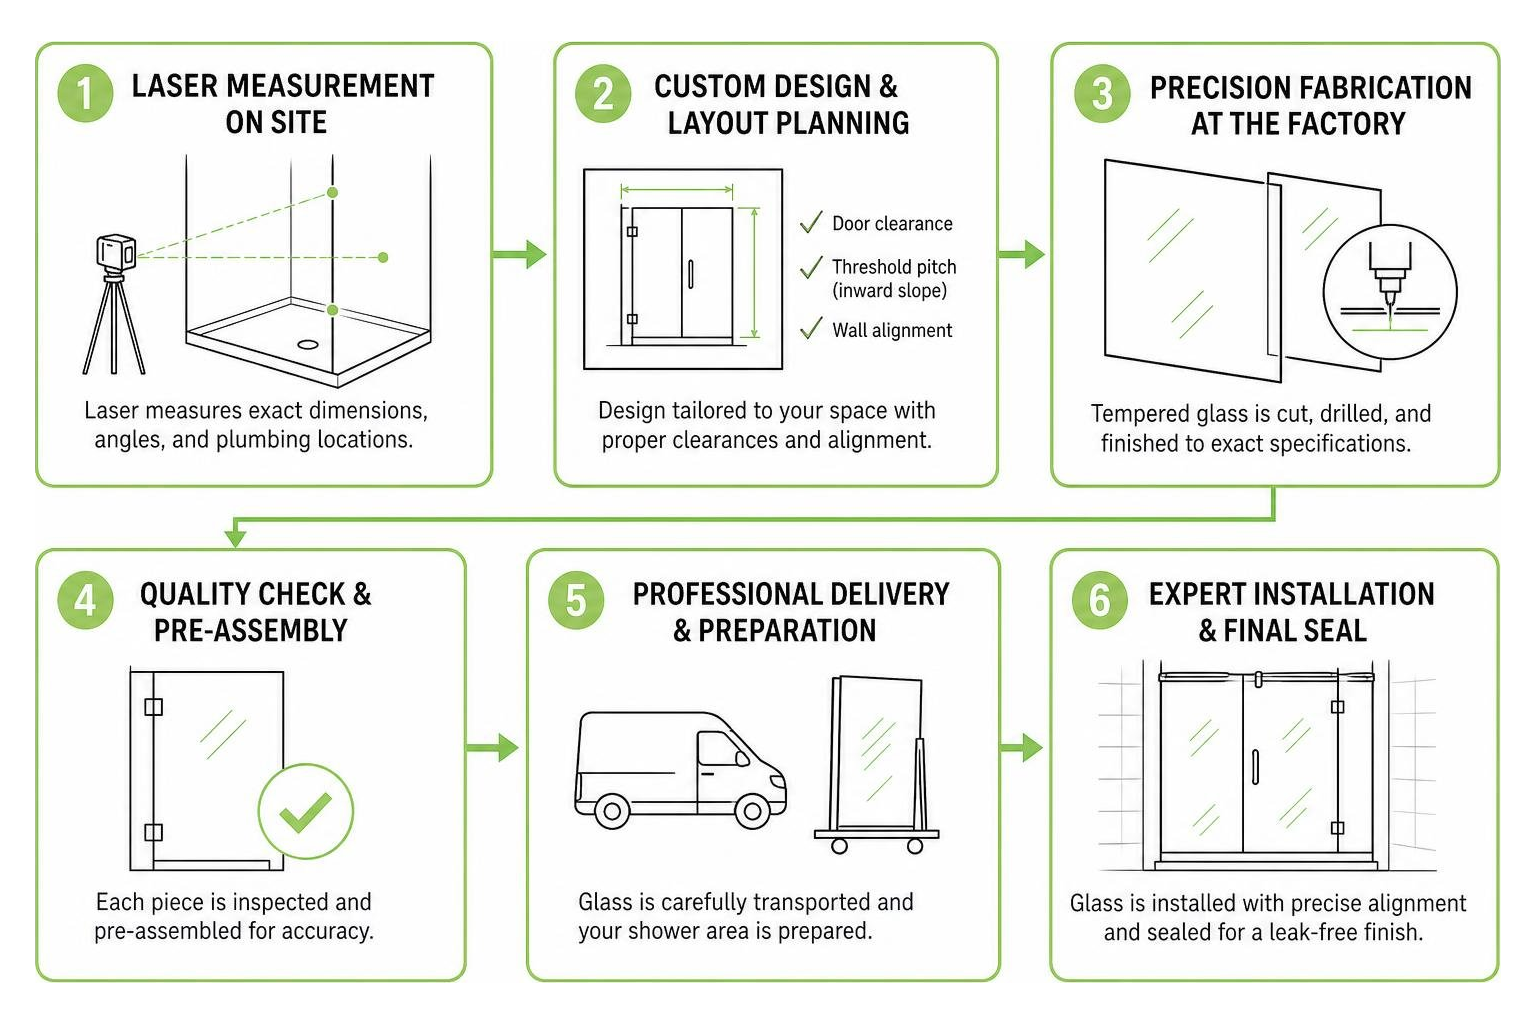
A successful shower installation begins long before the first piece of glass arrives. Accurate layout planning, laser-level plumbing checks, and threshold pitch calculations are essential to prevent frustrating leaks and misaligned doors.

Choosing the Right Bathroom Glass Shower Cabin for Small Spaces

In small bathrooms, every square inch matters. Standard prefabricated enclosures often start at compact footprints such as 32″ x 32″, 34″ x 34″, or 36″ x 36″.

When working with limited floor space:

  1. Check Door Swing Clearance: Ensure a swinging door will not hit your vanity drawers, toilet bowl, or entry door.
  2. Prioritize Sliding Hardware: Sliding and rolling panels operate entirely within the shower footprint, preserving external walkway clearance.
  3. Account for Threshold Pitch: The shower curb or threshold must slope inward slightly (about 3/16 inch) so standing water drains back into the pan rather than out onto your bathroom floor.

Before committing to a layout, run through these 3 Things to Do Before Buying a Glass Shower Door to confirm your plumbing, wall stud backing, and clearances are ready.

DIY Assembly vs. Professional Custom Glazing

While pre-packaged modular kits are available for DIYers, glass installation has zero tolerance for error. Tempered glass cannot be cut, drilled, or trimmed once manufactured. If your bathroom walls are out-of-plumb—a common reality in older homes—a standard pre-cut rectangle will leave unsightly gaps along the wall channel.

Process workflow from laser measurement to custom glass installation

Modular systems sometimes include adjustable wall profiles that accommodate minor wall variations (up to 10mm per side). However, for a true frameless look with tight, leak-free gaps, custom laser fabrication is best.

At JP Precision Glass, we specialize in custom-cut, made-to-size enclosures tailored to the exact angles of your space. Whether you need Custom Frameless Showers Chicago or expansive floor-to-ceiling Glass Walls Chicago, professional laser measurement guarantees your glass fits flush against your tilework.

Long-Term Care, Warranties, and Troubleshooting Common Issues

Even the highest quality glass enclosure requires routine care and smart purchasing decisions to maintain its pristine look and avoid costly surprises during remodeling.

Maintaining Your Bathroom Glass Shower Cabin for Long-Term Clarity

Keeping your glass sparkling does not require harsh chemicals. In fact, abrasive cleaning powders and highly acidic sprays can degrade protective coatings and corrode hardware plating.

  • Daily Routine: Use a flexible silicone squeegee after the last shower of the day. It takes 30 seconds and eliminates 90% of standing water before minerals can dry and bond.
  • Weekly Cleaning: Wipe down the glass using a soft microfiber cloth and a mild solution of warm water mixed with a few drops of dish soap or a dedicated pH-neutral glass cleaner.
  • Seal & Gasket Maintenance: Check bottom sweep seals and magnetic door gaskets periodically. Mineral deposits can build up inside vinyl channels over time; wiping them clean keeps your water barrier watertight.

Investing in high-grade glass pays off in everyday maintenance. To see how glass simplifies cleaning routines while enhancing room lighting, read about the 3 Advantages of Glass Shower Walls.

Avoiding Delivery Defects, Out-of-Plumb Walls, and Water Leaks

One of the most common pitfalls in bathroom remodeling is discovering manufacturing or shipping defects after installation is already underway. For example, uninspected resin defects or minor edge chips can result in major delays and uncompensated contractor labor expenses if tilework must be redone.

To protect your investment:

  • Inspect Immediately Upon Delivery: Unpack and inspect all glass panels, hinges, and tracks under bright light before your contractor begins drilling into finished tile.
  • Verify Manufacturer Warranties: Standard warranties often cover only replacement parts and exclude secondary labor or re-tiling costs. Always clarify what coverage your supplier provides.
  • Check Structural Studs: Heavy frameless glass doors require solid wood backing (2x4s or 2x6s) behind the tile to support the weight of the hinges. Never rely on simple drywall anchors for heavy glass doors.

Frequently Asked Questions About Glass Shower Enclosures

What is the ideal glass thickness for a frameless shower cabin?

The standard recommendation for frameless enclosures is 3/8-inch (10mm) tempered safety glass. It provides the ideal balance of structural rigidity, weight, and smooth door operation without requiring heavy metal framing. For heavy commercial panels or extra-tall standalone screens, 1/2-inch (12mm) glass is also used.

Can a glass shower cabin be installed on an uneven or out-of-plumb wall?

Yes. If you use a modular framed kit, adjustable wall profiles can typically absorb up to 10mm (3/8 inch) of wall runout. For frameless enclosures, a custom glazier measures the wall angles with a digital laser level and tapers the glass panel during fabrication so it matches your wall profile with hairline precision.

How do protective hydrophobic coatings prevent limescale buildup?

Hydrophobic coatings create an invisible, ultra-smooth chemical bond over the microscopic ridges of the glass. By reducing surface tension, the coating forces water to form tight beads and slide off immediately, preventing hard minerals, limescale, and soap residue from etching into the glass.

Conclusion

Upgrading your bathroom with a custom glass enclosure is one of the most effective ways to combine everyday luxury, easy maintenance, and lasting home value. By replacing dark, outdated curtains with clear, heavy tempered glass, you instantly open up your floor plan, highlight your tile design, and create a bright, spa-like retreat you can enjoy every day.

At JP Precision Glass, our team is dedicated to delivering precision-crafted, made-to-size solutions that fit your bathroom layout perfectly. Explore our full range of custom options and discover why we are the top choice for Shower Doors Chicago homeowners trust for quality craftsmanship and seamless installation.