• JP Precision Glass is the leading glass shower doors company in Chicago
One-piece shower stall versus modular multi-piece kit

Finding the Perfect 42-Inch Shower Stall for Your Budget and Space

Understanding Dimensions and Configurations for a 42 Inch Shower Stall

Choosing a shower stall involves looking beyond the nominal outer dimensions. While residential building codes generally require a minimum interior shower size of 30 inches by 30 inches, and commercial ADA baselines begin at 36 inches by 36 inches, a 42-inch footprint provides superior comfort without dominating mid-sized bathrooms. It delivers ample space to move freely while preserving critical square footage for vanities, linen towers, and unobstructed doorways.

Manufacturers produce 42-inch stalls in two core configurations:

  1. 42″ x 34″ Rectangular Footprint: Ideal for standard three-wall alcoves where depth is limited by a doorway, toilet, or vanity. This layout provides extra elbow room across the horizontal span while preserving essential walkway clearance in narrow rooms.
  2. 42″ x 42″ Square Footprint: Delivers exceptional standing room and works seamlessly in corner or wide-alcove layouts. The symmetrical design allows unrestricted movement, making it a popular choice for dedicated master suites and spacious guest bath remodels.

Standard prefabricated units feature total exterior heights between 75 and 80 inches. For example, a standard 42″ x 43″ alcove unit features an overall height of 80 inches with an interior standing clearance of 75 inches and an interior width of 38 inches. Factoring in wall stud depth and backer board thickness ensures your framing accommodates the true exterior profile. Verifying interior clearances ensures you have ample headroom and elbow space before beginning rough framing.

Sizing Comparisons: 36-Inch, 48-Inch, and 42 Inch Shower Stall Footprints

When comparing walk in shower options, square footage and usable space dictate the final feel of your bathroom. Standard 36-inch stalls fit tight floor plans but can feel restrictive around the shoulders, especially when reaching for toiletries or turning under the shower stream. Conversely, a mid-size 36 x 48 shower glass layout offers luxury space but may impede pathways or vanity clearance in compact rooms.

Stall Footprint Typical Interior Dimensions Best Suited For Key Spatial Benefit
36″ x 36″ ~32″ x 32″ Small powder rooms, compact guest baths Meets standard baseline; fits tight corners
42″ x 34″ ~38″ x 30″ Narrow tub-to-shower conversion alcoves Adds width without projecting into room traffic
42″ x 42″ ~38″ x 38″ Corner master baths, square alcoves Excellent shoulder room and balance
48″ x 36″ ~44″ x 32″ Primary bathrooms with elongated walls Expansive feel with space for larger seating

The 42-inch format hits the sweet spot for comfort, granting extra clearance to lather and turn without bumping shower walls or feeling boxed in by heavy enclosures.

Alcove and Corner Layout Strategies

Placement determines your stall’s structure and the door system required:

  • Three-Wall Alcoves: Rectangular 42-inch stalls drop directly into framed alcoves, making them ideal for replacing older tubs. They offer straightforward plumbing runs and work effortlessly with bypass sliding doors or pivot door systems.
  • Corner Neo-Angle & Square Stalls: Square 42-inch units placed in a corner open up central bathroom floor space by angling or squaring the exterior entry. Pairing a corner base with 36 x 42 glass shower enclosures ensures clean sightlines and preserves natural lighting across the room while eliminating dark, shadowed corners.

Comparing One-Piece Units, Modular Kits, and Shower Pan Bases

When shopping for a 42-inch stall, you will encounter three main formats, each catering to different architectural constraints and renovation goals:

One-Piece Seamless Inserts vs. Multi-Piece Wall Kits

  • One-Piece Units: These units feature a seamless construction that combines the base and surrounding walls into a single structure, eliminating caulk lines and minimizing leak points. Because there are no mechanical seams between the walls and base, maintenance is minimal. However, maneuvering a rigid 80-inch tall unit through standard 30-inch interior doorways and up stairwells during a remodel can be difficult. They are primarily suited for new construction or open-stud structural remodels where framing is exposed.
  • Multi-Piece Wall Kits: Systems such as the Aquatic 14242STNS corner shower feature tongue-and-groove interlocking panels that fasten directly to wall studs. These sections can easily be carried through tight hallways and staircases into existing bathrooms. Once in place, they assemble quickly on-site with watertight interlocking joints, making them the preferred choice for retrofits and DIY bathroom renovations.
  • Standalone Shower Pans: Prefabricated bases provide structural waterproofing at floor level while allowing custom wall finishes, such as ceramic, porcelain, or natural stone tile. This hybrid approach pairs the structural reliability of a factory-sloped composite base with the architectural appeal of tile.

Upgrading a 42 Inch Shower Stall with Custom Glass Enclosures

Many homeowners opt for a hybrid approach: installing a durable 42-inch curbed shower base with custom tile walls and premium glass. Integrating custom glass shower panels elevates the space beyond the look of standard prefabricated surround walls, replacing opaque plastic curtains and bulky aluminum framing with heavy tempered glass.

For walk-in designs or compact layouts, pairing a square pan with a 36-inch glass shower panel provides a sleek, barrier-free feel while effectively containing water spray. Fixed glass screens maximize open space, allowing uninterrupted sightlines that make compact and mid-sized bathrooms appear larger and brighter.

Material Performance, Durability, and Easy Maintenance

The longevity and maintenance of your shower stall depend on its composite structure and surface finish. Selecting the right material ensures structural rigidity underfoot while minimizing the time spent scrubbing soap scum and mineral deposits.

Acrylic shower stall surface maintenance and cleaning

Material Comparisons: Acrylic, Vikrell, and Fiberglass

Understanding the structural differences between composite formulations helps you select a unit that holds up to daily wear and tear:

  • Applied Acrylic & AcrylX™: Non-porous, high-gloss sheet molded with structural fiberglass backing. Resists scratches, chips, and UV fading, making it exceptionally easy to sanitize. Its smooth surface prevents mold spores and soap residue from embedding into microscopic pores.
  • Vikrell® Composite: A proprietary poly-composite material that provides uniform color throughout and high structural strength without requiring extra fiberglass backing. It resists chipping and cracking, providing a solid feel underfoot that avoids the flexing common in entry-level bases.
  • Gelcoat Fiberglass: A lightweight, budget-friendly composite coated in smooth marine resin. While cost-effective, gelcoat is more porous than pure acrylic and requires regular sealing to avoid staining and dulling over time.

Cleaning Protocols and Surface Care Best Practices

To preserve high-gloss finishes and prevent soap scum accumulation over years of use:

  • Use non-abrasive, pH-neutral liquid cleansers and soft microfiber cloths to wipe down walls and pan surfaces.
  • Avoid abrasive scrubbing pads, scouring powders, and harsh bleach solutions that can dull composite finishes and strip protective coatings.
  • Squeegee walls and glass enclosures after daily use to eliminate mineral spotting and hard water scale before it bonds to surfaces.
  • Periodically inspect silicone joints around the base and wall connections to catch early signs of wear and prevent hidden moisture penetration.

Plumbing Rough-Ins, Center Drains, and Code Standards

Proper subfloor preparation and plumbing alignment are vital for a lasting installation. A poorly leveled pan can cause standing water, premature joint failure, and annoying flex underfoot.
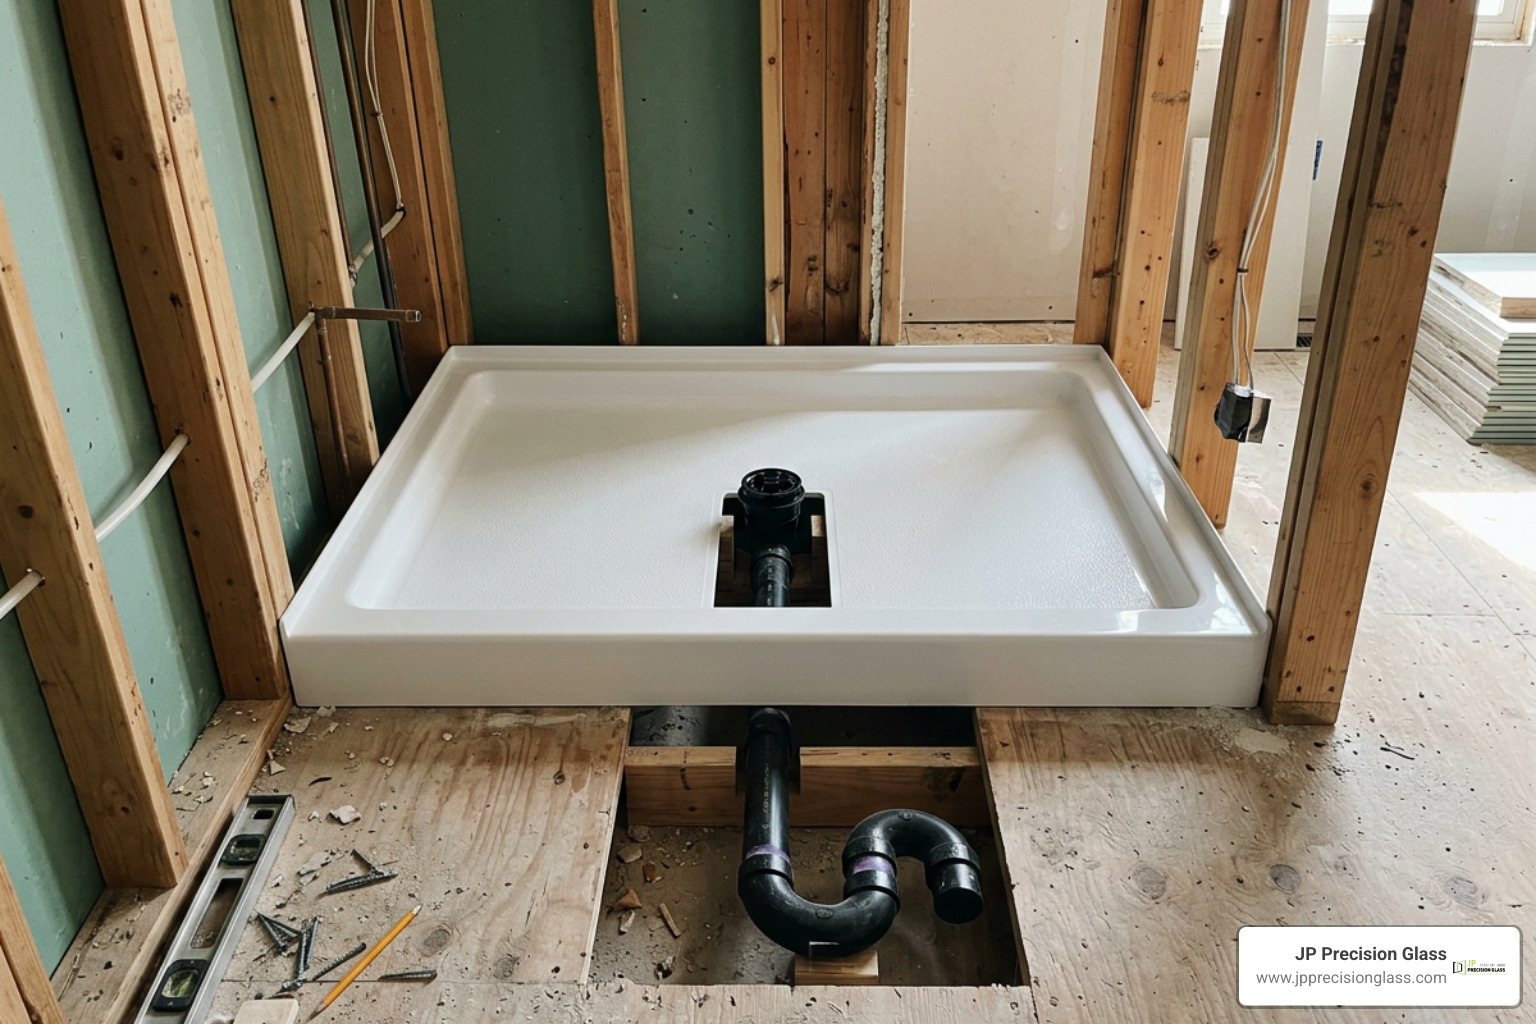
Center drain rough-in and curbed threshold profile

Center Drain Alignment and Rough-In Specifications

Most square 42″ x 42″ bases utilize a balanced center drain layout. For a true 42-inch square pan, the drain rough-in centerline is located exactly 21 inches from both the side framing studs and the back wall. For rectangular 42″ x 34″ pans, verify whether the base uses a centered drain (21 inches from side studs and 17 inches from the back) or an end drain designed to align with existing tub plumbing.

Always confirm subfloor cutouts allow adequate clearance for the 2-inch P-trap assembly and PVC drain flanges before fastening the pan to structural framing. Setting the base in a structural mortar bed prevents base deflection, reduces footstep noise, and ensures consistent drainage toward the center outlet.

Safety Standards, Thresholds, and Built-In Features

When selecting your shower components, look for compliance with national plumbing and building standards:

  • Code Compliance: High-quality shower bases, such as the Bestbath P4242.V2 curbed shower pan, meet ANSI Z124.1.2, IPC, and UPC standards for structural integrity, load bearing, and drainage capacity.
  • Thresholds: A standard 4-inch curbed threshold ensures reliable water containment while allowing straightforward installation of bottom-track shower doors. For barrier-free accessibility, low-profile and beveled thresholds offer easy entry without sacrificing drainage efficiency.
  • Built-in Features: Look for textured, slip-resistant bases, molded soap ledges, integrated corner seating, and factory-installed wood backing for secure grab bar installation.

Frequently Asked Questions About 42-Inch Showers

Is a 42-inch shower stall large enough for comfortable daily use?

Yes. A 42-inch shower stall offers significantly more shoulder room than standard 36-inch units, providing a spacious standing area that accommodates built-in shelves or corner shaving footrests without feeling cramped.

What is the standard rough-in plumbing distance for a 42-inch center drain base?

For a 42″ x 42″ square base, the center drain rough-in is 21 inches from the rough stud framing on both the rear and side walls. Always account for the thickness of any wallboard or backer material when verifying rough-in locations.

Can I install glass shower doors on a prefabricated 42-inch shower base?

Yes, provided the shower pan has a flat, level threshold curb at least 2 to 3 inches wide to support the door track or hinges. Ensure vertical wall studs are positioned where glass hardware and wall jambs will be anchored.

Conclusion

Choosing the right 42-inch shower stall balances space efficiency, daily comfort, and straightforward maintenance. Whether you install a quick multi-piece acrylic kit or combine a heavy-duty single-piece curbed pan with designer wall tile, this mid-sized footprint delivers premium functionality to modern bathrooms.

When you are ready to complete your remodel with custom-fitted frameless glass or precision-engineered sliding enclosures, reach out to our team at JP Precision Glass for expert guidance and tailored installation.
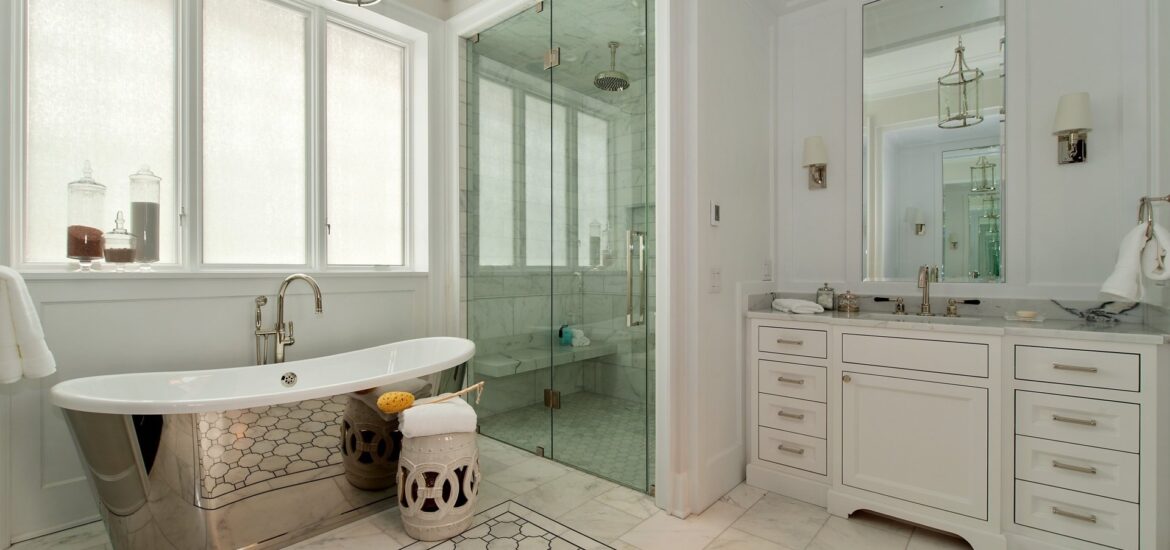
freestanding tub with glass enclosure

Stunning Freestanding Tub and Glass Enclosure Design Ideas

Plan a Freestanding Tub With Glass Enclosure That Feels Open

A freestanding tub with glass enclosure can work beautifully, even in a smaller bathroom, when the layout protects clear walking paths and keeps sightlines open. Start by choosing a compact tub, allow room to clean around it, and use clear frameless glass to separate the shower without creating a visual wall.

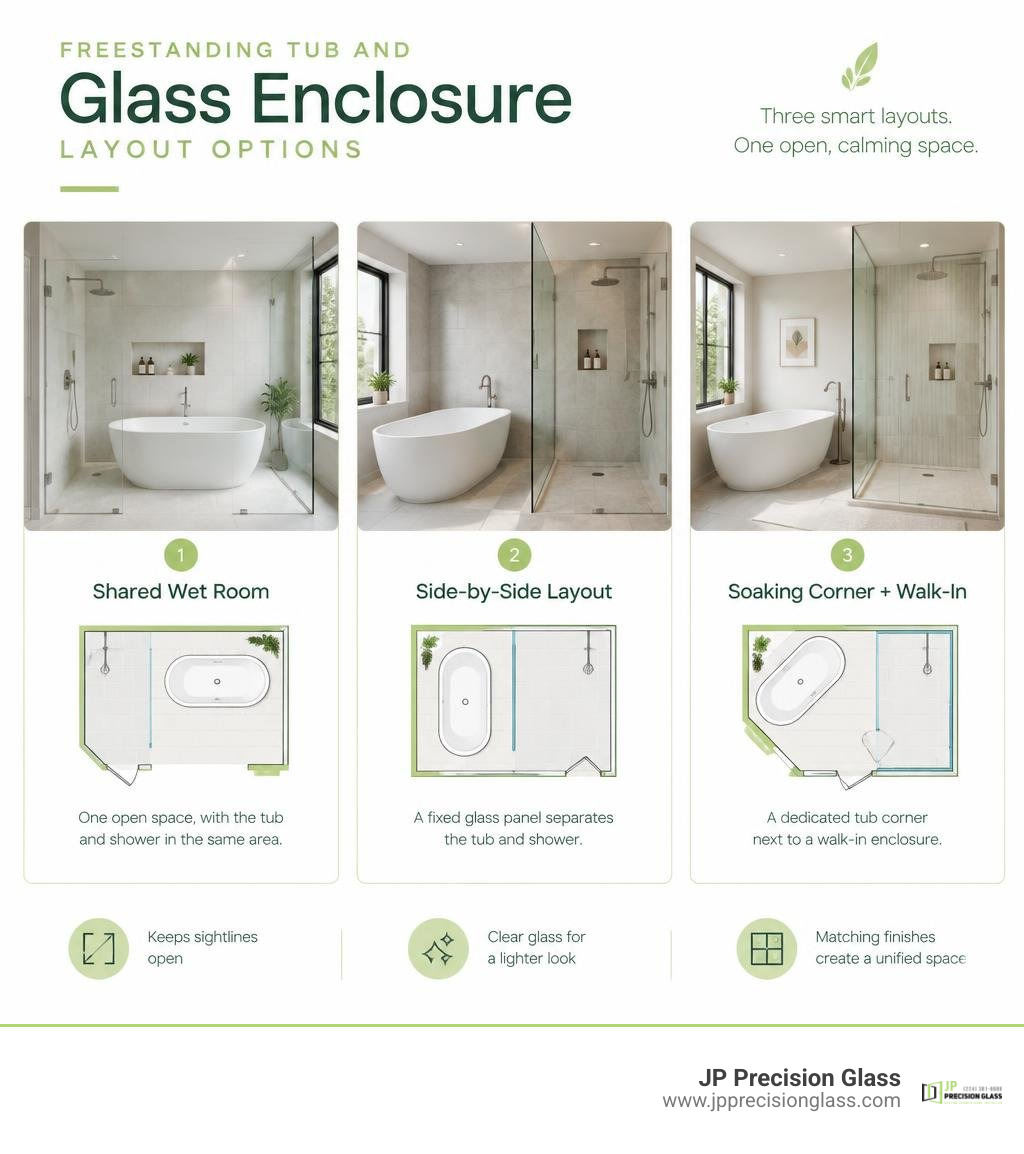
The most successful designs usually use one of three approaches: a shared wet room, a side-by-side tub and shower divided by a fixed glass panel, or a dedicated soaking corner next to a walk-in enclosure. Matching tile, metal finishes, and fixture scale helps the two zones feel like one calm, intentional space rather than a crowded collection of features.

Freestanding tub and glass enclosure layout options infographic

Freestanding tub with glass enclosure basics:

Top Layout Configurations for a Freestanding Tub with Glass Enclosure

When planning a bathroom remodel, pairing a freestanding soaking tub with a modern glass shower requires thoughtful floor plan zoning. The goal is to strike an architectural balance where neither fixture overwhelms the other. Depending on your room’s square footage, window placement, and plumbing footprint, three primary configurations stand out.

open-concept wet room with a standalone tub behind glass

The Shared Wet Room Freestanding Tub with Glass Enclosure

The wet room format places both the freestanding tub and the showerhead inside a single, fully waterproofed glass enclosure. Rather than walling off the shower in one corner and placing the tub in another, the two fixtures share a unified zone.

This approach offers major functional and visual advantages:

  • Continuous Floor Tile: By running unbroken floor tile across the entire wet zone, the bathroom appears significantly larger than it actually is.
  • Curbless Entry: Eliminating traditional shower curbs creates a barrier-free transition that enhances modern, minimalist aesthetics.
  • Open Containment: Oversized tempered glass panels keep splashing water contained while preserving direct sightlines to a contemporary oval freestanding bath.

Because the entire enclosure is engineered to get wet, you don’t have to worry about water dripping onto delicate dry-zone flooring when stepping out of the tub.

Side-by-Side Installation with a Frameless Glass Partition

In a side-by-side configuration, the freestanding tub sits directly adjacent to a walk-in shower, separated only by a sleek, stationary glass panel. This layout is a favorite in linear bathrooms where plumbing runs along a single structural wall.

Step-by-step layout planning framework for side-by-side tub and glass installations

The primary secret to making this layout work is leveraging the benefits of frameless glass shower doors. Heavy framed enclosures introduce bulky metal tracks that chop up the room. In contrast, ultra-clear, low-iron frameless glass delivers seamless splash protection without interrupting the flow of natural light. The tub remains on full display as a sculptural centerpiece while the shower functions independently right next to it.

Dedicated Corner Soaking Zone Alongside a Walk-In Enclosure

If your bathroom features an L-shaped layout or awkward alcoves, tucking the tub into its own corner zone while keeping the glass shower enclosure opposite or adjacent offers exceptional footprint efficiency.

Understanding how to style a corner tub glass enclosure allows you to turn an underutilized corner into an intentional spa retreat. Positioning a compact soaking tub beneath a window or along an accent wall adds depth to the room. Meanwhile, an independent glass shower enclosure anchors the opposite wall, maintaining clear walking corridors throughout the center of the bathroom.

Key Clearance and Space Requirements for Dual Tub and Shower Layouts

Nothing ruins the luxury of a primary bathroom faster than a cramped, claustrophobic layout. Before purchasing fixtures, understanding minimum dimensions, door swings, and ergonomic clearances ensures the room remains comfortable and functional.

well-spaced bathroom showing clearances between tub and glass

Wet Room Dimensions vs. Separate Zone Footprints

A shared wet room is inherently more efficient with floor space than designing two completely separate dry-and-wet zones. The comparison below illustrates typical spatial requirements:

Layout Configuration Minimum Recommended Space Optimal Space Best Suited For Key Spatial Benefit
Shared Wet Room 60 – 75 sq. ft. 80 – 90 sq. ft. Compact & medium primary baths Tub and shower share splash clearance
Side-by-Side (Glass Partition) 75 – 90 sq. ft. 100 – 120 sq. ft. Long, rectangular bathrooms Consolidates plumbing along one wall
Separate Defined Zones 90 – 100 sq. ft. 120 – 150+ sq. ft. Large, open master suites Independent traffic flow around each fixture

Achieving Adequate Clearance Around a Freestanding Tub with Glass Enclosure

To look its best, a freestanding bathtub needs “breathing room.” Shoving a tub flush against a glass panel or drywall eliminates its sculptural appeal and creates a cleaning nightmare where dust and moisture get trapped.

  • Perimeter Buffer: Maintain at least 6 to 12 inches of open clearance between the rim of an acrylic double-ended soaking tub and any adjacent glass partition or wall.
  • Door Swing Clearances: Ensure hinged glass shower doors have at least 24 to 30 inches of unobstructed outward swing path, preventing them from striking the tub rim or external fixtures.
  • Cleaning Access: Leaving adequate space allows a mop, squeegee, or hand to slide easily between the tub exterior and the shower glass.

Design and Aesthetic Strategies to Keep the Space Cohesive

Combining a freestanding tub and a custom glass enclosure requires unified styling so the components complement rather than compete with one another.

Material Continuity and Coordinated Hardware Finishes

Visual harmony starts with hardware coordination. If your freestanding tub filler features a sleek matte black or warm brushed brass profile, carry that exact metal finish across your shower door hinges, handles, channel clamps, and showerheads.

When exploring glass shower door styles, selecting low-profile hardware in matching finishes ties the enclosure to the tub tapware seamlessly. Repeating tile textures—such as running vertical subway tile behind the tub and continuing it inside the shower stall—further enhances aesthetic continuity.

Preventing Visual Clutter with Frameless Glass and Sightlines

Visual clutter makes even spacious bathrooms feel tight. To maintain an open, airy ambiance:

  1. Choose Heavy Tempered Glass: Opt for 3/8-inch or 1/2-inch architectural tempered glass to minimize bulky perimeter framing.
  2. Prioritize Uninhibited Views: Clear glass ensures that anyone entering the room looks right through the enclosure to the back tile work and the tub, making the entire footprint feel expansive.
  3. Elevate Other Elements: Pair the enclosure with floating vanities and minimalist wall-mounted fixtures.

You can get a sense of how frameless glass expands smaller spaces by viewing completed glass installations in our project portfolio.

Plumbing, Weight, and Waterproofing Essentials Before You Build

A flawless bathroom requires robust engineering behind the walls and underneath the subfloor.

Subfloor Load Bearing and Floor-Mounted Fillers

A standard 60-inch acrylic tub holds roughly 60 to 70 gallons of water. Since water weighs 8.34 pounds per gallon, a full tub easily exceeds 500 to 600 pounds before factoring in the bather’s weight.

  • Joist Inspection: Always have a contractor verify that floor joists can handle the concentrated static load without sagging.
  • Supply Lines: Floor-mounted freestanding tub fillers require rigid subfloor mounting brackets and integrated shut-off valves beneath the finished floor to prevent wobbling and leaks.

Waterproofing Membranes and Dual Drainage Strategy

Managing water flow and humidity is critical:

  • Membrane Systems: In wet room setups, continuous sheet membranes (like Schluter-Kerdi) must extend across the entire floor and travel up walls well past splash zones.
  • Dual Drainage: Wet rooms require carefully pitched floors sloped toward a high-capacity linear or center drain, completely separate from the tub’s dedicated pop-up waste line.
  • Proper Ventilation: Ensure your exhaust fan is rated for the combined cubic footage of the tub and shower zone (at least 1 CFM per square foot) to prevent moisture buildup on glass panels.

Frequently Asked Questions About Freestanding Tubs and Glass Enclosures

Will a glass shower enclosure look awkward placed directly next to a freestanding tub?

Not when designed with proper proportion and alignment. Aligning the edge of the glass partition with the centerline or end radius of the tub creates clean, architectural sightlines. Using clear frameless glass makes the partition practically disappear, highlighting the tub as a deliberate design feature rather than an afterthought.

Can a freestanding tub and glass enclosure fit in a small bathroom?

Yes. By choosing a compact freestanding tub (between 53 and 59 inches in length) and integrating it into a shared wet room or placing it alongside a custom stationary glass screen, homeowners can fit both fixtures into bathrooms as compact as 60 to 70 square feet without sacrificing openness.

How much clearance should you leave between a freestanding tub and a glass shower panel?

Ideally, you should leave between 6 and 12 inches of clearance between the tub rim and the glass partition. This spacing provides enough room for hands and cleaning tools while preserving the distinct silhouettes of both the tub and the glass enclosure.

Conclusion

Pairing a freestanding soaking tub with a custom glass enclosure is one of the most transformative upgrades you can make to your home. By choosing an efficient layout, maintaining proper clearances, and selecting high-performance materials, you can create a luxurious, spa-like sanctuary that maximizes both space and light.

At JP Precision Glass, we specialize in made-to-size, precision-cut glass enclosures that bring high-end bathroom concepts to life. Whether you are building an open-concept wet room or need a sleek partition next to your standalone tub, our team provides the craftsmanship and quality you need. Reach out today for expert custom shower door installation in Chicago to start planning your dream bathroom.

Zero threshold neo angle shower with matte black hardware

Why an Angled Walk In Shower Solves Your Toughest Slanted Ceiling Problems

5 Design Reasons an Angled Walk In Shower Solves Slanted Ceiling Headaches

Renovating an attic, loft, or under-eave bathroom often feels like a high-stakes game of geometric puzzle solving. When traditional rectangular stalls simply bump into low knee walls or cut off walkway clearances, an angled walk-in configuration adapts to your room’s natural architecture rather than fighting it. This approach is especially valuable in older Chicago homes, where attic conversions and dormer additions frequently create irregular ceiling pitches that demand a more thoughtful glass layout.

Custom Glass Cuts for an Angled Walk In Shower Under Attic Eaves

When a roofline slopes steeply into your bathroom, off-the-shelf rectangular glass will either leave gaping voids or fail to fit beneath the eave. Custom raked glass panels are precision-cut along the specific pitch of your ceiling, matching every angle down to the millimeter.

By taking digital laser measurements, we ensure heavy-duty tempered safety glass scribes cleanly along the drywall, ceiling trim, or exposed beam work. Exploring frameless glass shower enclosures allows you to avoid thick metal boundary frames that draw attention to irregular ceiling pitches, creating an airy, tailored appearance that lets your unique architecture shine. Because every attic slope is different, the fabrication process accounts for both the vertical wall transition and the angled ceiling line, so the finished enclosure feels like a natural extension of the room rather than a retrofit.

Maximizing Usable Floor Area with a Neo-Angle Footprint

A neo-angle configuration clips off the outward-facing 90-degree corner of a traditional square stall. This 45-degree diagonal entrance makes a massive difference in tight spaces:

  • Eliminates Dead Zones: It pulls the perimeter inward where floor traffic passes, preventing pinched transitions between your shower, vanity, and entry door.
  • Capitalizes on Standing Room: You position the showering zone where headroom peaks, leaving the lowest ceiling drop for built-in benches or shelving.
  • Enhances Traffic Flow: The beveled footprint gives compact rooms an easy, circular path of travel.
  • Preserves Visual Openness: Because the clipped corner reduces the visual mass of the enclosure, the bathroom feels larger even when the total square footage remains unchanged.

For particularly tight floor plans, pairing this layout with compact 36-inch glass shower panel solutions preserves essential open space without sacrificing splash protection. The diagonal entry also makes it easier to open and close a hinged door without colliding with a nearby vanity, toilet, or towel bar.

Barrier-Free Access in an Angled Walk In Shower Layout

Sloped ceiling bathrooms often serve as private primary suites or guest retreats where long-term accessibility is a priority. Designing your angled stall with a zero-threshold entry or a low-profile beveled curb provides seamless, trip-free entry for users of all mobility levels.

A low 1.75-inch beveled threshold can maintain dependable water containment while ensuring accessible roll-in or step-in entry. Pairing this low-profile entry with textured, anti-slip porcelain floor tile creates a safe, elegant setup that meets universal design standards. In attic bathrooms, the same barrier-free approach also simplifies cleaning because there is no tall curb to step over or work around.

Seamless Integration of Built-In Benches and Shower Niches

Awkward low-clearance zones under roof slopes do not have to be wasted space. The area beneath a knee wall is ideal for tucking in a custom tiled bench, providing a convenient place to sit, shave, or relax.

To keep the interior open and clutter-free, recessed toiletry niches can be framed directly between wall studs. Lining the interior of a niche with contrasting herringbone mosaic tile, vertical subway tile, or polished marble adds depth and character while keeping soaps and bottles off the floor. A properly sloped niche shelf also prevents standing water, while a waterproof backing protects the surrounding framing from moisture damage.

Optimizing Natural Light and Skylight Placement

Slanted ceilings frequently incorporate roof windows or skylights. Positioning an angled glass stall directly beneath or adjacent to a skylight floods the shower with natural daylight and creates a natural channel for ventilation:

  1. Sightline Expansion: Frameless, ultra-clear glass lets overhead light wash across the entire bathroom, preventing dark shadow pockets.
  2. Moisture Evacuation: Skylights that open allow rising steam to vent straight outside, protecting custom drywall pitches from mildew.
  3. Privacy Control: If your shower sits near a vertical window or dormer, integrating fluted, frosted, or ribbed glass partitions preserves modesty without blocking daylight, a concept seen frequently in modern stylish 3×5 walk-in shower layouts.
  4. Reflective Brightness: Light-colored tile and polished chrome or brushed nickel fixtures can further bounce daylight around the room, making a compact attic bathroom feel more open and inviting.

Comparing Glass Enclosure Configurations for Sloped Installations

Selecting the right glass setup depends on your roof slope, overall room dimensions, and venting needs. Reviewing our resource on evaluating different walk-in shower options can help you weigh the custom glass configurations best suited to your space.

Configuration Type Best Ceiling / Room Scenario Key Benefits Hardware & Maintenance Considerations
Custom Raked Frameless Steep attic slopes, complex eaves, non-standard angles Maximizes visual space; perfectly scribes to unique pitches; ultra-clean look Requires precision laser templating and heavy-duty glass-to-wall clamps
Neo-Angle Hinged Door Standard corners needing outward floor clearance Clips the exterior corner; provides centered walk-in access; fits mid-sized rooms Ensure clear swing radius for the door away from vanity units and toilets
Fixed Splash Panel / Walk-In Moderate slopes with deep shower basins True barrier-free walk-in; no moving door parts; effortless cleaning Requires adequate depth and properly sloped flooring to prevent splash-out
Custom-Fit Corner Enclosure Standard 90° ceiling corners with predictable clearances Tailored fit for the exact corner dimensions; integrated shelving options; custom waterproof glass panels Precisely measured to your space; can accommodate complex roof pitch angles when needed

Waterproofing, Drainage, and Hardware Finishes for Corner Showers

Brass shower fixtures paired with marble tile on a sloped wall

Water management on a slanted ceiling demands meticulous attention. Because steam rises and condenses rapidly along sloped surfaces, applying a continuous liquid waterproofing membrane over cement backer board across both walls and the angled ceiling is essential. A sloped ceiling should always feature a slight pitch to guide condensation down the walls rather than allowing it to drip onto you mid-shower. In attic bathrooms, this detail is especially important because the ceiling plane is often closer to the showerhead than it would be in a standard full-height room.

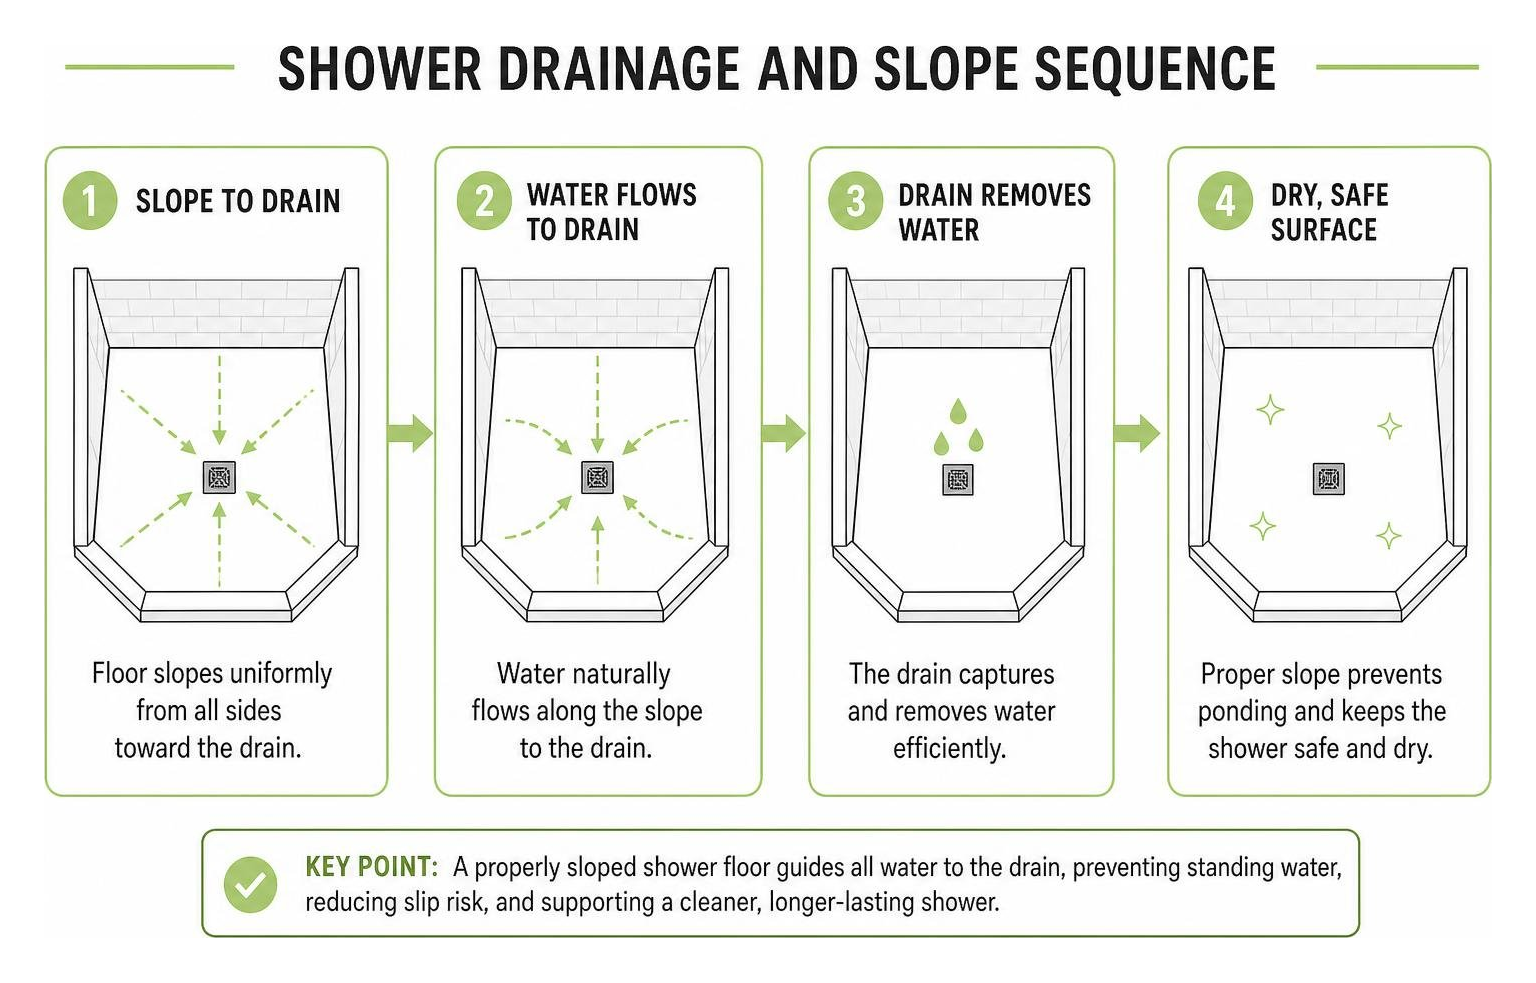
Proper pan slope and drain selection are equally critical:

  • Center Drains: Work exceptionally well with symmetrical neo-angle pans, drawing water evenly from all three exterior points toward the middle.
  • Linear Drains: Excellent for barrier-free, zero-threshold builds, allowing a single unbroken floor slope toward the back wall.
  • Offset Drains: Useful when existing plumbing locations cannot be moved, though they require careful tile layout to maintain a clean finished appearance.

Shower drainage and slope sequence

To elevate your aesthetic, coordinate hardware finishes with your tile palette. Warm brushed brass fixtures pair effortlessly with dramatic black or Carrara marble tile, bringing a modern vintage ambiance to cozy attic nooks. Alternatively, matte black hardware provides clean contrast against classic white subway tile, while polished chrome highlights an ultra-modern, minimalist space. When designing your enclosure, carefully selecting shower glass panels with durable, factory-applied protective coatings will keep your glass free from mineral buildup and hard water stains. The right finish also helps tie the shower visually to nearby plumbing fixtures, towel bars, and cabinet hardware for a cohesive look.

Frequently Asked Questions About Angled Showers and Sloped Ceilings

What are the standard dimensions for neo-angle shower enclosures?

Standard neo-angle footprints typically measure 36×36 inches, 40×40 inches, or 42×42 inches. A 40×40-inch footprint is common in compact attic bathrooms, while a 42×42-inch layout provides a bit more elbow room when the floor plan allows. The center diagonal door opening on these configurations usually ranges between 22 and 26 inches wide, which is enough for comfortable entry without consuming excessive floor space.

How do you properly waterproof an angled shower with a sloped ceiling?

Waterproofing requires a continuous vapor barrier and liquid or sheet membrane installed over cement backer board. Every seam, corner fastener, and plumbing penetration must be sealed. The ceiling should have at least an eight-foot clearance at the showerhead location, with a pitched surface painted in mold-resistant, high-gloss or semi-gloss moisture-rated paint. In addition, the ceiling slope should direct condensation toward the walls rather than allowing water to pool or drip from the lowest point.

Can you install a frameless glass door on an angled attic shower?

Yes. Frameless glass doors can be hung from reinforced wall studs or attached directly to fixed, raked glass panels using specialized glass-to-glass 135-degree or 180-degree heavy-duty hinges. When installing on a sloped wall, it is common to use a fixed custom-cut panel along the angled ceiling while keeping the swinging door rectangular for smooth operation. Proper hinge placement and a carefully planned swing radius are essential to prevent the door from striking a sloped ceiling or nearby fixture.

How do you choose the right glass configuration for a sloped ceiling?

The best configuration depends on the roof pitch, the location of the showerhead, and the amount of available floor space. A custom raked frameless panel is ideal for steep or irregular slopes, while a neo-angle hinged door works well when you need to preserve outward floor clearance. For moderate slopes with a deep shower basin, a fixed splash panel can create a true walk-in opening with no moving parts. A professional measurement and design review will help determine which option fits your specific attic layout.

Conclusion

An awkward ceiling slope doesn’t mean you have to settle for a dark, cramped shower stall. By taking advantage of a tailored neo-angle layout, you can transform difficult architectural angles into a bright, functional centerpiece for your home. The right combination of custom raked glass, careful waterproofing, and thoughtful hardware selection turns an under-eave bathroom into a comfortable space that feels intentional rather than compromised.

When you are ready to bring high-end craftsmanship to your bathroom renovation, our team at JP Precision Glass provides the precise laser measuring, custom glass fabrication, and expert installation needed to master any room layout. Contact us today to explore our custom frameless shower door installation in Chicago and turn your challenging space into a luxurious daily retreat.

bath shower screen with return

Is a Bath Shower Screen with Return Worth the Splurge?

Is a Bath Shower Screen with Return Worth It?

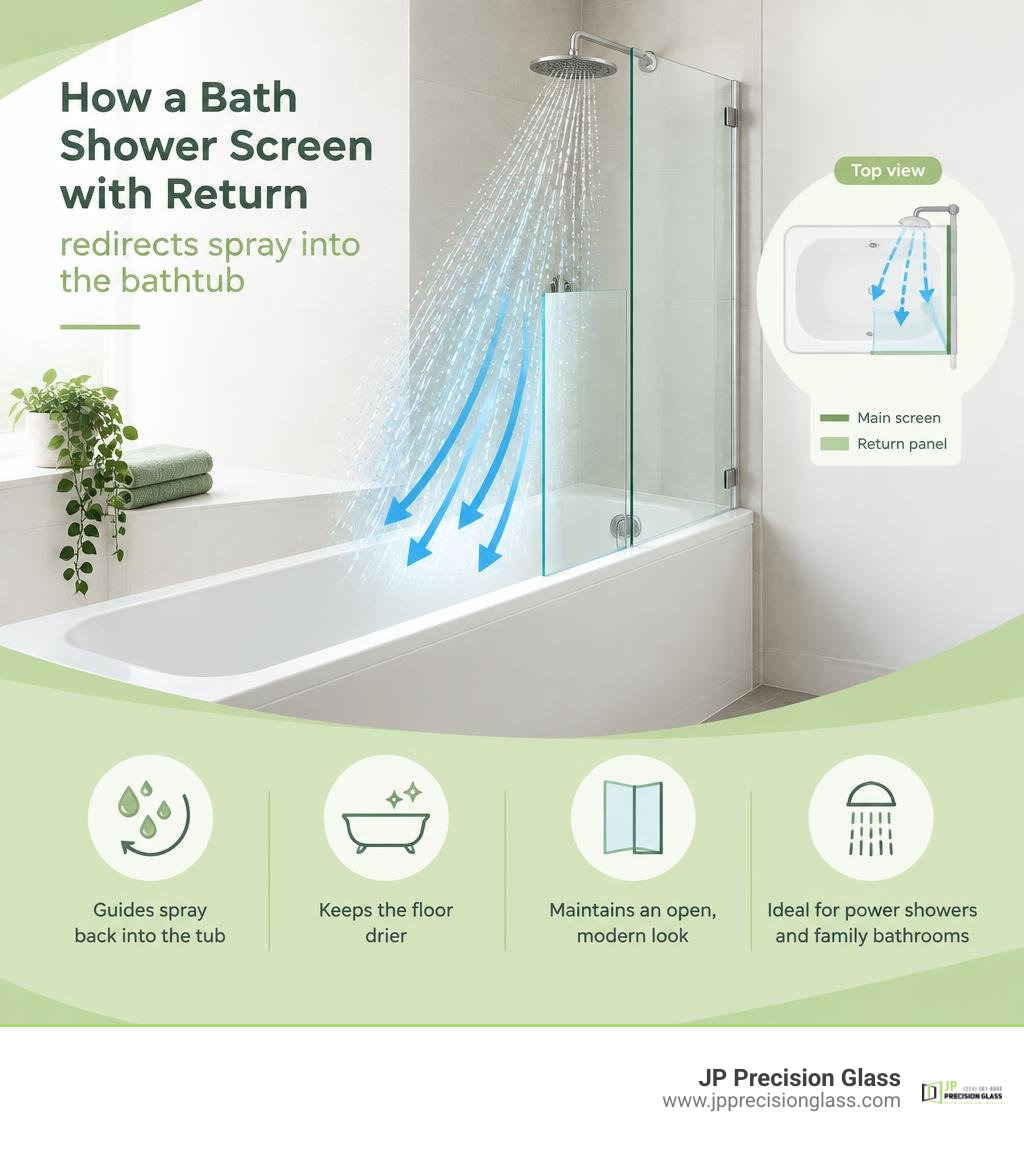
Yes, a bath shower screen with return is usually worth choosing if you want better splash control without closing off the bathroom. It adds a short glass panel at the open edge of the main bath screen, creating an L-shaped barrier that guides spray back into the tub.

It is especially useful for power showers, busy family bathrooms, and tubs with a wider showering end. Compared with a standard single flat screen, a return panel helps keep the floor drier while preserving the clean, open look of glass.

Before choosing one, confirm that:

  • Your bath has a flat, suitable rim for the screen and return panel.
  • The screen matches the bath shape, whether straight, L-shaped, P-shaped, or curved.
  • There is enough clearance for a fixed or hinged panel to sit safely near the bath edge.
  • The glass, seals, and wall fixings are sized for your bathroom’s layout.

A well-fitted return is not a guarantee against every drop of water, but it greatly reduces the main splash path that escapes around the end of an over-bath screen. For a remodel where sleek design, easy cleaning, and practical water control matter, it can be a smart upgrade. For broader context on how these enclosures compare with other glass options, see the shower enclosure overview.

How a bath shower screen with return redirects spray into the bathtub infographic

Quick look at bath shower screen with return:

What Is a Bath Shower Screen with Return and How Does It Work?

An over-bath showering setup brings together the relaxation of a soaking tub with the daily convenience of a standing shower. However, standard single-panel glass screens often leave a significant gap where ricocheting water escapes onto the bathroom floor. This is where a return panel comes into play.

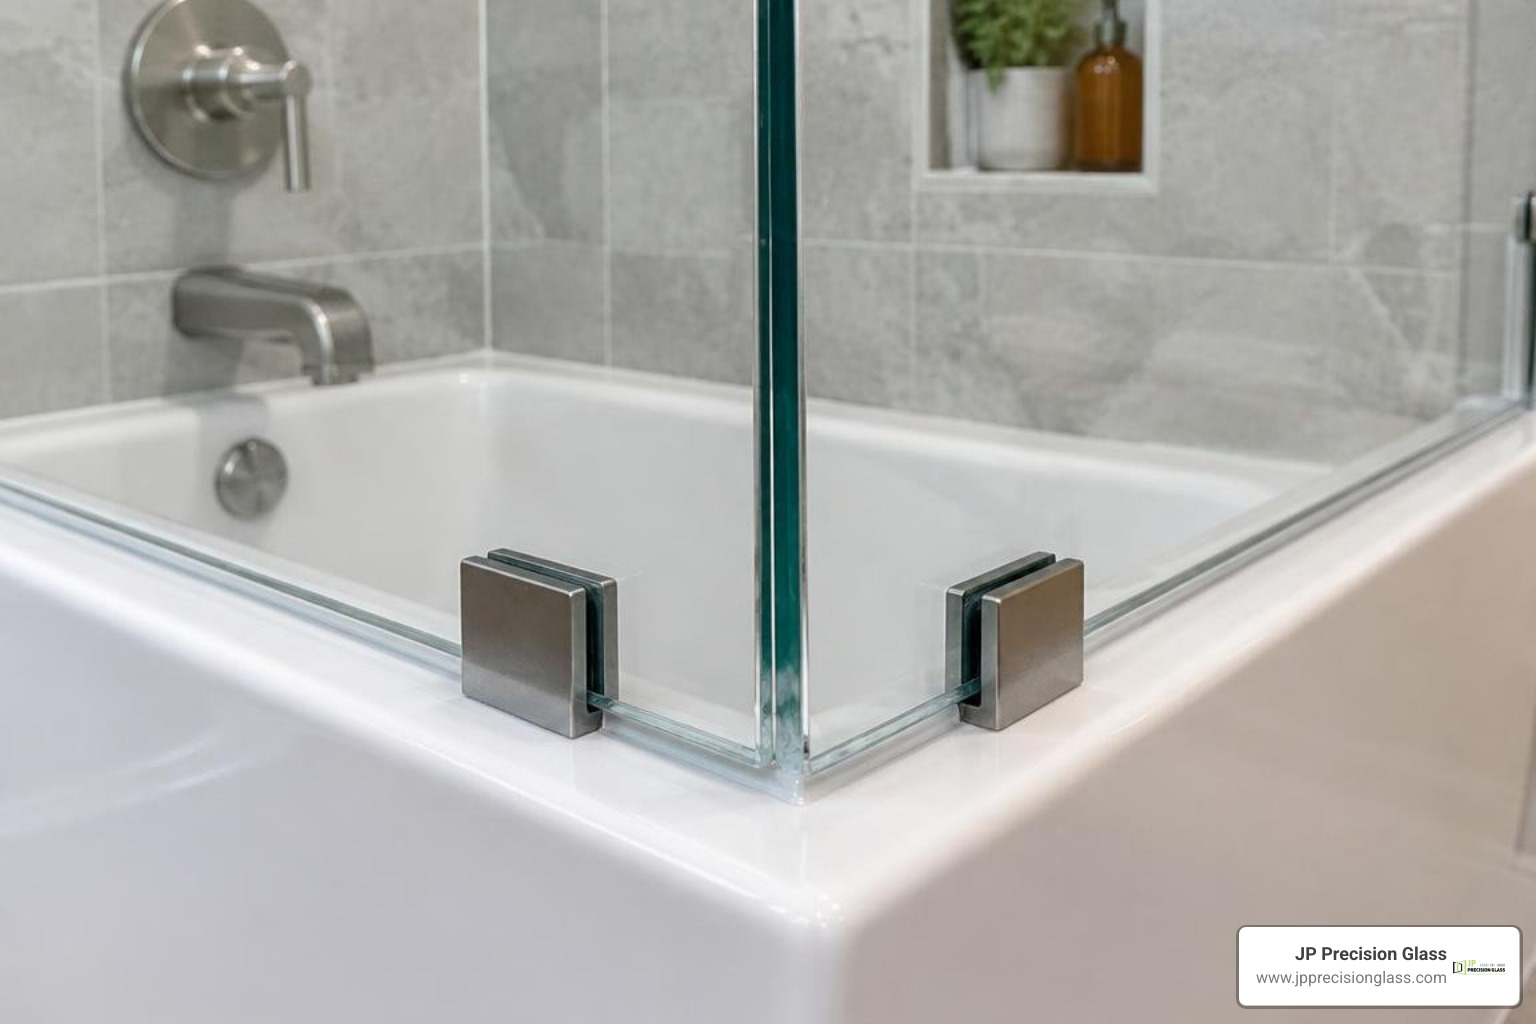
close-up of a fixed 90-degree return screen joint

A return panel is an additional, shorter pane of glass positioned at an angle—most commonly a 90-degree right angle—at the outer edge of the primary bath screen. By forming an L-shaped footprint along the rim of the bathtub, the return creates an inward-facing barrier.

When you shower, droplets do not just spray straight ahead; they bounce off your body, deflect off the side walls, and travel outward diagonally. The return panel blocks this lateral spray trajectory and channels the water back down into the tub basin, dramatically enhancing splash protection without turning your bath into a fully boxed-in cubicle.

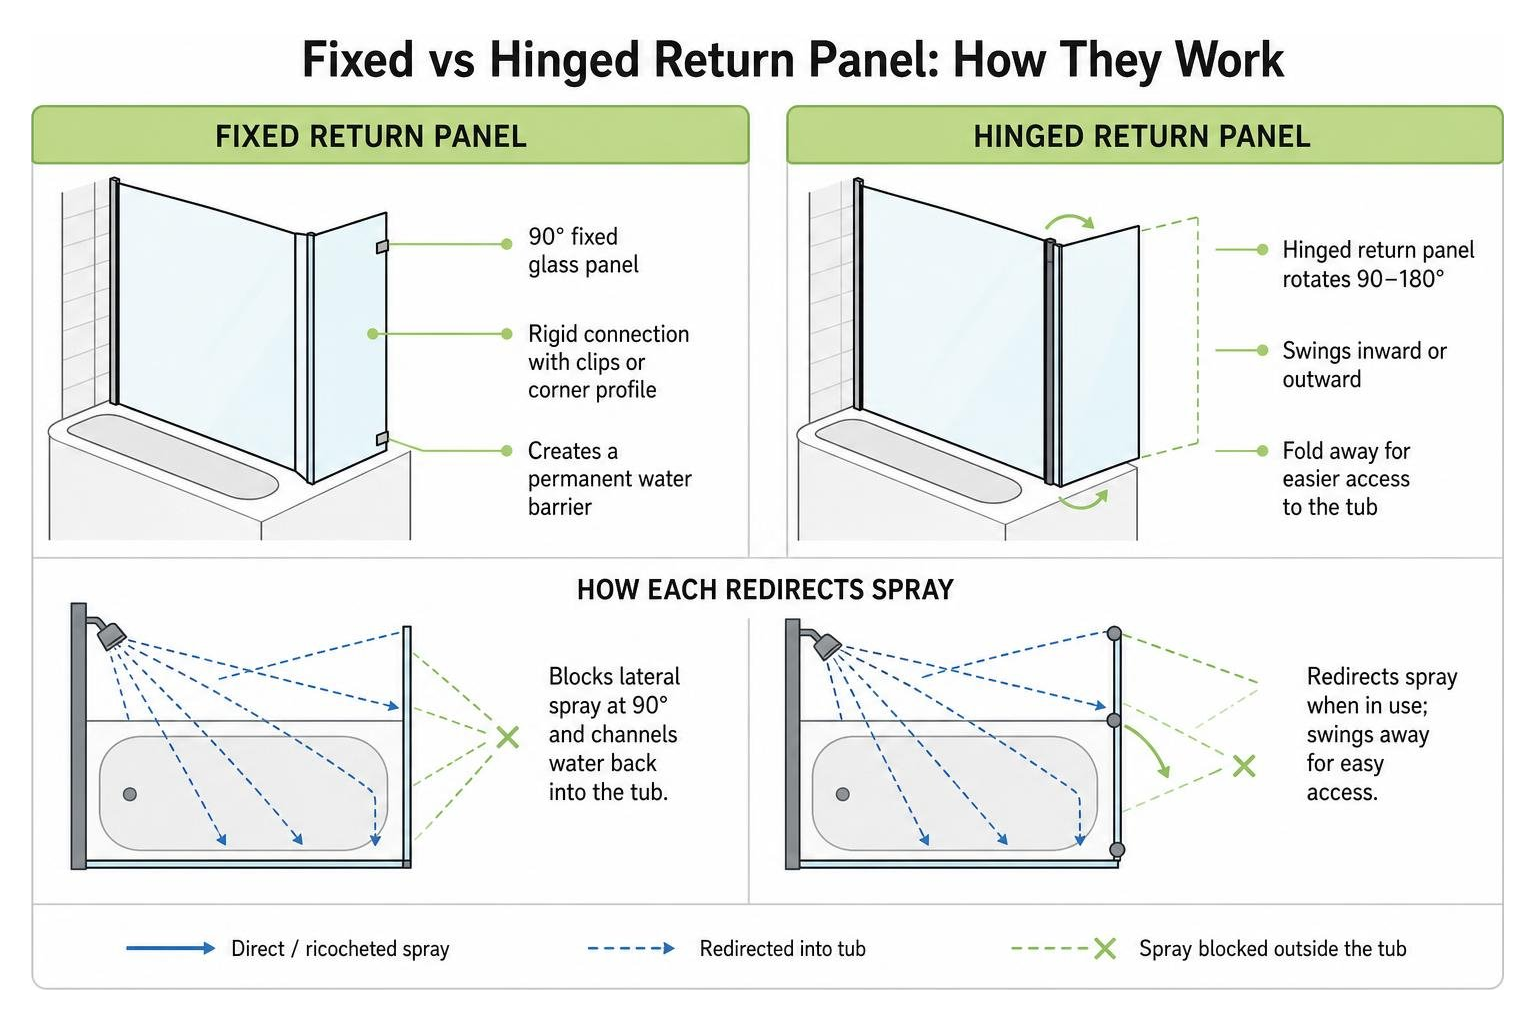
Anatomy of Fixed vs Hinged Return Panels

Return screens generally fall into two functional categories:

  1. Fixed Return Panels: These panels attach rigidly to the main screen using stationary glass clips or a corner profile. Because they do not move, they offer high structural stability and create a permanent water barrier. They are particularly popular on dedicated L-shaped shower baths.
  2. Hinged Return Panels (Flipper Screens): Equipped with a continuous hinge or concealed pivot hardware, a flipper screen can rotate 90 to 180 degrees inward or outward. This allows you to swing the deflector panel inward to reach tub controls without getting soaked, or fold it back out of the way when stepping into the bath.

comparison of fixed versus hinged return panel mechanics

Single Over-Bath Panels vs. a Bath Shower Screen with Return

A standard single straight screen only shields the length of the tub directly adjacent to the wall. Water spraying toward the open end of the tub easily rolls off the rim. Adding a return panel encloses the splash zone on two planes, protecting sensitive vanity units and floorboards from chronic moisture damage.

Feature Single Straight Screen Screen with Fixed Return Screen with Hinged Return
Water Containment Moderate; allows side spray escape Excellent; full 2-sided barrier High; flexible splash deflection
Access Convenience Open entry Fixed entry point Hinged panel swings clear
Tub Compatibility Straight, standard tubs L-shaped and wide straight tubs Straight and curved baths
Visual Footprint Minimalist line Defined shower corner Sleek, adjustable profile

When deciding on the right layout for your space, learning how to choose the perfect glass tub enclosure can help you match your bathing habits with the right glass style.

Key Benefits: Water Containment and Enhanced Usability

Upgrading to a bath shower screen with return transforms a routine shower-bath hybrid into a dedicated showering zone.

minimalist bath screen with return preventing water escape

Superior Splash Protection for Power Showers

High-pressure showerheads and aerated power showers produce a high volume of turbulent spray. A single flat pane often struggles to contain this increased water velocity. The angled return acts as a deflector wall, stopping escaping mist and droplets right at the critical escape corner.

Quality designs feature continuous bottom gaskets and precision-fitted wall profiles to prevent pooling along the tub ledge. For bathrooms with specialized layouts, adding dedicated bath shower screen extension panels provides an extra layer of splash defense tailored to high-output shower systems.

Space Optimization and Open Bathroom Feel

Clear glass enclosures allow sightlines to pass uninterrupted across the room, making compact bathrooms feel significantly larger and brighter.

Even in tight quarters where every millimeter counts, choosing a compact 500mm glass shower screen or an over-bath return setup delivers the functionality of a walk-in shower enclosure without sacrificing the tub. Many return screens also feature integrated horizontal towel rails on the exterior glass, keeping your bath sheets dry, warm, and within arm’s reach.

Bathtub Shape Compatibility and Sizing Factors

Bath screens with return panels are engineered to complement a wide range of modern tub profiles.

Straight, L-Shaped, and P-Shaped Bathtub Configurations

  • Straight Baths: Standard rectangular tubs benefit from a square-edged screen with a fixed or hinged 300mm return to catch lateral spray along the straight rim.
  • L-Shaped Shower Baths: Designed specifically with an expanded, squared showering end, L-shaped baths pair naturally with a 90-degree fixed return panel that follows the exact contour of the tub’s outer ledge.
  • P-Shaped and Curved Baths: These tubs feature a rounded, ergonomic bulge at the showering end. They require curved bath screens paired with articulated or curved return sections that contour to the bath’s unique radius.

Reversible Handing and Layout Versatility

Most return screens feature universal handing, meaning the hardware and glass panels are completely reversible. During installation, the screen can be configured for either a left-hand or right-hand wall mount. This versatility ensures you can easily position the glass to clear vanity basins, toilet suites, and wall-mounted towel radiators without obstructing entry.

Glass Specifications, Hardware Finishes, and Aesthetic Styles

The durability and appearance of your screen depend directly on the materials you select. Consulting comprehensive glass shower enclosure comparisons can help clarify how different specifications perform over decades of daily use.

Choosing the Right Glass Thickness for a Bath Shower Screen with Return

Bath screens typically use toughened safety glass (tempered glass) to comply with rigorous safety standards:

  • 6mm Safety Glass: The most common standard for hinged over-bath screens. It balances strength, lightweight operation, and smooth hinge movement.
  • 8mm Premium Glass: Provides greater structural rigidity, reducing screen flex and giving the installation a solid, luxurious feel.
  • 10mm Frameless Glass: Ideal for high-end bespoke enclosures. If you are exploring 10mm frameless shower screen options, keep in mind that the increased weight requires heavy-duty wall anchors and sturdy structural backing.

High-grade screens often include an easy-clean factory nano-coating that repels water and prevents limescale, soap scum, and hard mineral buildup.

Hardware and glass treatments allow you to personalize your enclosure:

  • Polished Chrome: A timeless, reflective finish that complements traditional and contemporary chrome brassware.
  • Matte Black: Crisp, architectural framing that grounds industrial, monochrome, and modern designs.
  • Brushed Brass: Warm metallic hardware that pairs well with organic textures and earthy tiles.
  • Decorative Glass: Fluted (reeded) glass offers tactile elegance and visual privacy, while silk-screened grid patterns or subtle smoked glass create striking focal points.

Measuring and Installation Best Practices

Precision is essential when fitting an over-bath screen. Even minor discrepancies in bath level or wall plumb can lead to water pooling or seal failure.

Accurate Measurement Steps for Bathtub Screens

Before ordering your screen, verify these critical checkpoints:

  1. Check Wall Plumb: Use a long spirit level to check if your tiled wall leans inward or outward. Choose a wall profile that offers built-in out-of-true adjustment (typically 15mm to 20mm).
  2. Confirm Bath Rim Levelness: Verify that the bathtub deck sits level along both its length and width.
  3. Measure Rim Width: Ensure the flat landing area of the tub rim is wide enough to seat the glass channel and bottom drip seal without hanging over the edge.
  4. Account for Obstructions: Check the full swing radius of hinged panels to confirm they clear faucets, shower valves, and nearby sanitaryware.

Maintenance, Seal Replacement, and Glass Care

Keeping your glass screen pristine requires simple, consistent habits:

  • Use a soft silicone squeegee after each shower to wipe away standing droplets.
  • Clean glass surfaces using non-abrasive, pH-neutral cleaners and a microfiber cloth to protect the water-repellent coating.
  • Inspect the bottom vinyl sweep and vertical magnetic seals periodically. Replacing worn seals every few years maintains an impenetrable water barrier.

Frequently Asked Questions About Over-Bath Screens

Does a bath screen with a return panel prevent all leaks?

While an L-shaped return panel dramatically reduces escaping spray compared to standard straight screens, it is designed to redirect indirect spray and splashing. It is not an airtight seal against high-pressure water streams sprayed directly at the glass joints. Directing your showerhead toward the tiled wall rather than directly at the screen joint ensures reliable water containment.

Can a return panel screen be fitted to any standard bath?

Most screens can be fitted to standard rectangular baths, provided the bath rim has a flat, level surface at least 40mm to 50mm wide. Tubs with steep internal slopes, pronounced roll tops, or uneven decorative rims may not allow bottom seals to seat properly.

Is a fixed return panel better than a hinged flipper screen?

It depends on your bathroom layout. A fixed return panel provides exceptional structural stability and a permanent barrier, making it ideal for dedicated shower baths. A hinged flipper panel offers greater accessibility, allowing you to fold the deflector inward to turn on the taps or bathe small children without leaning over rigid glass.

Conclusion

Upgrading to an over-bath shower screen with a return panel delivers the splash-stopping security of a dedicated enclosure while maintaining an open, airy bathroom environment. By blocking lateral spray, protecting your flooring, and providing a clean architectural look, it offers substantial long-term value for modern homes. When you are ready to elevate your space with custom, precision-crafted installations, explore our premium collection of made-to-measure glass shower panels to find the perfect fit for your bathroom.

bath shower doors

The Ultimate Guide to Bath Shower Doors: Compare & Buy

Choose Bath Shower Doors That Fit Your Space and Routine

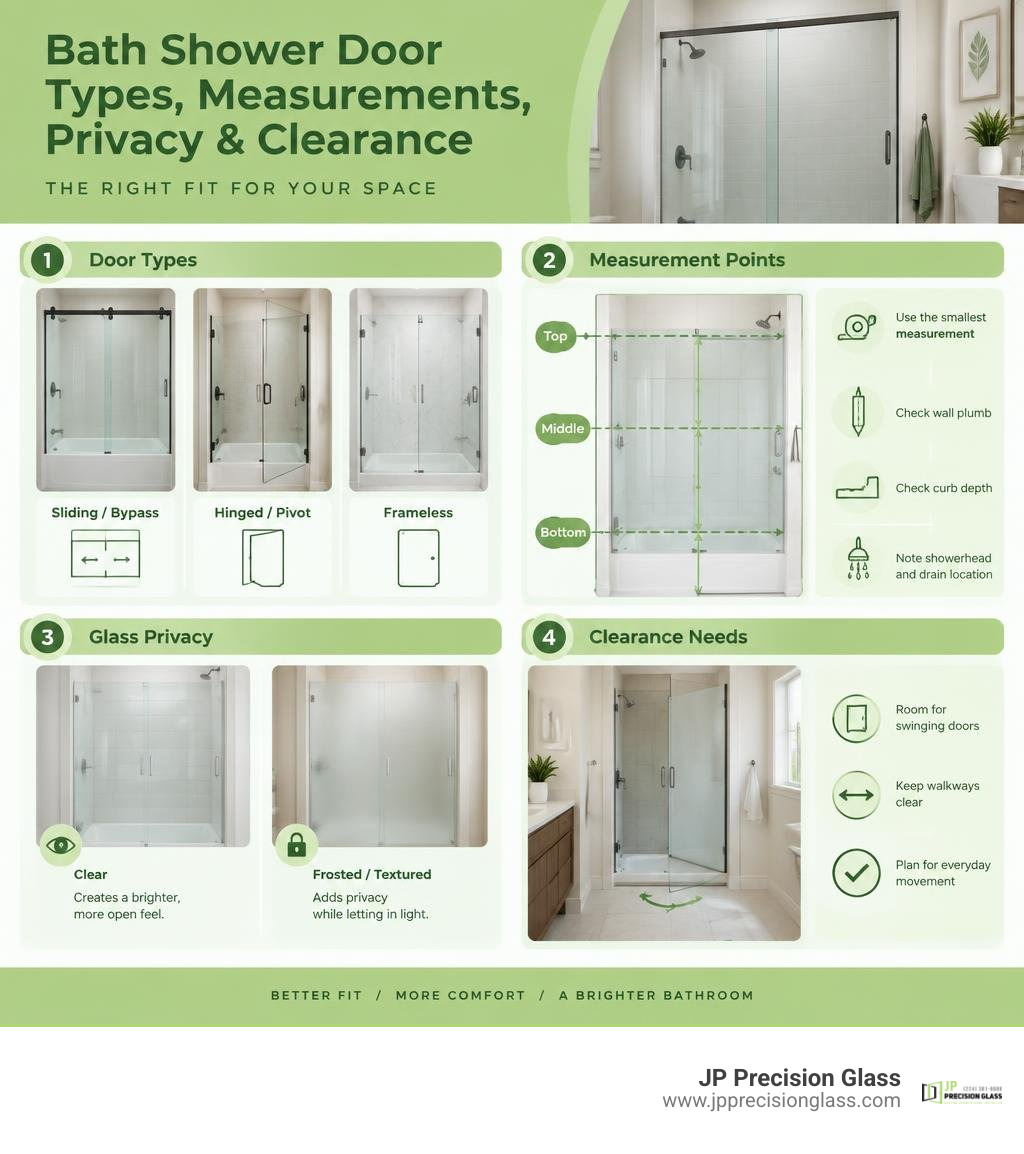
The best bath shower doors match your opening size, bathroom clearance, privacy needs, and cleaning preferences. Choose a sliding or bypass door when floor space is tight; choose a hinged or pivot door for a wider entry when you have room for it to swing; and choose frameless glass for a clean, open look with fewer seams to maintain.

Before buying, measure the finished opening at the top, middle, and bottom, then use the smallest measurement. Also check wall plumb, curb depth, and the location of the showerhead and drain. These details help prevent poor fit, leaks, and doors that cannot open as planned.

Framed doors offer dependable support and adjustability. Semi-frameless designs balance structure with a lighter look. Fully frameless doors use thick tempered glass, usually 3/8 to 1/2 inch, for a sleek custom finish. Clear glass makes a small bathroom feel larger, while frosted or textured glass adds privacy.

A well-fitted glass door does more than contain water. It can make a compact Chicago bathroom feel brighter, simplify cleaning, and give a remodel a polished final detail.

Bath shower door types, measurement points, glass privacy, and clearance needs infographic

Understanding the Core Types of Bath Shower Doors

Selecting the right door begins with understanding how different configurations interact with your space. The two biggest factors to evaluate are frame construction (how the glass is supported) and operating mechanics (how the door moves).

frameless hinged and sliding bath shower doors side by side

Every layout presents unique spatial opportunities. A narrow guest bath requires a different approach than an expansive primary suite. Exploring the primary categories helps determine which style suits your home best.

Framed, Semi-Frameless, and Frameless Glass Designs

Glass door systems fall into three main structural categories:

  • Framed Doors: These models feature aluminum or composite metal wrapping around every edge of the glass panels. The metal channels provide total perimeter support, allowing the use of thinner tempered glass (typically 1/4 inch). Framed units are exceptionally sturdy and forgiving on out-of-plumb walls, though the metal channels require more attention during routine cleaning.
  • Semi-Frameless Doors: A hybrid solution that gives you the best of both worlds. The perimeter wall jambs and bottom tracks are framed for structural integrity and water containment, but the swinging or sliding door panels have bare, polished glass edges. If you are learning how to choose the right glass tub enclosure, semi-frameless options offer a lighter look while maintaining straightforward installation parameters.
  • Frameless Doors: The gold standard of modern luxury design. Frameless systems eliminate exterior perimeter framing entirely. Instead, they rely on heavy-duty, premium safety tempered glass—typically 3/8 inch to 1/2 inch thick—supported by solid metal clamps and heavy hinges anchored directly into wall studs. This creates an open, spa-like aesthetic that showcases custom tilework and eliminates places where soap scum can hide.

Sliding, Hinged, Pivot, and Bypass Door Mechanics

How your door opens dictates how comfortably you can move around your bathroom fixtures:

  • Sliding and Bypass Doors: Bypass systems feature two glass panels resting on overhead rollers that glide past one another on parallel tracks. Because they do not open outward into the bathroom floor plan, modern sliding glass tub enclosures are ideal for compact layouts where a swinging door might hit a vanity, toilet, or linen closet. Many premium models—such as modern double sliding semi-frameless glass door specifications—feature reversible configurations and smooth overhead exposed rollers that maximize accessibility from either side.
  • Hinged Doors: These operate like standard passage doors, swinging outward on side-mounted wall hinges. They provide the widest possible walk-in entry opening and a truly frameless look, but they require adequate clear floor space outside the shower curb.
  • Pivot Doors: Pivot doors rotate on top and bottom pivot pins rather than wall-mounted side hinges. This mechanism distributes the heavy glass weight downward into the curb and floor, making it an excellent choice for wider openings or situations where wall framing cannot support heavy side hinges.

Space-Saving Folding, Bifold, and Partial Screen Configurations

When space is at a premium or you want an open walk-in feel, specialized configurations provide flexible solutions:

  • Bifold and Folding Doors: These units utilize center hinges that fold inward on themselves along a track. Choosing folding and bifold tub door systems gives you a wide entry path without demanding exterior swing clearance.
  • Fixed Walk-In Screens: Also known as splash panels, these consist of a single stationary glass pane secured to the wall and curb. They create a minimalist, barrier-free walk-in shower experience with zero moving mechanical parts.
  • Partial Glass Screens and Half Doors: Installing partial glass tub enclosures offers excellent splash protection over a bathtub while keeping the space open and airy. For added convenience, exploring bathtub glass half door options that feature a stationary panel paired with a hinged deflector gives you effortless access to your tub faucets without stepping inside.

How to Choose the Best Glass, Finishes, and Hardware

Beyond the basic door mechanics, the combination of glass style, protective treatments, and hardware finishes defines the personality and longevity of your shower.

Glass Opacity, Protective Coatings, and Privacy Options

Tempered architectural glass comes in several finishes to balance light transmission with personal privacy:

  • Clear Glass: The most popular choice for modern renovations. It maximizes visual space, brightens the room by letting natural light flow freely, and puts your custom tile or stone work on display.
  • Frosted and Acid-Etched Glass: Provides total visual privacy while still allowing soft, diffused light to pass through. Choosing frosted glass bathtub doors for privacy is an outstanding solution for shared family bathrooms where multiple people may need the space simultaneously.
  • Rain and Patterned Textures: Textured glass features decorative impressions, such as trickling raindrops, embedded directly into one side of the panel. It obscures visibility, softens light, and hides water droplets and fingerprints.
  • Smoke Gray and Tinted Glass: Offers a bold, contemporary design statement while creating a sleek, semi-private enclosure.
  • Hydrophobic Protective Coatings: Factory-applied treatments (such as EnduroShield) bond permanently to the microscopic pores of the glass. This creates an ultra-smooth surface that causes water, mineral deposits, and soap scum to bead up and slide off, cutting regular cleaning time significantly.

Hardware Materials and Contemporary Finish Styles

Shower hardware must withstand continuous moisture, humidity, and daily handling. We recommend solid brass or marine-grade stainless steel hardware for all structural components, clamps, and hinges to ensure long-term corrosion resistance.

To create a cohesive aesthetic, coordinate your door hardware with your bathroom faucets, lighting, and cabinet pulls:

  • Matte Black: Crisp, modern, and industrial. It creates high-contrast lines that anchor contemporary spaces.
  • Brushed Nickel: A timeless, warm metallic tone that excels at concealing fingerprints and minor water spots.
  • Polished Chrome: Highly reflective, classic, and versatile, pairing naturally with traditional and transitional fixtures.
  • Brushed Gold / Brass: Adds an upscale, vintage-luxe warmth to custom walk-in enclosures.
  • Oil-Rubbed Bronze: Deep, rich, and rustic—ideal for Mediterranean, farmhouse, or classic craftsman bathrooms.

Sizing, Measuring, and Layout Compatibility

A beautiful glass door is only as good as its measurements. Because tempered safety glass cannot be cut, drilled, or modified once it has undergone the heat-tempering process, measuring accurately before ordering is essential.

measuring shower opening width and wall plumb with a tape measure

Accurate Measuring and Sizing for Bath Shower Doors

To determine your door dimensions, always measure the finished opening—meaning after all backer boards, waterproofing membranes, and final tiles or wall surrounds are completely installed.

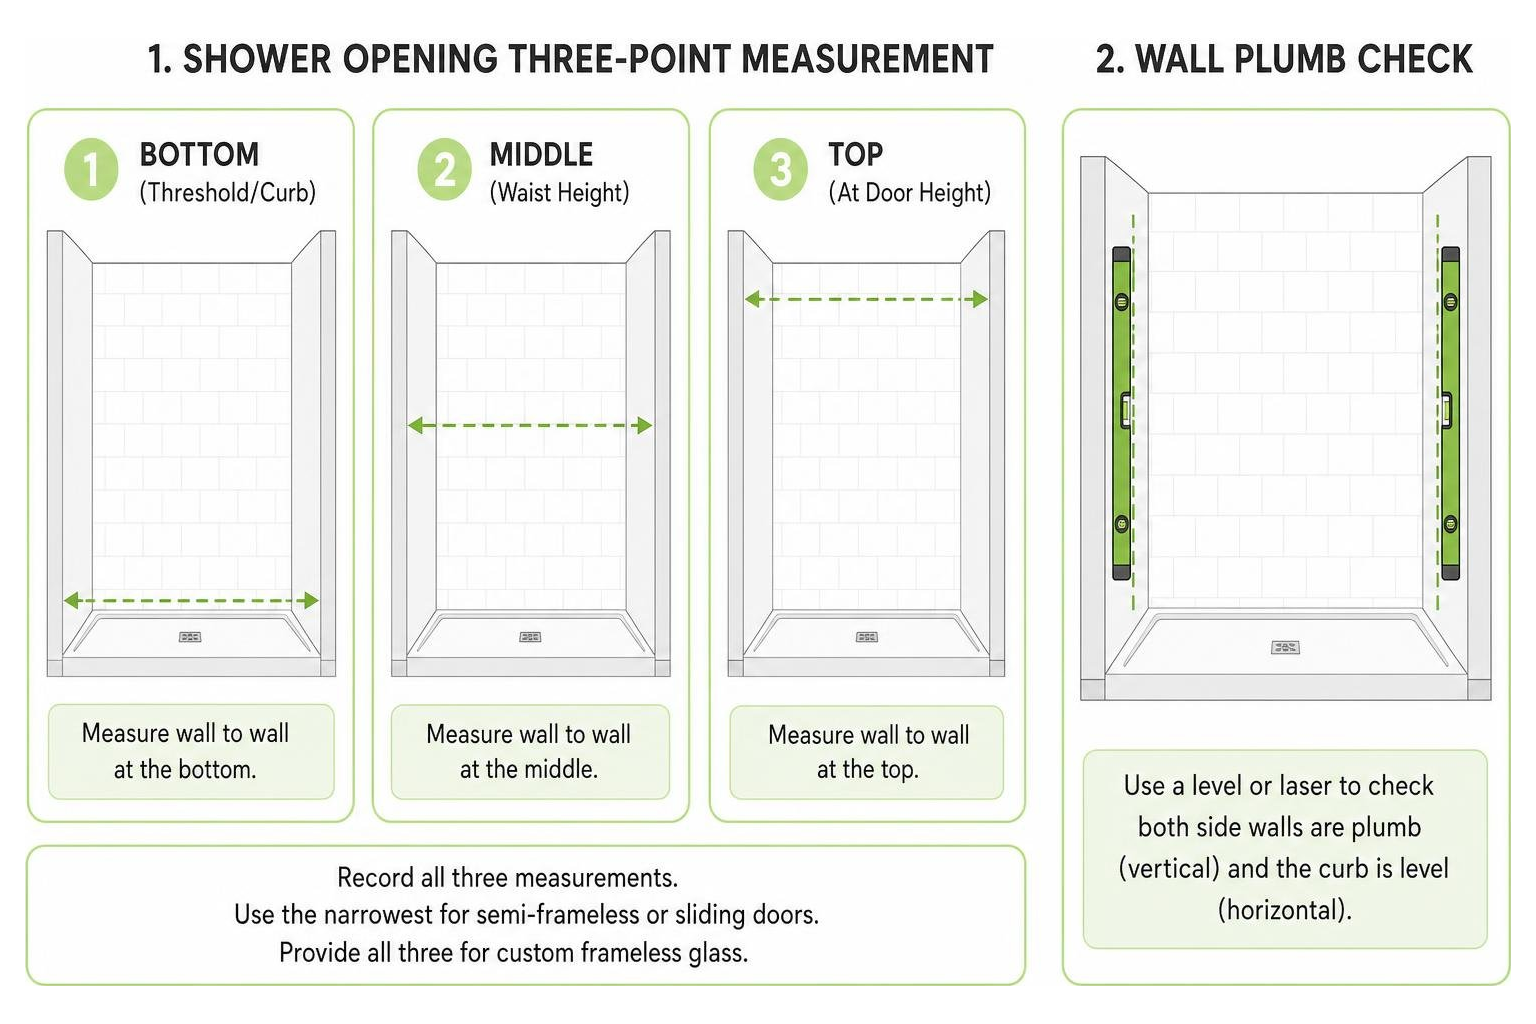
Shower opening three-point measurement process and wall plumb check

  1. Width (3-Point Check): Measure the horizontal distance from wall to wall at three distinct points: the bottom (along the threshold or curb), the middle (around waist height), and the top (at your intended door height, typically 72 or 76 inches). Record all three numbers. If the numbers vary, use the narrowest measurement when ordering semi-frameless or sliding systems with adjustment channels. For custom frameless glass, provide all three dimensions so the glass can be precision-cut to match the exact taper of your walls.
  2. Height: Measure vertically from the top of the shower curb or bathtub ledge up to the top of the tile or ceiling line. Standard doors typically stand 72 inches tall, while modern luxury designs frequently measure 76 inches or higher for a dramatic look and superior steam containment.
  3. Plumb and Level: Use a long spirit level or laser level on both side walls and across the threshold curb. If a wall leans inward or outward, a standard off-the-shelf door may leave unsightly wedge-shaped gaps or fail to seal properly without custom glass fabrication.
  4. Curb Depth: Measure the flat horizontal depth of your threshold or tub deck. Most sliding track systems require a minimum of 2.5 to 3.5 inches of flat, unobstructed curb surface.
Door Style Standard Width Ranges Standard Height Minimum Curb Depth Needed Clearance Requirement
Bypass / Sliding Door 48″ to 60″ (up to 72″) 72″ to 76″+ 2.75″ to 3.5″ 0″ (glides along curb)
Frameless Hinged Door 24″ to 36″ (single panel) 72″ to 80″+ 2.0″ to 3.0″ Equal to door panel width
Neo-Angle / Corner 36″ x 36″ to 42″ x 42″ 72″ to 76″ 2.5″ to 3.5″ Outward swing at 45° angle
Walk-In / Splash Screen 30″ to 48″ (fixed panel) 74″ to 80″+ 1.5″ to 2.5″ Open entry space (min. 22″)

Matching Bath Shower Doors with Existing Bases and Layouts

Your shower base, curb profile, and plumbing layout dictate which door systems will operate safely and effectively:

  • Drain and Showerhead Placement: Never position a hinged door opening directly in the path of a high-pressure showerhead spray. Hinges and sliding doors should be configured so water strikes fixed glass panels or solid walls first.
  • Curbless and ADA-Compliant Layouts: For barrier-free accessibility, zero-threshold curbless showers paired with wide-opening bypass doors or stationary walk-in screens provide effortless wheelchair and walker access.
  • Tub-to-Shower Conversions: If you are keeping a standard 60-inch alcove tub footprint, choosing modern half glass enclosure solutions or sliding systems preserves full bathing utility while elevating your shower aesthetic.

Installation, Leak Prevention, and Long-Term Maintenance

Achieving a water-tight, long-lasting installation requires careful attention to structural backing, proper sealing techniques, and routine care.

DIY vs. Professional Installation Considerations

While framed or semi-frameless sliding kits can be handled by experienced DIYers, frameless heavy glass requires specialized expertise:

  • Glass Weight: Heavy-glass frameless panels (3/8″ or 1/2″ thick) can weigh between 70 and 120 pounds per panel. Handling them requires professional suction grips and at least two people. Tempered glass is strong on its face, but a light tap on an unprotected corner against hard tile can cause it to shatter instantly.
  • Structural Wall Blocking: Heavy frameless hinges cannot be fastened into drywall or hollow tile anchors alone. They must be secured directly into double 2×4 solid wood studs behind the finished wall.
  • Precision Drilling: Drilling through porcelain, marble, or natural stone requires diamond-tipped masonry bits, continuous water cooling, and steady hands to avoid cracking expensive tile.

If you are confident in your carpentry skills and working with lightweight sliding kits, our step-by-step DIY glass enclosure guidelines outline the essential tool list and step-by-step prep needed for clean results. For custom frameless installations, partnering with our professional team at JP Precision Glass ensures absolute laser-level alignment, safe structural mounting, and a flawless water seal.

Preventing Leaks and Streamlining Glass Cleaning

Water containment does not require heavy metal frames when your door is properly outfitted:

  • Vinyl Sweeps and Drip Rails: Frameless doors utilize clear polycarbonate bottom sweeps with angled drip deflectors that direct running water back into the shower pan.
  • Magnetic and Bubble Seals: Vertical jamb seals snap shut securely to prevent lateral spray from escaping between the door panel and the wall.
  • Proper Silicone Application: When sealing tracks or stationary panel channels, apply high-grade, 100% mildew-resistant silicone sealant along the outside perimeter of the shower. Sealing the inside can trap moisture inside the channels, leading to mold buildup.
  • Daily Maintenance: Keep a squeegee inside the shower. Taking 30 seconds to wipe down the glass after your final rinse removes mineral-heavy water droplets before they can evaporate and form stubborn limescale deposits.

Frequently Asked Questions About Bath Shower Doors

What is the difference between a shower door and a shower enclosure?

A shower door refers to the moving glass panel (or sliding bypass pair) that encloses an alcove opening bordered by three existing walls. A shower enclosure is a multi-sided glass structure designed for corner, neo-angle, or freestanding layouts. It includes the door panel along with one or more stationary return glass panels, corner posts, and headers to create a standalone, fully enclosed showering space.

Do frameless shower doors leak more than framed models?

When properly measured and installed, frameless shower doors do not leak. Frameless systems rely on tight engineering tolerances (gaps of 1/8 inch or less), clear vinyl edge seals, bottom sweeps, and an inward-sloping curb (pitched roughly 1/8 to 1/4 inch toward the drain). As long as showerheads are not pointed directly at the glass seams and the curb has proper slope, water stays securely contained inside.

What is the easiest style of shower door to clean?

Frameless glass shower doors with factory-applied hydrophobic protective coatings are the easiest to clean. Because frameless systems eliminate metal bottom channels, frame tracks, and rubber gaskets, there are no recessed corners where water pools or soap scum accumulates. A quick pass with a squeegee and an occasional wipe with a microfiber cloth and mild soap keep the glass crystal clear.

Conclusion

Upgrading your bathroom with a custom glass enclosure is one of the most rewarding investments you can make for your home. Beyond protecting your floors from water damage, modern glass doors maximize light, expand visual space, and highlight the beauty of your tile and fixtures.

Whether you are looking for sleek frameless hinged doors, space-saving bypass sliding systems, or versatile 3 panel shower door solutions for your bathtub, precision measurement and expert craftsmanship make all the difference. At JP Precision Glass, we specialize in designing, customizing, and installing tailored glass shower doors and enclosures that fit your unique layout flawlessly. Let us help you transform your daily routine into a refreshing, spa-like experience.