• JP Precision Glass is the leading glass shower doors company in Chicago

Author Archives: jp-admin

bath shower screen with return

Is a Bath Shower Screen with Return Worth the Splurge?

Is a Bath Shower Screen with Return Worth It?

Yes, a bath shower screen with return is usually worth choosing if you want better splash control without closing off the bathroom. It adds a short glass panel at the open edge of the main bath screen, creating an L-shaped barrier that guides spray back into the tub.

It is especially useful for power showers, busy family bathrooms, and tubs with a wider showering end. Compared with a standard single flat screen, a return panel helps keep the floor drier while preserving the clean, open look of glass.

Before choosing one, confirm that:

  • Your bath has a flat, suitable rim for the screen and return panel.
  • The screen matches the bath shape, whether straight, L-shaped, P-shaped, or curved.
  • There is enough clearance for a fixed or hinged panel to sit safely near the bath edge.
  • The glass, seals, and wall fixings are sized for your bathroom’s layout.

A well-fitted return is not a guarantee against every drop of water, but it greatly reduces the main splash path that escapes around the end of an over-bath screen. For a remodel where sleek design, easy cleaning, and practical water control matter, it can be a smart upgrade. For broader context on how these enclosures compare with other glass options, see the shower enclosure overview.
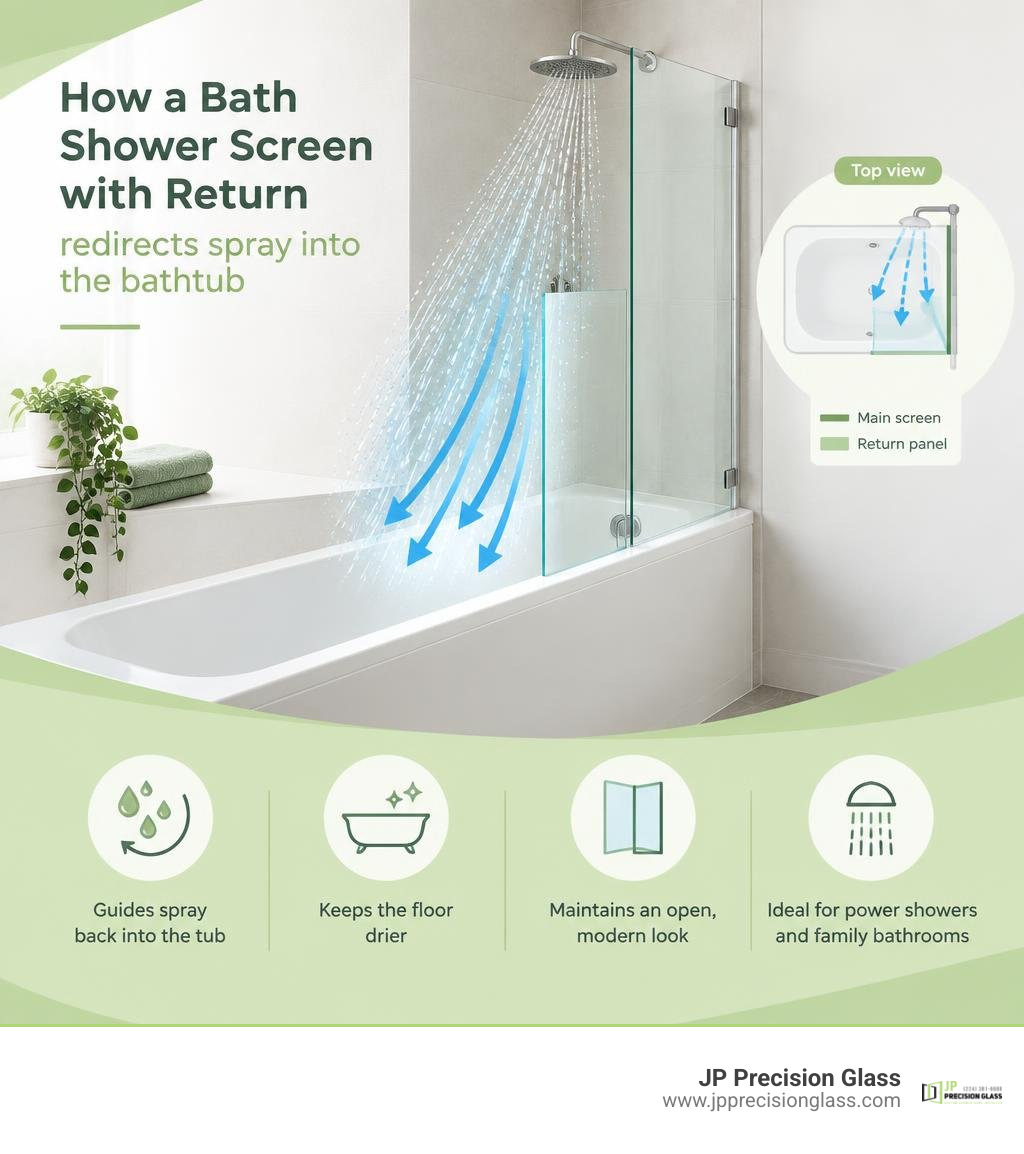
How a bath shower screen with return redirects spray into the bathtub infographic

Quick look at bath shower screen with return:

What Is a Bath Shower Screen with Return and How Does It Work?

An over-bath showering setup brings together the relaxation of a soaking tub with the daily convenience of a standing shower. However, standard single-panel glass screens often leave a significant gap where ricocheting water escapes onto the bathroom floor. This is where a return panel comes into play.
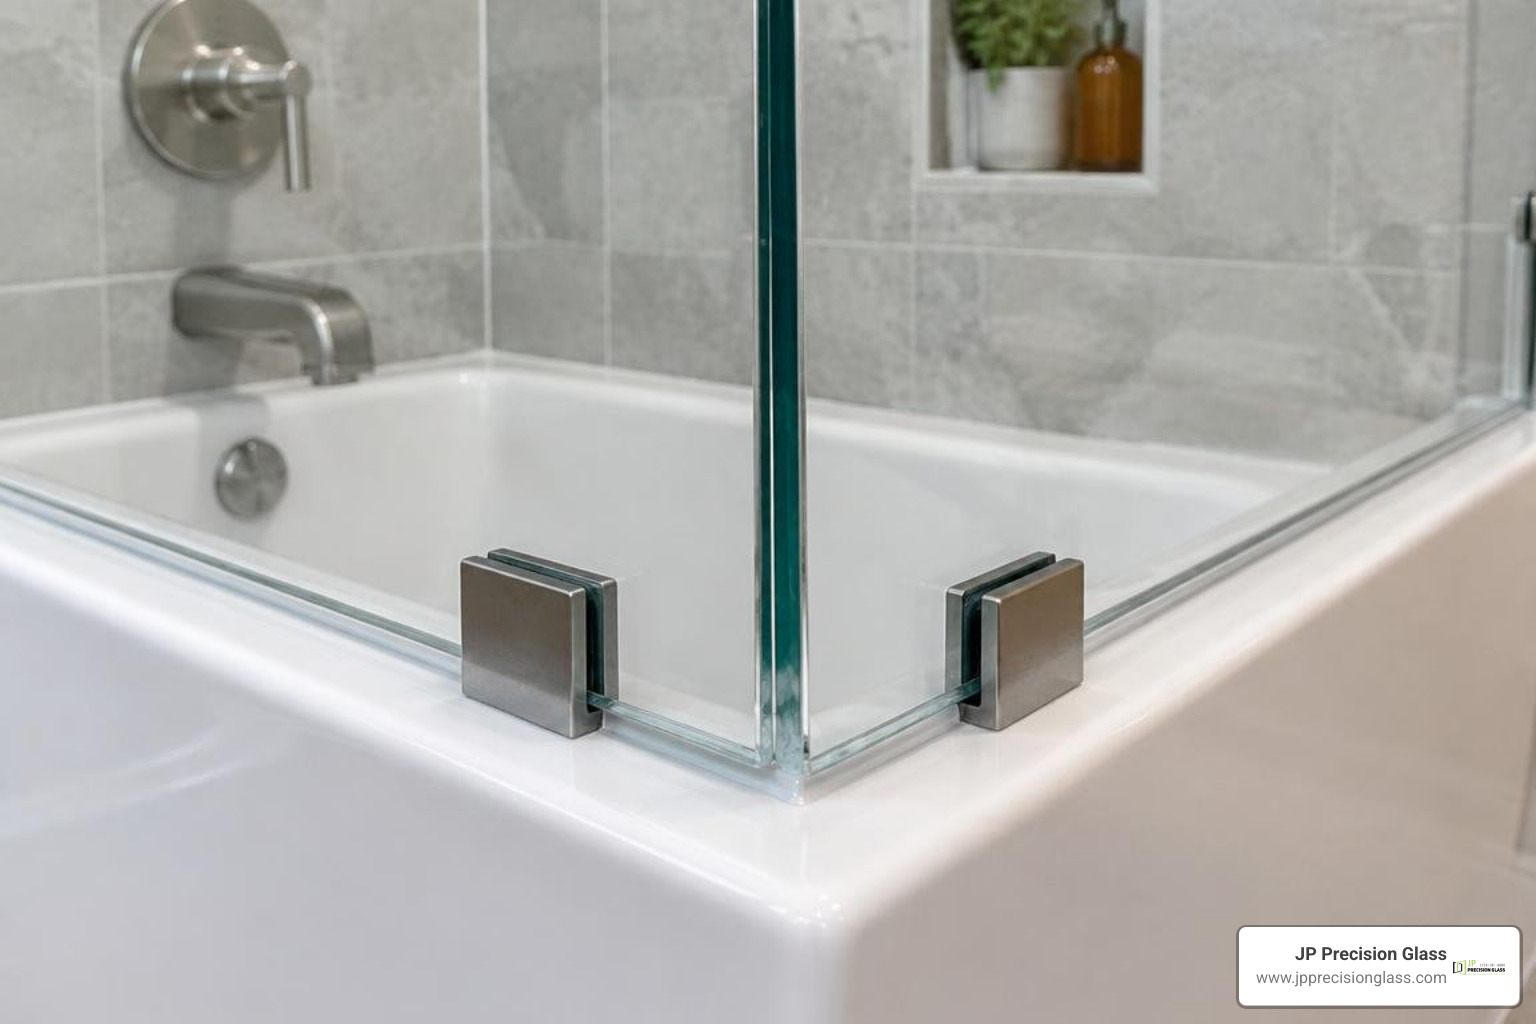
close-up of a fixed 90-degree return screen joint

A return panel is an additional, shorter pane of glass positioned at an angle—most commonly a 90-degree right angle—at the outer edge of the primary bath screen. By forming an L-shaped footprint along the rim of the bathtub, the return creates an inward-facing barrier.

When you shower, droplets do not just spray straight ahead; they bounce off your body, deflect off the side walls, and travel outward diagonally. The return panel blocks this lateral spray trajectory and channels the water back down into the tub basin, dramatically enhancing splash protection without turning your bath into a fully boxed-in cubicle.

Anatomy of Fixed vs Hinged Return Panels

Return screens generally fall into two functional categories:

  1. Fixed Return Panels: These panels attach rigidly to the main screen using stationary glass clips or a corner profile. Because they do not move, they offer high structural stability and create a permanent water barrier. They are particularly popular on dedicated L-shaped shower baths.
  2. Hinged Return Panels (Flipper Screens): Equipped with a continuous hinge or concealed pivot hardware, a flipper screen can rotate 90 to 180 degrees inward or outward. This allows you to swing the deflector panel inward to reach tub controls without getting soaked, or fold it back out of the way when stepping into the bath.
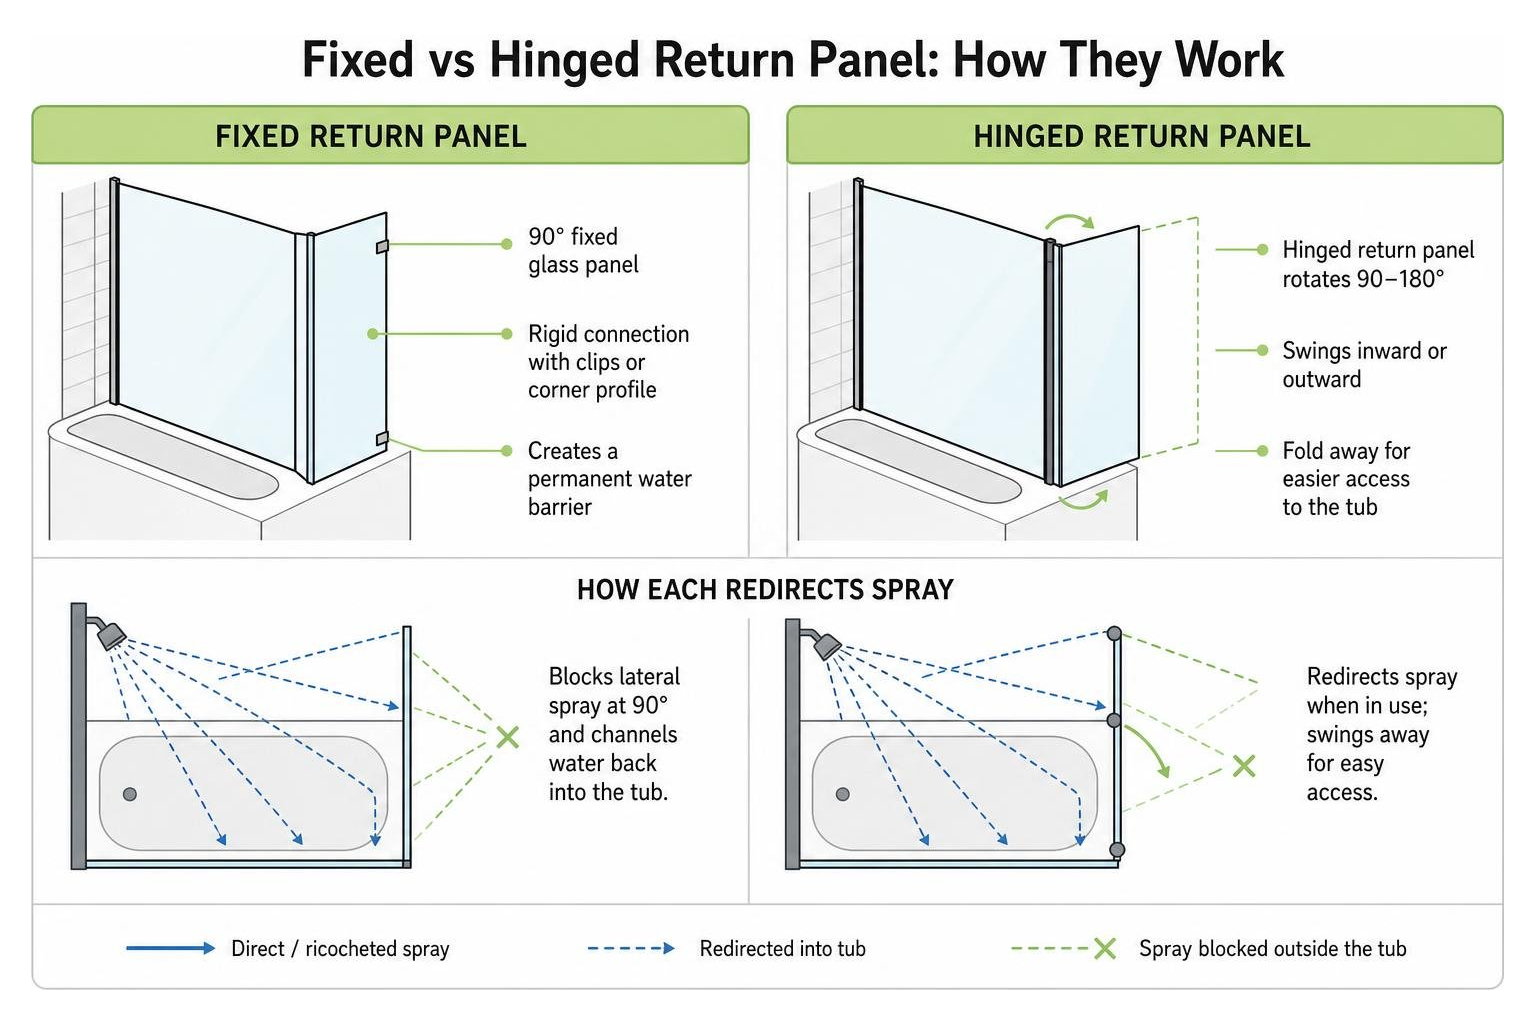
comparison of fixed versus hinged return panel mechanics

Single Over-Bath Panels vs. a Bath Shower Screen with Return

A standard single straight screen only shields the length of the tub directly adjacent to the wall. Water spraying toward the open end of the tub easily rolls off the rim. Adding a return panel encloses the splash zone on two planes, protecting sensitive vanity units and floorboards from chronic moisture damage.

Feature Single Straight Screen Screen with Fixed Return Screen with Hinged Return
Water Containment Moderate; allows side spray escape Excellent; full 2-sided barrier High; flexible splash deflection
Access Convenience Open entry Fixed entry point Hinged panel swings clear
Tub Compatibility Straight, standard tubs L-shaped and wide straight tubs Straight and curved baths
Visual Footprint Minimalist line Defined shower corner Sleek, adjustable profile

When deciding on the right layout for your space, learning how to choose the perfect glass tub enclosure can help you match your bathing habits with the right glass style.

Key Benefits: Water Containment and Enhanced Usability

Upgrading to a bath shower screen with return transforms a routine shower-bath hybrid into a dedicated showering zone.
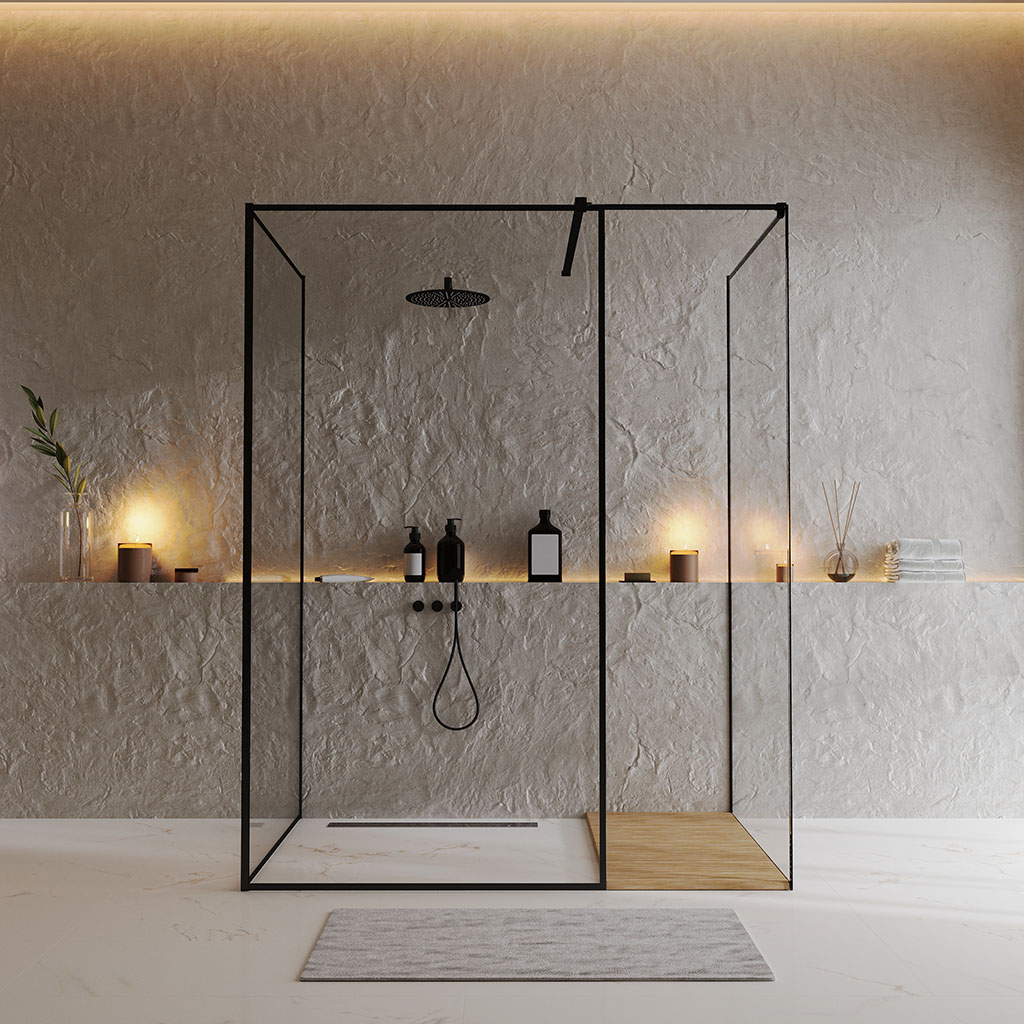
minimalist bath screen with return preventing water escape

Superior Splash Protection for Power Showers

High-pressure showerheads and aerated power showers produce a high volume of turbulent spray. A single flat pane often struggles to contain this increased water velocity. The angled return acts as a deflector wall, stopping escaping mist and droplets right at the critical escape corner.

Quality designs feature continuous bottom gaskets and precision-fitted wall profiles to prevent pooling along the tub ledge. For bathrooms with specialized layouts, adding dedicated bath shower screen extension panels provides an extra layer of splash defense tailored to high-output shower systems.

Space Optimization and Open Bathroom Feel

Clear glass enclosures allow sightlines to pass uninterrupted across the room, making compact bathrooms feel significantly larger and brighter.

Even in tight quarters where every millimeter counts, choosing a compact 500mm glass shower screen or an over-bath return setup delivers the functionality of a walk-in shower enclosure without sacrificing the tub. Many return screens also feature integrated horizontal towel rails on the exterior glass, keeping your bath sheets dry, warm, and within arm’s reach.

Bathtub Shape Compatibility and Sizing Factors

Bath screens with return panels are engineered to complement a wide range of modern tub profiles.

Straight, L-Shaped, and P-Shaped Bathtub Configurations

  • Straight Baths: Standard rectangular tubs benefit from a square-edged screen with a fixed or hinged 300mm return to catch lateral spray along the straight rim.
  • L-Shaped Shower Baths: Designed specifically with an expanded, squared showering end, L-shaped baths pair naturally with a 90-degree fixed return panel that follows the exact contour of the tub’s outer ledge.
  • P-Shaped and Curved Baths: These tubs feature a rounded, ergonomic bulge at the showering end. They require curved bath screens paired with articulated or curved return sections that contour to the bath’s unique radius.

Reversible Handing and Layout Versatility

Most return screens feature universal handing, meaning the hardware and glass panels are completely reversible. During installation, the screen can be configured for either a left-hand or right-hand wall mount. This versatility ensures you can easily position the glass to clear vanity basins, toilet suites, and wall-mounted towel radiators without obstructing entry.

Glass Specifications, Hardware Finishes, and Aesthetic Styles

The durability and appearance of your screen depend directly on the materials you select. Consulting comprehensive glass shower enclosure comparisons can help clarify how different specifications perform over decades of daily use.

Choosing the Right Glass Thickness for a Bath Shower Screen with Return

Bath screens typically use toughened safety glass (tempered glass) to comply with rigorous safety standards:

  • 6mm Safety Glass: The most common standard for hinged over-bath screens. It balances strength, lightweight operation, and smooth hinge movement.
  • 8mm Premium Glass: Provides greater structural rigidity, reducing screen flex and giving the installation a solid, luxurious feel.
  • 10mm Frameless Glass: Ideal for high-end bespoke enclosures. If you are exploring 10mm frameless shower screen options, keep in mind that the increased weight requires heavy-duty wall anchors and sturdy structural backing.

High-grade screens often include an easy-clean factory nano-coating that repels water and prevents limescale, soap scum, and hard mineral buildup.

Hardware and glass treatments allow you to personalize your enclosure:

  • Polished Chrome: A timeless, reflective finish that complements traditional and contemporary chrome brassware.
  • Matte Black: Crisp, architectural framing that grounds industrial, monochrome, and modern designs.
  • Brushed Brass: Warm metallic hardware that pairs well with organic textures and earthy tiles.
  • Decorative Glass: Fluted (reeded) glass offers tactile elegance and visual privacy, while silk-screened grid patterns or subtle smoked glass create striking focal points.

Measuring and Installation Best Practices

Precision is essential when fitting an over-bath screen. Even minor discrepancies in bath level or wall plumb can lead to water pooling or seal failure.

Accurate Measurement Steps for Bathtub Screens

Before ordering your screen, verify these critical checkpoints:

  1. Check Wall Plumb: Use a long spirit level to check if your tiled wall leans inward or outward. Choose a wall profile that offers built-in out-of-true adjustment (typically 15mm to 20mm).
  2. Confirm Bath Rim Levelness: Verify that the bathtub deck sits level along both its length and width.
  3. Measure Rim Width: Ensure the flat landing area of the tub rim is wide enough to seat the glass channel and bottom drip seal without hanging over the edge.
  4. Account for Obstructions: Check the full swing radius of hinged panels to confirm they clear faucets, shower valves, and nearby sanitaryware.

Maintenance, Seal Replacement, and Glass Care

Keeping your glass screen pristine requires simple, consistent habits:

  • Use a soft silicone squeegee after each shower to wipe away standing droplets.
  • Clean glass surfaces using non-abrasive, pH-neutral cleaners and a microfiber cloth to protect the water-repellent coating.
  • Inspect the bottom vinyl sweep and vertical magnetic seals periodically. Replacing worn seals every few years maintains an impenetrable water barrier.

Frequently Asked Questions About Over-Bath Screens

Does a bath screen with a return panel prevent all leaks?

While an L-shaped return panel dramatically reduces escaping spray compared to standard straight screens, it is designed to redirect indirect spray and splashing. It is not an airtight seal against high-pressure water streams sprayed directly at the glass joints. Directing your showerhead toward the tiled wall rather than directly at the screen joint ensures reliable water containment.

Can a return panel screen be fitted to any standard bath?

Most screens can be fitted to standard rectangular baths, provided the bath rim has a flat, level surface at least 40mm to 50mm wide. Tubs with steep internal slopes, pronounced roll tops, or uneven decorative rims may not allow bottom seals to seat properly.

Is a fixed return panel better than a hinged flipper screen?

It depends on your bathroom layout. A fixed return panel provides exceptional structural stability and a permanent barrier, making it ideal for dedicated shower baths. A hinged flipper panel offers greater accessibility, allowing you to fold the deflector inward to turn on the taps or bathe small children without leaning over rigid glass.

Conclusion

Upgrading to an over-bath shower screen with a return panel delivers the splash-stopping security of a dedicated enclosure while maintaining an open, airy bathroom environment. By blocking lateral spray, protecting your flooring, and providing a clean architectural look, it offers substantial long-term value for modern homes. When you are ready to elevate your space with custom, precision-crafted installations, explore our premium collection of made-to-measure glass shower panels to find the perfect fit for your bathroom.
bath shower doors

The Ultimate Guide to Bath Shower Doors: Compare & Buy

Choose Bath Shower Doors That Fit Your Space and Routine

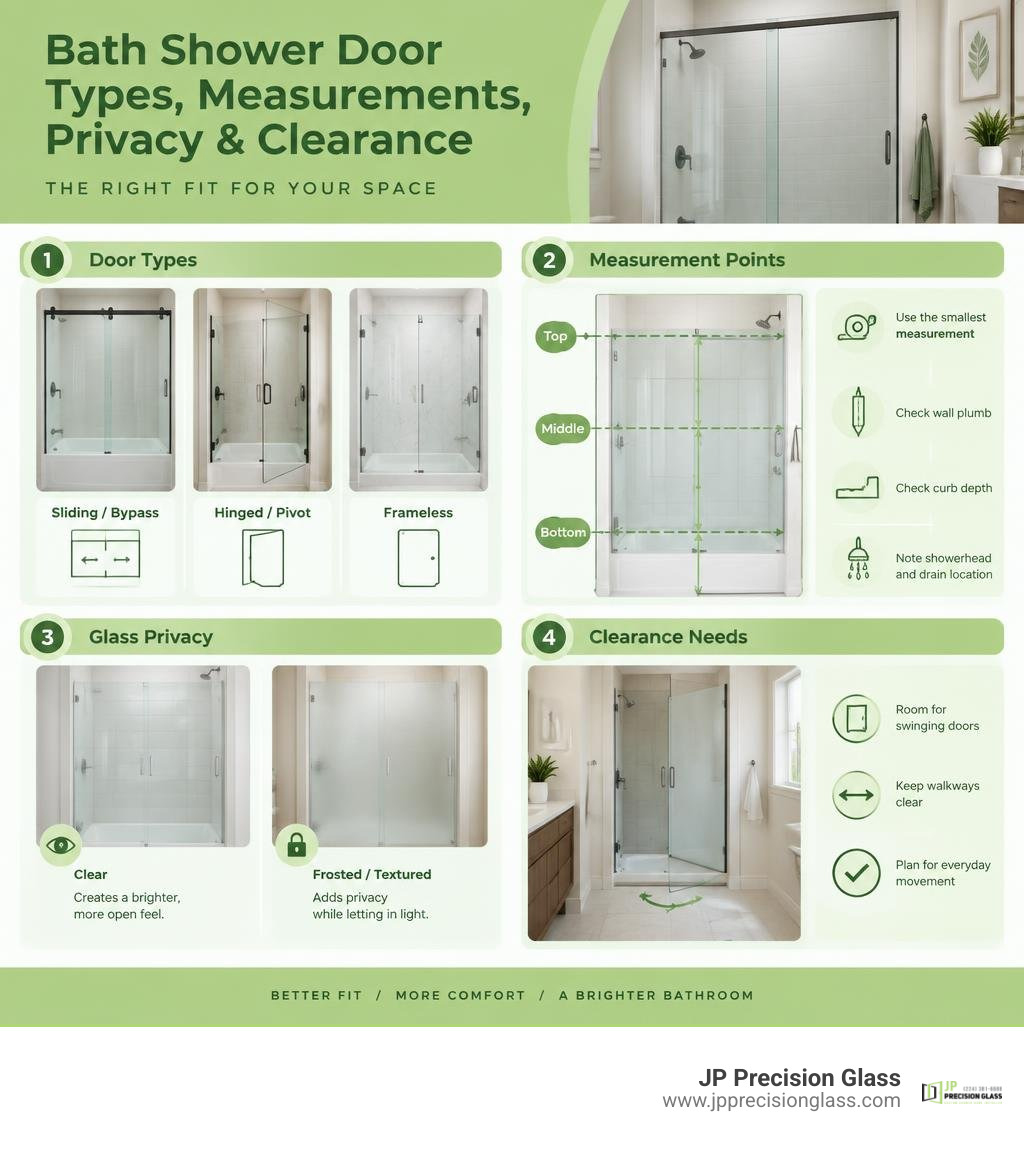
The best bath shower doors match your opening size, bathroom clearance, privacy needs, and cleaning preferences. Choose a sliding or bypass door when floor space is tight; choose a hinged or pivot door for a wider entry when you have room for it to swing; and choose frameless glass for a clean, open look with fewer seams to maintain.

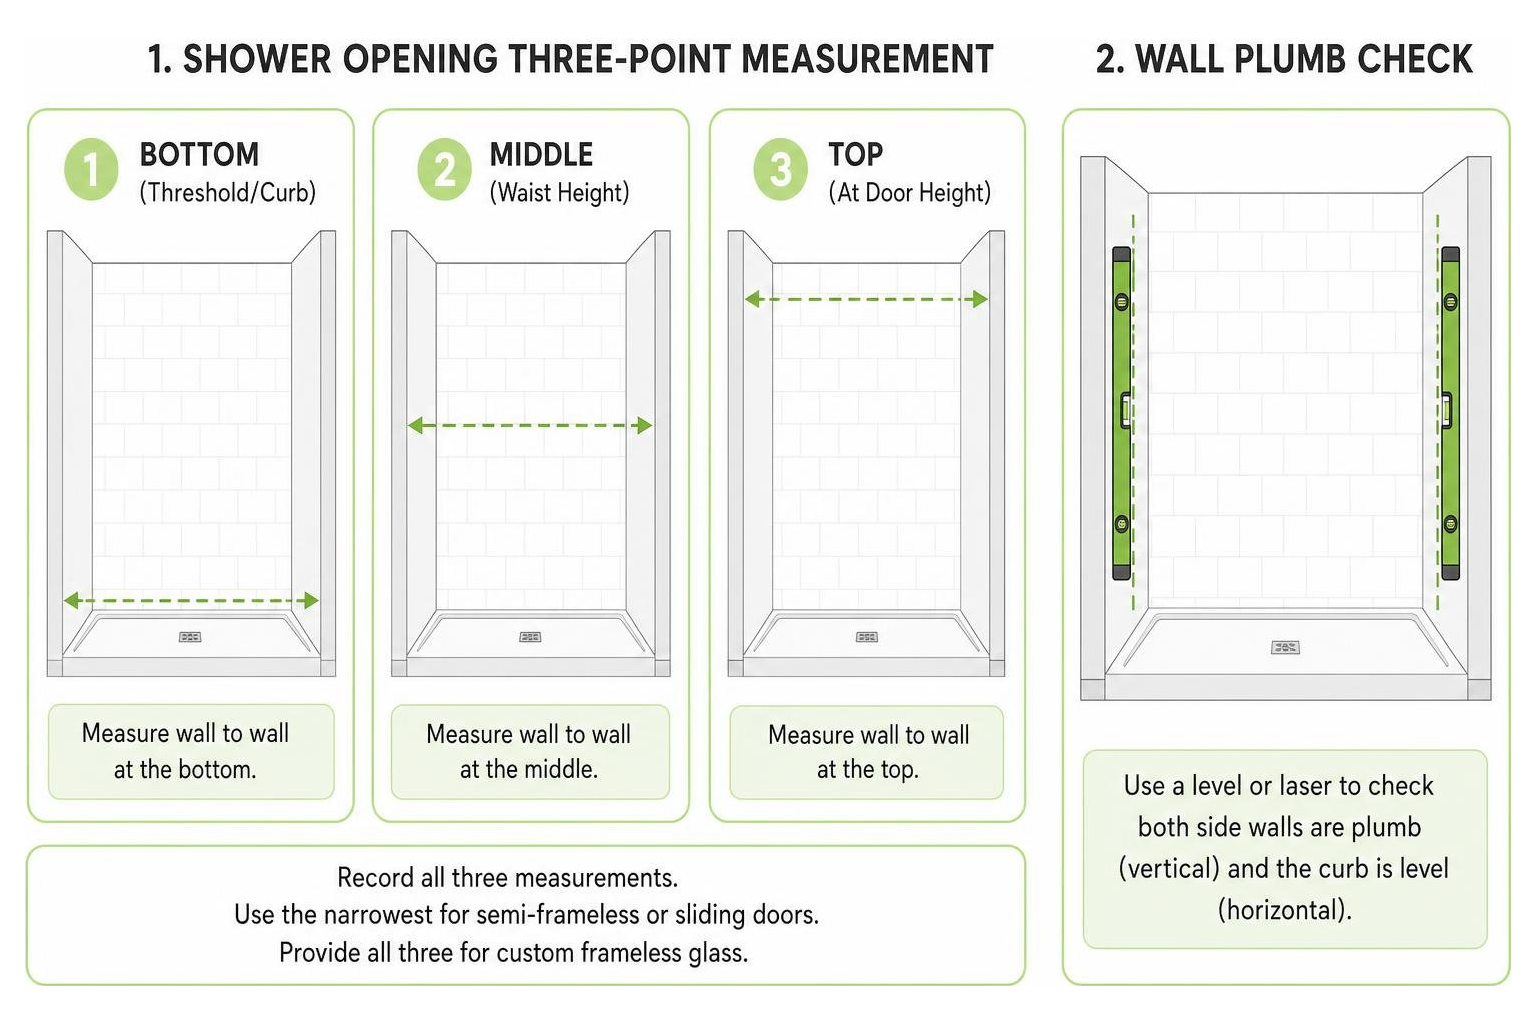
Before buying, measure the finished opening at the top, middle, and bottom, then use the smallest measurement. Also check wall plumb, curb depth, and the location of the showerhead and drain. These details help prevent poor fit, leaks, and doors that cannot open as planned.

Framed doors offer dependable support and adjustability. Semi-frameless designs balance structure with a lighter look. Fully frameless doors use thick tempered glass, usually 3/8 to 1/2 inch, for a sleek custom finish. Clear glass makes a small bathroom feel larger, while frosted or textured glass adds privacy.

A well-fitted glass door does more than contain water. It can make a compact Chicago bathroom feel brighter, simplify cleaning, and give a remodel a polished final detail.

Bath shower door types, measurement points, glass privacy, and clearance needs infographic

Understanding the Core Types of Bath Shower Doors

Selecting the right door begins with understanding how different configurations interact with your space. The two biggest factors to evaluate are frame construction (how the glass is supported) and operating mechanics (how the door moves).

frameless hinged and sliding bath shower doors side by side

Every layout presents unique spatial opportunities. A narrow guest bath requires a different approach than an expansive primary suite. Exploring the primary categories helps determine which style suits your home best.

Framed, Semi-Frameless, and Frameless Glass Designs

Glass door systems fall into three main structural categories:

  • Framed Doors: These models feature aluminum or composite metal wrapping around every edge of the glass panels. The metal channels provide total perimeter support, allowing the use of thinner tempered glass (typically 1/4 inch). Framed units are exceptionally sturdy and forgiving on out-of-plumb walls, though the metal channels require more attention during routine cleaning.
  • Semi-Frameless Doors: A hybrid solution that gives you the best of both worlds. The perimeter wall jambs and bottom tracks are framed for structural integrity and water containment, but the swinging or sliding door panels have bare, polished glass edges. If you are learning how to choose the right glass tub enclosure, semi-frameless options offer a lighter look while maintaining straightforward installation parameters.
  • Frameless Doors: The gold standard of modern luxury design. Frameless systems eliminate exterior perimeter framing entirely. Instead, they rely on heavy-duty, premium safety tempered glass—typically 3/8 inch to 1/2 inch thick—supported by solid metal clamps and heavy hinges anchored directly into wall studs. This creates an open, spa-like aesthetic that showcases custom tilework and eliminates places where soap scum can hide.

Sliding, Hinged, Pivot, and Bypass Door Mechanics

How your door opens dictates how comfortably you can move around your bathroom fixtures:

  • Sliding and Bypass Doors: Bypass systems feature two glass panels resting on overhead rollers that glide past one another on parallel tracks. Because they do not open outward into the bathroom floor plan, modern sliding glass tub enclosures are ideal for compact layouts where a swinging door might hit a vanity, toilet, or linen closet. Many premium models—such as modern double sliding semi-frameless glass door specifications—feature reversible configurations and smooth overhead exposed rollers that maximize accessibility from either side.
  • Hinged Doors: These operate like standard passage doors, swinging outward on side-mounted wall hinges. They provide the widest possible walk-in entry opening and a truly frameless look, but they require adequate clear floor space outside the shower curb.
  • Pivot Doors: Pivot doors rotate on top and bottom pivot pins rather than wall-mounted side hinges. This mechanism distributes the heavy glass weight downward into the curb and floor, making it an excellent choice for wider openings or situations where wall framing cannot support heavy side hinges.

Space-Saving Folding, Bifold, and Partial Screen Configurations

When space is at a premium or you want an open walk-in feel, specialized configurations provide flexible solutions:

  • Bifold and Folding Doors: These units utilize center hinges that fold inward on themselves along a track. Choosing folding and bifold tub door systems gives you a wide entry path without demanding exterior swing clearance.
  • Fixed Walk-In Screens: Also known as splash panels, these consist of a single stationary glass pane secured to the wall and curb. They create a minimalist, barrier-free walk-in shower experience with zero moving mechanical parts.
  • Partial Glass Screens and Half Doors: Installing partial glass tub enclosures offers excellent splash protection over a bathtub while keeping the space open and airy. For added convenience, exploring bathtub glass half door options that feature a stationary panel paired with a hinged deflector gives you effortless access to your tub faucets without stepping inside.

How to Choose the Best Glass, Finishes, and Hardware

Beyond the basic door mechanics, the combination of glass style, protective treatments, and hardware finishes defines the personality and longevity of your shower.

Glass Opacity, Protective Coatings, and Privacy Options

Tempered architectural glass comes in several finishes to balance light transmission with personal privacy:

  • Clear Glass: The most popular choice for modern renovations. It maximizes visual space, brightens the room by letting natural light flow freely, and puts your custom tile or stone work on display.
  • Frosted and Acid-Etched Glass: Provides total visual privacy while still allowing soft, diffused light to pass through. Choosing frosted glass bathtub doors for privacy is an outstanding solution for shared family bathrooms where multiple people may need the space simultaneously.
  • Rain and Patterned Textures: Textured glass features decorative impressions, such as trickling raindrops, embedded directly into one side of the panel. It obscures visibility, softens light, and hides water droplets and fingerprints.
  • Smoke Gray and Tinted Glass: Offers a bold, contemporary design statement while creating a sleek, semi-private enclosure.
  • Hydrophobic Protective Coatings: Factory-applied treatments (such as EnduroShield) bond permanently to the microscopic pores of the glass. This creates an ultra-smooth surface that causes water, mineral deposits, and soap scum to bead up and slide off, cutting regular cleaning time significantly.

Hardware Materials and Contemporary Finish Styles

Shower hardware must withstand continuous moisture, humidity, and daily handling. We recommend solid brass or marine-grade stainless steel hardware for all structural components, clamps, and hinges to ensure long-term corrosion resistance.

To create a cohesive aesthetic, coordinate your door hardware with your bathroom faucets, lighting, and cabinet pulls:

  • Matte Black: Crisp, modern, and industrial. It creates high-contrast lines that anchor contemporary spaces.
  • Brushed Nickel: A timeless, warm metallic tone that excels at concealing fingerprints and minor water spots.
  • Polished Chrome: Highly reflective, classic, and versatile, pairing naturally with traditional and transitional fixtures.
  • Brushed Gold / Brass: Adds an upscale, vintage-luxe warmth to custom walk-in enclosures.
  • Oil-Rubbed Bronze: Deep, rich, and rustic—ideal for Mediterranean, farmhouse, or classic craftsman bathrooms.

Sizing, Measuring, and Layout Compatibility

A beautiful glass door is only as good as its measurements. Because tempered safety glass cannot be cut, drilled, or modified once it has undergone the heat-tempering process, measuring accurately before ordering is essential.

measuring shower opening width and wall plumb with a tape measure

Accurate Measuring and Sizing for Bath Shower Doors

To determine your door dimensions, always measure the finished opening—meaning after all backer boards, waterproofing membranes, and final tiles or wall surrounds are completely installed.

Shower opening three-point measurement process and wall plumb check

  1. Width (3-Point Check): Measure the horizontal distance from wall to wall at three distinct points: the bottom (along the threshold or curb), the middle (around waist height), and the top (at your intended door height, typically 72 or 76 inches). Record all three numbers. If the numbers vary, use the narrowest measurement when ordering semi-frameless or sliding systems with adjustment channels. For custom frameless glass, provide all three dimensions so the glass can be precision-cut to match the exact taper of your walls.
  2. Height: Measure vertically from the top of the shower curb or bathtub ledge up to the top of the tile or ceiling line. Standard doors typically stand 72 inches tall, while modern luxury designs frequently measure 76 inches or higher for a dramatic look and superior steam containment.
  3. Plumb and Level: Use a long spirit level or laser level on both side walls and across the threshold curb. If a wall leans inward or outward, a standard off-the-shelf door may leave unsightly wedge-shaped gaps or fail to seal properly without custom glass fabrication.
  4. Curb Depth: Measure the flat horizontal depth of your threshold or tub deck. Most sliding track systems require a minimum of 2.5 to 3.5 inches of flat, unobstructed curb surface.
Door Style Standard Width Ranges Standard Height Minimum Curb Depth Needed Clearance Requirement
Bypass / Sliding Door 48″ to 60″ (up to 72″) 72″ to 76″+ 2.75″ to 3.5″ 0″ (glides along curb)
Frameless Hinged Door 24″ to 36″ (single panel) 72″ to 80″+ 2.0″ to 3.0″ Equal to door panel width
Neo-Angle / Corner 36″ x 36″ to 42″ x 42″ 72″ to 76″ 2.5″ to 3.5″ Outward swing at 45° angle
Walk-In / Splash Screen 30″ to 48″ (fixed panel) 74″ to 80″+ 1.5″ to 2.5″ Open entry space (min. 22″)

Matching Bath Shower Doors with Existing Bases and Layouts

Your shower base, curb profile, and plumbing layout dictate which door systems will operate safely and effectively:

  • Drain and Showerhead Placement: Never position a hinged door opening directly in the path of a high-pressure showerhead spray. Hinges and sliding doors should be configured so water strikes fixed glass panels or solid walls first.
  • Curbless and ADA-Compliant Layouts: For barrier-free accessibility, zero-threshold curbless showers paired with wide-opening bypass doors or stationary walk-in screens provide effortless wheelchair and walker access.
  • Tub-to-Shower Conversions: If you are keeping a standard 60-inch alcove tub footprint, choosing modern half glass enclosure solutions or sliding systems preserves full bathing utility while elevating your shower aesthetic.

Installation, Leak Prevention, and Long-Term Maintenance

Achieving a water-tight, long-lasting installation requires careful attention to structural backing, proper sealing techniques, and routine care.

DIY vs. Professional Installation Considerations

While framed or semi-frameless sliding kits can be handled by experienced DIYers, frameless heavy glass requires specialized expertise:

  • Glass Weight: Heavy-glass frameless panels (3/8″ or 1/2″ thick) can weigh between 70 and 120 pounds per panel. Handling them requires professional suction grips and at least two people. Tempered glass is strong on its face, but a light tap on an unprotected corner against hard tile can cause it to shatter instantly.
  • Structural Wall Blocking: Heavy frameless hinges cannot be fastened into drywall or hollow tile anchors alone. They must be secured directly into double 2×4 solid wood studs behind the finished wall.
  • Precision Drilling: Drilling through porcelain, marble, or natural stone requires diamond-tipped masonry bits, continuous water cooling, and steady hands to avoid cracking expensive tile.

If you are confident in your carpentry skills and working with lightweight sliding kits, our step-by-step DIY glass enclosure guidelines outline the essential tool list and step-by-step prep needed for clean results. For custom frameless installations, partnering with our professional team at JP Precision Glass ensures absolute laser-level alignment, safe structural mounting, and a flawless water seal.

Preventing Leaks and Streamlining Glass Cleaning

Water containment does not require heavy metal frames when your door is properly outfitted:

  • Vinyl Sweeps and Drip Rails: Frameless doors utilize clear polycarbonate bottom sweeps with angled drip deflectors that direct running water back into the shower pan.
  • Magnetic and Bubble Seals: Vertical jamb seals snap shut securely to prevent lateral spray from escaping between the door panel and the wall.
  • Proper Silicone Application: When sealing tracks or stationary panel channels, apply high-grade, 100% mildew-resistant silicone sealant along the outside perimeter of the shower. Sealing the inside can trap moisture inside the channels, leading to mold buildup.
  • Daily Maintenance: Keep a squeegee inside the shower. Taking 30 seconds to wipe down the glass after your final rinse removes mineral-heavy water droplets before they can evaporate and form stubborn limescale deposits.

Frequently Asked Questions About Bath Shower Doors

What is the difference between a shower door and a shower enclosure?

A shower door refers to the moving glass panel (or sliding bypass pair) that encloses an alcove opening bordered by three existing walls. A shower enclosure is a multi-sided glass structure designed for corner, neo-angle, or freestanding layouts. It includes the door panel along with one or more stationary return glass panels, corner posts, and headers to create a standalone, fully enclosed showering space.

Do frameless shower doors leak more than framed models?

When properly measured and installed, frameless shower doors do not leak. Frameless systems rely on tight engineering tolerances (gaps of 1/8 inch or less), clear vinyl edge seals, bottom sweeps, and an inward-sloping curb (pitched roughly 1/8 to 1/4 inch toward the drain). As long as showerheads are not pointed directly at the glass seams and the curb has proper slope, water stays securely contained inside.

What is the easiest style of shower door to clean?

Frameless glass shower doors with factory-applied hydrophobic protective coatings are the easiest to clean. Because frameless systems eliminate metal bottom channels, frame tracks, and rubber gaskets, there are no recessed corners where water pools or soap scum accumulates. A quick pass with a squeegee and an occasional wipe with a microfiber cloth and mild soap keep the glass crystal clear.

Conclusion

Upgrading your bathroom with a custom glass enclosure is one of the most rewarding investments you can make for your home. Beyond protecting your floors from water damage, modern glass doors maximize light, expand visual space, and highlight the beauty of your tile and fixtures.

Whether you are looking for sleek frameless hinged doors, space-saving bypass sliding systems, or versatile 3 panel shower door solutions for your bathtub, precision measurement and expert craftsmanship make all the difference. At JP Precision Glass, we specialize in designing, customizing, and installing tailored glass shower doors and enclosures that fit your unique layout flawlessly. Let us help you transform your daily routine into a refreshing, spa-like experience.

glass closet door repair

Stop Struggling with Sticking Glass Closet Doors for Good

Fix Sticking Glass Closet Doors Safely

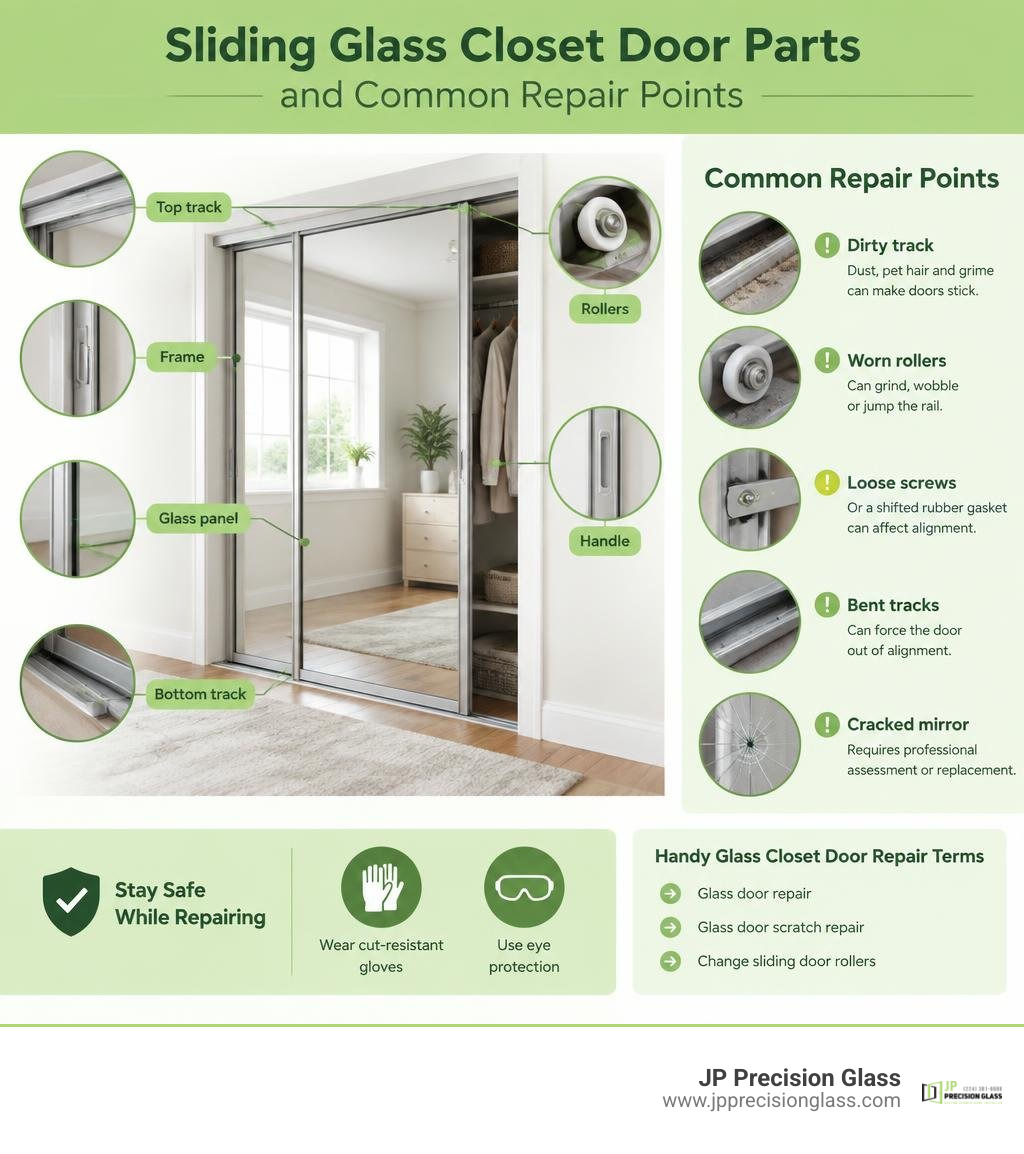
For most glass closet door repair problems, start by cleaning the track, tightening loose screws, and checking whether the rollers are worn or out of alignment. If the mirror is cracked, the frame is separating, or the glass is loose, stop using the door until it is secured or professionally assessed.

Common causes include:

  • Dust, pet hair, and grime packed into the track
  • Worn rollers that grind, wobble, or jump the rail
  • Loose frame screws or a shifted rubber gasket
  • Bent tracks that force the door out of alignment
  • Cracked or shattered mirror panels

Sliding mirror doors save floor space, reflect natural light, and can make a smaller room feel much larger. But because mirror panels are heavy and fragile, use cut-resistant gloves and eye protection before removing a door or handling damaged glass.

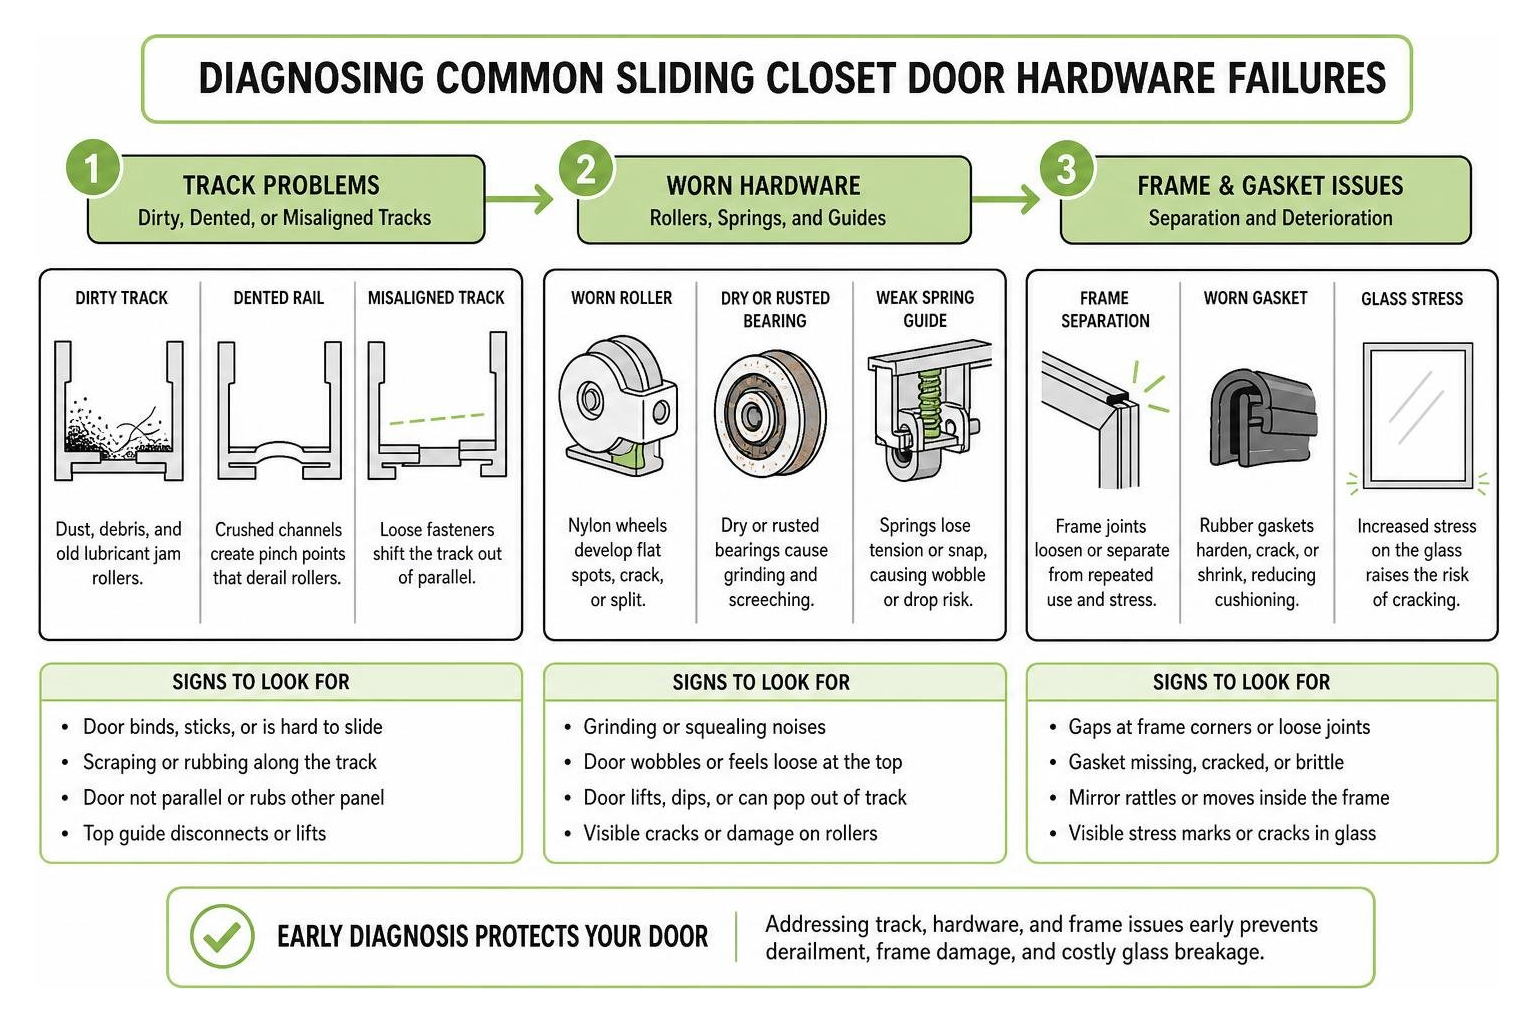
Sliding glass closet door parts and common repair points infographic

Handy glass closet door repair terms:

Diagnosing Common Sliding Glass Closet Door Issues

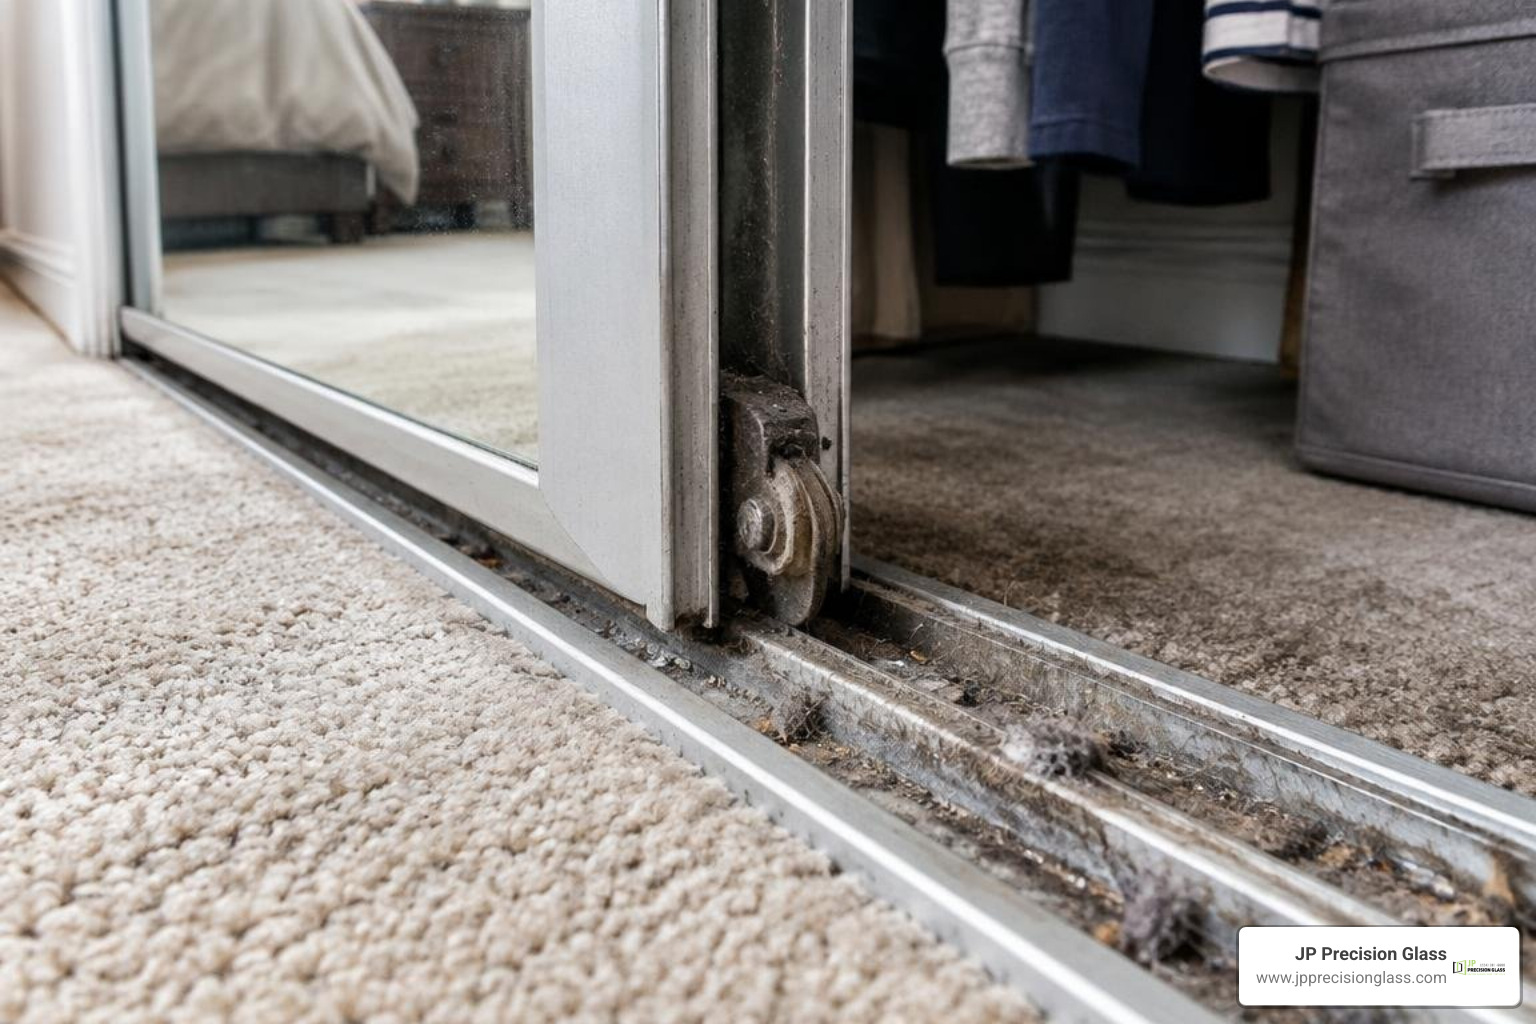
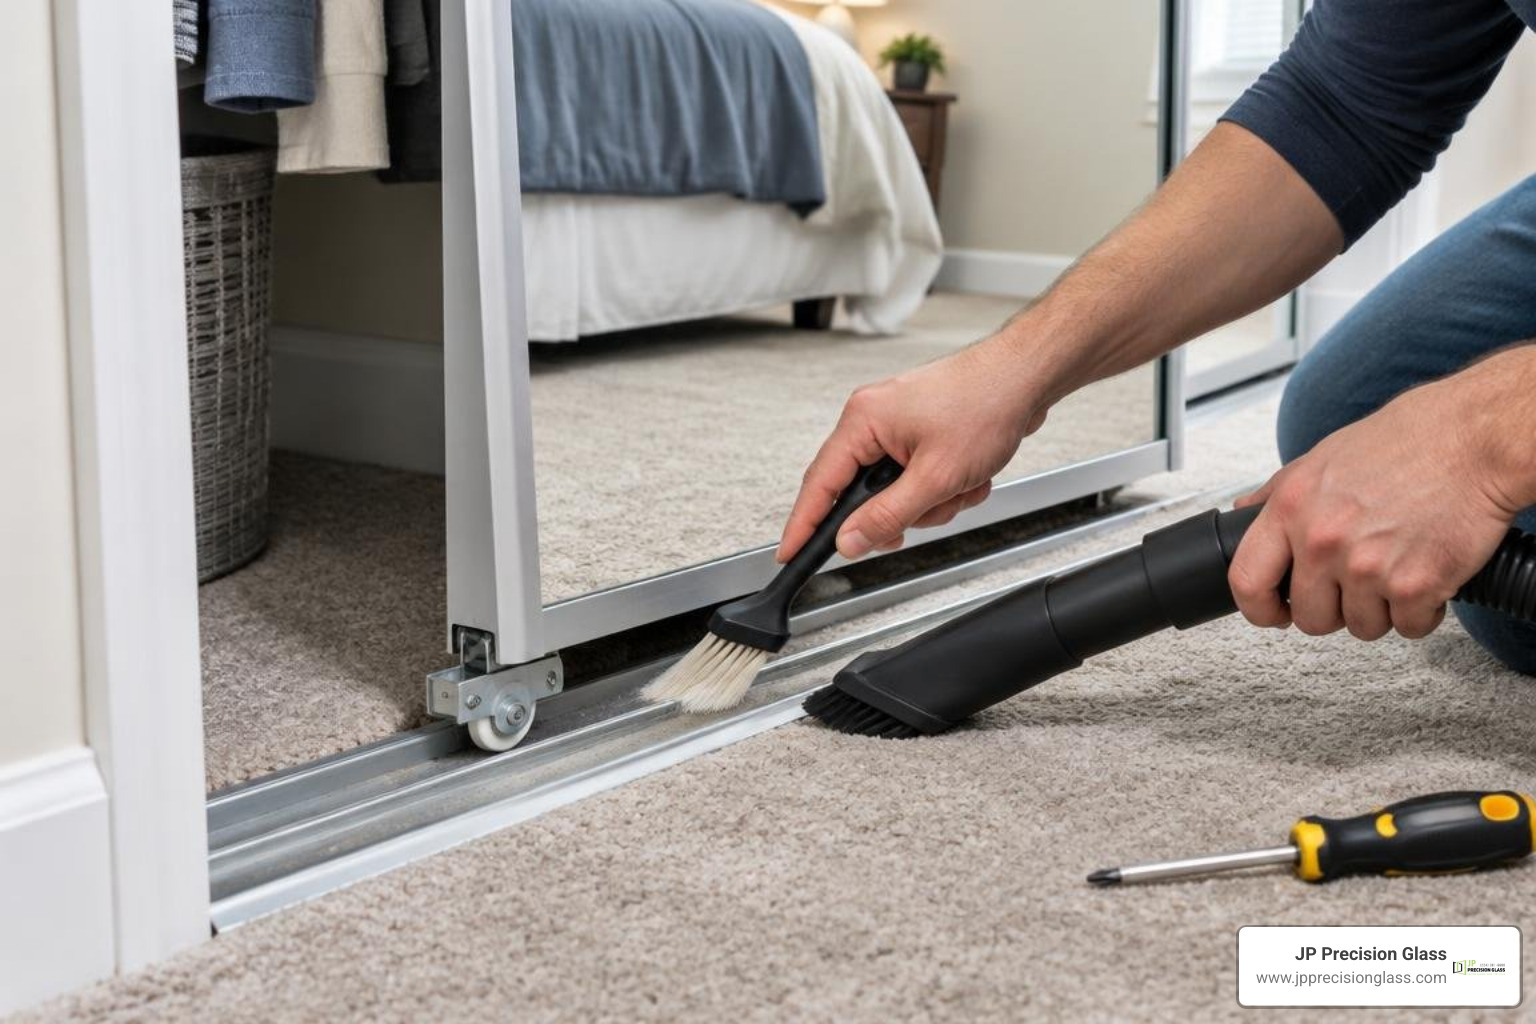
Clogged closet door bottom track and worn roller mechanism

When a sliding mirrored wardrobe door stops gliding effortlessly across the room, it can turn your morning routine into a workout. Before diving into tools and replacement parts, we need to pinpoint exactly what is causing the mechanical failure. Because glass panels carry significant weight, any issue with hardware or tracks places physical stress directly onto the glass itself.

Identifying these issues early protects your door from irreversible track warping or sudden glass breakage. While you might be familiar with repairing bent aluminum tracks on exterior patio sliders, interior closet systems have their own unique structural quirks that require careful diagnosis.

Dirty, Dented, or Misaligned Tracks

The bottom track of a sliding closet system acts as a natural dust trap. Over months and years, loose carpet fibers, pet hair, dirt, and stray items settle directly into the channels. When combined with old lubricant, this debris forms a sticky, abrasive sludge that jams the wheels.

Beyond simple dirt, tracks frequently suffer physical trauma:

  • Dented rails: Stepping on the bottom track or dropping heavy storage bins can crush aluminum channels, creating pinch points that derail rollers.
  • Track misalignment: If the fastening screws loosen along the floor or header, the track shifts out of parallel. This forces the door panels to bind against each other or scrape the frame.
  • Uneven mounting surfaces: Settling floors can create low spots where rollers bottom out, leaving the top guide disconnected from the ceiling channel.

Worn-Out Rollers, Springs, and Hardware

Sliding glass door hardware does not last forever. The internal wheels are typically molded from nylon or steel, mounted onto ball bearings or axle pins that endure constant friction. Over time, nylon wheels develop flat spots, crack, or split entirely.

Diagnosing common sliding closet door hardware failures

When internal bearings dry out or rust, they produce an unmistakable grinding screech. Furthermore, many modern top-hung systems rely on spring-loaded tension guides. If these springs lose tension or snap, the door will wobble uncontrollably within the header channel, threatening to drop out of the frame. Inspecting and replacing sliding door rollers restores alignment before the door derails and cracks the mirror.

Frame Separation and Deteriorating Gaskets

Mirrored closet doors typically consist of a large mirror panel surrounded by an aluminum perimeter frame, cushioned by an internal U-channel rubber gasket. As the door is pulled and pushed over thousands of cycles, the physical pull force concentrates on the frame stile rather than the glass.

Over time, this dynamic causes:

  • Gasket retraction: The rubber gasket dries out, shrinks, and creeps backward into the aluminum profile cavity, leaving the glass unanchored.
  • Loose corner assemblies: Corner joinery screws vibrate loose, causing the aluminum frame to splay outward away from the glass.
  • Glass slippage: Without tight gasket tension, the mirror panel slides down inside the metal frame, dragging against the floor track and creating extreme stress along the bottom glass edge.

Step-by-Step Glass Closet Door Repair for Smooth Sliding

Cleaning tracks and adjusting roller height screws on sliding door

Fixing a stubborn sliding mirror door is entirely manageable when you follow a methodical sequence. Glass handling demands patience, controlled movements, and a clean, padded workstation. Never rush the physical removal or reinstallation of large mirrored panels.

Essential Tools and Materials for Glass Closet Door Repair

Before starting your repair, set up your work area. Clear a wide floor space and lay down thick moving blankets or drop cloths to support the glass panel safely.

Gather the following tools and supplies:

  • PPE: ANSI-rated safety glasses and cut-resistant work gloves.
  • Screwdrivers: #2 Phillips head and flat-head screwdrivers for roller adjustment and frame assembly.
  • Cleaning supplies: White vinegar, liquid dish soap, a spray bottle, microfiber cloths, and a stiff nylon scrub brush.
  • Track adjustments: A rubber mallet and a wooden scrap block for reshaping bent metal rails.
  • Chemicals: Dry PTFE lubricant spray (avoid greasy petroleum-based oils) and specialized pH-neutral mirror mastic.
  • Glass surface care: A glass cleaning squeegee, plastic putty knife, and specialized compounds for buffing surface glass scratches.

Cleaning and Lubricating the Track System

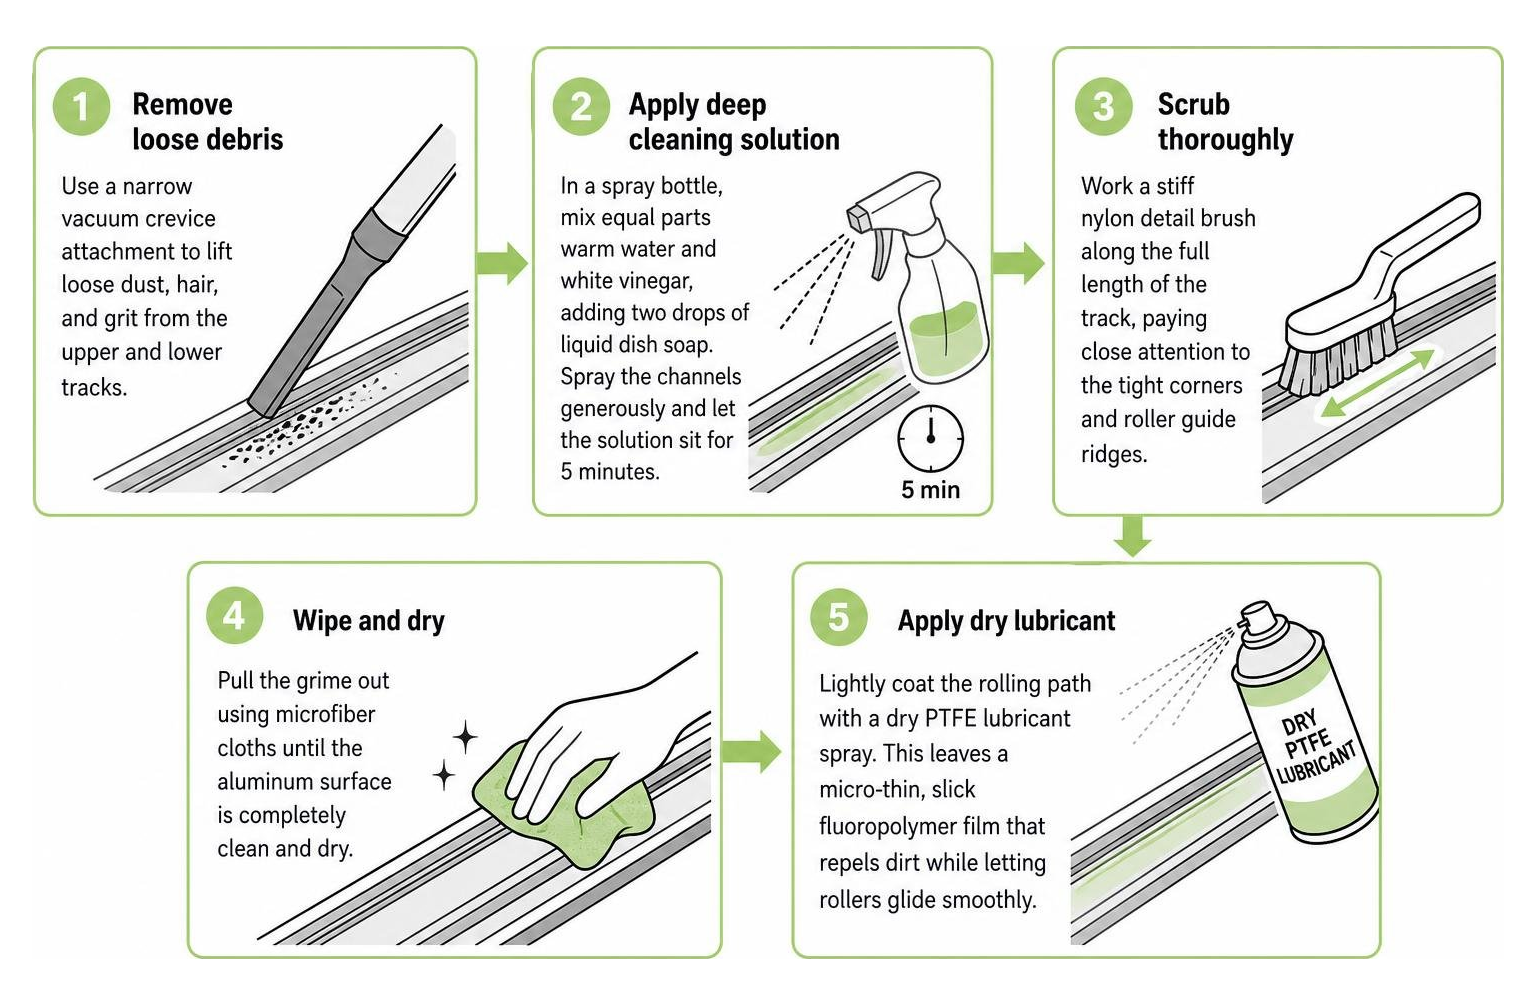
Never spray wet oils like standard WD-40 into your tracks. Wet lubricants act as a magnet for dust and pet hair, rapidly transforming into a thick abrasive paste that destroys roller bearings. Instead, rely on deep cleaning and dry friction reducers.

Step by step track cleaning and lubrication process

  1. Remove loose debris: Use a narrow vacuum crevice attachment to lift loose dust, hair, and grit from the upper and lower tracks.
  2. Apply deep cleaning solution: In a spray bottle, mix equal parts warm water and white vinegar, adding two drops of liquid dish soap. Spray the channels generously and let the solution sit for 5 minutes to break down hardened sludge.
  3. Scrub thoroughly: Work a stiff nylon detail brush along the full length of the track, paying close attention to the tight corners and roller guide ridges.
  4. Wipe and dry: Pull the grime out using microfiber cloths until the aluminum surface is completely clean and dry.
  5. Apply dry lubricant: Lightly coat the rolling path with a dry PTFE lubricant spray. This leaves a micro-thin, slick fluoropolymer film that repels dirt while letting rollers glide smoothly. For continued smooth operation, follow a preventative mirror door maintenance guide to keep your tracks in peak shape.

Realigning Wheels and Replacing Damaged Rollers

If cleaning alone does not restore effortless movement, you must adjust or replace the roller assemblies.

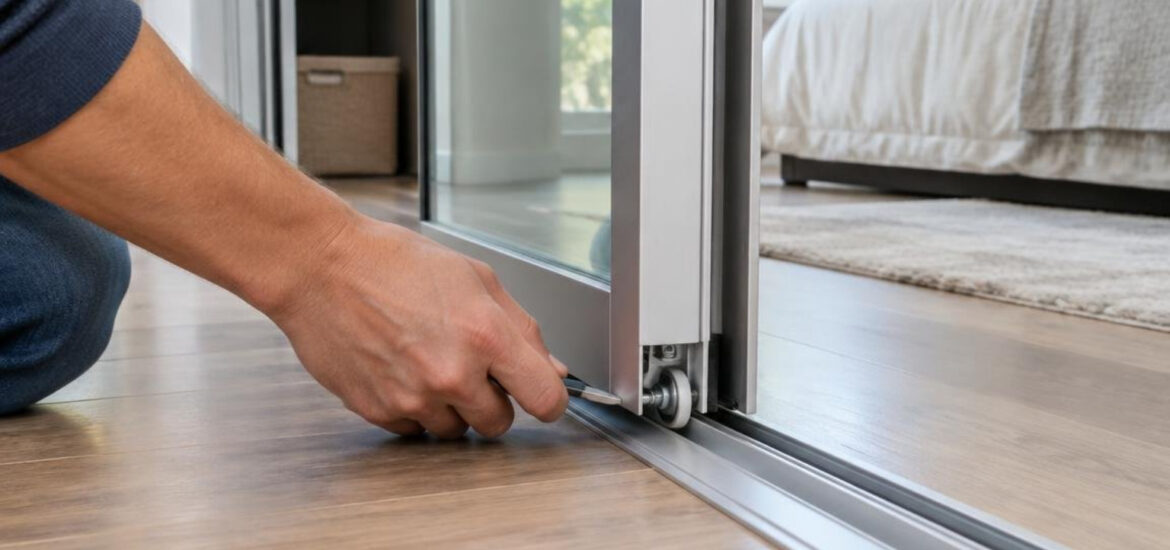
  1. Remove the door panel: Grip the mirror door firmly by its metal stiles. Lift the door straight up into the deep top track to clear the bottom wheels from the floor rail, then swing the bottom of the door toward you and lower the entire panel out. Place it face-down onto your padded blanket.
  2. Inspect the roller mechanisms: Look closely at the wheels. If they are flattened, cracked, or loose on their center rivets, remove the mounting screws and slide the old roller assemblies out of the bottom frame corners.
  3. Install new rollers: Match your replacement rollers to the original manufacturer profile. Slide the new units into the frame channels and secure them with the mounting screws.
  4. Rehang the door: Insert the top guides into the upper header channel first. Push upward against any internal guide springs, align the bottom wheels directly over the floor track rails, and gently lower the door into place.
  5. Calibrate height and plumb: Locate the adjustment screw near each bottom wheel. Turn the screw clockwise to raise that side of the door, or counter-clockwise to lower it. Adjust both sides until the door hangs plumb, fits flush against the wall jamb, and moves with minimal effort.

Addressing Cracked Glass Panels, Detached Frames, and Replacements

Glass damage requires immediate attention. A shifting frame or an unaddressed crack compromises structural stability, turning a routine household fixture into a safety hazard.

Stabilizing Surface Cracks with Glass Resin

If your mirror has sustained a small, localized hairline surface crack (under 1 inch) rather than a complete through-and-through fracture, you can stabilize the glass using an optical-grade windshield resin repair kit.

  • Clean the surface: Wipe away all surface contaminants with isopropyl alcohol and let the glass dry completely.
  • Position the bridge injector: Center the applicator suction cup directly over the origin of the crack to seal the area.
  • Inject low-viscosity resin: Drop the specialized optical resin into the chamber. Screw down the pressure plunger to force resin deep into the microscopic fissure, evacuating trapped air pockets.
  • Cure under UV light: Place clear curing film over the repair and expose it to a UV curing lamp (or direct sunlight) for 15 to 30 minutes.
  • Scrape flush: Carefully hold a fresh razor blade at a 45-degree angle to scrape away hardened surface resin without scratching the surrounding glass mirror.

Note: Resin stabilizes the glass and restores reflective clarity, but severe or edge-to-edge fractures cannot be safely repaired and require complete panel replacement.

Reattaching Detached Mirror Frames and Gaskets

When an aluminum stile separates from the mirror glass, do not force the frame back on with a hammer while the door is hanging. Instead, take the panel down and rebuild the edge connection:

  1. Disassemble the corner: Lay the door on your padded surface and unscrew the top and bottom corner fasteners on the detached side.
  2. Inspect and reseat the gasket: Pull the loose metal channel completely away. Straighten the flexible rubber U-channel gasket, wrapping it tightly and evenly along the bare edge of the mirror glass.
  3. Apply specialized adhesive: If the mirror backing is loose from a wood or composite substrate, use only pH-neutral mirror mastic. Standard construction adhesives contain harsh acids that eat away the silver reflective coating, causing ugly black spots (desilvering). Apply mastic in golf-ball-sized dabs rather than spreading it flat. Review safe methods to re-adhere mirror closet door panels to ensure a long-lasting, non-corrosive bond.
  4. Reassemble the frame: Press the aluminum stile back over the gasketed glass edge using steady, even hand pressure. Tap gently with a rubber mallet if necessary. Reinstall and tighten the corner assembly screws, then let the assembly cure undisturbed for a full 24 hours before rehanging.

Replacing Just the Mirror Panel vs. the Entire Door

Homeowners often wonder whether a broken mirror requires an entirely new door system or just a fresh sheet of glass.

Repair Factor Replacing Just Mirror Glass Panel Replacing Entire Door System
Best Used For Broken mirror with intact frame and tracks Severely bent frames, crushed tracks, obsolete hardware
Safety Standard Category II safety backing required Factory-certified safety backing included
Hardware Reusability Keeps original rollers, top guides, and stiles Provides brand-new, modernized tracking and quiet rollers
Aesthetic Result Preserves matching trim with other room closets Upgrades room with modern finishes and contemporary styles
Structural Integrity Relies on condition of existing metal frame Brand-new structural frame under full warranty

When to Choose Professional Glass Closet Door Repair

While routine track maintenance and wheel replacements are great DIY projects, certain situations demand professional equipment and expertise:

  • Shattered safety glass: Handling broken glass sheets requires heavy suction lifters, safety containers, and disposal protocols.
  • Large, heavy custom panels: Floor-to-ceiling mirrored doors are extremely heavy. Carrying and setting these panels without bending the frame requires multiple experienced technicians.
  • Severely warped structural frames: If the aluminum frame is twisted, custom fabrication is necessary to ensure the new glass sits evenly without stress points.
  • Complex hardware sourcing: Older or discontinued closet systems often feature obsolete track profiles that need custom retrofit solutions.

Most standard residential glass repairs can be diagnosed and resolved quickly in a single service visit.

Frequently Asked Questions About Sliding Mirror Closet Doors

Why does my sliding mirror closet door keep jumping off the track?

Doors typically jump their rails due to three main issues:

  1. The bottom roller height adjustment is set too low, leaving excessive slack at the top header guide.
  2. Hardened debris in the track acts as a ramp that forces the wheel up and out of its groove.
  3. The nylon wheel has developed a crack or flat spot that catches on the track lip during movement.

Can I use standard construction adhesive to glue my closet mirror?

No. Never use standard construction adhesive or general-purpose silicone on mirrors. These formulas contain acetic acid and solvents that react chemically with the silver and copper backing of the mirror. Within weeks or months, the backing will corrode, creating permanent black spots and causing the glass to separate from the substrate. Always use a dedicated, pH-neutral mirror mastic.

What are the main benefits of installing sliding mirror closet doors?

Sliding mirror closet doors combine functional wardrobe access with smart interior design. They reflect both natural and artificial light to make compact bedrooms feel nearly twice as large, double as full-length dressing mirrors without occupying extra wall space, and slide completely within the closet opening without swinging out into your floor space.

Restoring Function and Safety to Your Glass Doors

Maintaining your glass closet doors keeps your home functional, bright, and safe. With routine track cleaning, proper dry lubrication, and timely hardware adjustments, your sliding panels will glide quietly for years to come.

When your glass fixtures require precision work, custom sizing, or complete hardware replacements, working with experienced specialists makes all the difference. At JP Precision Glass, we bring that same dedication to accuracy, premium materials, and made-to-size craftsmanship to every home project. Discover how our expert glass shower door and specialty repair services can transform your living spaces with durable, elegant, and safe glass installations tailored perfectly to your home.

custom glass shower panel

The Ultimate Guide to Custom Glass Shower Panels

How to Choose the Right Custom Glass Shower Panel

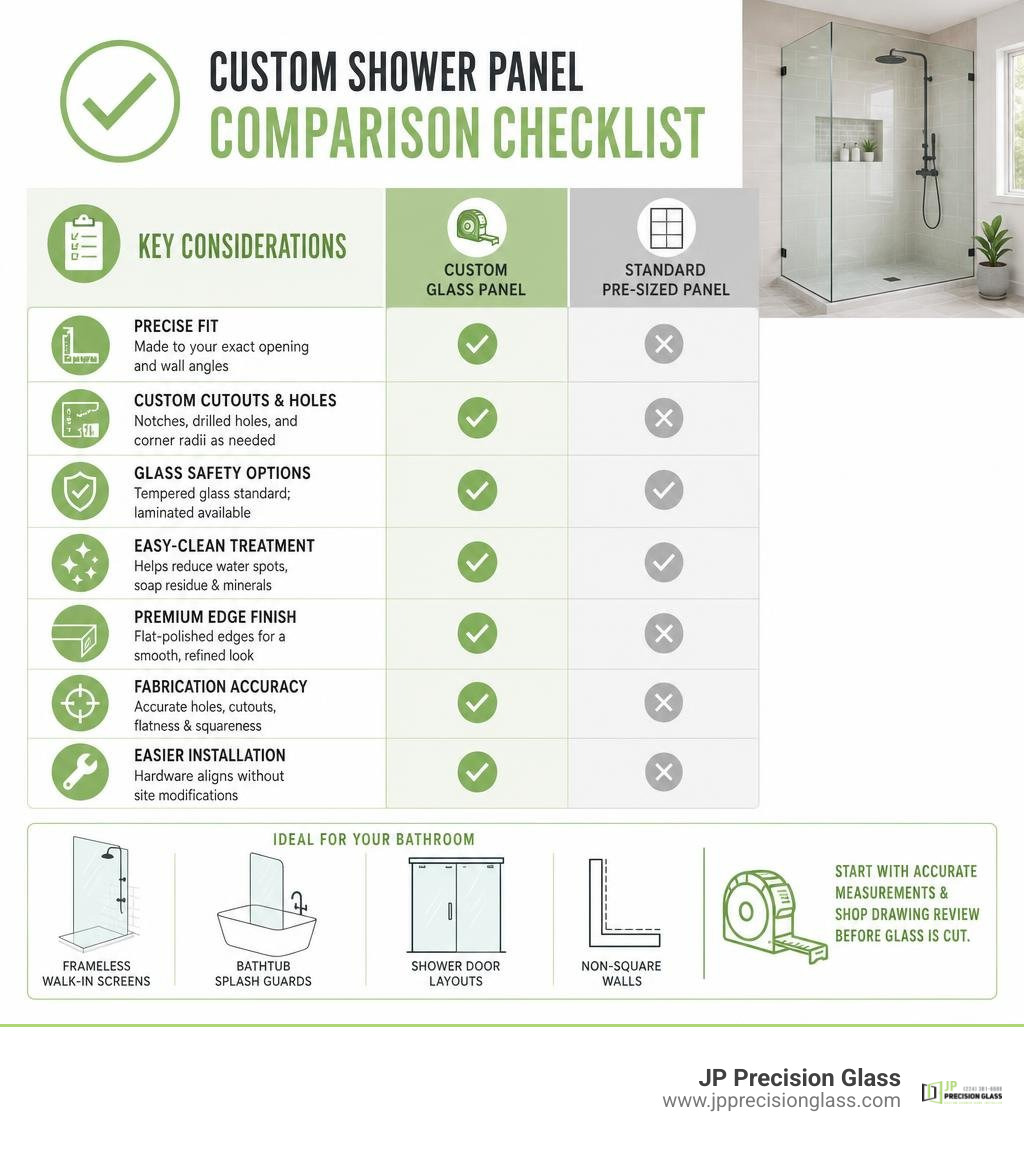
A custom glass shower panel is made to fit your bathroom’s exact opening, wall angles, hardware layout, and design goals. Compared with a standard pre-sized panel, it can include precise notches, drilled holes, corner radii, and edge finishes for a cleaner fit and easier installation.

When comparing options, focus on:

  • Glass build: Tempered glass is a common safety choice; laminated glass can add another layer of breakage protection.
  • Edge finish: Flat-polished edges offer a smooth, refined look that is easy to wipe clean.
  • Easy-clean treatment: A protective surface treatment helps water, soap residue, and mineral deposits release more easily.
  • Fabrication accuracy: Correct hole locations, cutouts, flatness, and squareness help hardware align without site modifications.

For a Chicago bathroom remodel, custom sizing is especially useful when walls are not perfectly square or when you want a frameless walk-in screen, bathtub splash guard, or tailored shower-door layout. The best result starts with careful measuring and shop-drawing review before glass is cut.

custom shower panel comparison checklist infographic

Common custom glass shower panel vocab:

Easy-Clean Technology vs. Standard Shower Glass

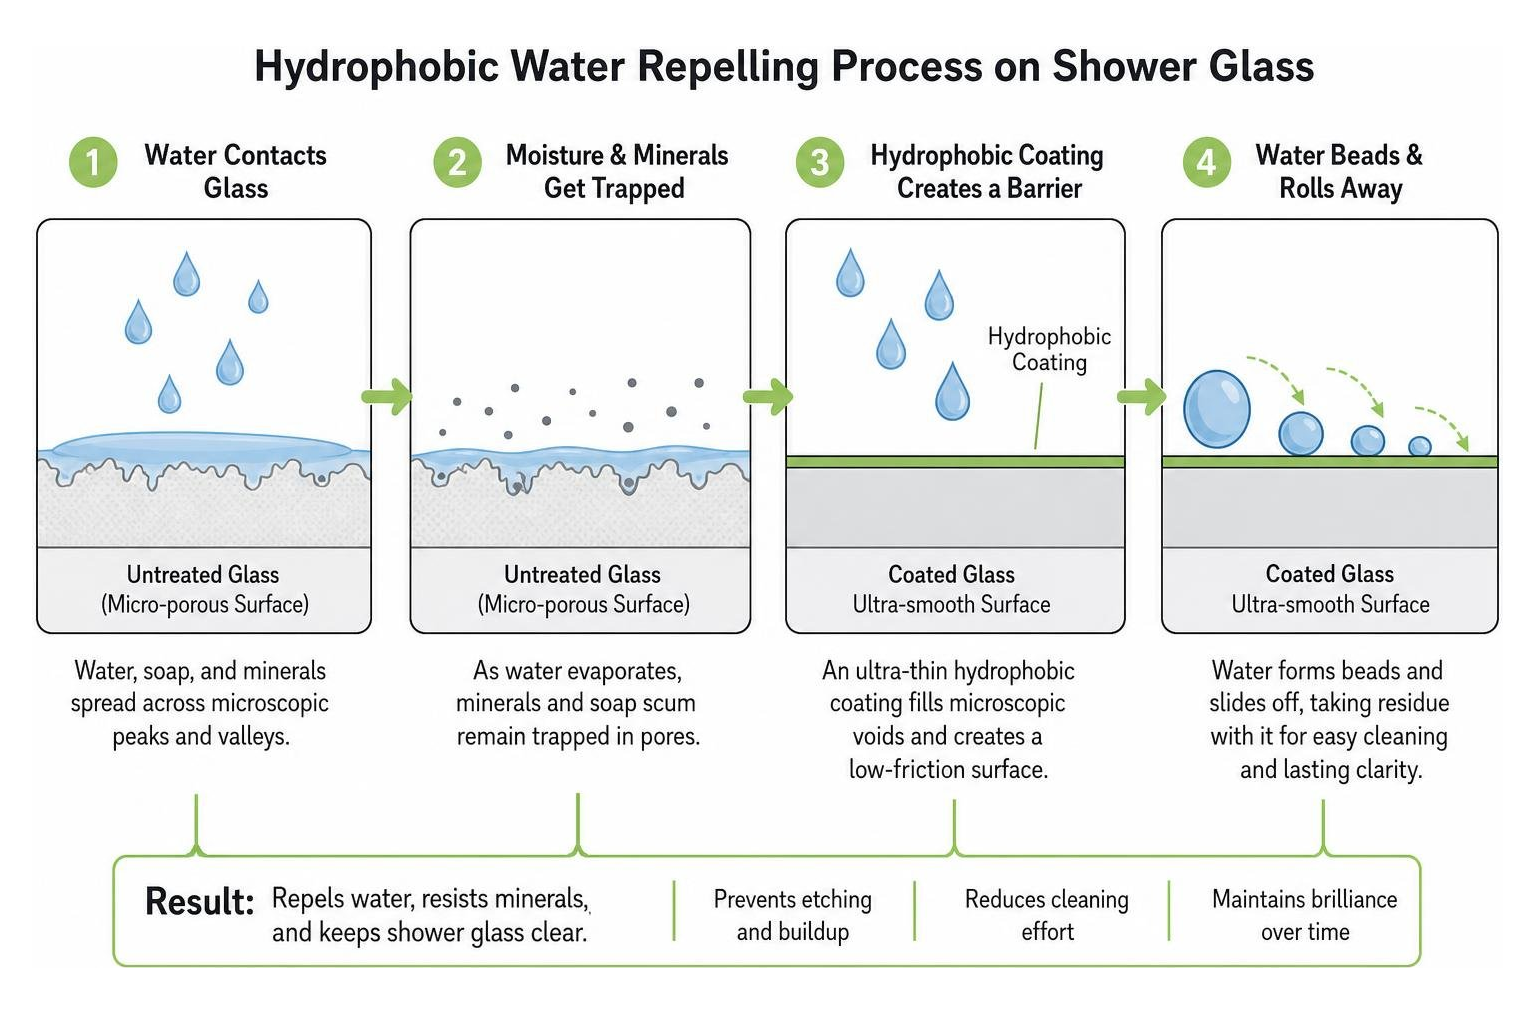
When evaluating custom shower glass, understanding the difference between standard float glass and easy-clean treated panels is essential for long-term satisfaction. Untreated glass may look flawless initially, but microscopic imperfections across its surface naturally trap moisture, hard water minerals, and soap scum over time. Without protection, routine showers lead to chemical etching, cloudiness, and persistent water spots that standard bathroom cleaners struggle to remove.

Investing in Custom Build Easy-Clean Option Shower Glass addresses this issue at the manufacturing stage. By bonding a protective barrier to the glass surface, water beads up and rolls away instead of clinging to pores. This preserves crystal-clear optics and dramatically cuts weekly cleaning efforts.

Feature Standard Untreated Shower Glass Easy-Clean Coated Shower Panel
Surface Profile Micro-porous and naturally rough Ultra-smooth hydrophobic barrier
Water Contact Angle Low (water spreads and sits flat) High (water forms tight beads and sheds)
Mineral & Limescale Resistance Vulnerable to etching and hard water buildup Repels dissolved minerals and prevents bonding
Cleaning Effort Requires frequent scrubbing with harsh chemicals Quick wipe down with squeegee or microfiber cloth
Long-Term Clarity Prone to hazing, staining, and permanent fogging Retains brilliant transparency over years of use
Coating Application None Factory-applied or cured polymer/silica coating

How Easy-Clean Hydrophobic Barriers Protect Glass

The science behind easy-clean treatments relies on hydrophobic nanotechnology. Glass is made primarily of silica, which possesses natural microscopic peaks and valleys. When hot water, soap lather, and body oils splash against untreated panels, they settle into these micro-fissures. As the water evaporates, it leaves behind calcium and magnesium crystals that bond directly to the silica lattice.

Modern shower glass innovations solve this challenge by applying an ultra-thin, optically clear hydrophobic shield across the glass face. This treatment fills every microscopic void, creating an exceptionally low-friction surface.

Water droplet contact angles increase significantly, causing moisture to pull together into droplets and slide downward, carrying soap residue away. Because minerals cannot find a mechanical anchor, routine maintenance shifts from intensive scrubbing to a swift rinse and squeegee pass. Factory-cured coatings provide durable, multi-year protection against daily wear and tear.

hydrophobic water repelling process on shower glass

Custom Glass Shower Panel Engineering and Customization Options

Every bathroom features unique geometry, architectural quirks, and personal styling goals. Off-the-shelf prefabricated panels force installers to adapt the room to the glass, often resulting in wide silicone caulk joints, uneven sightlines, and compromised waterproofing. Bespoke engineering eliminates these compromises by fabricating panels tailored to the precise structural realities of your space.

architectural diagram highlighting custom glass corner radii, notches, and precision edge profiles

Customization begins with exact measurements, accounting for wall bow, out-of-plumb tile runs, and sloped shower curbs. Glass processing machinery can incorporate:

  • Custom Corner Radii: Rounded top corners soften contemporary enclosures and reduce snag points in walk-in layouts.
  • Precision Notches: Seamless cutouts around knee walls, pony walls, decorative tile benches, and overhanging tub ledges ensure tight, moisture-tight fits.
  • Edge Profiles:
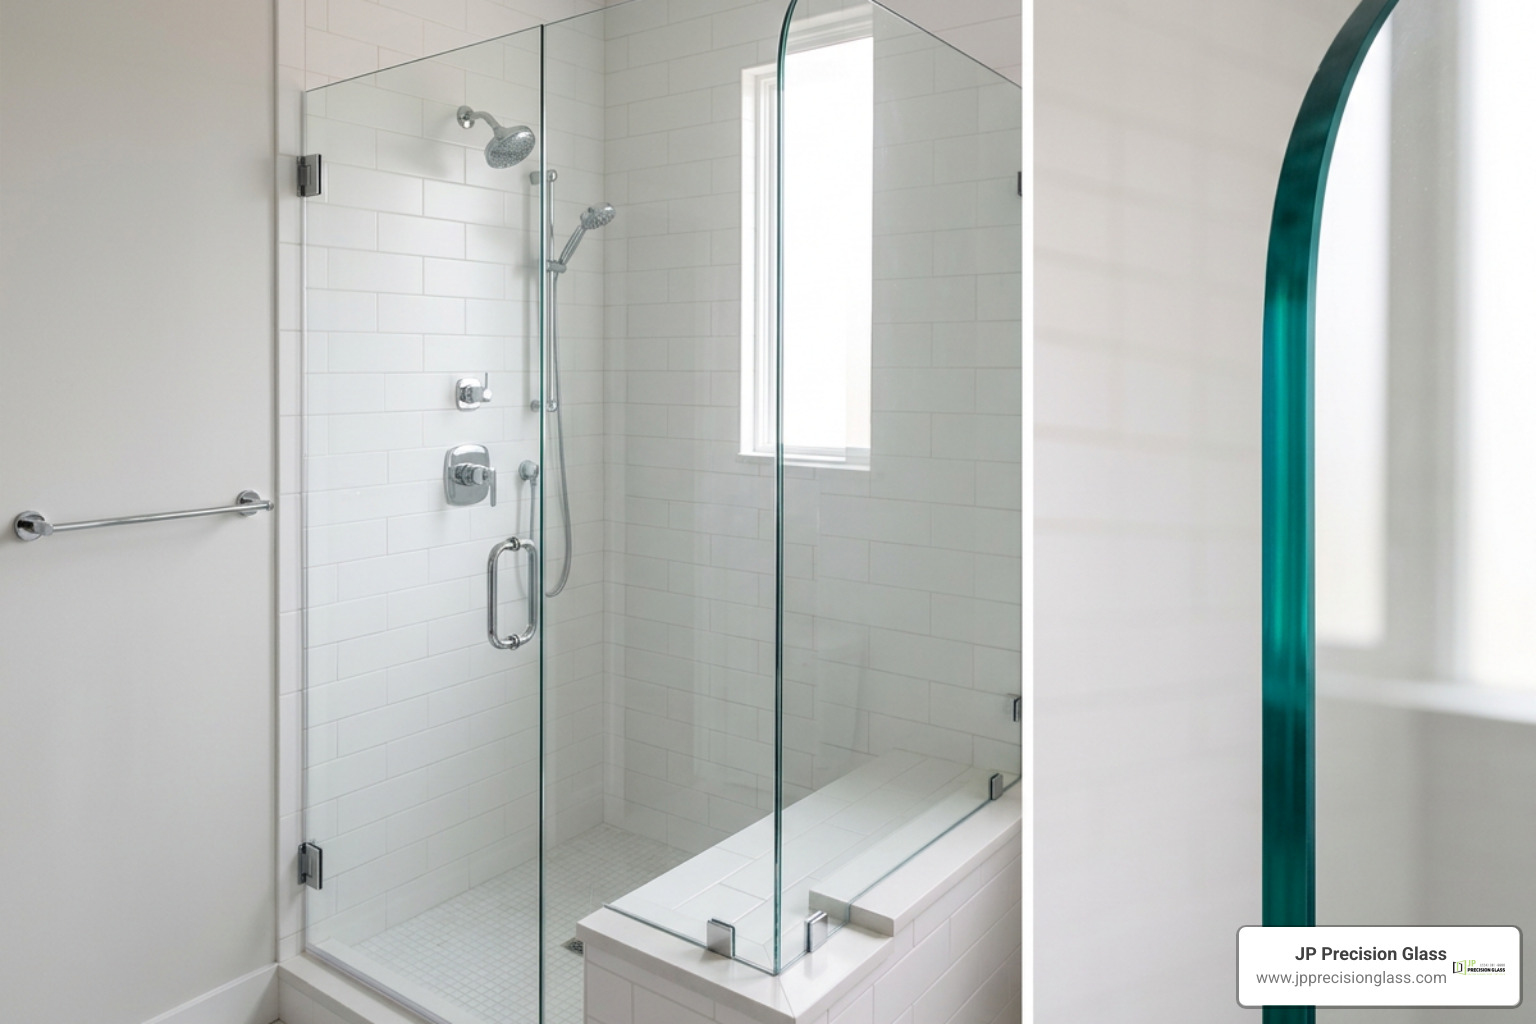
    • Flat Polished Edges: The premier choice for frameless enclosures, featuring flat, ground faces with small, pristine 45-degree chamfered arris edges for safety and luxury appeal.
    • Pencil Polished Edges: Smooth, rounded edge profiles that deliver an organic, soft touch along exposed walk-in screen margins.
    • Seamed Safety Edges: Lightly sanded edges designed for hidden channels and framed perimeter profiles where aesthetics are concealed.

Selecting the Right Custom Glass Shower Panel Thickness and Build

Selecting panel thickness and glass structure impacts both architectural presence and safety. To evaluate glass builds for your home, review the ultimate guide to compare and buy shower glass panels to match glass types to enclosure designs.

  • 3/8-Inch (10mm) Tempered Glass: The standard for high-end residential frameless glass. It offers structural stability, minimal deflection, and manageable weight for wall hinges and floor clamps.
  • 1/2-Inch (12mm) Tempered Glass: A substantial option that provides superior structural rigidity. It delivers a solid feel, minimal flex over tall spans (exceeding 80 inches), and a high-end look.
  • Laminated Safety Glass: Built by bonding two lites of glass around a tough, transparent interlayer (PVB or SentryGlas). If fractured, the interlayer holds the fragments intact within the opening. This makes laminated builds an exceptional choice for multi-story spaces, commercial fitness facilities, and luxury hospitality projects prioritizing impact safety.

Precision Fabrication for Your Custom Glass Shower Panel

Reliable performance depends entirely on precision fabrication. At JP Precision Glass, we utilize digital templating and CNC machinery to execute custom specifications with tight manufacturing tolerances. Discover our comprehensive range of glass shower panels to see how custom-tailored fabrication enhances residential installations.

Through CNC waterjet cutting and automated edge polishing, hardware cutouts—such as hinge notches, header cutouts, handle holes, and wall clamp reliefs—are milled into the raw glass prior to the thermal tempering furnace. Because fully tempered safety glass cannot be cut, drilled, or altered once heat-treated, achieving dimensional accuracy on the initial fabrication run is essential.

Key Applications in Modern Residential and Commercial Spaces

Custom glass panels elevate bathrooms across diverse architectural environments, balancing openness with practical water containment.

luxury walk-in shower enclosure with a fixed custom glass partition and matte black hardware

Homeowners looking to upgrade can transform your space with modern bathroom shower glass enclosures that turn standard layouts into open, spa-like retreats. Common applications include:

  • Fixed Shower Screens: Stationary glass lites mounted via low-profile floor channels or minimalist clamps to separate wet and dry zones without moving parts.
  • Bathtub Splash Shields: Custom glass guards installed directly onto tub decks to modernize traditional bath-shower combos while eliminating dated curtain rods.
  • Boutique Hotels & Spas: Heavy-duty, easy-clean panels engineered to withstand rigorous cleaning cycles while maintaining an upscale guest aesthetic.

Walk-In Enclosures and Compact Bathrooms

Open-concept, curbless walk-in showers have become a staple of modern interior design. In compact bathrooms, bulky doors or wide swing paths can crowd fixtures like vanities and toilets. A tailored stationary screen creates an inviting, barrier-free entrance while preserving sightlines across the room.

Understanding panel proportions ensures proper splash containment. Learn why a 36 glass shower panel is the perfect fit for compact walk-in showers, providing reliable water deflection without overwhelming smaller floor plans.

Frameless Shower Doors and Architectural Layouts

For larger, multi-sided shower layouts, custom stationary panels integrate with operable doors, return panels, and transom vents. Homeowners upgrading from framed assemblies frequently choose our shower door replacement Chicago services to eliminate mold-trapping metal tracks and open up room lighting.

To explore the advantages of all-glass configurations, consider the benefits of frameless glass shower doors, which highlight how heavy glass panels create cohesive, open visual appeal.

For custom projects throughout the Chicagoland region, our team provides full layout design and installation. Explore custom frameless showers Chicago and custom shower door Chicago for specialized local service and design expertise. If you are comparing door formats, our comprehensive guide on glass shower doors: a comprehensive guide to types comparison breaks down sliding, hinged, and stationary configurations.

Manufacturing Quality Control and Site Installation Readiness

High-end shower glass requires strict quality control at every stage of production. Premium fabrication ensures that panels arrive on-site square, optically clear, and ready for mounting hardware without unexpected field adjustments.

Quality control protocols focus on:

  • Optical Clarity & Low-Iron Formulation: Minimizing internal roller-wave distortion and utilizing ultra-clear low-iron glass formulations to eliminate natural greenish glass tints.
  • Squareness & Flatness Inspection: Laser-checking diagonal dimensions to verify true 90-degree corners (or precise custom angles) and inspecting surfaces for bow, warp, or camber.
  • Coating-Ready Machine Edges: Specially ground and polished perimeter edges that resist transit chipping, protect against handling abrasions, and provide a pristine base for structural silicone sealants.

Shop Drawings, CNC Tolerances, and Pre-Drilled Hardware Holes

Every custom installation relies on coordinated Computer-Aided Design (CAD) shop drawings. These drawings document every critical detail: glass height, width, thickness, radius corners, and exact Cartesian coordinates for through-glass fastener holes.

CNC-milled drill holes maintain tight tolerances, ensuring that heavy-duty wall clamps, stabilizer bars, and pivot hinges seat flush against the glass without pinch points or uneven stress distribution. This precision fit prevents glass binding and simplifies on-site hardware alignment.

Packaging, Bulk Supply Logistics, and Transit Protection

Transporting heavy architectural glass requires specialized crating and protection methods. Custom panels are separated with shock-absorbing interleaf cork pads to prevent face-to-face friction and surface micro-scratches. Edge and corner protectors guard the vulnerable perimeters against accidental impacts during transit.

For multi-unit developments and commercial projects, glass panels can be packed in custom export-grade timber crates, sequenced by floor level or room unit. This organized logistics approach minimizes jobsite handling, reduces the risk of accidental breakage, and streamlines installation workflows.

Frequently Asked Questions About Custom Shower Glass

What is the difference between tempered and laminated shower glass?

Tempered glass undergoes a thermal treatment where standard float glass is heated to roughly 1,150°F (620°C) and rapidly cooled with high-pressure air streams. This process creates high surface compression, making the panel four to five times stronger than standard annealed glass. When broken, tempered glass fractures into small, blunt-edged dice rather than sharp, jagged shards, meeting building safety codes for shower enclosures.

Laminated glass consists of two glass lites bonded together with a durable, transparent interlayer. While tempered glass remains the standard for residential shower doors and walk-in screens, laminated glass offers added structural containment. If an impact fractures a laminated panel, the adhesive interlayer holds the fragments in place, preventing loose fallout and keeping the wet area enclosed until replacement.

How do coating-ready edges improve the installation process?

Coating-ready machine edges are precision-ground and micro-polished during the primary CNC processing phase. By eliminating micro-fractures, rough tooling marks, and irregular perimeter burrs, coating-ready edges offer several practical benefits:

  • Reduced Handling Damage: Smooth, arrised edges resist chipping when installers position panels into metal U-channels or align them against floor clamps.
  • Improved Silicone Adhesion: Uniform, polished edge margins allow structural silicone and mildew-resistant sealants to adhere consistently, creating watertight perimeter seals.
  • Refined Aesthetics: Exposed frameless edges catch and refract ambient bathroom light evenly, without the cloudy or wavy visual distortions seen on roughly buffed glass edges.

How do I ensure accurate measurements for out-of-square walls?

Bathrooms rarely feature perfectly square, plumb walls—especially in older homes or spaces with handcrafted tilework. Attempting to measure a custom opening with a basic tape measure often leads to uneven glass gaps and leaking joints.

To capture out-of-square conditions accurately:

  1. Use Laser Levels: Project vertical and horizontal laser reference lines to identify specific wall bows, leaning studs, and unlevel curb slopes.
  2. Measure at Multiple Heights: Take width measurements across the bottom curb, the midpoint (around 36 inches), and the planned top panel height (typically 72 to 84 inches).
  3. Utilize Digital Templating: Professional glass installers use digital point-to-point laser scanners or physical hard-template boards to record wall contours precisely. These coordinates are fed directly into CAD software, allowing CNC machines to cut the glass edge to mirror the wall’s natural angle.

Conclusion

A well-designed bathroom should combine everyday functionality with lasting visual appeal. Choosing a precision-engineered shower partition ensures your space benefits from tailored dimensions, easy-clean glass protection, and durable safety builds that hold up to years of daily use. Whether you are designing a minimalist walk-in wet room or replacing an outdated framed enclosure, custom glass fabrication delivers clean sightlines and dependable performance.

Ready to begin planning your bathroom remodel? Connect with our experienced team at JP Precision Glass to explore tailored custom shower door solutions built specifically for your space.

corner tub glass enclosure

How to Style a Corner Tub Glass Enclosure Like a Pro

Style a Corner Tub Glass Enclosure for Space, Light, and Privacy

A well-styled corner tub glass enclosure should fit the room before it follows a trend. Start by choosing a layout that preserves clear floor space, match the door operation to available clearance, and select glass that gives you the right balance of light and privacy.

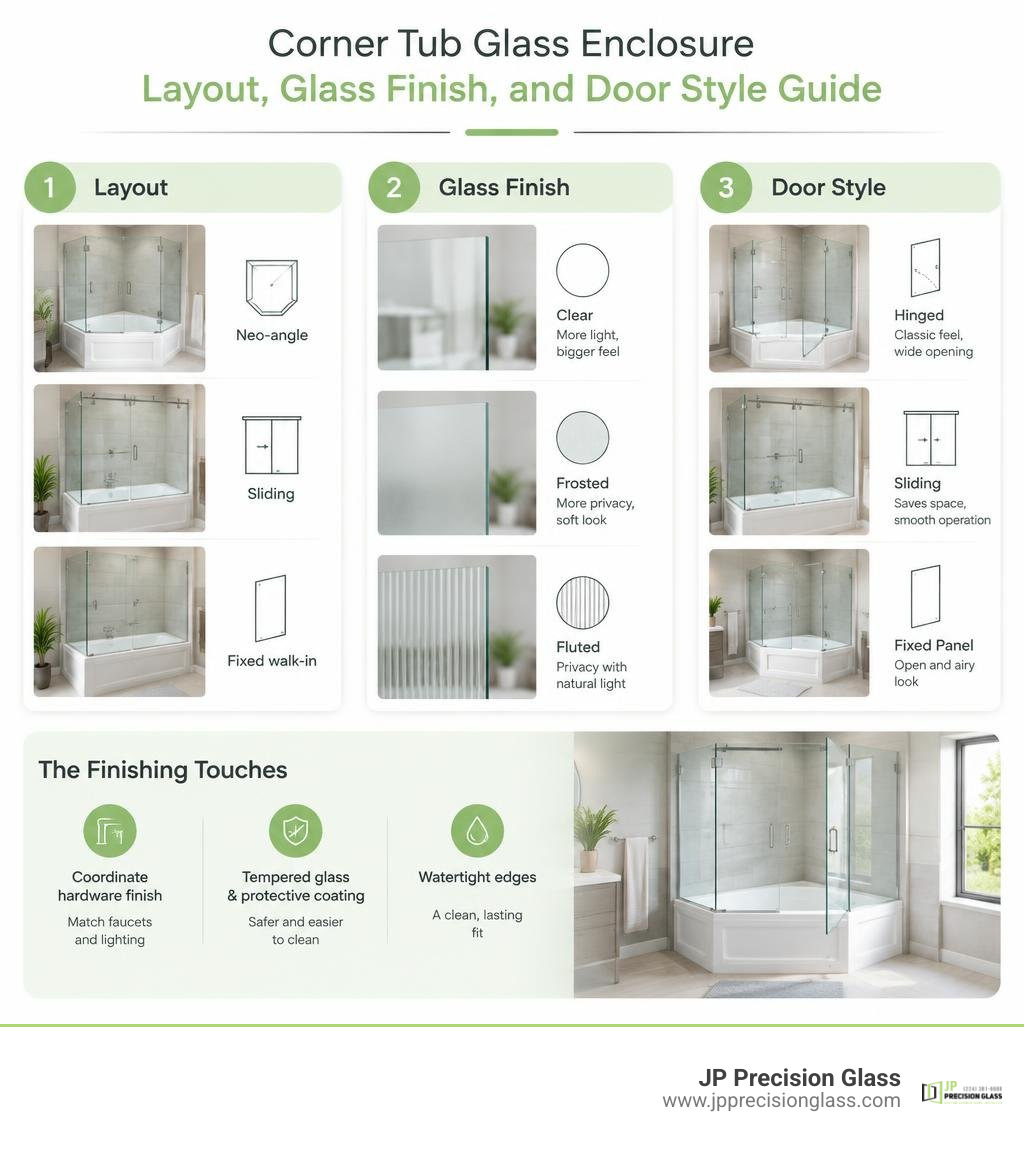
  1. Choose a neo-angle layout to soften a tight corner, a sliding system when there is no room for a door swing, or a fixed walk-in panel for an open look.
  2. Use clear glass to make a small bathroom feel larger; choose frosted or fluted glass when privacy matters more.
  3. Coordinate the hardware finish with faucets and lighting, then plan for easy cleaning with tempered glass and a protective water-repellent coating.

The best result is not necessarily the most elaborate one. It is a clean, well-measured design with safe glass, watertight edges, and a door or panel arrangement that works with how you move through the bathroom. The sections ahead break down the layout, glass, hardware, and installation choices that make a corner enclosure look custom without wasting valuable space.

Corner tub enclosure layout, glass finish, and door style guide infographic

Corner tub glass enclosure terms at a glance:

For broader context on how glass enclosures are used in residential bathrooms, see shower.

1. Select the Right Layout for Your Corner Tub Glass Enclosure

Designing a functional corner bathing space begins with understanding the footprint of your room. Corner installations are naturally suited for saving space, but selecting the proper configuration determines whether your bathroom feels open and airy or cramped and awkward. When exploring how to choose the perfect bathroom tub glass enclosures for your home, the primary goal is balancing structural containment with accessible movement.

Neo-angle and walk-in corner glass tub configurations

A standard corner installation involves two perpendicular structural walls meeting at a 90-degree angle, with custom glass panels completing the boundary along the outer edges of the tub or low-profile acrylic base. Installing a corner base typically requires direct-to-stud framing, after which finished backwalls—such as waterproof backwall kits or custom-set tile—are integrated. Once the walls and base are fully set, we measure the precise walk-in openings and sightlines to ensure the surrounding fixtures remain unobstructed.

Neo-Angle Corner Configurations

Neo-angle configurations are among the most efficient geometric layouts for tight corner areas. Instead of following a conventional square or rectangular boundary, a neo-angle enclosure features a diamond-inspired footprint that cuts across the outer corner at two 135-degree angles. This clipped corner design removes the sharp point extending into the room, freeing up valuable floor area in front of vanities or toilets.

In a neo-angle design, the center panel serves as the door, flanked by two stationary glass return panels anchored to the tiled walls. This setup provides excellent sightlines and structural stability while keeping the walk-in opening central. Proper drain planning is essential; neo-angle setups typically use a dedicated corner or offset center drain to ensure rapid water evacuation away from the door threshold.

Walk-In and Corner Bathtub Shields

If you prefer an open-concept bathroom aesthetic without swinging doors, fixed splash panels and walk-in designs offer barrier-free convenience. Understanding why you need a glass bathtub shield comes down to simplicity: a stationary panel shields high-spray zones near the showerhead while leaving the rest of the corner open for effortless entry.

Weighing the pros and cons of partial glass tub enclosures helps determine if this minimalist approach suits your household. Partial enclosures eliminate mechanical tracks and hinges entirely, creating clean visual lines and reducing cleaning tasks. However, walk-in openings require thoughtful showerhead placement to prevent stray water droplets from reaching the bathroom floor.

2. Match Glass Textures and Door Mechanics to Your Space

Every bathroom layout presents unique spatial challenges. The way your glass door opens and the texture of the glass itself significantly impact both functionality and daily comfort.

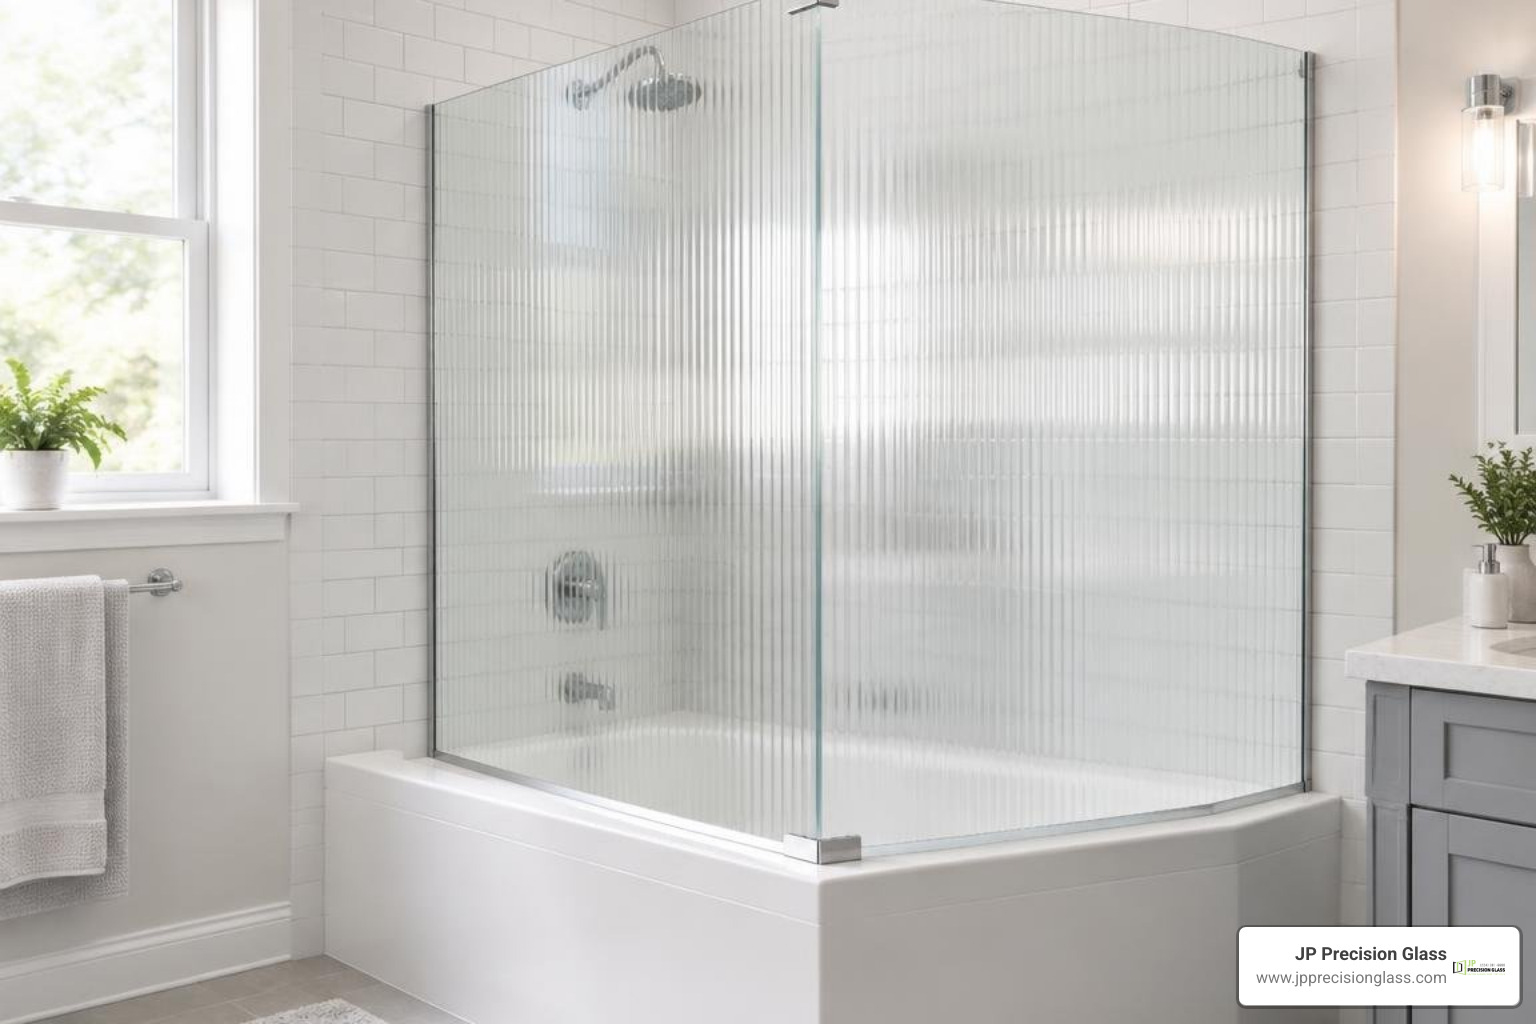
Textured fluted glass panel installed on a corner tub

Sliding vs. Hinged Systems for a Corner Tub Glass Enclosure

Choosing between sliding and hinged doors comes down to clearance space outside the tub:

  • Sliding Systems: In compact bathrooms where a vanity or linen closet sits right next to the tub edge, swinging doors can cause clearance conflicts. It is easy to see why sliding glass tub enclosures are making a major comeback. Modern sliding setups feature sleek, exposed top-roller tracks that glide effortlessly without intruding into the room. Dual-sliding configurations also allow entry from either side.
  • Hinged and Pivot Systems: If your floor plan offers ample clearance, hinged pivot doors provide a wide walk-in opening. High-grade pivot hinges mount directly to the wall or stationary glass panels, equipped with magnetic latching vinyl seals that snap closed to keep water inside. Many models also offer reversible door swings, allowing you to mount the handle on whichever side best matches your natural traffic flow.

Clear, Frosted, and Fluted Glass Finishes

The style and texture of your glass set the overall tone of the space:

  • Clear and Low-Iron Glass: Clear tempered glass is the standard choice for modern designs. It lets natural light travel unhindered, creating an open feeling in compact bathrooms. Low-iron glass removes the subtle green tint found in standard glass, offering pristine clarity.
  • Fluted (Ribbed) Glass: Inspired by classic Art Deco architecture, fluted glass features vertical grooves that refract light beautifully while obscuring direct views inside. It adds architectural depth and high-end style to any corner configuration.
  • Frosted Glass: If maximum privacy is your top priority in a busy household, upgrading your tub with frosted glass doors creates an opaque, satin-like barrier that hides water spots while diffusing soft light.

3. Structural Essentials: Glass Thickness and Wall Adjustability

A durable corner glass installation depends on robust materials and precise alignment. Because glass panels meet at custom angles along the tub rim, understanding glass thickness and wall plumbness is critical.

Feature 1/4-Inch (6 mm) Tempered Glass 3/8-Inch (10 mm) Tempered Glass
Structural Profile Lightweight, ideal for semi-frameless sliding systems Heavyweight, rigid, ideal for fully frameless designs
Hardware Requirement Aluminum wall profiles, u-channels, and top guide rails Solid brass heavy-duty hinges and structural clamps
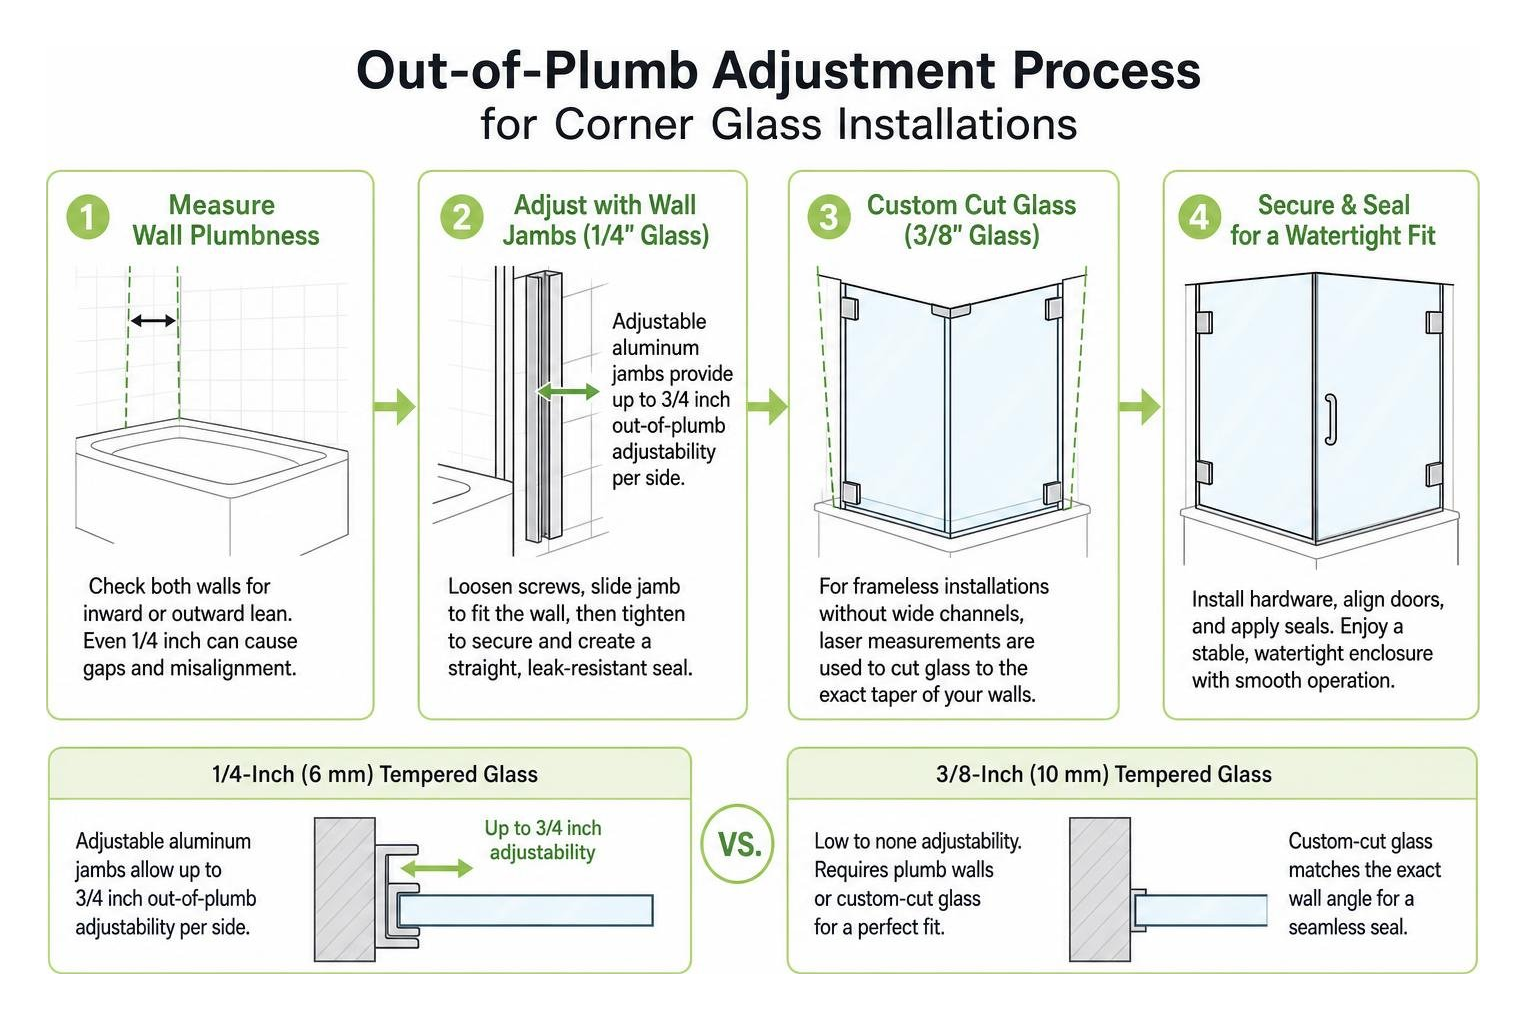
Out-of-Plumb Flexibility High (often up to 3/4 inch per side via wall jambs) Low to none (requires plumb walls or custom-cut glass)
Visual Aesthetic Slim, framed or semi-framed modern profile Substantial, luxury frameless presence
Impact Resistance Certified safety tempered, standard residential grade Certified safety tempered, maximum residential strength

Balancing 1/4-Inch and 3/8-Inch Tempered Safety Glass

Tempered safety glass is manufactured through extreme thermal heating and rapid cooling, making it up to four times stronger than standard annealed glass. If broken, it crumbles into small, blunt granular chunks rather than dangerous jagged shards.

  • 1/4-Inch (6 mm) Glass: Standard for framed and semi-frameless sliding enclosures. Its lighter weight reduces wear on rolling hardware and simplifies installation while meeting all residential safety building codes.
  • 3/8-Inch (10 mm) Glass: The gold standard for fully frameless corner enclosures. This heavier glass provides superior structural rigidity, eliminating flex in stationary return panels and delivering a premium, solid feel when closing the door.

Managing Out-of-Plumb Walls in a Corner Tub Glass Enclosure

Bathroom walls are rarely perfectly plumb, especially in older homes. If a wall leans inward or outward by even 1/4 inch, a rectangular piece of glass will leave an uneven gap, causing water leaks and misaligned latches.

Out-of-plumb adjustment process for corner glass installations

Many pre-engineered kits manage uneven surfaces by using adjustable aluminum wall jambs that provide up to 3/4-inch out-of-plumb adjustability per side. Think of out-of-plumb adjustability like leveling the legs of a table on an uneven floor—it absorbs minor imperfections without compromising stability. For fully frameless 3/8-inch installations that do not use wide metal channels, our team takes custom laser measurements to cut the glass to the exact taper of your wall, guaranteeing a watertight perimeter seal.

4. Hardware Finishes and Easy-Clean Glass Coatings

The finishing touches define both the daily look and long-term maintenance of your enclosure.

  • Hardware Coordination: Match your glass hardware with your existing plumbing fixtures. Matte black delivers bold, modern contrast against white subway tile; polished chrome offers timeless reflection and pairs well with classic aesthetics; and brushed brass adds warm elegance. High-grade solid brass or stainless steel internal components prevent rust in high-moisture environments.
  • Factory-Applied Protective Coatings: Untreated glass is naturally porous, allowing hard water minerals, soap scum, and limescale to bond to the surface over time. High-performance hydrophobic coatings (such as ClearMax technology) seal these microscopic valleys, creating an ultra-smooth shield that causes water to bead up and roll off instantly. This can cut routine cleaning time by up to 40%.
  • Routine Upkeep: To maintain your glass, avoid abrasive scouring pads or harsh bleach-based chemicals that can degrade protective coatings and corrode hardware finishes. Keep a silicone squeegee in the shower to wipe down the glass after the last shower of the day, followed by a quick wipe with a microfiber cloth.

Frequently Asked Questions About Corner Tub Glass Layouts

Can a corner glass enclosure be installed on an existing bathtub?

Yes, as long as your existing bathtub features a flat, level rim with adequate width (typically at least 2 to 3 inches) to support the bottom glass channels or guide tracks. The tub must be securely anchored to the framing with no flex, and the surrounding walls must be finished with waterproof tile or acrylic panels.

How do out-of-plumb adjustments work on uneven bathroom walls?

In semi-frameless systems, an aluminum wall profile attaches to the wall, and the glass panel slides inside a telescoping channel. By shifting the glass deeper into or farther out of the channel (often allowing up to 3/4 inch of play), installers ensure the door hangs plumb even if the wall leans. For frameless installations, out-of-plumb walls are accommodated by custom-cutting the glass at an angle to match the wall’s precise slope.

What is the easiest way to clean and protect treated corner glass?

Daily maintenance takes less than 30 seconds: simply wipe the panels with a silicone squeegee after each use to prevent standing water droplets from evaporating and leaving mineral deposits. For weekly cleaning, use warm water with a drop of mild dish soap or a dedicated non-abrasive, pH-neutral glass cleaner, applied with a soft microfiber cloth.

Conclusion

Styling a corner tub enclosure is all about balancing smart geometry, durable materials, and refined design. Whether you opt for a modern neo-angle footprint to save floor space, a sliding system with exposed rollers, or an open walk-in shield, investing in certified tempered glass and precision installation elevates your entire bathroom.

At JP Precision Glass, we specialize in custom-tailored glass solutions designed to fit your unique space. If you are planning a bathroom renovation, explore our expert shower door installation in Chicago to discover how precision-crafted glass can transform your home.