• JP Precision Glass is the leading glass shower doors company in Chicago

Author Archives: jp-admin

10mm frameless shower screen

Everything You Need to Know Before Buying a 10mm Frameless Shower Screen

Why a 10mm Frameless Shower Screen Is the Smart Choice for Modern Bathrooms

A 10mm frameless shower screen (3/8-inch heavy tempered glass) provides a sleek, modern enclosure without bulky aluminum frames. It is the premier standard for contemporary walk-in showers and alcoves, delivering three core benefits:

  • Maximum rigidity: 10mm tempered glass supports its own weight with discreet metal clamps, eliminating the flex and wobble seen in thinner panels.
  • Enhanced safety: Heavy-duty ANSI-certified glass withstands high impact and thermal shock while maintaining clean sightlines.
  • Effortless cleaning: Removing metal perimeter channels eliminates the damp crevices where soap scum, grime, and mold typically build up.

Upgrading your bathroom should make your space feel larger, brighter, and easier to maintain. A frameless 10mm glass panel gives you the clean lines of an open-concept wet room with the dependable strength needed for everyday family use.
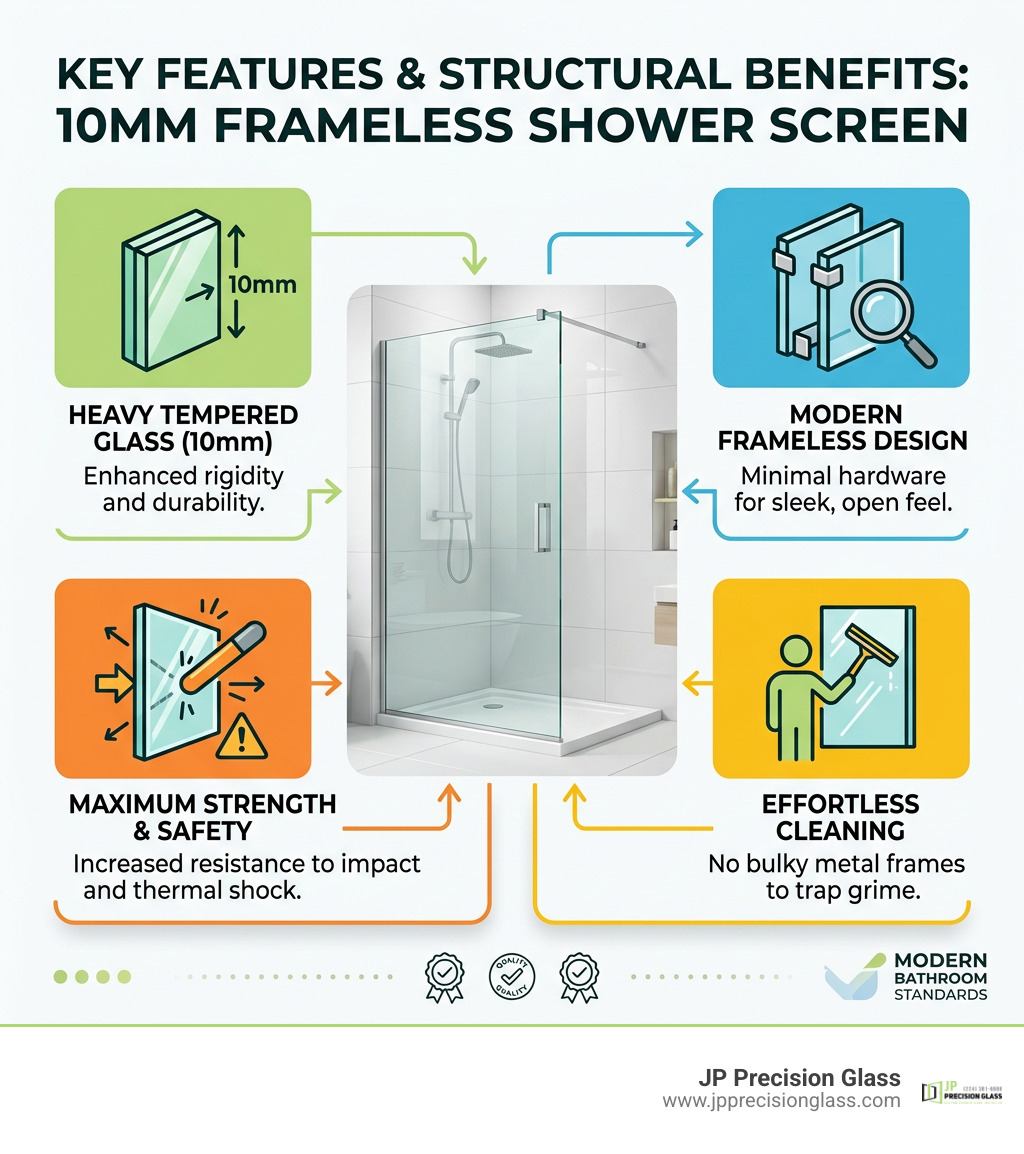
Key features and structural benefits of a 10mm frameless shower screen infographic

10mm frameless shower screen terms simplified:

Why Choose a 10mm Frameless Shower Screen for Modern Bathrooms?

Sleek frameless walk-in shower panel anchored with discreet wall clamps

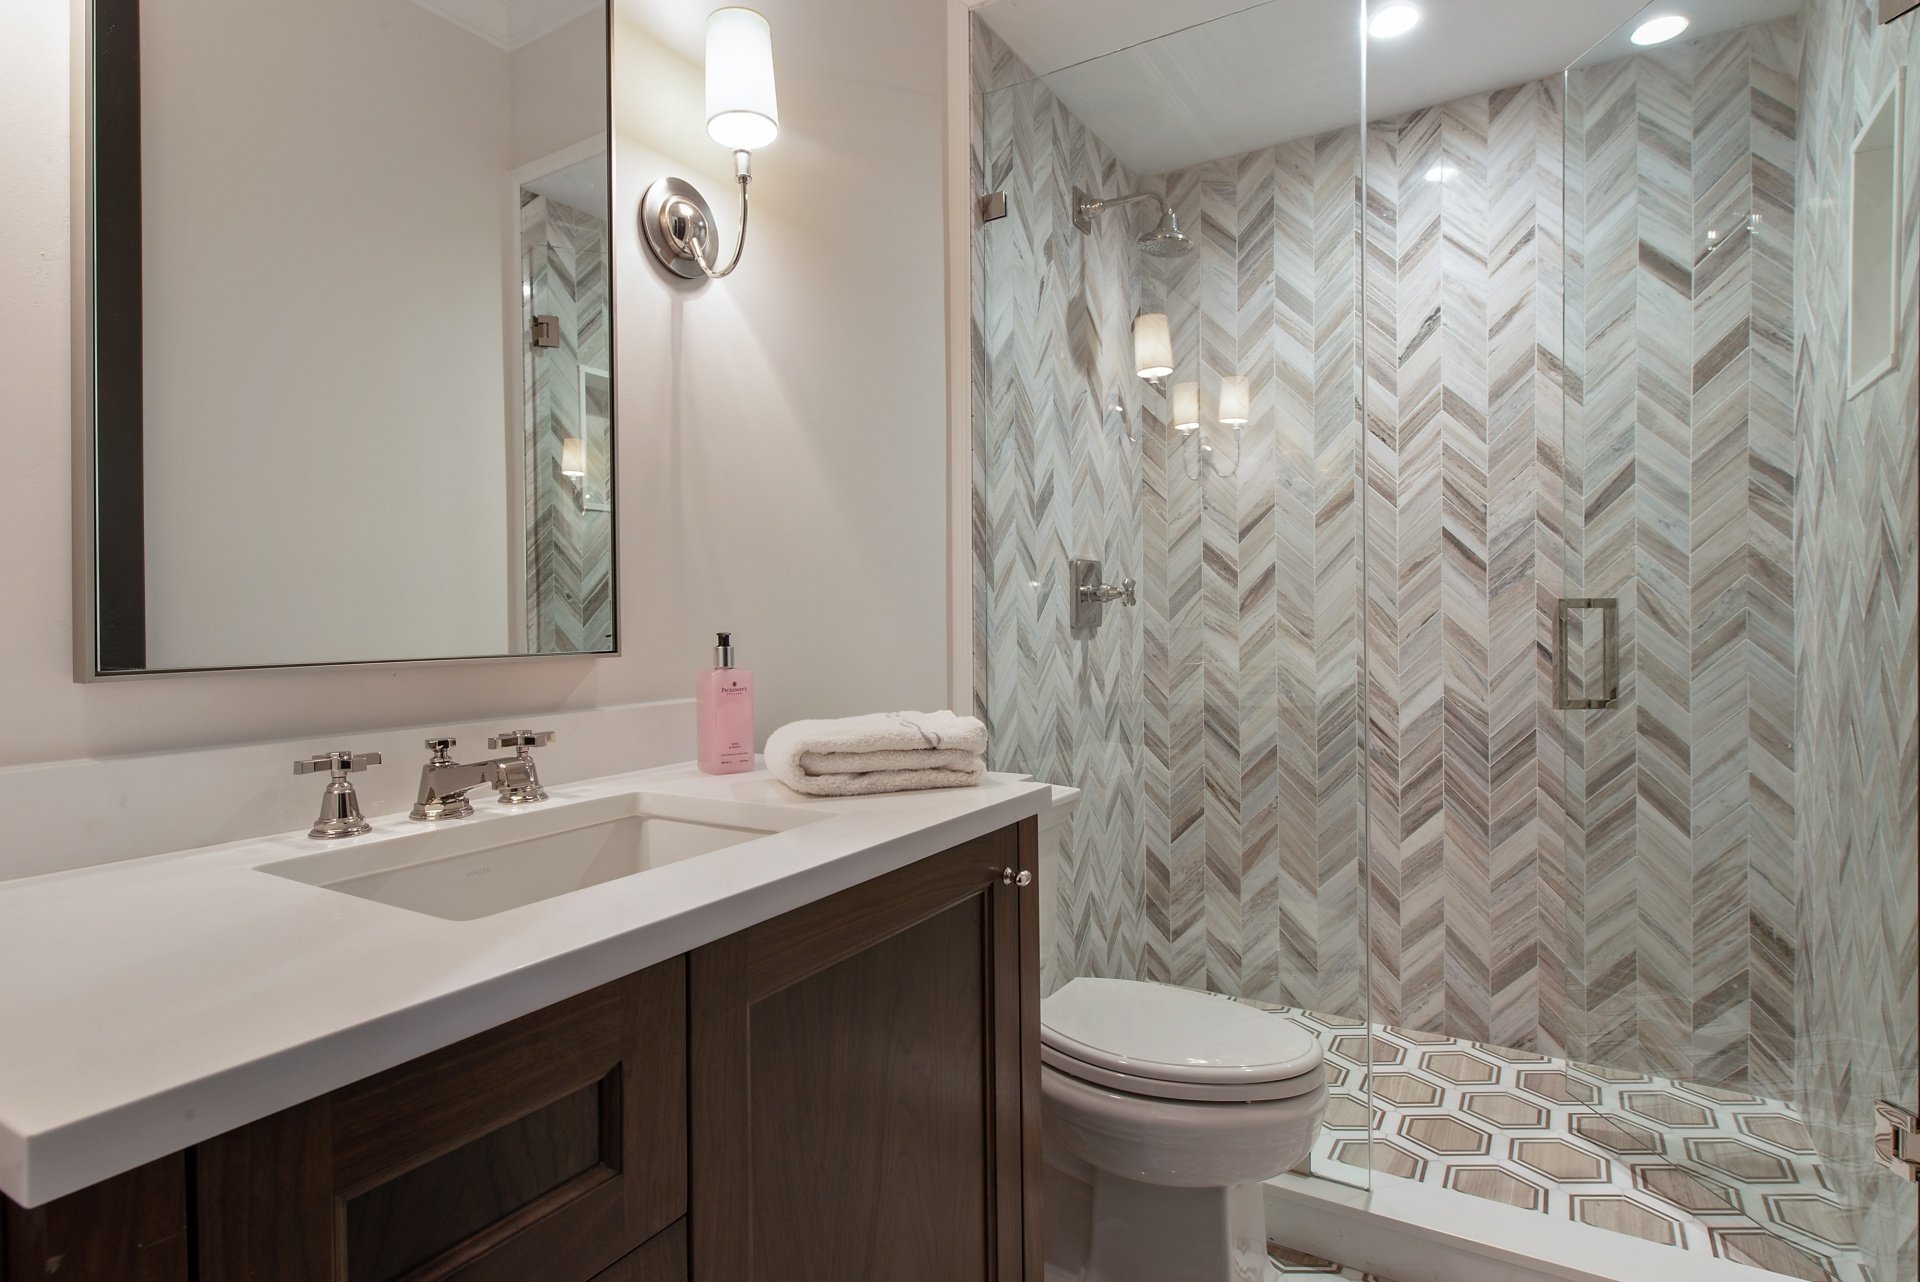
When designing a contemporary bathroom, eliminating visual clutter is paramount. Traditional framed shower doors rely on thick perimeter channels that box in the space, trap moisture, and collect mineral deposits. Exploring the benefits of frameless glass shower doors reveals why homeowners gravitate toward frameless enclosures: they let natural light flow freely across tile patterns and architectural features while creating an uninterrupted sightline.

The structural secret behind this minimalist look is glass thickness. A 10mm panel delivers self-supporting rigidity, allowing you to anchor the glass directly into walls and shower bases using low-profile brackets or slim floor channels.

Beyond aesthetics, moving to a fully frameless system improves hygiene. By getting rid of damp aluminum tracks and rubber gaskets where mold and bacteria thrive, maintenance becomes as simple as a quick swipe with a squeegee.

Key Advantages of a 10mm Frameless Shower Screen Over Thinner Glass

Many entry-level shower kits rely on 6mm (1/4-inch) or 8mm (5/16-inch) glass. While lighter and easier to ship, thinner glass exhibits noticeable flex when opened, closed, or bumped.

When evaluating options in our guide to types & comparison of glass shower doors, 10mm (3/8-inch) stands out as the sweet spot between structural integrity and everyday usability. It offers a solid, substantial feel without placing excessive mechanical strain on high-grade hinges and wall anchors.

Feature / Specification 6mm (1/4″) Glass 8mm (5/16″) Glass 10mm (3/8″) Heavy Glass
Structural Frame Requirement Full perimeter frame required Semi-frameless or light frameless 100% frameless with clamps
Deflection & Wobble High flex; easily bends Moderate stability Negligible flex; firm feel
Weight per Square Foot ~3.1 lbs ~4.1 lbs ~5.2 lbs
Impact Resistance Moderate High Superior heavy-duty durability
Best Fit Application Budget rentals, slider kits Mid-range alcoves Luxury walk-ins, custom enclosures

Safety Ratings and Explosion-Proof Film Protection

Safety in wet environments is essential. High-grade 10mm architectural glass undergoes a thermal tempering process, heating the glass to over 1,100°F (600°C) and rapidly cooling it with high-pressure air blasts. This creates deep surface compression, producing safety glass certified under standards like ANSI Z97.1 and international benchmarks like Australia’s AS2208.

If standard float glass breaks, it creates dangerous, jagged shards. Tempered glass fractures into small, blunt, dice-sized pebbles.

Thermal tempering and explosion-proof film safety mechanism

Many modern premium panels feature an invisible explosion-proof safety film adhered to the exterior surface. If an extreme impact occurs, this micro-thin laminate holds the glass fragments intact within the panel plane, preventing scattering across the bathroom floor.

Comparing Glass Thickness and Design Options

Selecting the right glass involves balancing transparency, light diffusion, and privacy. The advantages of glass shower walls extend beyond simple open designs to include customized glass treatments:

  • Standard Clear Float Glass: Excellent clarity with a subtle, natural greenish tint along the polished edges due to natural iron content.
  • Ultra-Clear Low-Iron Glass: Purified during manufacturing to eliminate the green hue, delivering true-to-life color rendering for intricate marble, mosaic, or subway tile.
  • Frosted & Acid-Etched Glass: Provides visual privacy while allowing soft, diffused daylight to penetrate the enclosure.

Sizing and Layout Options for a 10mm Frameless Shower Screen

Shower spaces come in all shapes and sizes. Whether you are selecting 32-inch glass shower doors for a space-conscious guest bath or planning a compact walk-in shower layout using 36-inch glass panels, standard heights typically range from 72 to 80 inches (1800mm to 2000mm).

Off-the-shelf single panels—such as the Scudo 10mm clear glass shower panel—work well for walk-in wet rooms. For corner enclosures, options like the 900 x 900mm frameless glass shower screen combine return panels with hinged doors to maximize floor space.

Aesthetic Profiles, French Grids, and Easy-Clean Surface Coatings

Modern finishes allow your shower screen to anchor your bathroom’s overall design aesthetic:

  • Hydrophobic Easy-Clean Coatings: Microscopic silica-based sealants fill the microscopic pores of the glass surface. Water beads up and rolls off, preventing limescale buildup and soap scum adhesion.
  • French Grid Patterns: Silkscreened or ceramic-fused matte black exterior lines deliver an industrial, modern look while keeping the interior glass smooth for effortless squeegeeing.
  • Bracing Bars: For wider walk-in panels (exceeding 36 inches), a matching ceiling or wall-mounted stabilization bar provides solid reinforcement without cluttering sightlines.

To explore the latest treatment options, check out recent shower glass innovations.

Hardware Selection and Waterproofing Essentials
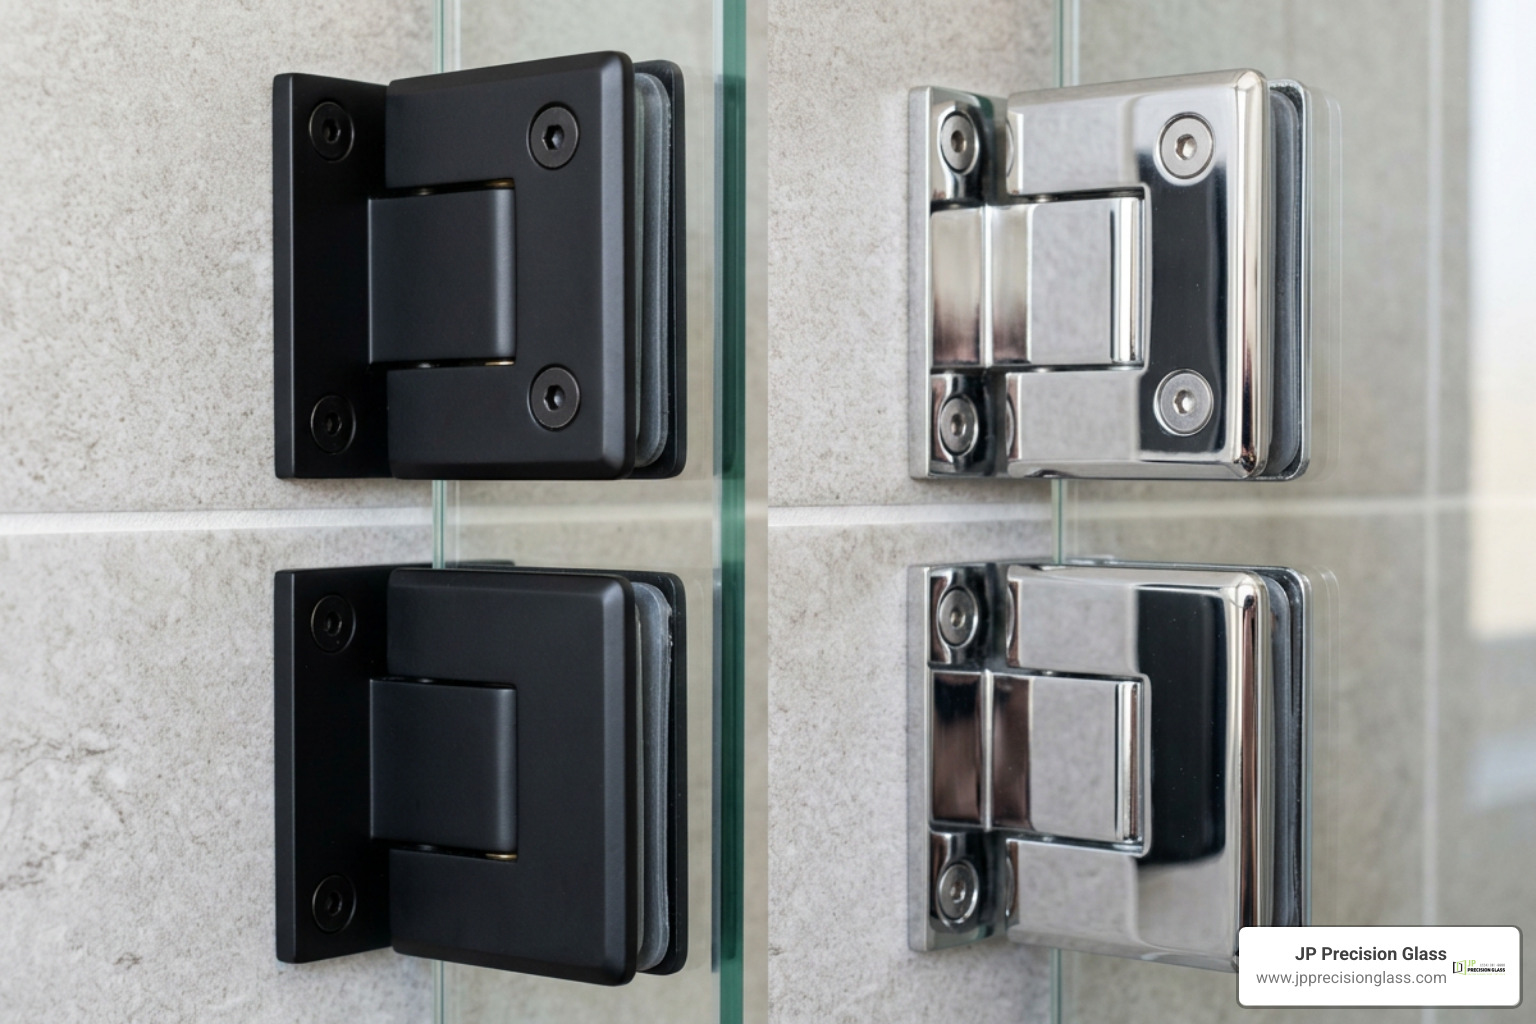
Solid brass and stainless steel mounting clamps in matte black and chrome finishes

Because frameless screens lack aluminum framing, their structural stability depends entirely on the mounting hardware. High-traffic residential installations require heavy-duty components made from solid forged brass or 304/316 marine-grade stainless steel to resist rust and corrosion.

Whether configuring single walk-in shields or learning how to design a spacious 2-person walk-in shower, matching your hardware finishes—such as matte black, brushed nickel, polished chrome, or satin brass—creates a cohesive look across your fixtures.

Water Seals, Floor Strips, and Wet-Dry Separation

A frameless screen achieves clean lines while keeping water contained using precise sealing components:

  • Translucent Vertical Seals: Polycarbonate strips clip onto the vertical edges of door panels to close gaps without detracting from the open look.
  • Bottom Drip Sweeps: Dual-durometer sweeps with flexible lower fins channel water back toward the shower drain.
  • Low-Profile Floor Deflection Strips: Sleek acrylic or metallic threshold dams mounted directly to the curb prevent surface water from escaping.
  • High-Grade Sanitary Silicone: Mildew-resistant clear silicone applied along fixed glass-to-tile junctions creates a lasting watertight seal.

Installation Requirements and Professional Fitting Considerations

Installing a 10mm frameless glass screen requires careful handling and precision. A standard 36×78-inch panel weighs roughly 65 to 75 pounds (30 to 35 kg). Handling this weight while positioning the glass against finished tile demands dual-cup suction lifters and multiple people.

Key installation steps include:

  1. Wall Stud Reinforcement: Screws must anchor securely into solid wood studs or reinforced backing behind finished drywall and tile.
  2. Managing Out-of-Plumb Walls: Frameless glass cannot flex to hide uneven walls. Installers must take precise laser measurements to cut custom glass or make minor clamp adjustments to keep gaps uniform.
  3. Universal Handing: Many standalone panels feature reversible handing, allowing mounting on either the left or right wall depending on your plumbing layout.

Reviewing a comprehensive guide to compare and buy shower glass panels helps clarify the technical aspects of installation. For homeowners seeking tailored configurations, our team at JP Precision Glass provides dedicated support for custom frameless showers in Chicago, ensuring every panel is custom-measured, fabricated, and installed securely.

Frequently Asked Questions About Frameless Shower Screens

Is 10mm glass strong enough to be installed completely frameless?

Yes. 10mm (3/8-inch) tempered glass is the standard for frameless showers because its thickness resists bending under load. When paired with high-grade solid brass or stainless steel clamps, it provides a stable, self-supporting barrier that complies with ANSI Z97.1 safety criteria.

Can a 10mm shower screen be installed on any bathroom floor?

10mm frameless panels can be installed on curbless wet-room floors, pre-formed acrylic shower pans, or custom-tiled curbs. The key requirement is an adequate floor slope (typically 1/4 inch per foot) directing water toward the drain to prevent pooling near the glass edges.

How do you prevent water from leaking around a frameless screen?

Effective water containment combines proper shower head placement with targeted seal profiles. Direct shower heads inward toward tiled walls rather than toward open glass seams, use bottom sweeps with integrated drip rails, and apply mildew-resistant silicone along all fixed glass junctions.

Conclusion

Upgrading your bathroom with heavy architectural glass adds lasting comfort, clean modern style, and everyday functionality. Its solid feel, simple maintenance, and transparent design make it a rewarding improvement for any home renovation.

At JP Precision Glass, we deliver precision, made-to-measure solutions backed by high-quality materials and professional installation across the Chicago area. Explore our full range of custom glass shower panels to find the right fit for your home.
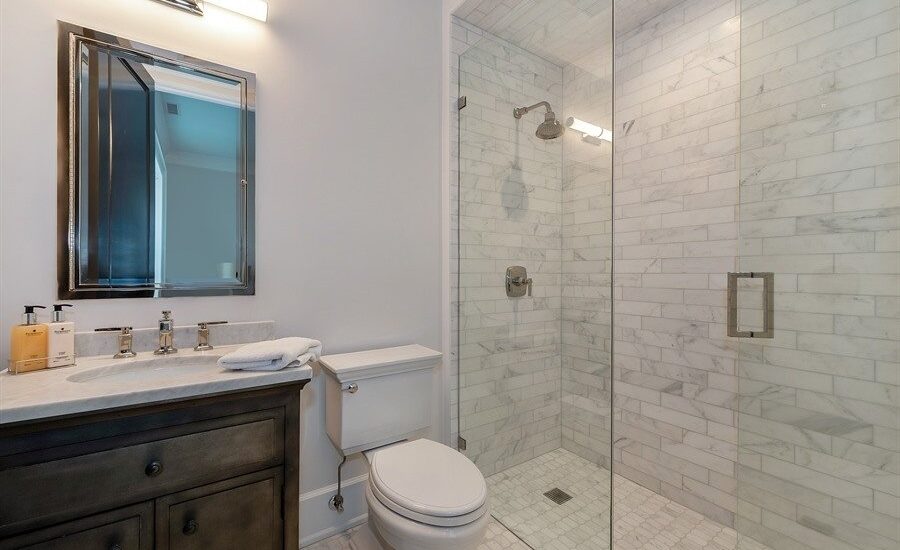
modern frameless glass shower

Everything You Need to Budget for Modern Shower Glass

What Drives Shower Glass Prices in a Modern Bathroom Remodel

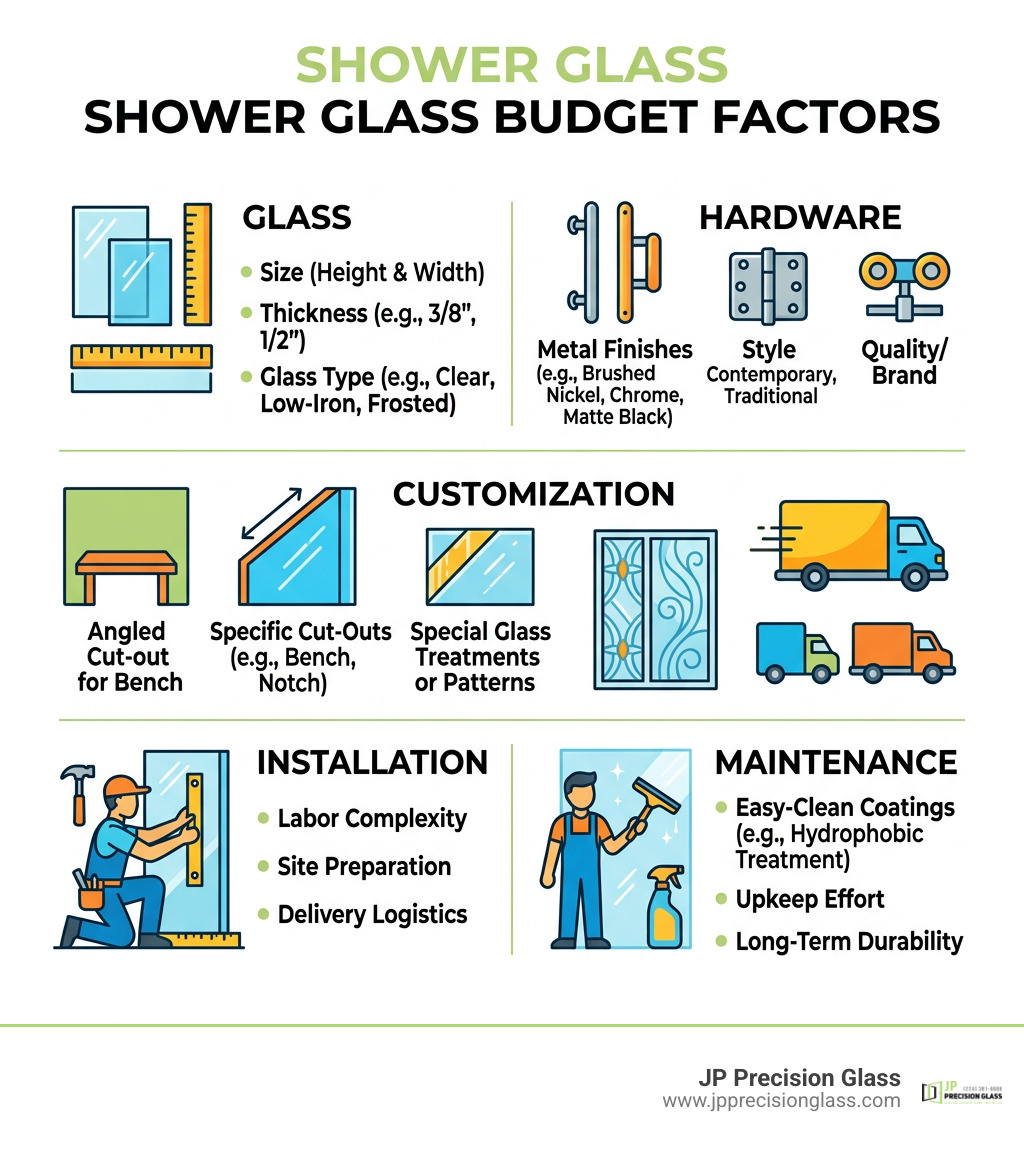
Shower glass prices depend most on glass size and thickness, enclosure style, hardware, custom cuts, and installation conditions. A simple fixed panel with standard hardware is usually the most budget-friendly route, while a made-to-measure frameless enclosure with heavy glass, specialty finishes, sliding doors, or angled walls requires more materials and skilled labor.

Before requesting estimates, confirm your opening dimensions, tile condition, wall support, and preferred door style. This helps you compare quotes fairly and avoid surprises such as extra site preparation, delivery, old-door removal, or seal and hardware upgrades.

For Chicago remodels, labor availability, building access, and the precision needed to work around uneven walls or tile can also affect the final budget. A clear written scope is the best way to separate necessary work from optional upgrades.

Shower glass budget factors: glass, hardware, customization, installation, and maintenance infographic

Explore more about shower glass prices:

Understanding Shower Glass Prices and Cost Factors

architectural tempered shower glass panel

When mapping out a bathroom renovation, understanding what dictates your overall budget helps you make informed design decisions. The total investment for your enclosure comes down to physical material demands, architectural precision, and the aesthetic elements chosen for your space.

Key elements affecting your enclosure scope include:

  • Panel Dimensions and Surface Area: Larger openings require heavier panes, extra structural support, specialized transport, and often two or more technicians for safe maneuvering and staging.
  • Edge Polishing and Notching: Flat polished edges, beveled details, mitered seams, or custom cutouts for knee walls, pony walls, built-in benches, and decorative tile overhangs require specialized computerized CNC machinery and hand finishing.
  • Specialty Coatings and Glass Types: Factory-applied hydrophobic treatments shield surfaces against hard water etching and mineral buildup. Choosing between standard clear float glass and ultra-clear low-iron glass (which eliminates the natural greenish hue visible along the edges) also changes the manufacturing complexity.
  • Custom Fabrications: Out-of-square walls or complex ceiling slopes demand custom-tempered glass fabricated to exact laser specifications rather than standard off-the-shelf rectangular sizing.

Glass Thickness and Shower Glass Prices

The thickness of your glass directly governs its structural rigidity, weight, and visual profile. Standard safety glass typically ranges from lighter panels used in framed units to substantial architectural glass designed for open, minimalist designs.

In modern frameless applications, the two most prevalent choices are 3/8-inch (10mm) and 1/2-inch (12mm) heavy tempered safety glass. While 3/8-inch glass provides an exceptional balance of structural stability and weight for most standard residential enclosures, 1/2-inch glass delivers a substantial, luxurious feel with maximum rigidity, making it ideal for tall stationary panels, expansive shower screens, or free-standing walk-in designs.

Thicker glass creates a modern aesthetic while eliminating the need for bulky aluminum framing. For homeowners exploring the benefits of frameless glass shower doors, opting for heavier tempered panels provides solid operation, enhanced sound dampening, and safety compliance certified by the Safety Glazing Certification Council (SGCC).

How Hardware Finishes Influence Shower Glass Prices

Hardware functions as both the mechanical backbone and the jewelry of your shower enclosure. Hinges, handles, header bars, clamps, and rolling mechanisms must hold substantial weight while standing up to constant moisture, steam, and everyday handling.

  • Finish Selections: Standard chrome often serves as an accessible entry point, while finishes like brushed nickel, matte black, oil-rubbed bronze, brushed bronze, or brushed brass require multi-stage electroplating or physical vapor deposition (PVD) processes for long-term corrosion and tarnish resistance.
  • Mechanism Design: Advanced systems, such as a double sliding frameless soft-close shower door, incorporate fluid dampeners that catch rolling panels before they reach the wall jamb. This protects the glass from impact shock, prevents bouncing, and reduces operating noise.
  • Solid Brass Construction: Solid forged brass mounting brackets and heavy-duty stainless steel components prevent sagging and hinge fatigue over decades of use compared to lighter cast aluminum alternatives.

Professional Labor and Installation Requirements

Skilled craftsmanship is essential when working with heavy architectural glass. Frameless panels demand precise leveling and secure structural fastening, making affordable shower door installation an investment in long-term safety, water containment, and clean aesthetics. Because tempered glass cannot be cut, drilled, or altered once it completes the heat-tempering process, every initial measurement must be accurate down to a fraction of an inch.

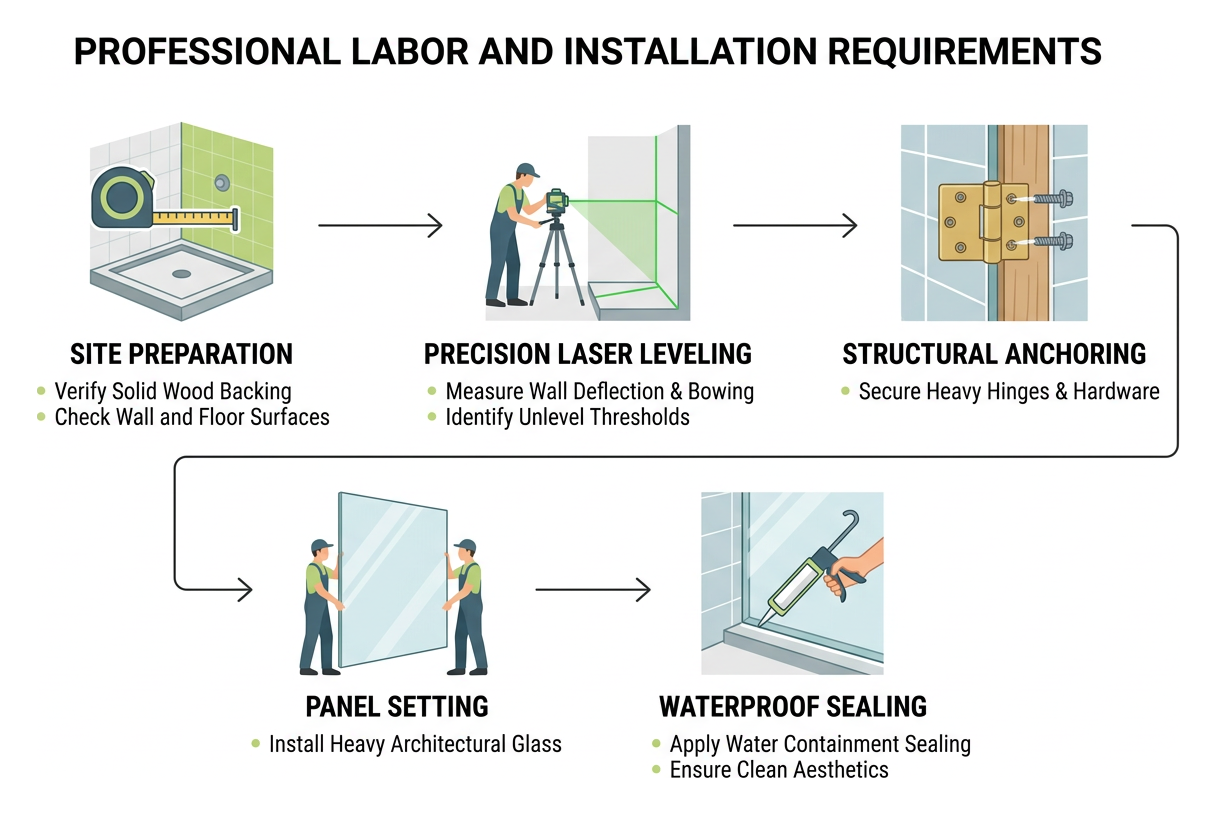
Installation workflow from site prep to final sealing

Installation Timeframes and Site Preparation

Proper installation requires careful sequencing to ensure the glass performs flawlessly without putting undue stress on wall tiles or structural studs:

  1. Precision Measuring and Laser Templating: Technicians utilize laser levels and digital measuring tools to identify wall deflection, bowing, out-of-plumb conditions, or unlevel curbs and thresholds.
  2. Structural Backing Verification: Installers confirm that solid wood blocking exists behind tile walls to hold heavy glass hinges and structural brackets securely under load.
  3. Specialized Tile Drilling: Diamond-tipped core bits lubricated with water penetrate porcelain, ceramic, glass mosaic, or natural stone slabs without cracking or chipping surrounding surfaces.
  4. Mounting, Setting, and Alignment: Panels are plumbed, clamped, leveled, and micro-adjusted to create perfectly even sightlines, consistent reveals, and uniform gaps along door swings.
  5. Sanitary Seal Application: High-grade mildew-resistant silicone cures along critical stationary joints to keep water securely within the shower footprint while allowing necessary expansion tolerance.

Regional Cost Variations Across Markets

Installation labor and logistical requirements vary based on geographic location, building styles, and local market conditions. You can review a detailed shower glass price guide to see broader nationwide trends.

  • Metro vs. Rural Markets: Dense urban centers, such as downtown condominium buildings, involve specific challenges including freight elevator reservations, parking permits, certificate of insurance (COI) requirements, and tight hallway navigation.
  • Contractor Availability: Regions with high remodeling activity and specialized glazing technicians reflect local trade labor demand and scheduling availability.
  • Building Codes: Coastal, high-wind, or seismic zones often enforce strict structural fastening and glass tempering mandates that influence hardware choices and mounting methods.

Comparing Basic, Mid-Range, and Custom Enclosures

Selecting the right enclosure requires balancing budget, architectural layout, and personal design goals. Understanding the differences between standard prefabricated kits, semi-frameless systems, and fully custom frameless enclosures ensures you select the configuration best suited to your space.

Feature Category Standard Prefabricated Semi-Frameless Mid-Range Custom Frameless
Glass Thickness Lighter standard glass Moderate thickness Heavy architectural glass
Frame Style Fully framed aluminum Minimal perimeter frame Completely frameless
Hardware Options Basic chrome or brushed finish Standard designer finishes Custom PVD finishes & soft-close
Configuration Fit Fixed standard openings Limited width adjustments Fully custom to out-of-plumb walls
Aesthetic Profile Traditional Transitional Clean, modern minimalism

Consulting our guide to buying bathroom shower enclosures locally can help you determine which format suits your bathroom layout and overall design vision.

Replacing Outdated Shower Glass

Upgrading an older shower requires careful removal and prep work. If your existing enclosure shows signs of hardware wear, corroded aluminum channels, or cloudy, etched glass, choosing to replace glass shower door assemblies can refresh your space without requiring a complete wall overhaul.

Our team ensures that glass shower doors replacement made easy includes removing old metal frames, clearing degraded silicone, repairing minor tile anchor voids, and inspecting the base threshold before securing new glass. This thorough preparation prevents moisture intrusion behind tiled surfaces and guarantees that the new frameless assembly sits perfectly square and secure.

Long-Term Maintenance and Hidden Ownership Expenses

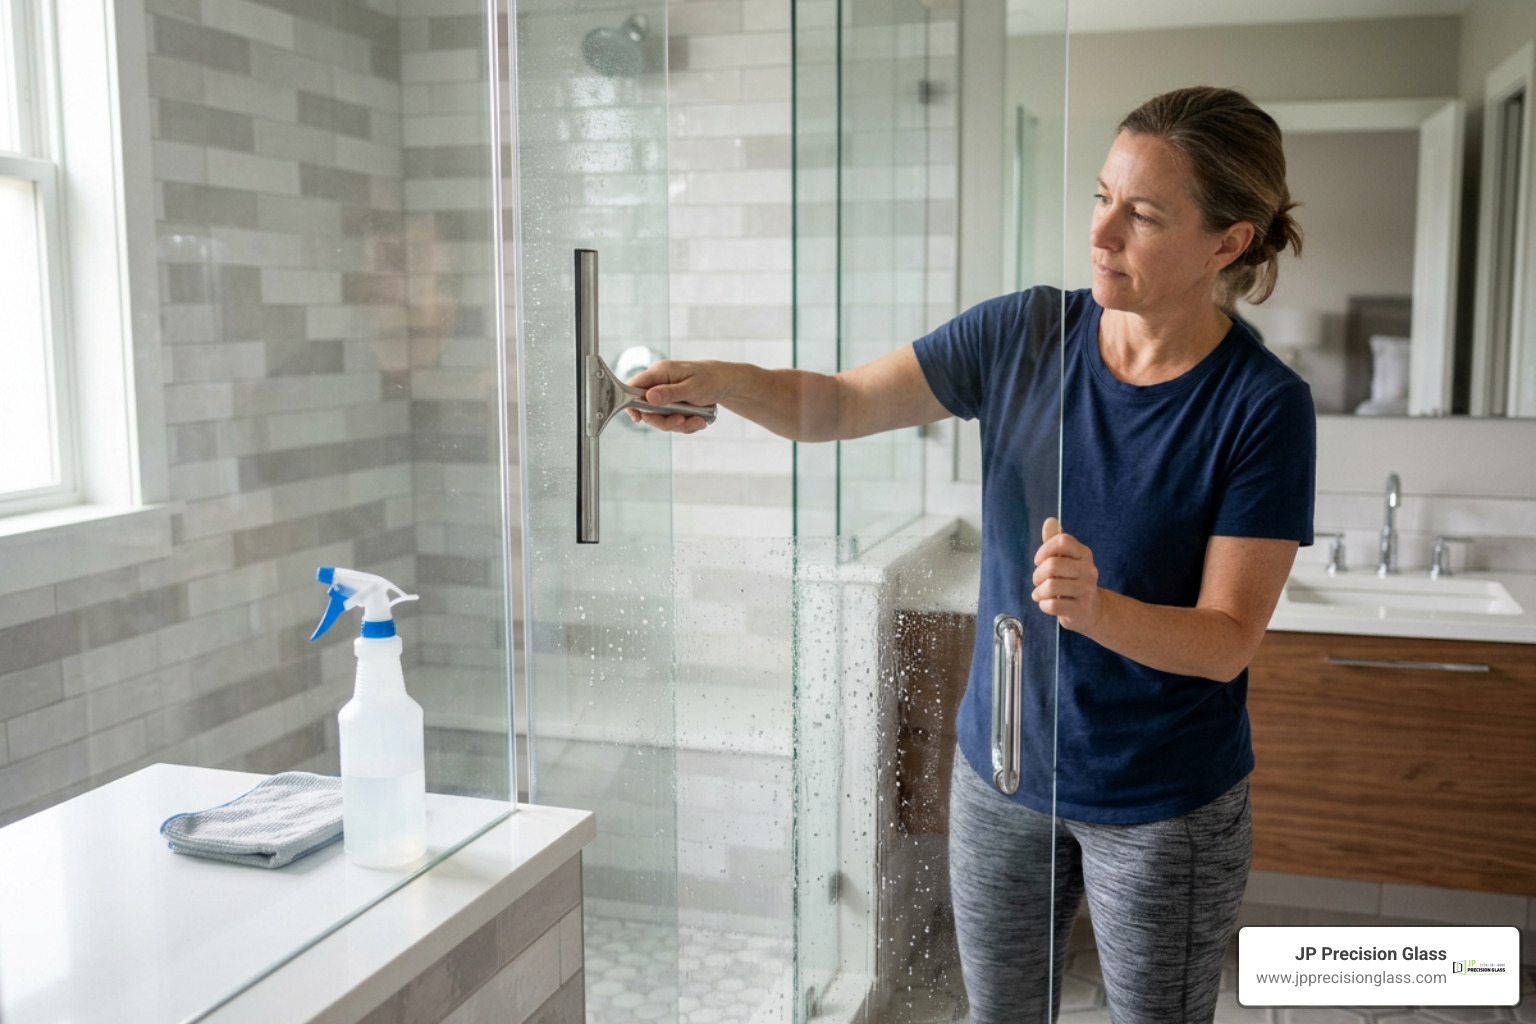
glass maintenance and water spot prevention

Maintaining shower glass requires regular care to protect the surface from hard water mineral etching, soap scum accumulation, and mechanical wear over the lifespan of the enclosure.

  • Silicone Joint Inspection: Check perimeter sealant every one to two years for discoloration, peeling, or separation, recaulking stationary joints when necessary to maintain watertight integrity.
  • Hardware Fastener Tightening: Periodically check hinge clamp screws, handle fasteners, and support bar connections to maintain proper door alignment and prevent sagging.
  • Vinyl Sweep Replacement: Replace bottom door sweeps, drip rails, and magnetic jamb seals when they show signs of stiffness, discoloration, or wear to avoid water escaping onto bathroom floors.
  • Surface Re-application: Refresh protective hydrophobic glass coatings periodically with compatible maintenance sprays to keep water beading effortlessly and reduce routine squeegee effort.
  • Proper Cleaning Habits: Avoid abrasive scouring pads and harsh chemical cleaners containing ammonia, bleach, or strong acids that can degrade protective coatings and corrode decorative hardware finishes.

Frequently Asked Questions About Shower Glass Budgeting

What factors cause the largest budget increases for glass panels?

Custom angled cuts, out-of-plumb wall adjustments, specialty tinted or ultra-clear low-iron glass, and complex sliding or bi-fold hardware configurations represent the primary elements that expand project scope.

How often do glass seals and hardware need maintenance?

Bottom drip sweeps and vinyl splash guards generally benefit from replacement every two to three years depending on water hardness and usage frequency. Silicone perimeter seals should be inspected annually.

Is professional installation necessary for heavy glass enclosures?

Yes. Heavy architectural glass is tempered for safety, which makes its edges vulnerable to shattering if bumped against tile during installation. Professional glazers ensure proper load distribution, plumb alignment, and structural anchoring into solid wall studs.

Conclusion

Designing a modern shower enclosure balances visual appeal, functional hardware, and structural stability. By understanding how glass thickness, hardware choices, installation complexity, and long-term care shape your project, you can make confident choices for your home.

When you are ready to enhance your bathroom, explore custom glass shower enclosures with our expert team at JP Precision Glass to create a tailored solution built to last.

bathtub doors frosted glass

Upgrade Your Tub with the Best Frosted Glass Bathtub Doors

Why Frosted Glass Bathtub Doors Are Worth the Upgrade

Bathtub doors with frosted glass are one of the smartest upgrades you can make in a bathroom remodel. They look great, add privacy, and are far easier to maintain than a shower curtain.

Here’s a quick look at what you need to know before buying:

What You Want to Know Quick Answer
Best type for small bathrooms Sliding (bypass) frosted glass door
Best type for open layouts Hinged or pivot frosted glass door
Standard width range 44–60 inches
Standard height 56–72 inches
Common glass thickness 1/4 in. (6mm) standard; 3/8 in. (10mm) premium
Typical price range ~$300 to $850+ depending on size and style
Safety requirement SGCC-certified tempered glass
Top hardware finishes Brushed nickel, matte black, chrome

Whether you’re replacing a worn-out shower curtain or upgrading a dated glass enclosure, frosted glass tub doors offer a clean, modern look — and real privacy — that clear glass simply can’t match.

For Chicago homeowners planning a bathroom remodel, the right door isn’t just about style. It’s about finding something that fits your exact space, installs cleanly, and holds up over time.

Below, we cover everything you need to choose the right frosted glass tub door — from types and sizes to installation and maintenance.

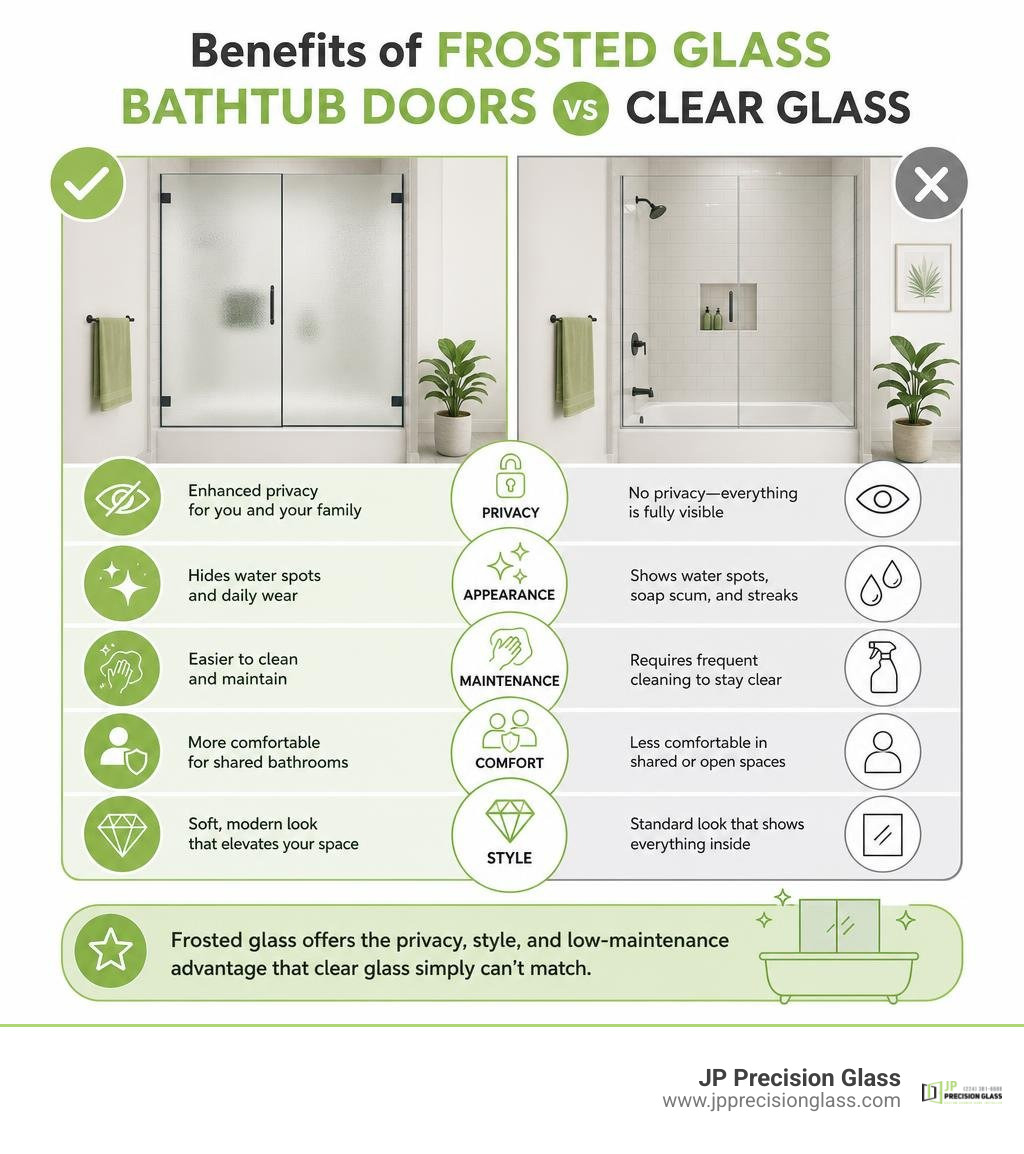
Benefits of frosted glass bathtub doors vs clear glass infographic infographic

Why Choose Bathtub Doors Frosted Glass Over Clear Glass?

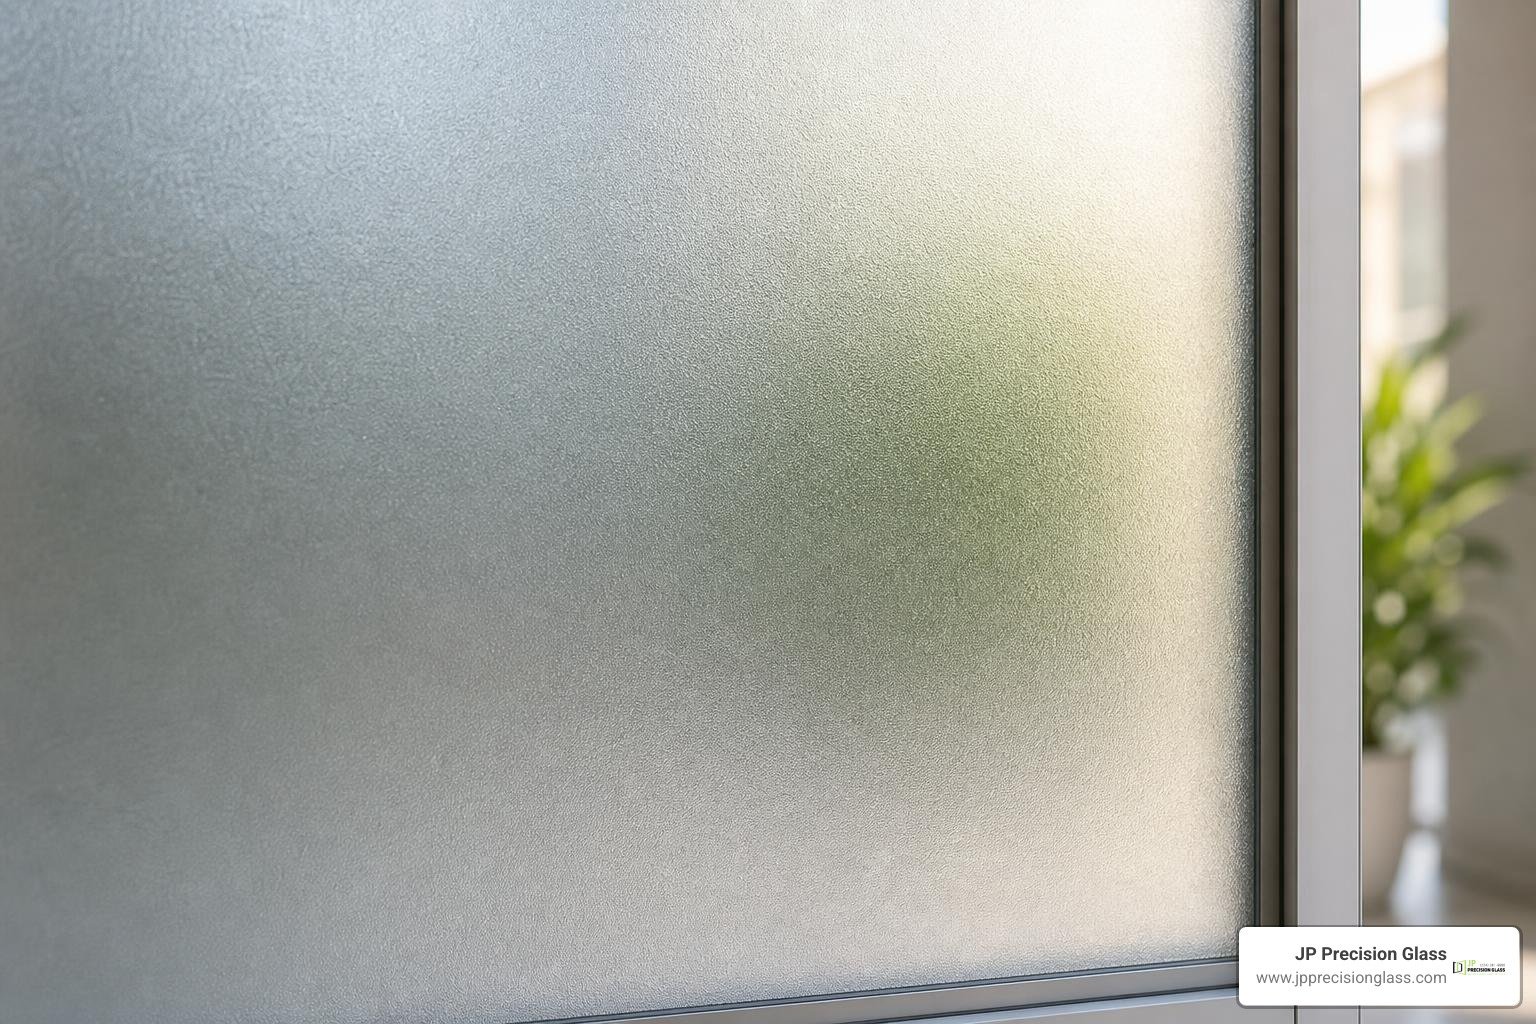
frosted glass texture close-up

When upgrading a bathtub enclosure, the debate between clear glass and frosted glass is one of the first design hurdles homeowners face. While clear glass is praised for making spaces feel larger, bathtub doors frosted glass options offer a unique set of practical and aesthetic advantages that make them a superior choice for many households.

Enhanced Privacy

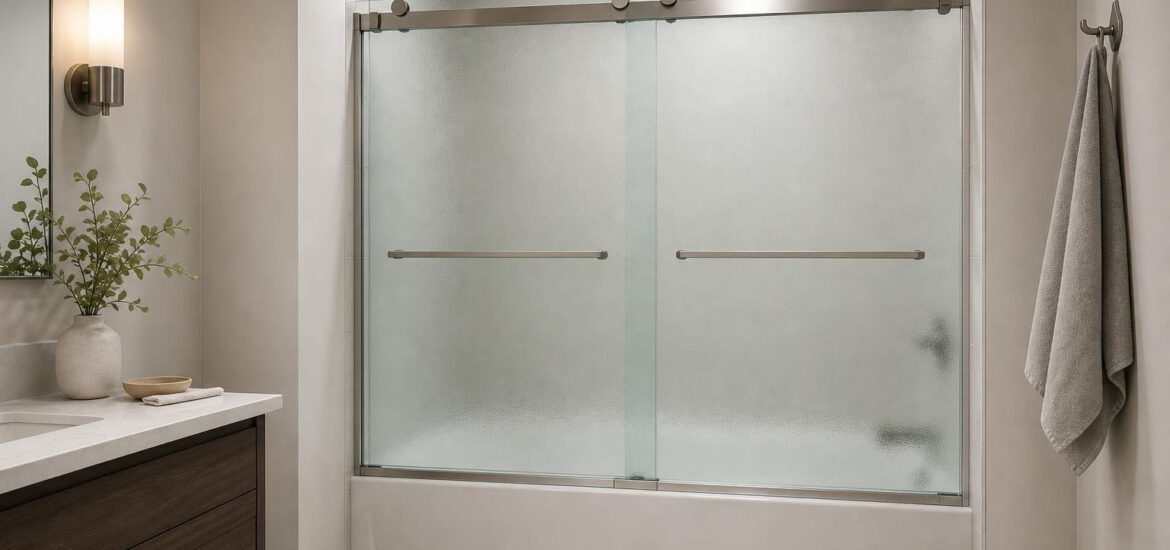
The primary reason homeowners opt for frosted glass is privacy. If you live in a busy household where family members share a bathroom, a frosted door is a lifesaver. It allows one person to use the sink or mirror while another showers in complete privacy. The textured surface diffuses light beautifully, obscuring details while still letting natural light illuminate the tub area.

Effortless Maintenance

Let’s face it: clear glass is a full-time job. Every water droplet, soap scum streak, and fingerprint stands out immediately. Frosted glass is incredibly forgiving. Because of its textured, acid-etched or sandblasted surface, it naturally hides water spots, streaks, and mineral deposits. While you still need to clean it, you won’t have to squeegee the glass after every single shower just to keep your bathroom looking presentable.

Frosted vs. Obscure vs. Tinted Glass

It is easy to confuse the different types of specialty glass on the market:

  • Frosted Glass: Created via acid etching or sandblasting, this glass has a uniform, translucent, satin-like appearance. It diffuses light smoothly and offers high-level privacy.
  • Obscure Glass: This is a broad category that includes patterned, textured, or rain glass. Instead of a smooth frost, it might feature physical patterns pressed into the glass to distort the view.
  • Tinted Glass: This glass is colored during manufacturing (often bronze or gray). While it reduces glare and adds a modern aesthetic, it does not offer the same level of privacy as a fully frosted panel.

When exploring the 3 advantages of glass shower walls, privacy and light diffusion consistently rank at the top, making frosted finishes a standout choice for busy family bathrooms.

Types and Configurations of Frosted Glass Tub Doors

Selecting the right layout for your bathtub doors frosted glass project depends on your bathroom’s physical layout, the placement of your toilet and vanity, and your design preferences. Glass doors generally fall into three structural categories: frameless, semi-frameless, and framed.

  • Frameless: These doors rely on heavy, thick glass (usually 3/8-inch or 10mm) and minimal metal hardware. They offer a sleek, high-end look and are incredibly easy to clean because there are no metal tracks to trap grime. Understanding the benefits of frameless glass shower doors can help you decide if this premium look fits your budget.
  • Semi-Frameless: These feature metal framing around the main structure but have frameless edges on the moving door panels. They strike a great balance between structural support and a modern aesthetic.
  • Framed: Framed doors have metal wrapping around all edges of the glass panels. They are highly durable, cost-effective, and excellent at keeping water contained, though the metal tracks require more frequent cleaning.

Sliding Bathtub Doors Frosted Glass Options

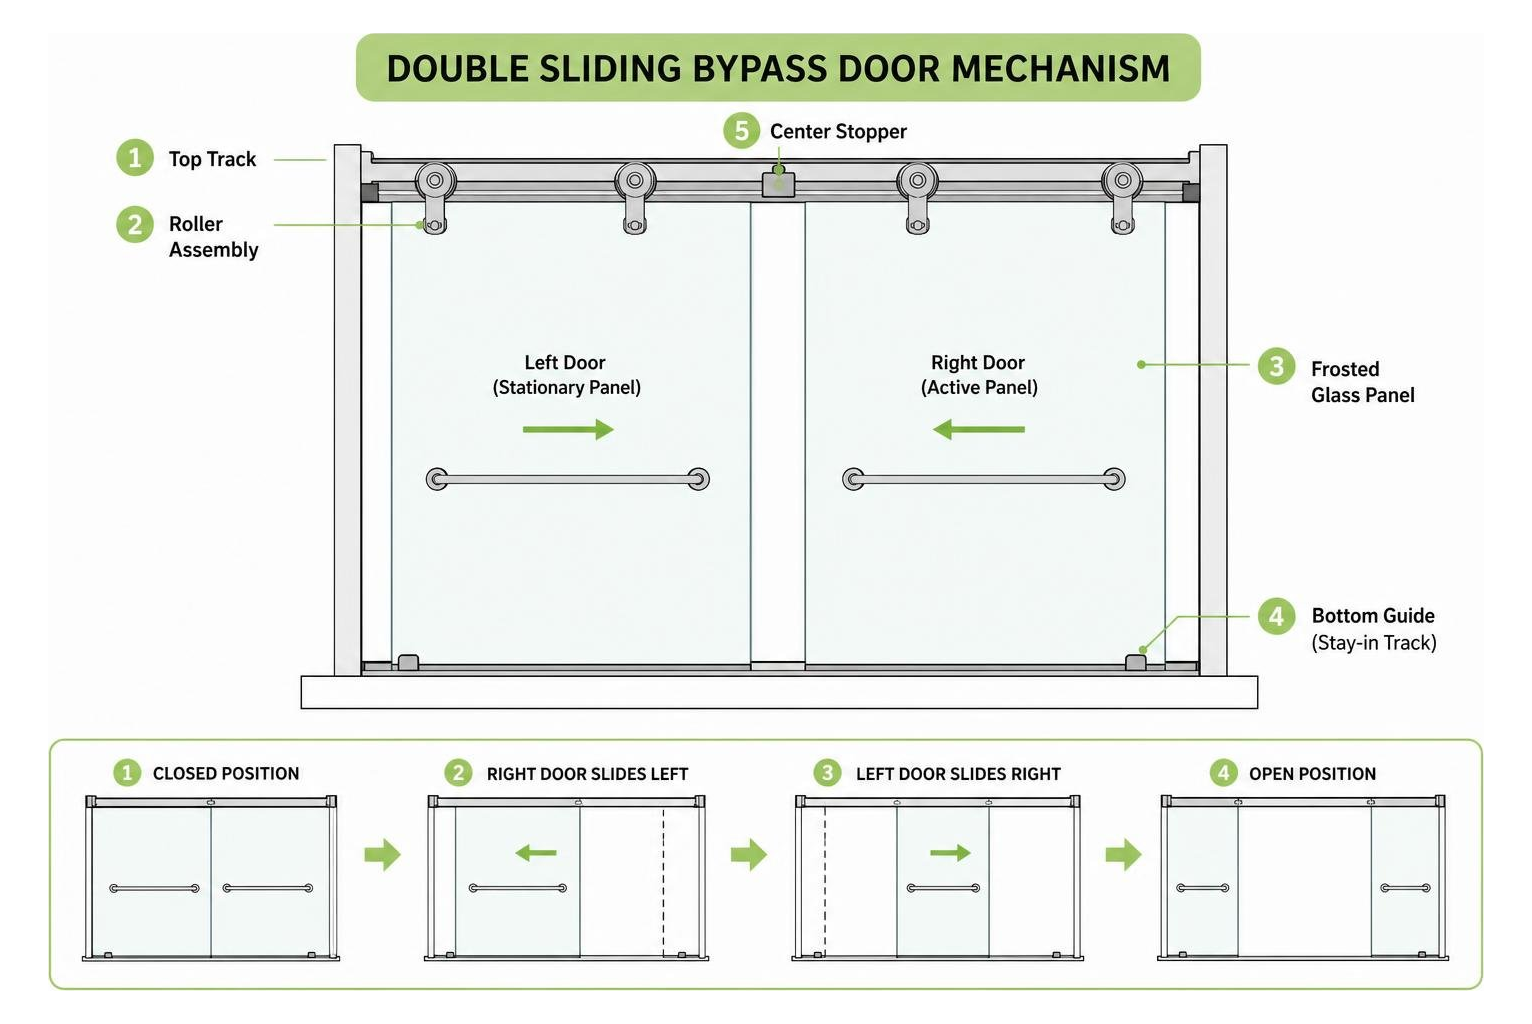
Sliding (or bypass) doors are the ultimate space savers. They consist of two panels that slide parallel to one another within a track. This configuration is perfect for narrow bathrooms where a swinging door would hit a vanity, toilet, or wall.

Diagram of double sliding bypass door mechanism

If you are looking for a reliable sliding option, there are several popular configurations on the market:

Sliding doors are highly sought after; in fact, retail favorites like the CKB Bathtub Sliding Door (56″–60″ W x 56″ H) with tempered frosted glass rank as best-sellers online. Choosing high-quality sliding shower doors ensures your tub remains functional and beautiful for years.

Hinged and Pivot Bathtub Doors Frosted Glass Designs

Hinged or pivot doors swing outward like a traditional room door. They are ideal for larger bathrooms where space is not a constraint. These designs offer a wide, welcoming opening and a very clean, European-inspired look.

  • Swinging Doors: Attached directly to the wall or a fixed glass panel using heavy-duty hinges.
  • Folding/Bi-Fold Panels: These panels fold inward or outward, making them excellent for tight spaces where a full swing isn’t possible.
  • Half-Glass Panels (Tub Shields): A modern trend where a single fixed or hinged panel covers only the front half of the tub (where the showerhead sprays), leaving the back half open.

If you are looking for a swing-style configuration, options like the 51 in. x 58 in. Frameless Glass Hinged Bathtub Door in Polished Brass bring a stunning, high-contrast look to your bath space. Using custom glass shower panels allows you to tailor the hinge placement and glass size to match your bathroom’s exact layout.

Sizing, Measuring, and Hardware Finishes for Your Tub

Getting a perfect fit is the most critical step of any glass door project. While retail kits are designed to fit “standard” alcoves, real-world bathrooms are rarely perfectly square.

How to Measure Your Tub Opening

Before ordering any door, you must take precise measurements. Do not assume your walls are straight! Follow these steps:

  1. Measure the Width: Measure the distance from wall to wall at the top of your tub opening and at the bottom (along the tub threshold).
  2. Check for Plumb: Use a level against both walls to see if they lean inward or outward. Even a 1/4-inch slope (out-of-plumb) can cause pre-fabricated retail doors to leak or bind.
  3. Measure the Height: Measure from the top lip of the tub ledge up to your desired door height. Ensure you have enough clearance from your showerhead and ceiling.

Taking these steps is essential, and reviewing 3 things to do before buying a glass shower door will save you from making costly measuring mistakes.

Choosing the Right Hardware Finish

Your door’s hardware should tie the entire bathroom design together. The most popular finishes for frosted glass doors include:

  • Brushed Nickel: A classic, warm silver tone that resists water spots and fingerprints beautifully.
  • Matte Black: Bold and modern, matte black provides a stunning high-contrast frame against the soft white of frosted glass.
  • Chrome: Highly reflective and traditional, chrome is bright, affordable, and easy to match with existing plumbing fixtures.
  • Polished Brass/Gold: Adds a touch of vintage luxury and warmth to contemporary bathrooms.

To elevate your design, select high-quality shower glass accessories like matching handles, towel bars, and hinges.

Standard Retail vs. Custom Sizing

Feature Standard Retail Doors Custom Precision Glass Doors
Width Adjustability Limited (usually via cutting top tracks) Made-to-measure down to the 1/16th of an inch
Out-of-Plumb Walls Cannot handle significant wall angles Glass is custom-cut to match the exact slope of your walls
Glass Thickness Typically 1/4 in. (6mm) Heavy-duty 3/8 in. (10mm) or 1/2 in. (12mm)
Height Options Fixed standard heights (56 in. to 60 in.) Completely customizable

Installation, Safety, and Maintenance of Frosted Glass

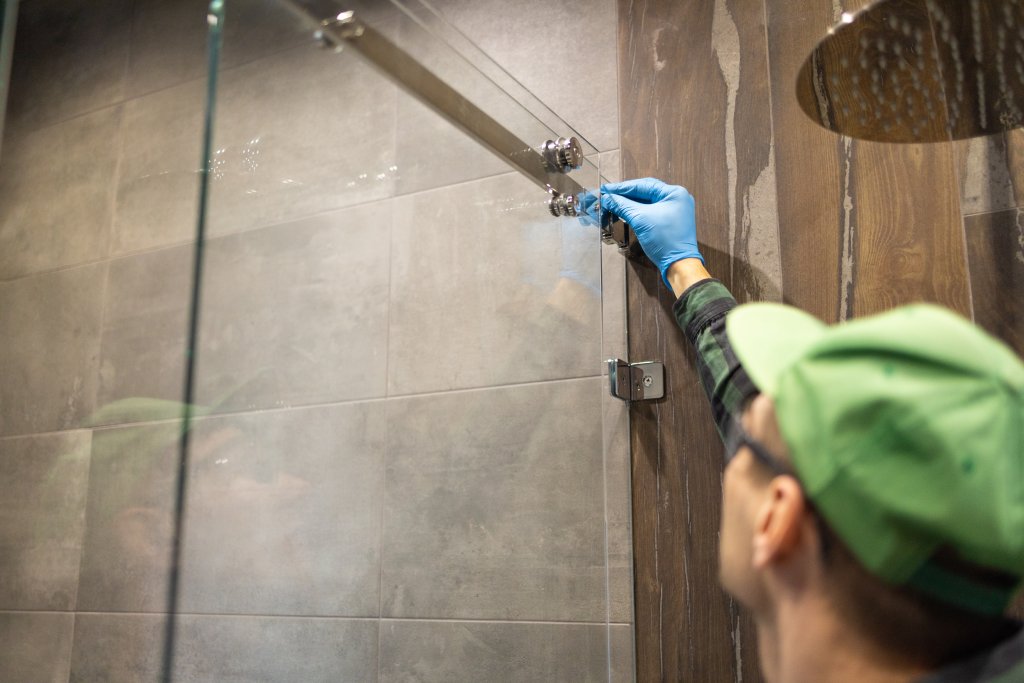
professional glass door installation

Installing a glass tub door requires patience, precision, and the right safety precautions. Because glass is heavy and fragile before installation, understanding safety standards is paramount.

Safety First: Tempered Glass and SGCC Certification

Never compromise on glass safety. Any glass door installed in a bathroom must be made of tempered safety glass. Tempered glass is heat-treated to be up to four times stronger than standard glass. If it does break, it crumbles into small, blunt pebbles rather than sharp, dangerous shards.

Always look for the SGCC (Safety Glass Certification Council) stamp on the corner of the glass. This certification guarantees the product meets strict American safety standards.

Cleaning and Maintenance Tips

While frosted glass hides dirt better than clear glass, it still requires proper care to prevent hard water spots and soap scum buildup:

  • Protective Coatings: Many premium glass doors feature factory-applied protective coatings like EnduroShield. These coatings seal the microscopic pores of the glass, causing water to bead up and slide off easily.
  • Avoid Abrasives: Never use harsh abrasive powders, steel wool, or heavy acid cleaners on the frosted side of the glass. The frosted texture can be permanently damaged or smoothed out by abrasive scrubbing.
  • The Vinegar Solution: For routine cleaning, use a mild mixture of warm water and white vinegar or a non-abrasive liquid dish soap. Spray, let sit for a few minutes, and wipe clean with a soft microfiber cloth.

Why Professional Installation Beats DIY

While some modular retail kits are marketed to DIYers, installing a heavy glass door is a high-risk project. Standard 3/8-inch glass panels are incredibly heavy and difficult to maneuver in tight bathroom spaces. If you bump a corner against a tile floor, the tempered glass can instantly shatter.

Furthermore, if your walls are out-of-plumb, a DIY kit will leave gaps where water can escape, leading to mold and subfloor water damage. Opting for professional, affordable shower door installation ensures a perfect, leak-free fit and keeps your home protected.

Frequently Asked Questions about Frosted Tub Doors

Choosing the right door often brings up a few common questions. We answer some of the most frequent queries below, and you can explore more in our guide on 6 glass shower door questions.

What is the difference between a tub door and a shower door?

The primary difference is height. Standard bathtub doors are designed to sit on the flat rim of a tub and typically stand between 56 and 60 inches tall. Shower doors, which are designed for walk-in shower pans that sit flush with the floor, are much taller, usually ranging from 70 to 76 inches. Additionally, tub doors must account for the wide ledge of the bathtub rim when tracking and sealing.

Can I use a privacy film on clear glass instead of buying frosted glass?

Yes, you can apply a stick-on vinyl privacy film to an existing clear glass door as a temporary DIY solution. However, film has several drawbacks compared to permanent frosted glass:

  • Durability: The high humidity and direct water exposure in a tub-shower combo will eventually cause the edges of the film to peel, bubble, and yellow.
  • Cleaning: Film is easily scratched by cleaning sponges and cannot be scrubbed.
  • Appearance: Film rarely looks as sleek or uniform as genuine acid-etched frosted glass.

Investing in permanent frosted glass is a highly durable, beautiful, and long-term solution.

Are there special considerations for corner bathtubs?

Yes. Corner bathtubs (which have two or three open sides exposed to the bathroom) require specialized glass configurations. Standard sliding doors will not work. Instead, corner tubs require custom-angled neo-angle panels, curved glass panels, or multi-panel return layouts. These installations require highly precise measurements and professional customization to ensure structural integrity and water tightness.

Conclusion

Upgrading your bathroom with a bathtub door with frosted glass is an investment that pays off daily in privacy, ease of cleaning, and modern style. Whether you prefer the space-saving utility of a sliding bypass door or the luxury feel of a frameless hinged panel, frosted glass provides the perfect balance of light and privacy.

While mass-market retail doors are available, they often fail to fit the real-world, out-of-plumb walls found in most homes. At JP Precision Glass, we specialize in designing, customizing, and installing beautiful, made-to-measure glass solutions that fit your bathroom perfectly.

Ready to transform your bathroom? Explore our services or check out our stunning photo gallery to see our work in action.

If you live in the Chicago area and want a flawless, professional installation, contact us today for a custom quote. Let us help you find the perfect door for your home from our complete shower door collection!

1700mm shower enclosure in a modern luxury bathroom

1700mm Shower Enclosure Guide: Maximizing Your Large Bathroom Space

Why a 1700mm Shower Enclosure Could Be the Best Upgrade for Your Bathroom

A 1700mm shower enclosure is one of the most popular large-format shower options for homeowners who want a spacious, comfortable showering experience — and it’s especially practical if you’re replacing a standard bathtub.

Quick answer: What is a 1700mm shower enclosure?

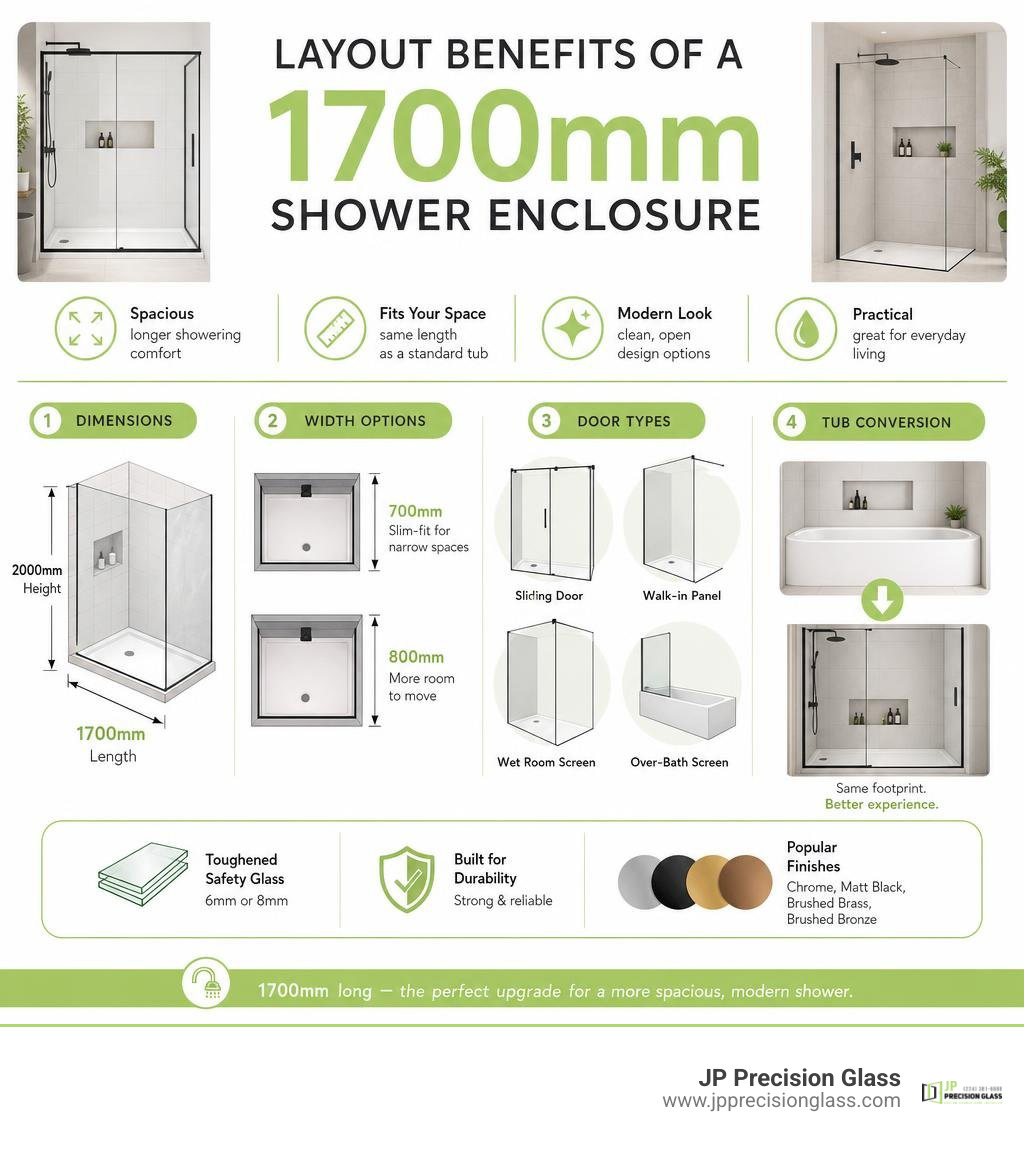
  • It’s a shower enclosure that is 1700mm long (roughly 67 inches), matching the length of a standard bathtub
  • Common widths are 700mm (slim-fit, great for narrow bathrooms) and 800mm (more generous showering space)
  • Available as sliding doors, walk-in panels, wet room screens, or over-bath screens
  • Glass is typically 6mm or 8mm toughened safety glass
  • Popular finishes include chrome, matt black, brushed brass, and brushed bronze

If your bathroom currently has a bathtub you rarely use, you’re not alone. Many homeowners are swapping out that underused tub for a generous walk-in shower — and a 1700mm enclosure is the perfect fit because it takes up exactly the same footprint.

Whether you’re working with a narrow ensuite in a Chicago home or a larger master bathroom, the 1700mm format gives you a long, comfortable shower space without blowing up your floor plan.

But not all 1700mm enclosures are built the same. Glass thickness, frame finish, door style, and whether you need a tray or a wet room setup all make a big difference — in both price and day-to-day experience.

This guide walks you through everything you need to know before buying or installing one.

Layout benefits of a 1700mm shower enclosure: dimensions, width options, door types, and tub conversion infographic

Key Benefits of a 1700mm Shower Enclosure

When planning a modern bathroom remodel in 2026, spatial efficiency and luxury aesthetics are top priorities. Opting for a 1700mm shower enclosure brings several distinct advantages to your home:

  • The Ultimate Tub-to-Shower Conversion: Because 1700mm is the standard length of a traditional bathtub in many homes, you can remove your old tub and drop a spacious shower enclosure into the exact same alcove. This minimizes the need to reroute major plumbing lines.
  • A Touch of Everyday Luxury: A shower of this size feels incredibly open. You will never feel cramped or bump your elbows against cold glass while washing your hair.
  • Minimalist Design Profile: Large glass structures create an unbroken line of sight across your bathroom. This makes the entire room feel significantly larger and brighter.
  • Enhanced Accessibility: Replacing a high-sided bathtub with a low-profile 1700mm tray or a completely flush wet room entry makes your bathroom safer and more accessible for family members of all ages.

By choosing a frameless or semi-frameless design, you can elevate these benefits even further. To understand how frameless styling maximizes light and visual space, explore our guide on the benefits of frameless glass shower doors.

Sleek 1700mm sliding glass shower in a modern bathroom renovation

Choosing the Right Width for Your 1700mm Shower Enclosure

While the 1700mm length is fixed, you have flexibility when it comes to the width of your enclosure. The two most common standard options are 700mm and 800mm, though custom sizes can be tailored to unique layouts.

  • 1700 x 700mm (The Space-Saving Slim Fit): This format is highly optimized for narrow, galley-style bathrooms or tight master ensuites where floor space is limited but length is available. It is widely considered the best layout for narrow spaces because its slim 700mm profile preserves valuable walkway clearance. If you are dealing with a particularly tight floor plan, you can explore the 1700 x 700mm Shower Enclosure | For Narrow Master Ensuite to see how this space-saving footprint works in real-world layouts.
  • 1700 x 800mm (The Balanced Classic): If your bathroom is at least 5.5 square meters or larger, upgrading to an 800mm width offers a noticeably more generous showering area. This extra 100mm of depth makes a substantial difference in comfort without overwhelming the room.
  • Custom Widths: If you have an awkward alcove or an older home with non-standard dimensions, custom-cut glass shower panels can be designed to fit your precise footprint.

Comparing Tray vs. Wet Room Installations

One of the biggest decisions you will make is whether to install your 1700mm enclosure on a dedicated shower tray or directly onto a tiled wet room floor.

A traditional shower tray provides a reliable, self-contained barrier against water. Modern slimline trays (ranging between 40mm and 45mm in height) maintain a clean, low-profile look without the complex subfloor preparation required for a wet room. For example, high-quality lightweight trays utilize advanced materials like a patented matrix of polyurethane resin and volcanic ash filler, capped with durable acrylic. This construction makes the tray up to 50% lighter than conventional stone resin while remaining incredibly strong.

On the other hand, a wet room installation offers a completely level, step-free transition from the bathroom floor to the shower zone. This is the ultimate minimalist aesthetic, though it requires professional tanking (waterproofing) and precise floor sloping to ensure proper drainage.

Feature Low-Profile Shower Tray Wet Room Installation
Aesthetic Modern, neat, defined border Seamless, ultra-minimalist, continuous flooring
Installation Complexity Moderate; straightforward plumbing and leveling High; requires professional tanking and subfloor sloping
Cost Budget-friendly to mid-range Higher upfront cost due to extensive waterproofing
Accessibility Low step-over height (40mm-45mm) Completely level, step-free entry
Maintenance Easy to clean acrylic capping Requires maintaining tile grout lines and seals

Types of 1700mm Enclosures and Glass Specifications

The physical layout of your bathroom and your personal style preferences will dictate the type of enclosure that works best for your space.

Walk-in shower featuring a fixed glass deflector panel

  • Sliding Door Enclosures: Because a 1700mm opening is exceptionally wide, a sliding door configuration is highly efficient. The door glides horizontally within the frame, meaning it requires zero outward clearance. This preserves the floor space in front of the shower, making it perfect for layouts where a toilet or vanity sits close to the enclosure. For a smooth, premium feel, look for sliding doors that feature low-friction roller mechanisms and minimalist internal fixings. You can learn more about these smooth-gliding systems by viewing our range of sliding shower doors.
  • Walk-In Showers: A walk-in design typically features a single, large fixed glass panel (often around 830mm wide) paired with an open entry area. This setup provides a highly modern, boutique-hotel aesthetic.
  • Wet Room Screens: Similar to walk-ins, wet room screens use simple, frameless glass panels anchored to the wall and floor with minimalist bracing bars. This style completely eliminates moving parts, reducing wear and tear over time.

Glass Thickness and Safety Features

When dealing with large spans of glass like those in a 1700mm shower enclosure, structural integrity and safety are paramount. Glass thickness generally ranges from 6mm to 8mm for premium residential installations.

  • 8mm Thermally Toughened Safety Glass: This is the standard for premium, high-durability enclosures. The added thickness gives the glass a heavy, solid feel when sliding or opening, and it resists flexing.
  • 6mm Toughened Glass: A lighter, more budget-friendly alternative that still meets strict safety standards. While it is highly reliable, it lacks the substantial, high-end feel of 8mm glass.
  • Easy-Clean Protective Coatings: Large glass panels are prone to showing water spots and soap scum. Premium enclosures feature specialized hydrophobic coatings (such as CleanCoat® technology) that repel water and dirt, making the glass incredibly easy to wipe clean with a squeegee. To explore the latest advancements in glass treatments and durability, check out our insights on shower glass innovations.

Frame Finishes and Hardware Options

The metal frame and hardware of your enclosure act as the “jewelry” of your bathroom. Selecting the right finish allows you to tie your shower design into your overall brassware and tap scheme.

  • Chrome: The classic choice. A polished chrome frame reflects light beautifully and matches almost any bathroom style.
  • Matt Black: Bold and contemporary. Matt black framing provides a striking contrast, especially when paired with light tiles or industrial-style decor.
  • Brushed Brass & Brushed Bronze: These warm, metallic tones have surged in popularity. They bring an understated, vintage-inspired luxury to modern bathroom designs.
  • Gun Metal Grey: A sophisticated, moody alternative to black that offers a sleek, metallic sheen.

To complete your space with matching handles, support bars, and seals, browse our collection of premium shower glass accessories.

Installation and Practical Considerations

Installing a large-format glass enclosure requires careful preparation and precision. Because a 1700mm glass panel or sliding door is heavy and rigid, there is very little room for error during the installation process.

To ensure a watertight seal and smooth mechanical operation, we always recommend utilizing a professional service. You can learn more about securing a perfect fit with our affordable shower door installation services.

How to Measure Your Bathroom for a 1700mm Shower Enclosure

Before purchasing any materials, you must take precise measurements of your bathroom footprint. Even minor errors can lead to leaks or a door that won’t close properly.

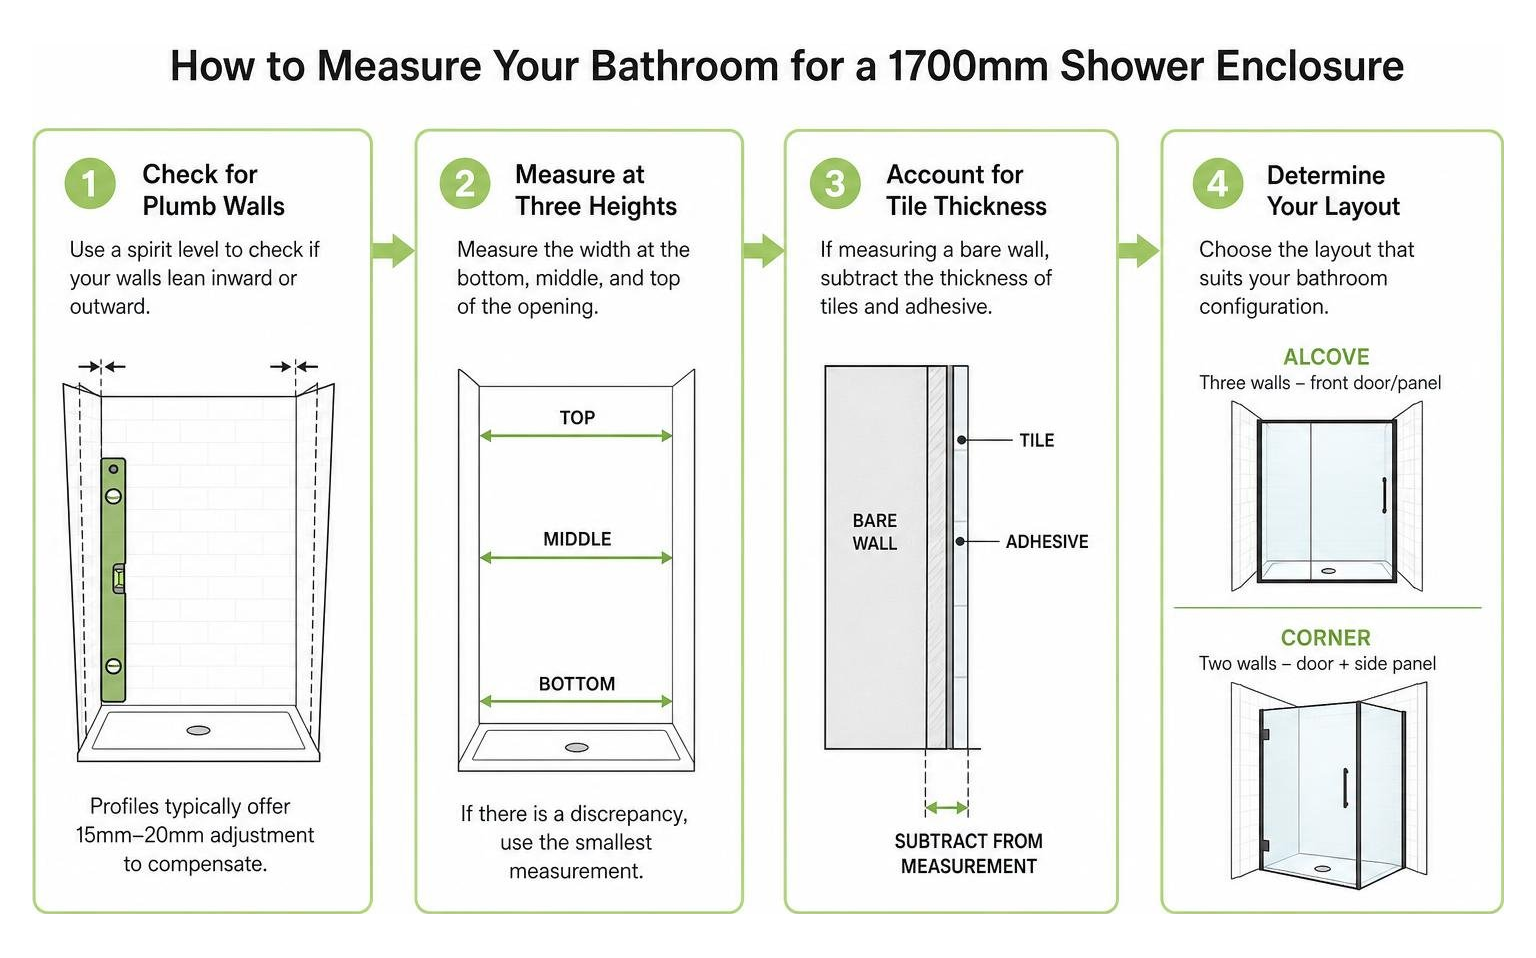
Step-by-step process for measuring a 1700mm shower space

  1. Check for Plumb Walls: Rarely are bathroom walls perfectly straight. Use a spirit level to check if your walls lean inward or outward. High-quality shower profiles typically offer between 15mm and 20mm of built-in adjustment to compensate for out-of-plumb walls.
  2. Measure at Three Heights: Measure the width of your shower opening at the bottom, middle, and top. If there is a discrepancy, use the smallest measurement when ordering your door or panel.
  3. Account for Tile Thickness: If you are measuring a bare stud wall or plasterboard, remember to subtract the thickness of your tiles and adhesive from your final measurements.
  4. Determine Your Layout: Decide if your enclosure will be installed in an alcove (surrounded by three walls, requiring only a front door or panel) or a corner (surrounded by two walls, requiring a side panel).

Using a 1700mm Enclosure with a Shower Bath

If you love the idea of a spacious shower but simply cannot give up your bathtub, a 1700mm shower bath is the perfect compromise. This setup combines a deep bathing area with a dedicated, wider showering zone at one end.

A classic example is the Stafford 1700×700 Shower Bath & 4mm Screen with Rail , which is crafted from highly durable Lucite® acrylic and has a water capacity of 141 liters. It features a universal-handing design, allowing you to install the bath in either a left- or right-handed configuration depending on your plumbing layout.

When installing a shower bath, the screen you choose is critical:

  • Glass Thickness: While budget-friendly screens often use 4mm glass, upgrading to a 6mm or 8mm custom screen provides much greater stability and safety.
  • Pivotal Mechanisms: Look for a screen that swings both inward and outward. This makes it much easier to turn on the taps before getting in and simplifies cleaning.
  • Integrated Towel Rails: A built-in rail on the exterior of the glass screen keeps your towel dry and within arm’s reach when you finish showering.

Frequently Asked Questions about 1700mm Enclosures

What is the best glass thickness for a 1700mm shower enclosure?

For an enclosure of this size, 8mm thermally toughened safety glass is highly recommended. It offers the ideal balance of structural strength, safety, and a premium, heavy-duty feel. While 6mm glass is a reliable and lightweight alternative, 8mm glass reduces flexing over wide spans. If you currently have thin or damaged glass and want to upgrade, you can learn about your options to replace glass shower door panels.

Can I convert my standard 1700mm bathtub into a walk-in shower?

Yes! This is one of the most common bathroom renovations we perform. Because a 1700mm walk-in shower matches the exact footprint of a standard tub, the conversion is highly straightforward. It allows you to transform a cramped, underutilized tub into a bright, modern, and accessible walk-in shower. For homeowners in the Chicago area looking to make this change, our team specializes in seamless shower door replacement chicago services.

How do I prevent leaks in a 1700mm walk-in shower?

Because walk-in showers feature an open entry, preventing water splash-out requires a few smart design choices:

  • Use a Deflector Panel: A small, 300mm to 400mm fixed or hinged glass “flipper” panel attached to the end of your main walk-in screen helps redirect water spray back into the shower area.
  • Install a High-Flow Waste: A 90mm high-flow shower waste trap is essential. It drains water rapidly, preventing pooling on low-profile trays.
  • Ensure Proper Sealing: High-quality silicone and magnetic seals must be applied precisely along all joints. If your existing seals are failing, it may be time to look into professional shower door repair chicago to protect your bathroom floor from water damage.

Conclusion

Upgrading to a 1700mm shower enclosure is a fantastic way to bring a spacious, high-end spa experience into your home. Whether you choose a space-saving 1700 x 700mm sliding door for a narrow master ensuite or a bold, open-concept walk-in wet room, this generous layout completely transforms how your bathroom looks and functions.

At JP Precision Glass, we specialize in designing, customizing, and installing high-quality glass shower doors tailored to your exact space. As Chicago’s leading glass shower door provider, we pride ourselves on delivering precision, premium materials, and flawless installations.

Ready to design your dream shower? Explore our high-precision shower doors chicago or view our custom sliding shower doors to get started today!

sliding glass door rollers

How to Remove and Replace Sliding Glass Door Rollers Without Breaking the Bank

Change Sliding Door Rollers to Restore a Smooth Glide

If your patio door drags, grinds, wobbles, or will not latch cleanly, first vacuum the lower track and try small, even adjustments to the height screws near the bottom corners. If the wheels are cracked, rusted, flat-spotted, or still bind after cleaning and adjustment, change sliding door rollers by removing the panel with a helper, matching the old roller assembly exactly, replacing both sides, and then leveling the door again.

Most problems come from worn rollers, debris, or a bent track – not a door that needs to be replaced. Because glass panels can be heavy, protect the floor, use a second person for lifting, and stop if the track is crushed or the panel uses heavy impact glass.

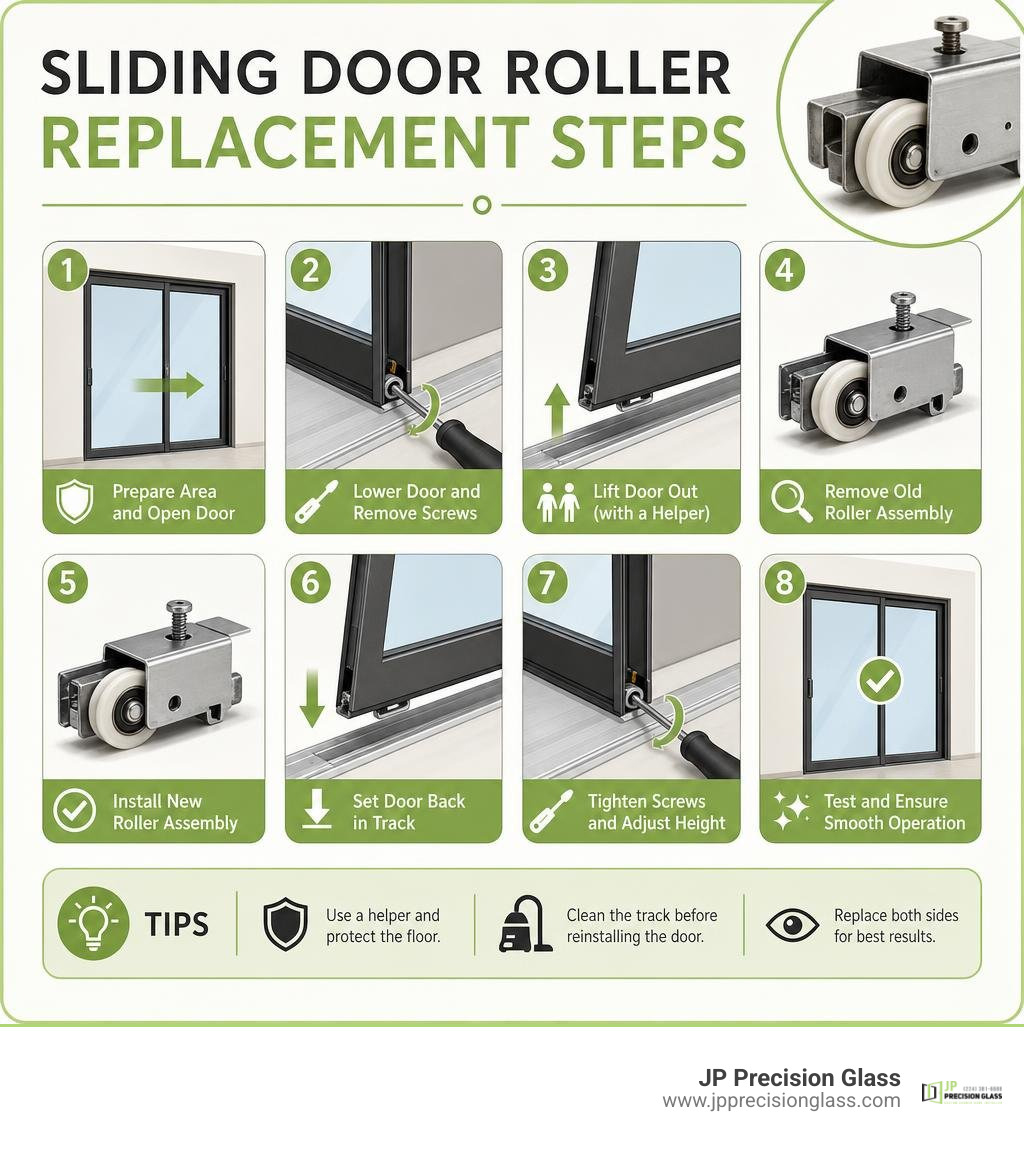
sliding door roller replacement steps infographic

Change sliding door rollers word list:

Diagnosing Sliding Door Issues: Adjustment vs Replacement

A sliding door should glide with minimal effort. When opening the door turns into a workout involving two hands and a hip check, the rolling mechanism is almost always screaming for help. Before tearing down your frame, it helps to distinguish between a simple height misalignment and mechanical failure.

Doors naturally settle over time. Daily use, structural shifting, and vibrations can cause the height adjustment screws at the base of the door to loosen. When this happens, the bottom aluminum rail drops down and drags directly across the raised metal track rib. This metal-on-metal contact produces a loud, harsh screech and shaves off aluminum dust.

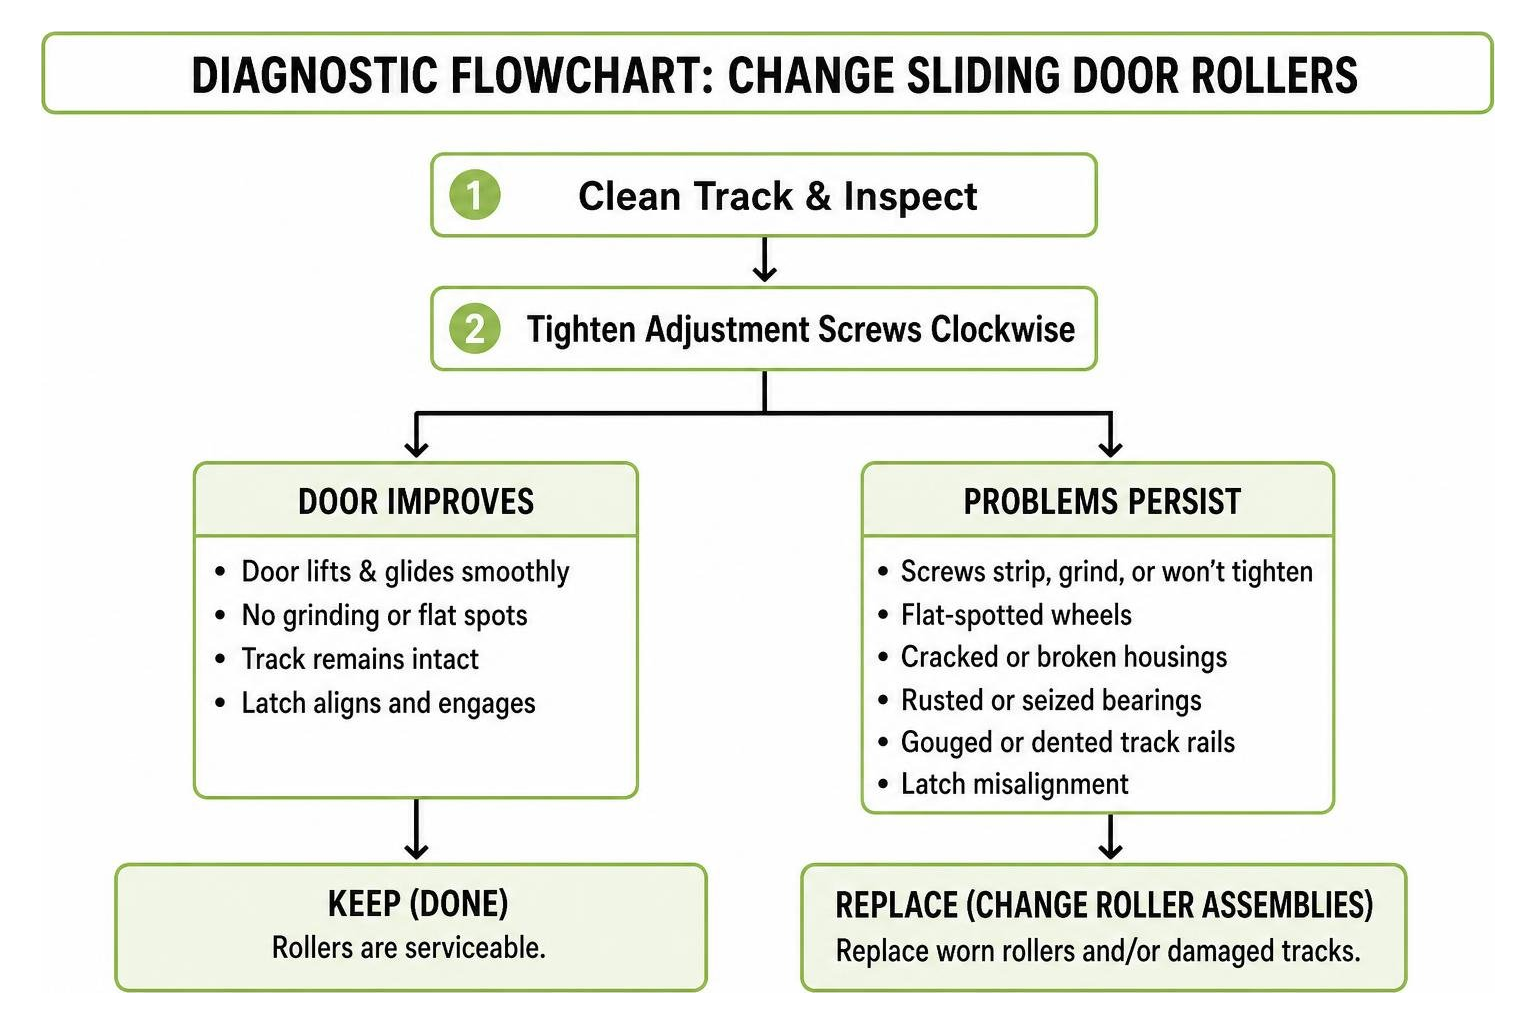
To determine if you only need an adjustment, locate the small access holes near the bottom edge of the door frame (often hidden under plastic snap-in caps). Using a screwdriver, turn the screws clockwise a quarter-turn to raise the panel. If raising the door lifts the rail clear off the track and restores a smooth, quiet glide, an adjustment was all you needed.

However, if turning the adjustment screws causes the screw head to spin freely without lifting the panel, or if the door continues to rumble, shudder, and bind, the roller internals are compromised. In that case, tackling a sliding-into-savings with diy aluminum glass door repair project by replacing the internal wheel assemblies is the proper course of action.

Signs of Worn Rollers and Damaged Tracks

When sliding door wheels reach the end of their service life, they leave clear physical symptoms:

  • Flat-Spotted Wheels: If a ball bearing seizes from corrosion or grit, the wheel stops rotating and slides across the metal track. Friction quickly grinds a flat spot onto the wheel circumference, creating a rhythmic bumping sensation whenever the door moves.
  • Cracked or Broken Nylon Housings: Constant downward pressure can fracture the wheel flange or split the outer roller housing, making the door wobble from side to side.
  • Internal Rust and Seized Bearings: Exposure to condensation, cleaning chemicals, or outdoor rain causes carbon steel bearings to rust solid.
  • Gouged or Dented Track Rails: Running flat-spotted or seized rollers over time will chew through the soft aluminum track crown, creating sharp gouges, metal burrs, or wavy valleys that catch the rollers.
  • Latch Misalignment: When one roller fails, that corner of the door sags. This creates an uneven reveal against the side jamb, preventing the door lock hook from engaging the strike plate properly.

diagnostic flowchart for sliding door roller repair

Roller Materials Compared: Steel, Nylon, and Stainless Steel

Selecting the proper roller material ensures longevity and protects your track from premature wear. Different materials offer unique trade-offs in weight capacity, operating sound, and environmental resistance:

Roller Material Load Capacity Operating Noise Corrosion Resistance Best Application
Standard Carbon Steel High (100–200+ lbs per pair) Moderate to High Low (Prone to rust in damp environments) Standard interior or mild-climate exterior patio doors
Molded Nylon / Delrin Medium (50–100 lbs per pair) Whisper Quiet (Reduces noise by up to 30%) High (Impervious to rust; chemically inert) Lightweight panels, screen doors, and interior partitions
Stainless Steel Very High (150–300+ lbs per pair) Moderate Superior (Resists salt spray, humidity, and standing water) Heavy patio doors, coastal zones, and high-moisture spaces

Builder-grade carbon steel rollers often last only 3 to 5 years before moisture causes their open bearings to degrade. For standard residential exterior doors, premium tandem rollers with sealed bearings and engineered Delrin or stainless steel wheels can deliver 10 to 15 years of smooth operation.

Pre-Repair Checklist: Tools and Roller Identification

A standard residential glass patio door panel weighs between 80 and 150 pounds, while double-pane thermal or impact-resistant panels can easily exceed 200 pounds. Proper preparation is essential to protect both your back and the glass panel.

Always conduct this repair with a helper. Never attempt to lift, maneuver, or balance a heavy glass sliding door panel alone. Make sure you have a clear, flat resting space ready before you start lifting.

Essential Tools Needed to Change Sliding Door Rollers

Gather these tools before beginning your project:

  • Screwdrivers: #2 and #3 Phillips head screwdrivers, along with a sturdy flathead screwdriver.
  • Prying and Tapping Tools: A non-marring rubber mallet, a wooden block (no thicker than 3/4 inch), and a stiff putty knife.
  • Pliers: Needle-nose pliers or a balance hook to extract internal roller cartridges.
  • Safety Equipment: Heavy-duty work gloves with grip palms and impact-rated safety glasses.
  • Track Maintenance Supplies: A shop vacuum with a narrow crevice attachment, a stiff nylon bristle brush, and a can of dry silicone spray lubricant (avoid oil-based lubricants like standard WD-40 or thick wheel grease, which attract dust).
  • Staging Materials: Two heavy moving blankets or a set of padded sawhorses to support the door panel horizontally during hardware swaps.

How to Measure and Identify Replacement Rollers

Hardware manufacturers have produced hundreds of distinct roller variations over the decades. Universal roller kits exist, but matching the original equipment manufacturer (OEM) dimensions ensures a drop-in fit without needing to drill new mounting holes.

measuring sliding door roller dimensions with calipers

Because subtle differences can affect fit, consult a comprehensive DIY roller replacement guide or take your old roller assembly directly to a local hardware specialist.

When measuring your existing roller assembly, check these four critical dimensions:

  1. Wheel Diameter: Measure the outside diameter of the wheel (common sizes include 1″, 1-1/8″, 1-1/4″, and 1-1/2″).
  2. Housing Dimensions: Measure the width, height, and overall length of the metal cartridge housing that slots into the door stile.
  3. Mounting Hole and Screw Locations: Note whether the assembly mounts through the side of the housing, the top, or the end, and measure the center-to-center distance between screw holes.
  4. Wheel Profile and Edge: Determine if the wheel has a concave (grooved) edge designed to sit on top of a raised track rail or a flat/convex edge.

Step-by-Step Guide: How to Change Sliding Door Rollers Safely

With your workspace cleared, moving blankets laid out on the floor, and tools within reach, you are ready to begin the replacement process.

Removing the Sliding Panel and Extracting Old Rollers

  1. Retract the Rollers Completely: Locate the adjustment screw access holes at the bottom outer corners of the door. Turn both adjustment screws counter-clockwise until the internal rollers retract fully into the bottom rail. This lowers the door frame and creates the maximum vertical clearance between the top of the door and the head track.
  2. Remove Head Stops or Anti-Lift Blocks: Inspect the upper track channel. Many modern sliding doors feature small aluminum or plastic anti-lift blocks screwed into the top channel to deter intruders. Unscrew and remove these blocks.
  3. Lift and Tilt the Panel: Stand facing the door with your helper, placing one person on each side of the panel. Firmly grip the vertical stiles. Lift the entire panel straight up into the deep upper track pocket until the bottom edge clears the raised bottom track rail. Swing the bottom of the door outward into the room and gently lower the panel down.
  4. Stage the Door Securely: Carry the panel carefully and set it down horizontally across your padded sawhorses or flat on the moving blankets. Never rest the bare glass directly on hard concrete or tile.
  5. Extract the Old Roller Assemblies: Inspect the bottom rail cavity. Depending on your door model, the roller may be secured by an end screw through the vertical stile or by a side mounting screw. Back out the retaining screws. If the roller is stuck from years of accumulated grime, insert a flathead screwdriver or hook tool into the housing notch and pry the assembly outward.

Installing New Roller Assemblies and Rehanging the Door

  1. Clean the Internal Pockets: Vacuum loose dirt, metal shavings, and insect debris out of the hollow bottom door rail pockets.
  2. Insert the New Assemblies: Slide the replacement roller cartridges into the cavity, ensuring the adjustment screw aligns perfectly with the access port on the door edge.
  3. Secure the Mounting Hardware: Thread the mounting screws into place. Hand-tighten them securely, taking care not to cross-thread or strip the aluminum channels.
  4. Pre-Set Roller Height: Before rehanging, turn the adjustment screws until both wheels are drawn halfway into their housings. This provides baseline clearance while allowing room for fine-tuning once the door is back in its frame.
  5. Inspect the Track System: Before lifting the door back into place, take a moment to vacuum, scrub, and wipe down the bottom track rail. Similar to how you how to install and maintain sliding glass shower doors, keeping sliding pathways clean prevents premature hardware wear.
  6. Rehang the Sliding Door: With your helper, lift the door panel, insert the top edge into the deep upper frame channel, swing the bottom inward until the wheels hover over the raised rail, and slowly lower the wheels directly onto the track crown.

Height Adjustment and Track Alignment

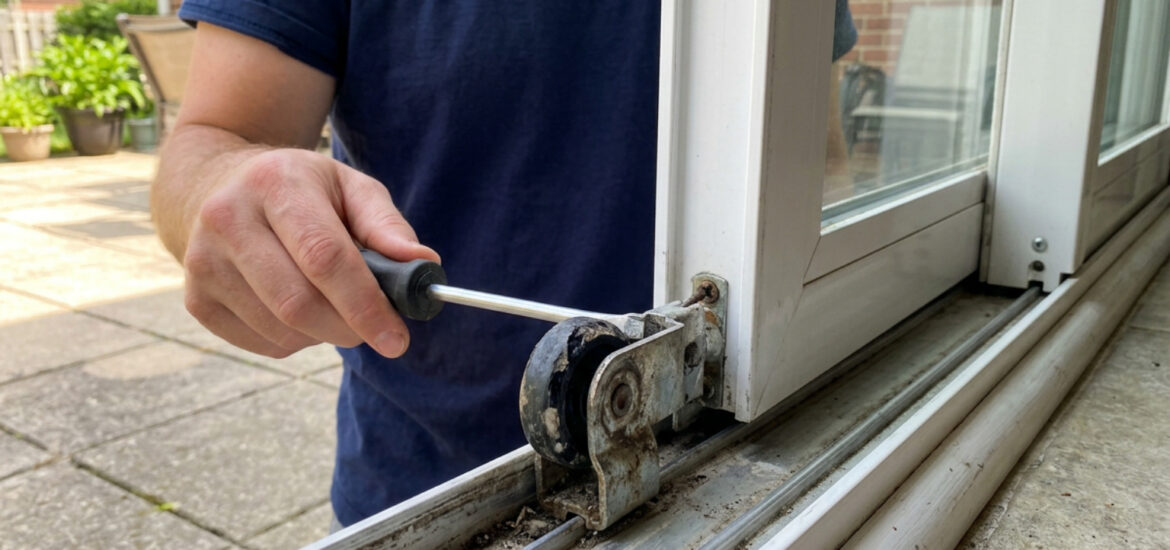
adjusting roller height screws with a screwdriver

Once the door sits securely in the track, you must level the panel to achieve an airtight seal:

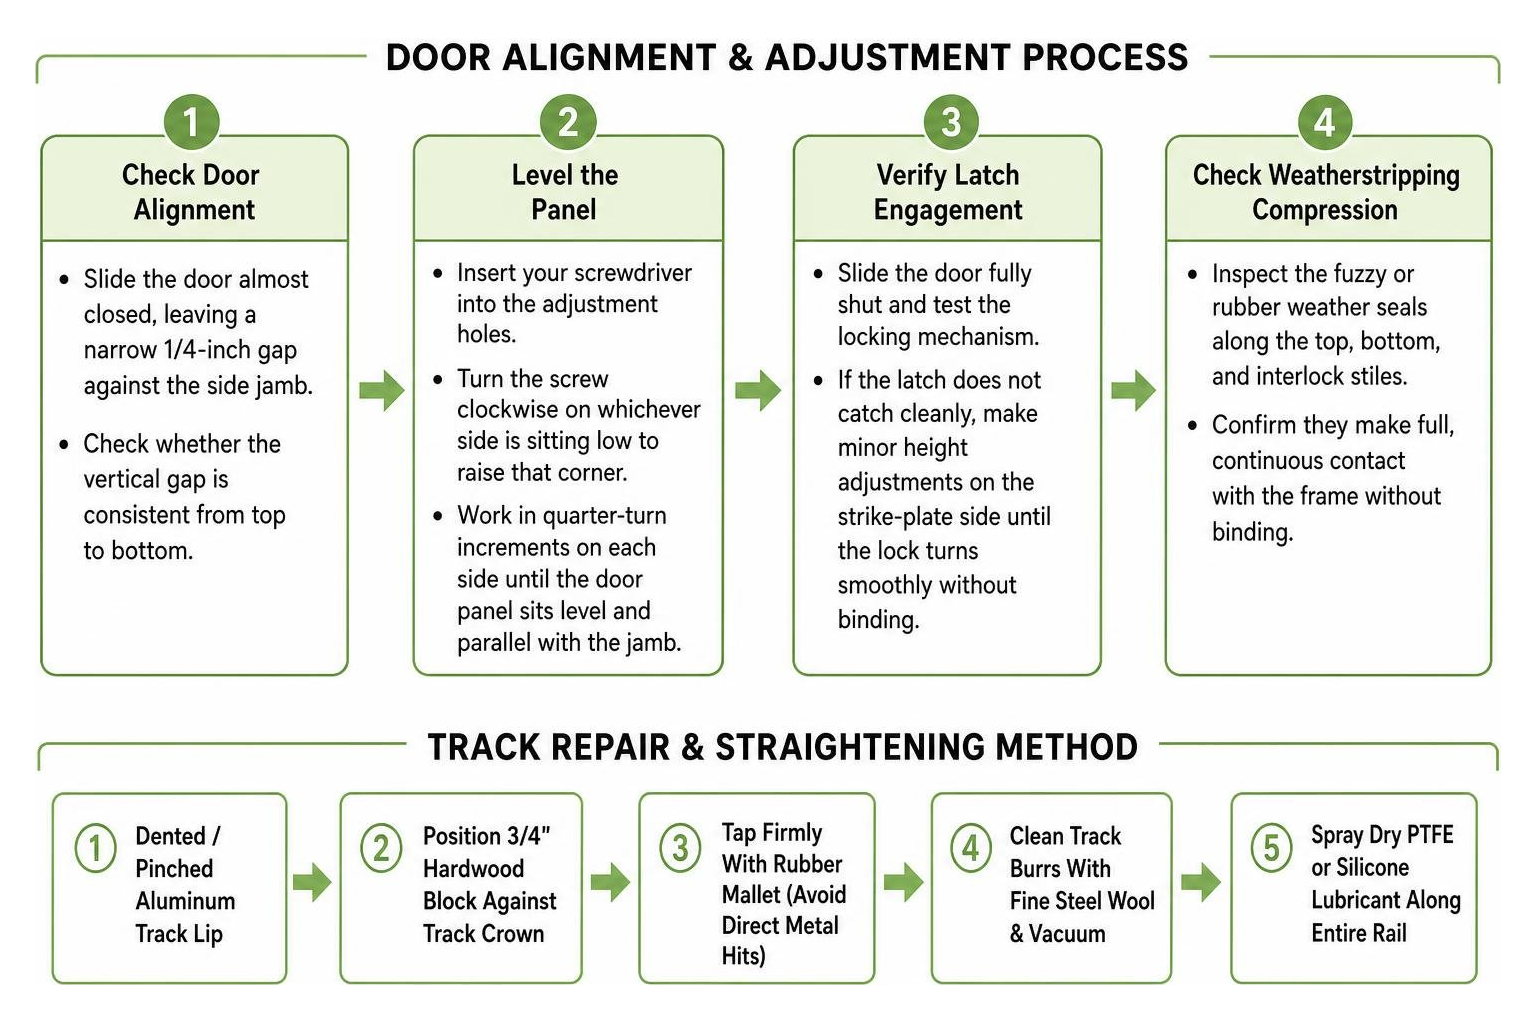
  • Check Door Alignment: Slide the door almost closed, leaving a narrow 1/4-inch gap against the side jamb. Check whether the vertical gap is consistent from top to bottom.
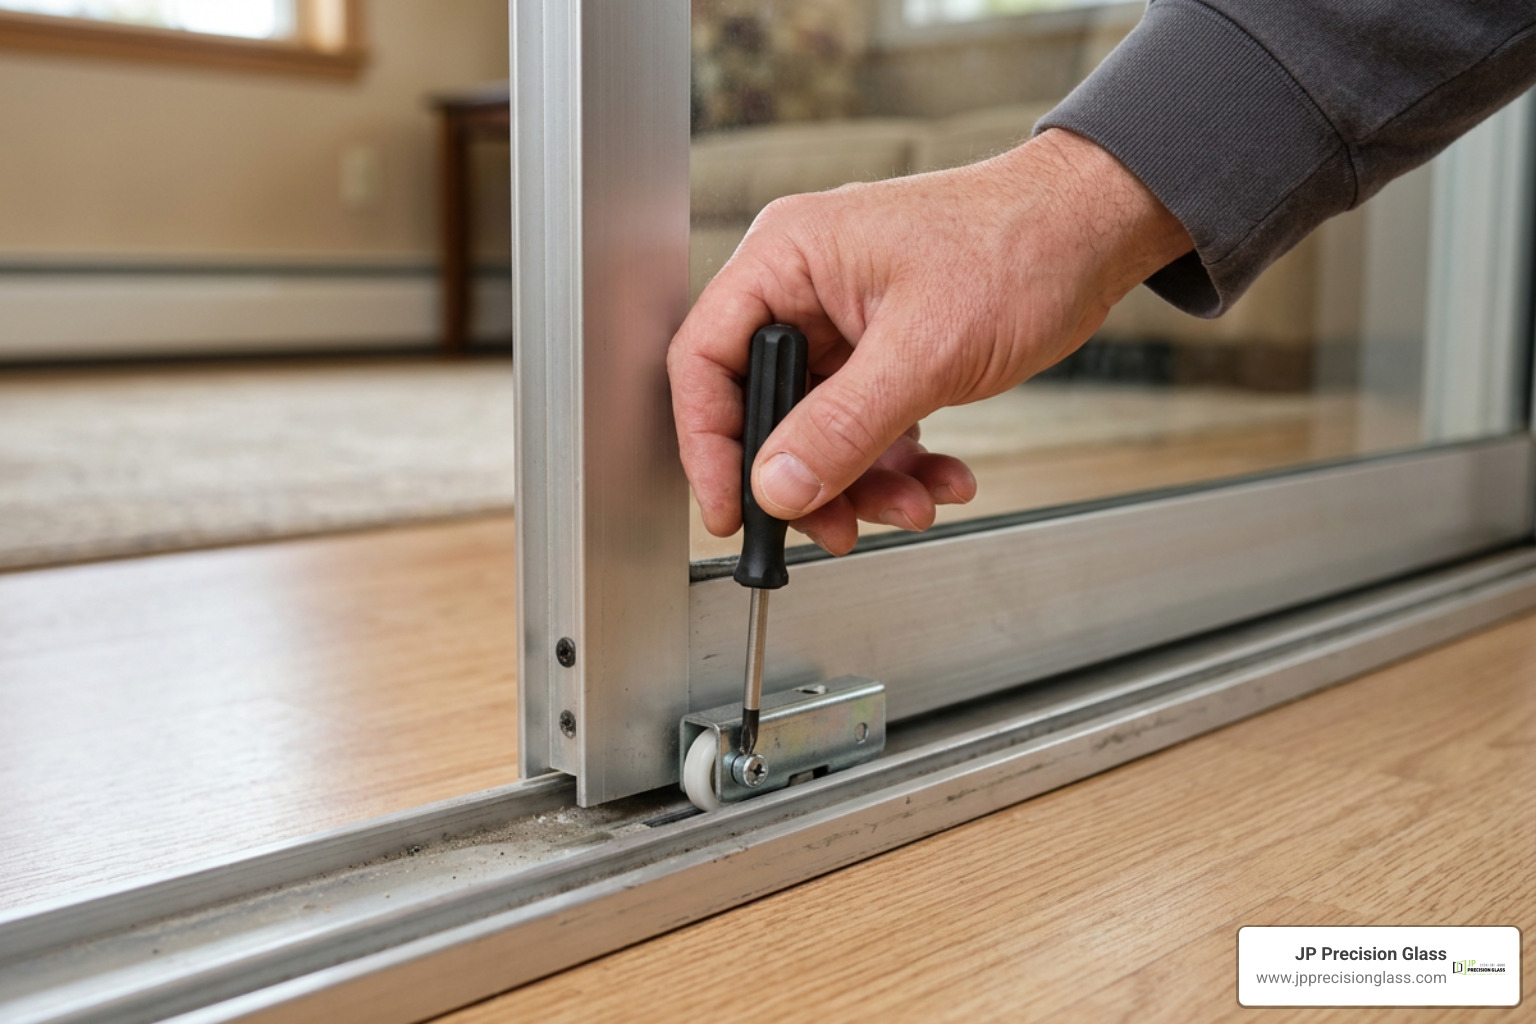
  • Level the Panel: Insert your screwdriver into the adjustment holes. Turn the screw clockwise on whichever side is sitting low to raise that corner. Work in quarter-turn increments on each side until the door panel sits level and parallel with the jamb.
  • Verify Latch Engagement: Slide the door fully shut and test the locking mechanism. If the latch does not catch cleanly, make minor height adjustments on the strike-plate side until the lock turns smoothly without binding.
  • Check Weatherstripping Compression: Inspect the fuzzy or rubber weather seals along the top, bottom, and interlock stiles to confirm they make full, continuous contact with the frame without binding.

Common Troubleshooting and Long-Term Maintenance

Even with brand-new hardware, surrounding track deformities or improper maintenance habits can cause premature roller failure. Addressing these common issues keeps your door gliding smoothly year-round.

track straightening and maintenance process

Correcting Sagging, Jumping Tracks, and Uneven Slides

If a door continues to jump the track or drag unevenly after roller replacement, check these trouble spots:

  • Straightening Bent or Pinched Track Rails: Heavy foot traffic can bend the raised aluminum track crown inward or outward. If the track is pinched, place a 3/4-inch block of wood against the damaged section and tap the wood firmly with a rubber mallet. This reshapes the metal without denting or cracking the aluminum rail. Detailed structural techniques can be found in this troubleshooting guide for sliding door repairs.
  • Installing a Track Cap / Cover: If previous seized rollers wore deep grooves into the track crown, new wheels will drop into those ruts and stick. You can snap a stainless steel track cover (repair cap) over the existing damaged rail to create a fresh, smooth surface without replacing the entire outer threshold.
  • Frame Misalignment: Misaligned frames cause approximately 70% of premature roller failures. If your home’s foundation or door frame has settled out of square, adjusting the rollers to their maximum height might not fully compensate. In that case, the outer frame may need shimming.

Cleaning and Lubrication Best Practices

To maximize the life of your new rollers, perform basic maintenance every six months:

  1. Deep Clean the Tracks: Vacuum pet hair, loose sand, and outdoor dirt from the sill. Use an old toothbrush and warm soapy water to break up hardened grime and mineral deposits, then dry the track thoroughly with a microfiber towel.
  2. Apply Dry Lubricants Only: Never spray standard penetrating oils, automotive grease, or cooking sprays into sliding tracks. Wet lubricants attract dirt and sand, forming an abrasive paste that grinds down bearing seals and wheel profiles. Always use a dry silicone spray or PTFE dry lubricant.
  3. Maintain Overhead Systems: Just as you regularly clean and protect sliding shower doors from soap scum and hard water scale, keeping patio tracks dry and free of debris prevents moisture from corroding lower wheel assemblies.

When to Call a Pro vs Change Sliding Door Rollers Yourself

While changing standard patio rollers is a manageable DIY task for handy homeowners, certain situations call for professional glass technicians:

  • Impact-Resistant Laminated Glass: Coastal impact doors feature thick, laminated glass panes that often weigh between 200 and 350 pounds. Lifting these panels requires specialized vacuum suction cups and mechanical equipment to avoid dropping the door or warping the structural frame.
  • Crushed or Split Frame Thresholds: If the bottom sill is crushed flat or structural rot has softened the subfloor beneath the track, simply replacing the rollers will not fix the issue. The door assembly must be removed to rebuild the structural foundation.
  • Seized Frame Stile Screws: Older aluminum or vinyl frames may have corroded assembly screws that strip or snap when loosened, requiring specialized extractors and re-tapping tools.

Frequently Asked Questions About Sliding Door Roller Replacement

How do I know if my rollers need adjustment or complete replacement?

If your door is difficult to slide, first clean the track and turn the adjustment screws to raise the panel. If the door lifts, stays level, and slides easily, an adjustment was all that was needed.

If the adjustment screw turns without lifting the door, the roller makes a continuous grinding sound, the wheels have flat spots, or the door continues to wobble and scrape the sill, the internal bearings are worn and the rollers must be replaced.

Can I replace sliding door rollers without removing the entire door panel?

On certain aluminum sliding door designs, you can access the rollers by loosening the bottom corner assembly screws and tapping the bottom rail down with a wood block and mallet while the door remains upright.

However, this method carries substantial risk. If you tap the frame unevenly, you can twist the metal stile or apply point-load stress to the tempered glass edge, shattering the entire panel. Removing the door panel onto a flat, padded surface is far safer and allows you to inspect the track and clean the roller pockets thoroughly.

Why does my sliding door still drag after installing new rollers?

If your door still drags after installing new rollers, check these four common culprits:

  1. Rollers Adjusted Too Low: The new rollers may be retracted too far into the housing, allowing the bottom aluminum frame to drag on the track. Turn the adjustment screws clockwise to raise the door.
  2. Damaged Track Crown: If the track has dips, deep gouges, or flat spots from previous failed rollers, the new wheels will drop into those depressions. Installing a stainless steel track cap will fix this.
  3. Debris in the Upper Guide Track: Dirt, spider webs, or failing top weatherstripping in the head channel can bind the top edge of the panel.
  4. Out-of-Square Door Frame: If the rough opening has settled, the top or side frame may pinch the panel as it slides open.

Conclusion

A sticky, stubborn sliding glass door does not mean you need to replace your entire door assembly. In most cases, removing the sliding panel, cleaning out years of track debris, and installing a fresh pair of matched tandem rollers will restore a smooth, quiet glide.

Taking the time to measure your replacement assemblies accurately, leveling the panel evenly with the corner adjustment screws, and applying dry silicone lubricant every season protects your hardware against premature wear.

When dealing with extra-heavy impact glass, structural subfloor settling, or intricate bathroom enclosures, working with professional glass specialists guarantees safe handling and precise alignment. If your home features specialized custom glass installations or requires professional shower door repair chicago services, precision-crafted hardware and professional expertise ensure your glass installations operate safely, cleanly, and effortlessly for years to come.