• JP Precision Glass is the leading glass shower doors company in Chicago

Tag Archives: Shower Door

One-piece shower stall versus modular multi-piece kit

Finding the Perfect 42-Inch Shower Stall for Your Budget and Space

Understanding Dimensions and Configurations for a 42 Inch Shower Stall

Choosing a shower stall involves looking beyond the nominal outer dimensions. While residential building codes generally require a minimum interior shower size of 30 inches by 30 inches, and commercial ADA baselines begin at 36 inches by 36 inches, a 42-inch footprint provides superior comfort without dominating mid-sized bathrooms. It delivers ample space to move freely while preserving critical square footage for vanities, linen towers, and unobstructed doorways.

Manufacturers produce 42-inch stalls in two core configurations:

  1. 42″ x 34″ Rectangular Footprint: Ideal for standard three-wall alcoves where depth is limited by a doorway, toilet, or vanity. This layout provides extra elbow room across the horizontal span while preserving essential walkway clearance in narrow rooms.
  2. 42″ x 42″ Square Footprint: Delivers exceptional standing room and works seamlessly in corner or wide-alcove layouts. The symmetrical design allows unrestricted movement, making it a popular choice for dedicated master suites and spacious guest bath remodels.

Standard prefabricated units feature total exterior heights between 75 and 80 inches. For example, a standard 42″ x 43″ alcove unit features an overall height of 80 inches with an interior standing clearance of 75 inches and an interior width of 38 inches. Factoring in wall stud depth and backer board thickness ensures your framing accommodates the true exterior profile. Verifying interior clearances ensures you have ample headroom and elbow space before beginning rough framing.

Sizing Comparisons: 36-Inch, 48-Inch, and 42 Inch Shower Stall Footprints

When comparing walk in shower options, square footage and usable space dictate the final feel of your bathroom. Standard 36-inch stalls fit tight floor plans but can feel restrictive around the shoulders, especially when reaching for toiletries or turning under the shower stream. Conversely, a mid-size 36 x 48 shower glass layout offers luxury space but may impede pathways or vanity clearance in compact rooms.

Stall Footprint Typical Interior Dimensions Best Suited For Key Spatial Benefit
36″ x 36″ ~32″ x 32″ Small powder rooms, compact guest baths Meets standard baseline; fits tight corners
42″ x 34″ ~38″ x 30″ Narrow tub-to-shower conversion alcoves Adds width without projecting into room traffic
42″ x 42″ ~38″ x 38″ Corner master baths, square alcoves Excellent shoulder room and balance
48″ x 36″ ~44″ x 32″ Primary bathrooms with elongated walls Expansive feel with space for larger seating

The 42-inch format hits the sweet spot for comfort, granting extra clearance to lather and turn without bumping shower walls or feeling boxed in by heavy enclosures.

Alcove and Corner Layout Strategies

Placement determines your stall’s structure and the door system required:

  • Three-Wall Alcoves: Rectangular 42-inch stalls drop directly into framed alcoves, making them ideal for replacing older tubs. They offer straightforward plumbing runs and work effortlessly with bypass sliding doors or pivot door systems.
  • Corner Neo-Angle & Square Stalls: Square 42-inch units placed in a corner open up central bathroom floor space by angling or squaring the exterior entry. Pairing a corner base with 36 x 42 glass shower enclosures ensures clean sightlines and preserves natural lighting across the room while eliminating dark, shadowed corners.

Comparing One-Piece Units, Modular Kits, and Shower Pan Bases

When shopping for a 42-inch stall, you will encounter three main formats, each catering to different architectural constraints and renovation goals:

One-Piece Seamless Inserts vs. Multi-Piece Wall Kits

  • One-Piece Units: These units feature a seamless construction that combines the base and surrounding walls into a single structure, eliminating caulk lines and minimizing leak points. Because there are no mechanical seams between the walls and base, maintenance is minimal. However, maneuvering a rigid 80-inch tall unit through standard 30-inch interior doorways and up stairwells during a remodel can be difficult. They are primarily suited for new construction or open-stud structural remodels where framing is exposed.
  • Multi-Piece Wall Kits: Systems such as the Aquatic 14242STNS corner shower feature tongue-and-groove interlocking panels that fasten directly to wall studs. These sections can easily be carried through tight hallways and staircases into existing bathrooms. Once in place, they assemble quickly on-site with watertight interlocking joints, making them the preferred choice for retrofits and DIY bathroom renovations.
  • Standalone Shower Pans: Prefabricated bases provide structural waterproofing at floor level while allowing custom wall finishes, such as ceramic, porcelain, or natural stone tile. This hybrid approach pairs the structural reliability of a factory-sloped composite base with the architectural appeal of tile.

Upgrading a 42 Inch Shower Stall with Custom Glass Enclosures

Many homeowners opt for a hybrid approach: installing a durable 42-inch curbed shower base with custom tile walls and premium glass. Integrating custom glass shower panels elevates the space beyond the look of standard prefabricated surround walls, replacing opaque plastic curtains and bulky aluminum framing with heavy tempered glass.

For walk-in designs or compact layouts, pairing a square pan with a 36-inch glass shower panel provides a sleek, barrier-free feel while effectively containing water spray. Fixed glass screens maximize open space, allowing uninterrupted sightlines that make compact and mid-sized bathrooms appear larger and brighter.

Material Performance, Durability, and Easy Maintenance

The longevity and maintenance of your shower stall depend on its composite structure and surface finish. Selecting the right material ensures structural rigidity underfoot while minimizing the time spent scrubbing soap scum and mineral deposits.

Acrylic shower stall surface maintenance and cleaning

Material Comparisons: Acrylic, Vikrell, and Fiberglass

Understanding the structural differences between composite formulations helps you select a unit that holds up to daily wear and tear:

  • Applied Acrylic & AcrylX™: Non-porous, high-gloss sheet molded with structural fiberglass backing. Resists scratches, chips, and UV fading, making it exceptionally easy to sanitize. Its smooth surface prevents mold spores and soap residue from embedding into microscopic pores.
  • Vikrell® Composite: A proprietary poly-composite material that provides uniform color throughout and high structural strength without requiring extra fiberglass backing. It resists chipping and cracking, providing a solid feel underfoot that avoids the flexing common in entry-level bases.
  • Gelcoat Fiberglass: A lightweight, budget-friendly composite coated in smooth marine resin. While cost-effective, gelcoat is more porous than pure acrylic and requires regular sealing to avoid staining and dulling over time.

Cleaning Protocols and Surface Care Best Practices

To preserve high-gloss finishes and prevent soap scum accumulation over years of use:

  • Use non-abrasive, pH-neutral liquid cleansers and soft microfiber cloths to wipe down walls and pan surfaces.
  • Avoid abrasive scrubbing pads, scouring powders, and harsh bleach solutions that can dull composite finishes and strip protective coatings.
  • Squeegee walls and glass enclosures after daily use to eliminate mineral spotting and hard water scale before it bonds to surfaces.
  • Periodically inspect silicone joints around the base and wall connections to catch early signs of wear and prevent hidden moisture penetration.

Plumbing Rough-Ins, Center Drains, and Code Standards

Proper subfloor preparation and plumbing alignment are vital for a lasting installation. A poorly leveled pan can cause standing water, premature joint failure, and annoying flex underfoot.
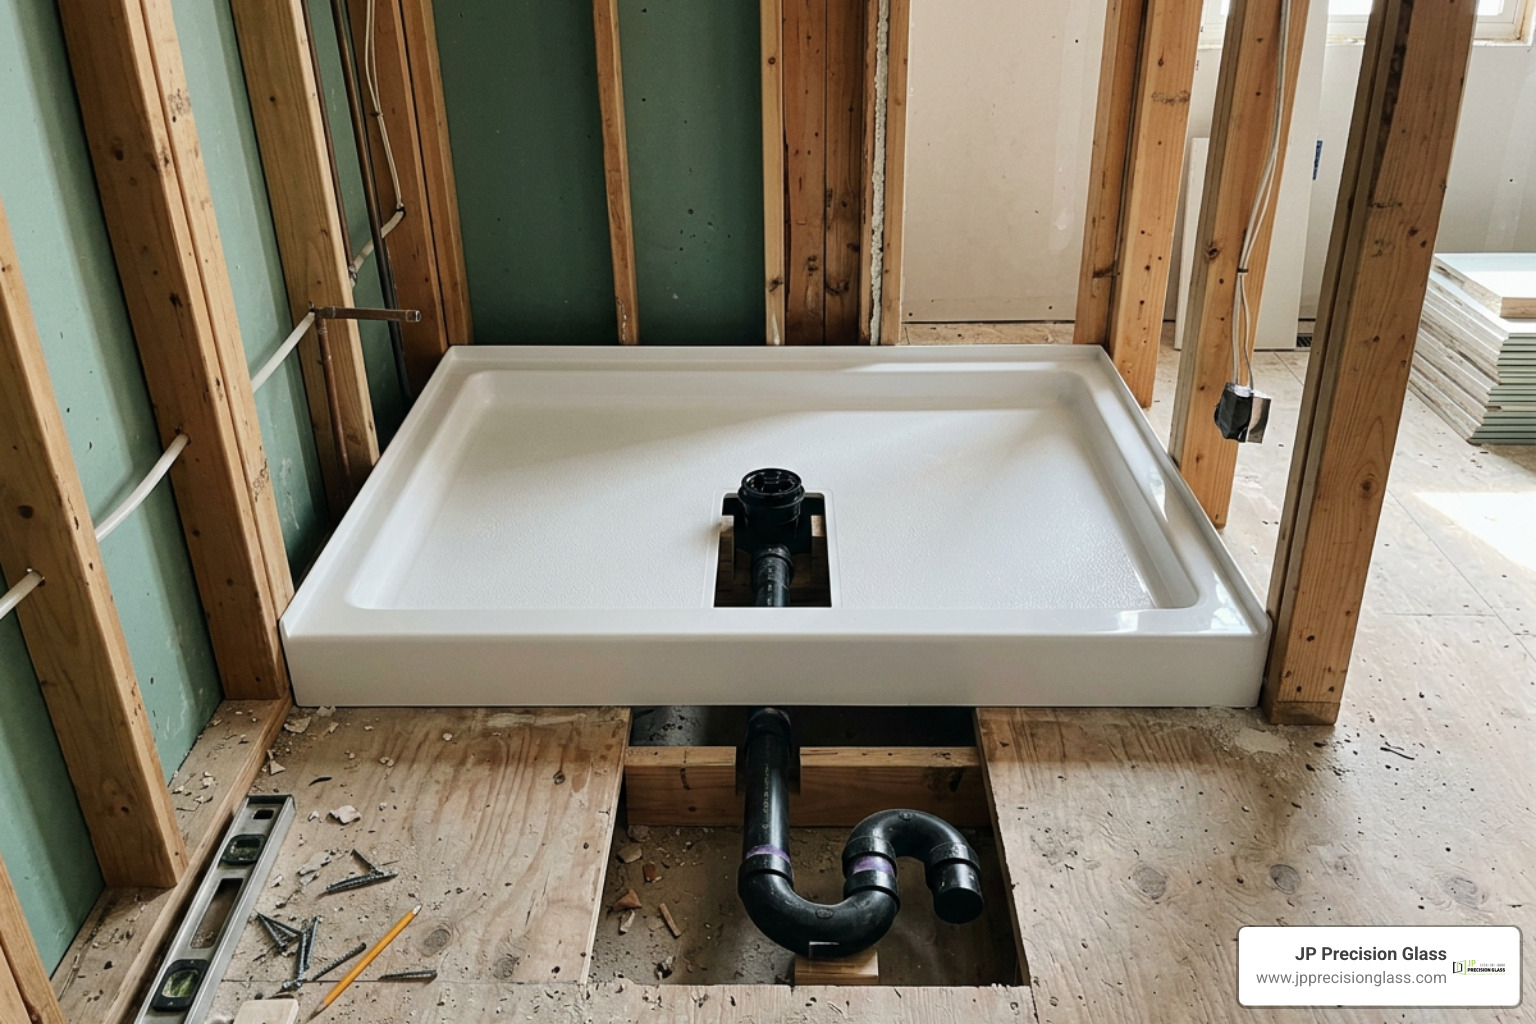
Center drain rough-in and curbed threshold profile

Center Drain Alignment and Rough-In Specifications

Most square 42″ x 42″ bases utilize a balanced center drain layout. For a true 42-inch square pan, the drain rough-in centerline is located exactly 21 inches from both the side framing studs and the back wall. For rectangular 42″ x 34″ pans, verify whether the base uses a centered drain (21 inches from side studs and 17 inches from the back) or an end drain designed to align with existing tub plumbing.

Always confirm subfloor cutouts allow adequate clearance for the 2-inch P-trap assembly and PVC drain flanges before fastening the pan to structural framing. Setting the base in a structural mortar bed prevents base deflection, reduces footstep noise, and ensures consistent drainage toward the center outlet.

Safety Standards, Thresholds, and Built-In Features

When selecting your shower components, look for compliance with national plumbing and building standards:

  • Code Compliance: High-quality shower bases, such as the Bestbath P4242.V2 curbed shower pan, meet ANSI Z124.1.2, IPC, and UPC standards for structural integrity, load bearing, and drainage capacity.
  • Thresholds: A standard 4-inch curbed threshold ensures reliable water containment while allowing straightforward installation of bottom-track shower doors. For barrier-free accessibility, low-profile and beveled thresholds offer easy entry without sacrificing drainage efficiency.
  • Built-in Features: Look for textured, slip-resistant bases, molded soap ledges, integrated corner seating, and factory-installed wood backing for secure grab bar installation.

Frequently Asked Questions About 42-Inch Showers

Is a 42-inch shower stall large enough for comfortable daily use?

Yes. A 42-inch shower stall offers significantly more shoulder room than standard 36-inch units, providing a spacious standing area that accommodates built-in shelves or corner shaving footrests without feeling cramped.

What is the standard rough-in plumbing distance for a 42-inch center drain base?

For a 42″ x 42″ square base, the center drain rough-in is 21 inches from the rough stud framing on both the rear and side walls. Always account for the thickness of any wallboard or backer material when verifying rough-in locations.

Can I install glass shower doors on a prefabricated 42-inch shower base?

Yes, provided the shower pan has a flat, level threshold curb at least 2 to 3 inches wide to support the door track or hinges. Ensure vertical wall studs are positioned where glass hardware and wall jambs will be anchored.

Conclusion

Choosing the right 42-inch shower stall balances space efficiency, daily comfort, and straightforward maintenance. Whether you install a quick multi-piece acrylic kit or combine a heavy-duty single-piece curbed pan with designer wall tile, this mid-sized footprint delivers premium functionality to modern bathrooms.

When you are ready to complete your remodel with custom-fitted frameless glass or precision-engineered sliding enclosures, reach out to our team at JP Precision Glass for expert guidance and tailored installation.
bath shower doors

The Ultimate Guide to Bath Shower Doors: Compare & Buy

Choose Bath Shower Doors That Fit Your Space and Routine

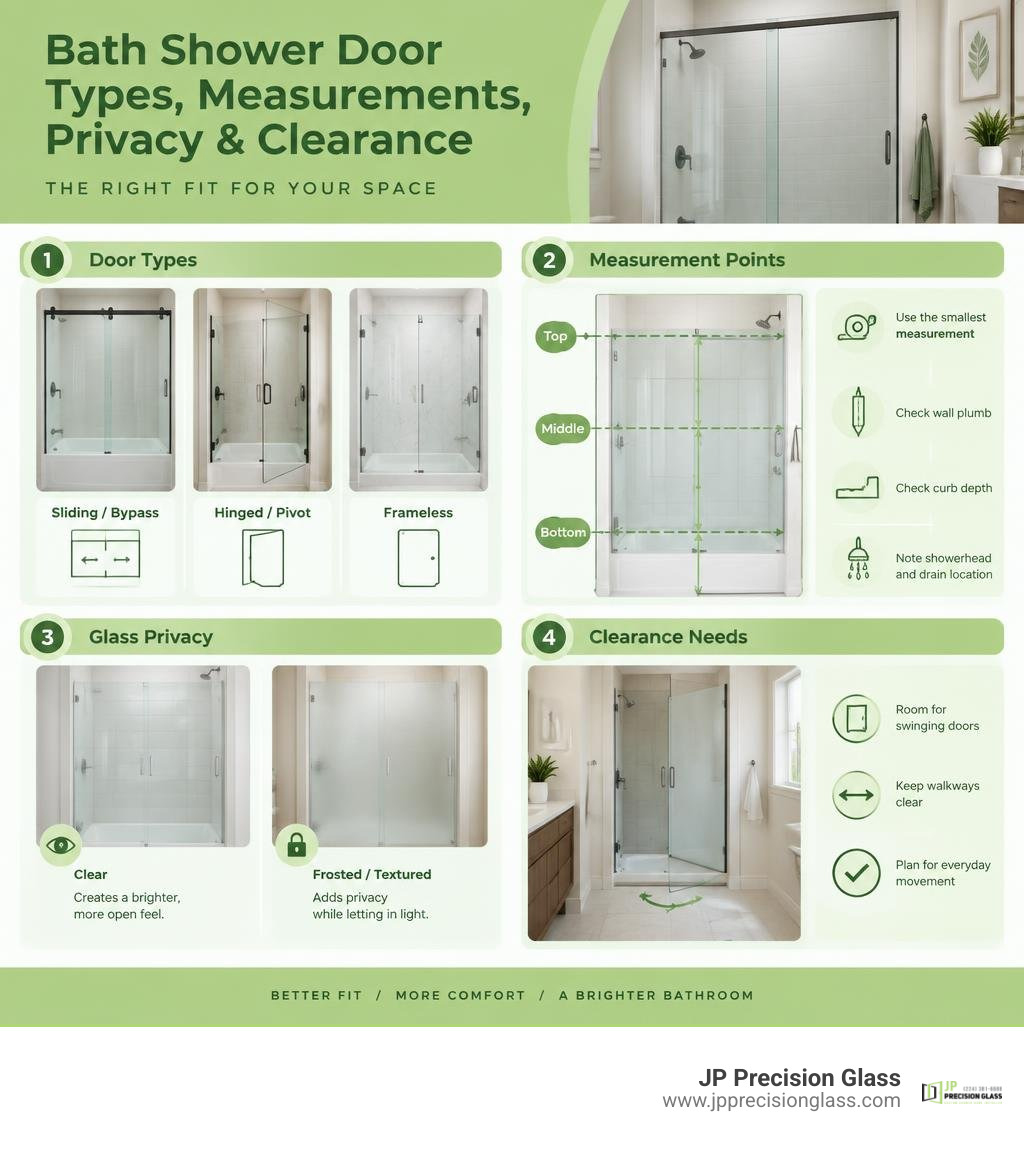
The best bath shower doors match your opening size, bathroom clearance, privacy needs, and cleaning preferences. Choose a sliding or bypass door when floor space is tight; choose a hinged or pivot door for a wider entry when you have room for it to swing; and choose frameless glass for a clean, open look with fewer seams to maintain.

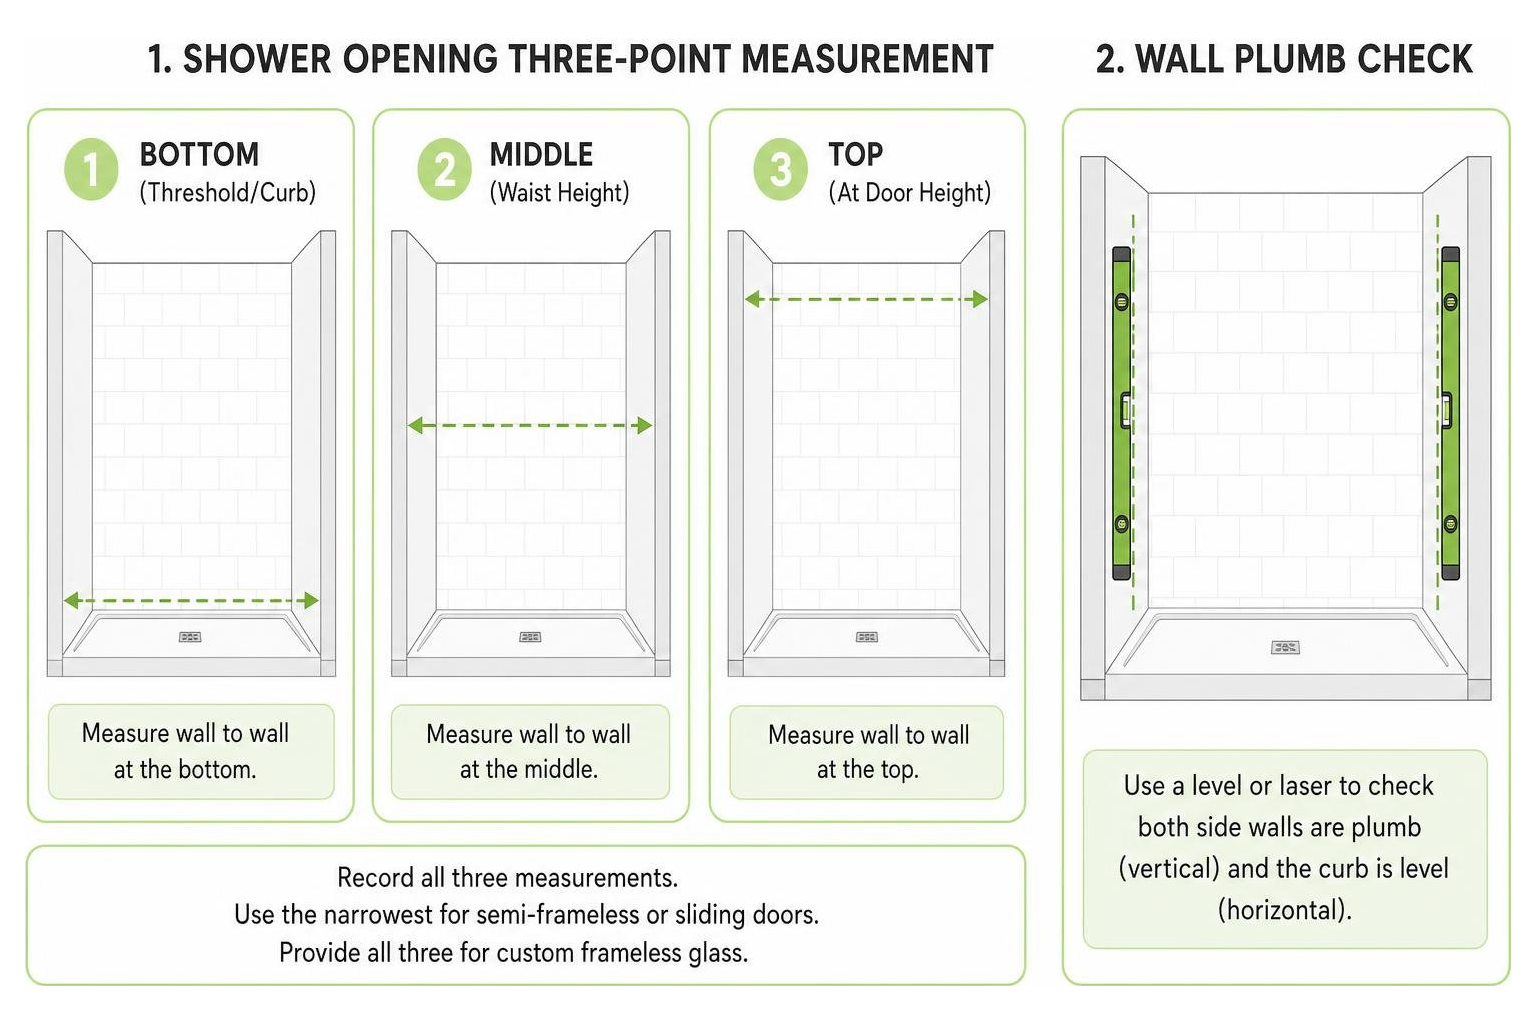
Before buying, measure the finished opening at the top, middle, and bottom, then use the smallest measurement. Also check wall plumb, curb depth, and the location of the showerhead and drain. These details help prevent poor fit, leaks, and doors that cannot open as planned.

Framed doors offer dependable support and adjustability. Semi-frameless designs balance structure with a lighter look. Fully frameless doors use thick tempered glass, usually 3/8 to 1/2 inch, for a sleek custom finish. Clear glass makes a small bathroom feel larger, while frosted or textured glass adds privacy.

A well-fitted glass door does more than contain water. It can make a compact Chicago bathroom feel brighter, simplify cleaning, and give a remodel a polished final detail.

Bath shower door types, measurement points, glass privacy, and clearance needs infographic

Understanding the Core Types of Bath Shower Doors

Selecting the right door begins with understanding how different configurations interact with your space. The two biggest factors to evaluate are frame construction (how the glass is supported) and operating mechanics (how the door moves).

frameless hinged and sliding bath shower doors side by side

Every layout presents unique spatial opportunities. A narrow guest bath requires a different approach than an expansive primary suite. Exploring the primary categories helps determine which style suits your home best.

Framed, Semi-Frameless, and Frameless Glass Designs

Glass door systems fall into three main structural categories:

  • Framed Doors: These models feature aluminum or composite metal wrapping around every edge of the glass panels. The metal channels provide total perimeter support, allowing the use of thinner tempered glass (typically 1/4 inch). Framed units are exceptionally sturdy and forgiving on out-of-plumb walls, though the metal channels require more attention during routine cleaning.
  • Semi-Frameless Doors: A hybrid solution that gives you the best of both worlds. The perimeter wall jambs and bottom tracks are framed for structural integrity and water containment, but the swinging or sliding door panels have bare, polished glass edges. If you are learning how to choose the right glass tub enclosure, semi-frameless options offer a lighter look while maintaining straightforward installation parameters.
  • Frameless Doors: The gold standard of modern luxury design. Frameless systems eliminate exterior perimeter framing entirely. Instead, they rely on heavy-duty, premium safety tempered glass—typically 3/8 inch to 1/2 inch thick—supported by solid metal clamps and heavy hinges anchored directly into wall studs. This creates an open, spa-like aesthetic that showcases custom tilework and eliminates places where soap scum can hide.

Sliding, Hinged, Pivot, and Bypass Door Mechanics

How your door opens dictates how comfortably you can move around your bathroom fixtures:

  • Sliding and Bypass Doors: Bypass systems feature two glass panels resting on overhead rollers that glide past one another on parallel tracks. Because they do not open outward into the bathroom floor plan, modern sliding glass tub enclosures are ideal for compact layouts where a swinging door might hit a vanity, toilet, or linen closet. Many premium models—such as modern double sliding semi-frameless glass door specifications—feature reversible configurations and smooth overhead exposed rollers that maximize accessibility from either side.
  • Hinged Doors: These operate like standard passage doors, swinging outward on side-mounted wall hinges. They provide the widest possible walk-in entry opening and a truly frameless look, but they require adequate clear floor space outside the shower curb.
  • Pivot Doors: Pivot doors rotate on top and bottom pivot pins rather than wall-mounted side hinges. This mechanism distributes the heavy glass weight downward into the curb and floor, making it an excellent choice for wider openings or situations where wall framing cannot support heavy side hinges.

Space-Saving Folding, Bifold, and Partial Screen Configurations

When space is at a premium or you want an open walk-in feel, specialized configurations provide flexible solutions:

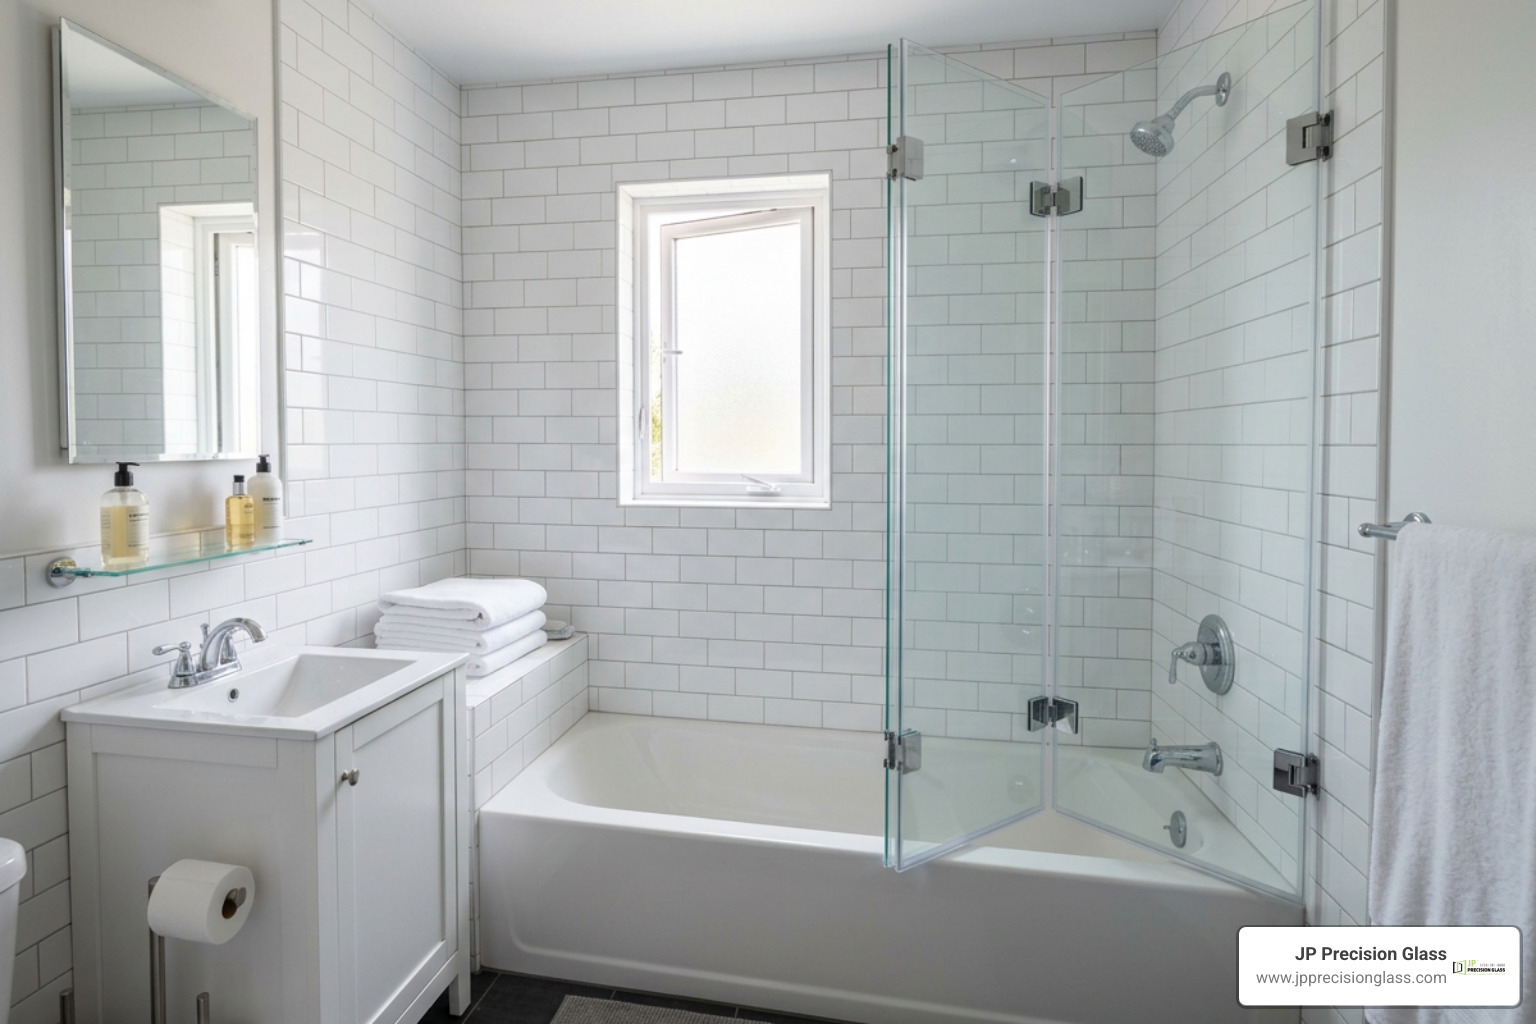
  • Bifold and Folding Doors: These units utilize center hinges that fold inward on themselves along a track. Choosing folding and bifold tub door systems gives you a wide entry path without demanding exterior swing clearance.
  • Fixed Walk-In Screens: Also known as splash panels, these consist of a single stationary glass pane secured to the wall and curb. They create a minimalist, barrier-free walk-in shower experience with zero moving mechanical parts.
  • Partial Glass Screens and Half Doors: Installing partial glass tub enclosures offers excellent splash protection over a bathtub while keeping the space open and airy. For added convenience, exploring bathtub glass half door options that feature a stationary panel paired with a hinged deflector gives you effortless access to your tub faucets without stepping inside.

How to Choose the Best Glass, Finishes, and Hardware

Beyond the basic door mechanics, the combination of glass style, protective treatments, and hardware finishes defines the personality and longevity of your shower.

Glass Opacity, Protective Coatings, and Privacy Options

Tempered architectural glass comes in several finishes to balance light transmission with personal privacy:

  • Clear Glass: The most popular choice for modern renovations. It maximizes visual space, brightens the room by letting natural light flow freely, and puts your custom tile or stone work on display.
  • Frosted and Acid-Etched Glass: Provides total visual privacy while still allowing soft, diffused light to pass through. Choosing frosted glass bathtub doors for privacy is an outstanding solution for shared family bathrooms where multiple people may need the space simultaneously.
  • Rain and Patterned Textures: Textured glass features decorative impressions, such as trickling raindrops, embedded directly into one side of the panel. It obscures visibility, softens light, and hides water droplets and fingerprints.
  • Smoke Gray and Tinted Glass: Offers a bold, contemporary design statement while creating a sleek, semi-private enclosure.
  • Hydrophobic Protective Coatings: Factory-applied treatments (such as EnduroShield) bond permanently to the microscopic pores of the glass. This creates an ultra-smooth surface that causes water, mineral deposits, and soap scum to bead up and slide off, cutting regular cleaning time significantly.

Hardware Materials and Contemporary Finish Styles

Shower hardware must withstand continuous moisture, humidity, and daily handling. We recommend solid brass or marine-grade stainless steel hardware for all structural components, clamps, and hinges to ensure long-term corrosion resistance.

To create a cohesive aesthetic, coordinate your door hardware with your bathroom faucets, lighting, and cabinet pulls:

  • Matte Black: Crisp, modern, and industrial. It creates high-contrast lines that anchor contemporary spaces.
  • Brushed Nickel: A timeless, warm metallic tone that excels at concealing fingerprints and minor water spots.
  • Polished Chrome: Highly reflective, classic, and versatile, pairing naturally with traditional and transitional fixtures.
  • Brushed Gold / Brass: Adds an upscale, vintage-luxe warmth to custom walk-in enclosures.
  • Oil-Rubbed Bronze: Deep, rich, and rustic—ideal for Mediterranean, farmhouse, or classic craftsman bathrooms.

Sizing, Measuring, and Layout Compatibility

A beautiful glass door is only as good as its measurements. Because tempered safety glass cannot be cut, drilled, or modified once it has undergone the heat-tempering process, measuring accurately before ordering is essential.

measuring shower opening width and wall plumb with a tape measure

Accurate Measuring and Sizing for Bath Shower Doors

To determine your door dimensions, always measure the finished opening—meaning after all backer boards, waterproofing membranes, and final tiles or wall surrounds are completely installed.

Shower opening three-point measurement process and wall plumb check

  1. Width (3-Point Check): Measure the horizontal distance from wall to wall at three distinct points: the bottom (along the threshold or curb), the middle (around waist height), and the top (at your intended door height, typically 72 or 76 inches). Record all three numbers. If the numbers vary, use the narrowest measurement when ordering semi-frameless or sliding systems with adjustment channels. For custom frameless glass, provide all three dimensions so the glass can be precision-cut to match the exact taper of your walls.
  2. Height: Measure vertically from the top of the shower curb or bathtub ledge up to the top of the tile or ceiling line. Standard doors typically stand 72 inches tall, while modern luxury designs frequently measure 76 inches or higher for a dramatic look and superior steam containment.
  3. Plumb and Level: Use a long spirit level or laser level on both side walls and across the threshold curb. If a wall leans inward or outward, a standard off-the-shelf door may leave unsightly wedge-shaped gaps or fail to seal properly without custom glass fabrication.
  4. Curb Depth: Measure the flat horizontal depth of your threshold or tub deck. Most sliding track systems require a minimum of 2.5 to 3.5 inches of flat, unobstructed curb surface.
Door Style Standard Width Ranges Standard Height Minimum Curb Depth Needed Clearance Requirement
Bypass / Sliding Door 48″ to 60″ (up to 72″) 72″ to 76″+ 2.75″ to 3.5″ 0″ (glides along curb)
Frameless Hinged Door 24″ to 36″ (single panel) 72″ to 80″+ 2.0″ to 3.0″ Equal to door panel width
Neo-Angle / Corner 36″ x 36″ to 42″ x 42″ 72″ to 76″ 2.5″ to 3.5″ Outward swing at 45° angle
Walk-In / Splash Screen 30″ to 48″ (fixed panel) 74″ to 80″+ 1.5″ to 2.5″ Open entry space (min. 22″)

Matching Bath Shower Doors with Existing Bases and Layouts

Your shower base, curb profile, and plumbing layout dictate which door systems will operate safely and effectively:

  • Drain and Showerhead Placement: Never position a hinged door opening directly in the path of a high-pressure showerhead spray. Hinges and sliding doors should be configured so water strikes fixed glass panels or solid walls first.
  • Curbless and ADA-Compliant Layouts: For barrier-free accessibility, zero-threshold curbless showers paired with wide-opening bypass doors or stationary walk-in screens provide effortless wheelchair and walker access.
  • Tub-to-Shower Conversions: If you are keeping a standard 60-inch alcove tub footprint, choosing modern half glass enclosure solutions or sliding systems preserves full bathing utility while elevating your shower aesthetic.

Installation, Leak Prevention, and Long-Term Maintenance

Achieving a water-tight, long-lasting installation requires careful attention to structural backing, proper sealing techniques, and routine care.

DIY vs. Professional Installation Considerations

While framed or semi-frameless sliding kits can be handled by experienced DIYers, frameless heavy glass requires specialized expertise:

  • Glass Weight: Heavy-glass frameless panels (3/8″ or 1/2″ thick) can weigh between 70 and 120 pounds per panel. Handling them requires professional suction grips and at least two people. Tempered glass is strong on its face, but a light tap on an unprotected corner against hard tile can cause it to shatter instantly.
  • Structural Wall Blocking: Heavy frameless hinges cannot be fastened into drywall or hollow tile anchors alone. They must be secured directly into double 2×4 solid wood studs behind the finished wall.
  • Precision Drilling: Drilling through porcelain, marble, or natural stone requires diamond-tipped masonry bits, continuous water cooling, and steady hands to avoid cracking expensive tile.

If you are confident in your carpentry skills and working with lightweight sliding kits, our step-by-step DIY glass enclosure guidelines outline the essential tool list and step-by-step prep needed for clean results. For custom frameless installations, partnering with our professional team at JP Precision Glass ensures absolute laser-level alignment, safe structural mounting, and a flawless water seal.

Preventing Leaks and Streamlining Glass Cleaning

Water containment does not require heavy metal frames when your door is properly outfitted:

  • Vinyl Sweeps and Drip Rails: Frameless doors utilize clear polycarbonate bottom sweeps with angled drip deflectors that direct running water back into the shower pan.
  • Magnetic and Bubble Seals: Vertical jamb seals snap shut securely to prevent lateral spray from escaping between the door panel and the wall.
  • Proper Silicone Application: When sealing tracks or stationary panel channels, apply high-grade, 100% mildew-resistant silicone sealant along the outside perimeter of the shower. Sealing the inside can trap moisture inside the channels, leading to mold buildup.
  • Daily Maintenance: Keep a squeegee inside the shower. Taking 30 seconds to wipe down the glass after your final rinse removes mineral-heavy water droplets before they can evaporate and form stubborn limescale deposits.

Frequently Asked Questions About Bath Shower Doors

What is the difference between a shower door and a shower enclosure?

A shower door refers to the moving glass panel (or sliding bypass pair) that encloses an alcove opening bordered by three existing walls. A shower enclosure is a multi-sided glass structure designed for corner, neo-angle, or freestanding layouts. It includes the door panel along with one or more stationary return glass panels, corner posts, and headers to create a standalone, fully enclosed showering space.

Do frameless shower doors leak more than framed models?

When properly measured and installed, frameless shower doors do not leak. Frameless systems rely on tight engineering tolerances (gaps of 1/8 inch or less), clear vinyl edge seals, bottom sweeps, and an inward-sloping curb (pitched roughly 1/8 to 1/4 inch toward the drain). As long as showerheads are not pointed directly at the glass seams and the curb has proper slope, water stays securely contained inside.

What is the easiest style of shower door to clean?

Frameless glass shower doors with factory-applied hydrophobic protective coatings are the easiest to clean. Because frameless systems eliminate metal bottom channels, frame tracks, and rubber gaskets, there are no recessed corners where water pools or soap scum accumulates. A quick pass with a squeegee and an occasional wipe with a microfiber cloth and mild soap keep the glass crystal clear.

Conclusion

Upgrading your bathroom with a custom glass enclosure is one of the most rewarding investments you can make for your home. Beyond protecting your floors from water damage, modern glass doors maximize light, expand visual space, and highlight the beauty of your tile and fixtures.

Whether you are looking for sleek frameless hinged doors, space-saving bypass sliding systems, or versatile 3 panel shower door solutions for your bathtub, precision measurement and expert craftsmanship make all the difference. At JP Precision Glass, we specialize in designing, customizing, and installing tailored glass shower doors and enclosures that fit your unique layout flawlessly. Let us help you transform your daily routine into a refreshing, spa-like experience.

corner tub glass enclosure

How to Style a Corner Tub Glass Enclosure Like a Pro

Style a Corner Tub Glass Enclosure for Space, Light, and Privacy

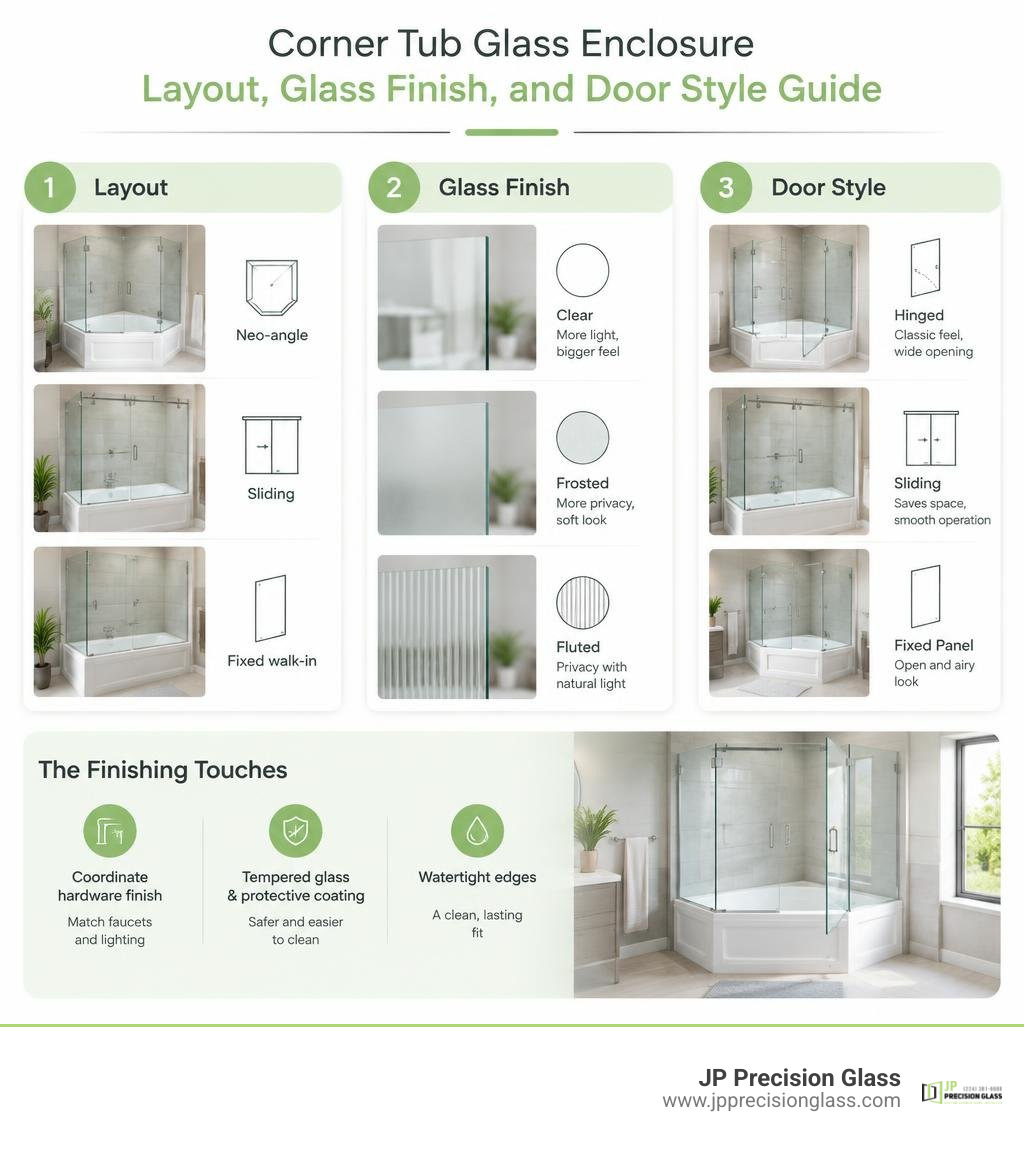
A well-styled corner tub glass enclosure should fit the room before it follows a trend. Start by choosing a layout that preserves clear floor space, match the door operation to available clearance, and select glass that gives you the right balance of light and privacy.

  1. Choose a neo-angle layout to soften a tight corner, a sliding system when there is no room for a door swing, or a fixed walk-in panel for an open look.
  2. Use clear glass to make a small bathroom feel larger; choose frosted or fluted glass when privacy matters more.
  3. Coordinate the hardware finish with faucets and lighting, then plan for easy cleaning with tempered glass and a protective water-repellent coating.

The best result is not necessarily the most elaborate one. It is a clean, well-measured design with safe glass, watertight edges, and a door or panel arrangement that works with how you move through the bathroom. The sections ahead break down the layout, glass, hardware, and installation choices that make a corner enclosure look custom without wasting valuable space.

Corner tub enclosure layout, glass finish, and door style guide infographic

Corner tub glass enclosure terms at a glance:

For broader context on how glass enclosures are used in residential bathrooms, see shower.

1. Select the Right Layout for Your Corner Tub Glass Enclosure

Designing a functional corner bathing space begins with understanding the footprint of your room. Corner installations are naturally suited for saving space, but selecting the proper configuration determines whether your bathroom feels open and airy or cramped and awkward. When exploring how to choose the perfect bathroom tub glass enclosures for your home, the primary goal is balancing structural containment with accessible movement.

Neo-angle and walk-in corner glass tub configurations

A standard corner installation involves two perpendicular structural walls meeting at a 90-degree angle, with custom glass panels completing the boundary along the outer edges of the tub or low-profile acrylic base. Installing a corner base typically requires direct-to-stud framing, after which finished backwalls—such as waterproof backwall kits or custom-set tile—are integrated. Once the walls and base are fully set, we measure the precise walk-in openings and sightlines to ensure the surrounding fixtures remain unobstructed.

Neo-Angle Corner Configurations

Neo-angle configurations are among the most efficient geometric layouts for tight corner areas. Instead of following a conventional square or rectangular boundary, a neo-angle enclosure features a diamond-inspired footprint that cuts across the outer corner at two 135-degree angles. This clipped corner design removes the sharp point extending into the room, freeing up valuable floor area in front of vanities or toilets.

In a neo-angle design, the center panel serves as the door, flanked by two stationary glass return panels anchored to the tiled walls. This setup provides excellent sightlines and structural stability while keeping the walk-in opening central. Proper drain planning is essential; neo-angle setups typically use a dedicated corner or offset center drain to ensure rapid water evacuation away from the door threshold.

Walk-In and Corner Bathtub Shields

If you prefer an open-concept bathroom aesthetic without swinging doors, fixed splash panels and walk-in designs offer barrier-free convenience. Understanding why you need a glass bathtub shield comes down to simplicity: a stationary panel shields high-spray zones near the showerhead while leaving the rest of the corner open for effortless entry.

Weighing the pros and cons of partial glass tub enclosures helps determine if this minimalist approach suits your household. Partial enclosures eliminate mechanical tracks and hinges entirely, creating clean visual lines and reducing cleaning tasks. However, walk-in openings require thoughtful showerhead placement to prevent stray water droplets from reaching the bathroom floor.

2. Match Glass Textures and Door Mechanics to Your Space

Every bathroom layout presents unique spatial challenges. The way your glass door opens and the texture of the glass itself significantly impact both functionality and daily comfort.

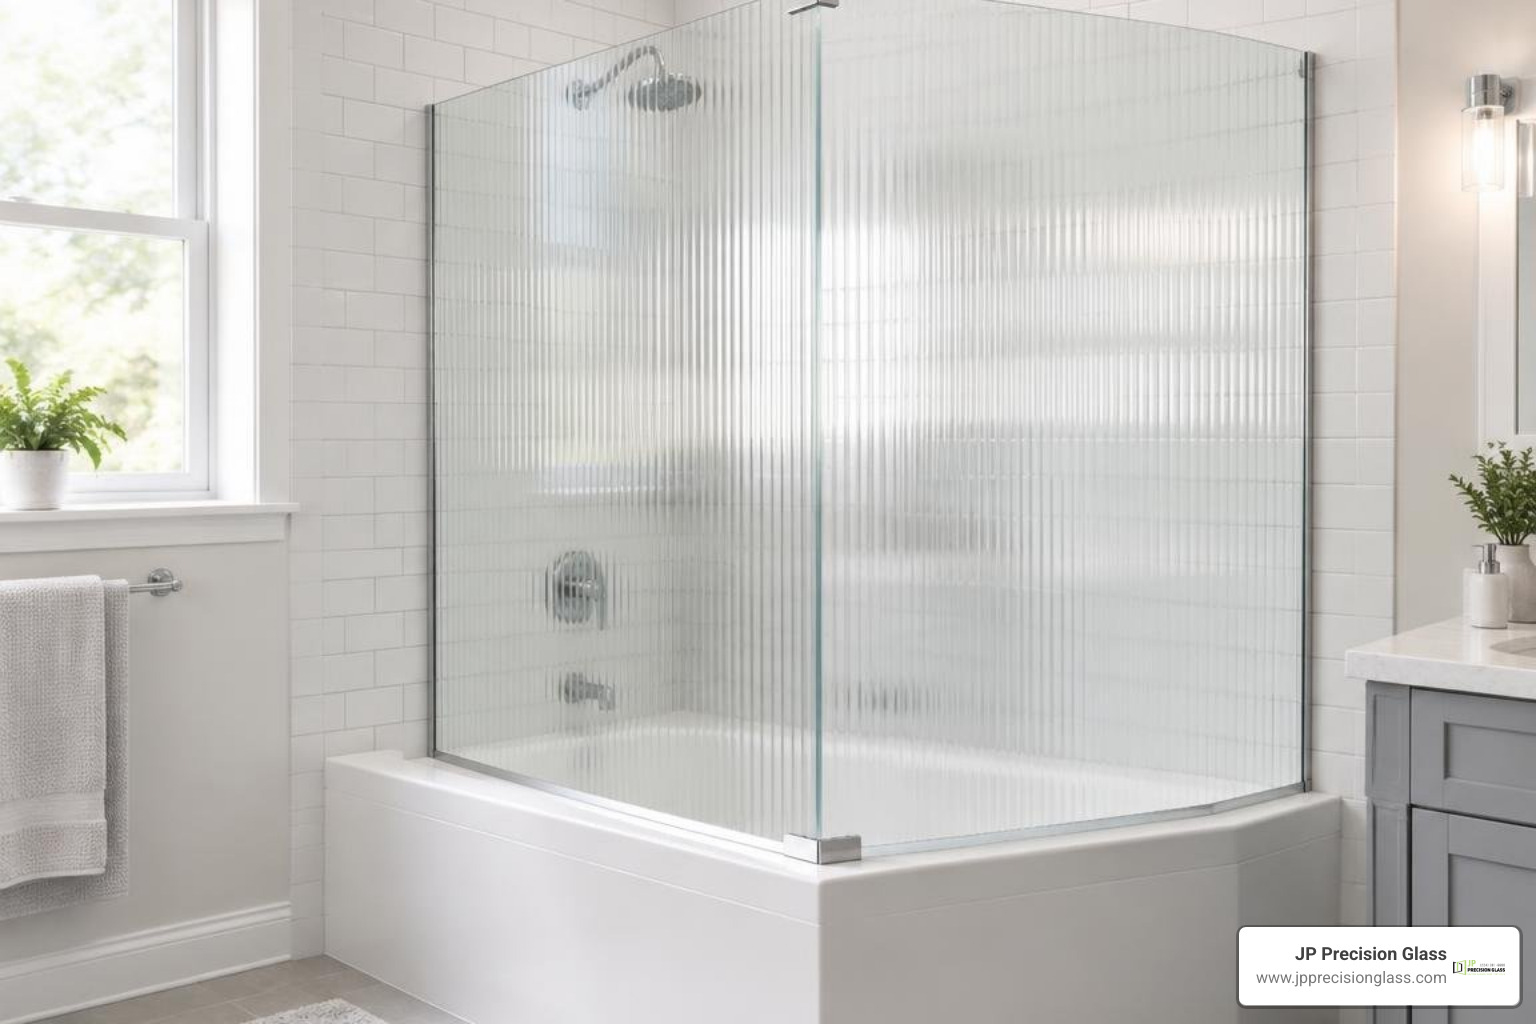
Textured fluted glass panel installed on a corner tub

Sliding vs. Hinged Systems for a Corner Tub Glass Enclosure

Choosing between sliding and hinged doors comes down to clearance space outside the tub:

  • Sliding Systems: In compact bathrooms where a vanity or linen closet sits right next to the tub edge, swinging doors can cause clearance conflicts. It is easy to see why sliding glass tub enclosures are making a major comeback. Modern sliding setups feature sleek, exposed top-roller tracks that glide effortlessly without intruding into the room. Dual-sliding configurations also allow entry from either side.
  • Hinged and Pivot Systems: If your floor plan offers ample clearance, hinged pivot doors provide a wide walk-in opening. High-grade pivot hinges mount directly to the wall or stationary glass panels, equipped with magnetic latching vinyl seals that snap closed to keep water inside. Many models also offer reversible door swings, allowing you to mount the handle on whichever side best matches your natural traffic flow.

Clear, Frosted, and Fluted Glass Finishes

The style and texture of your glass set the overall tone of the space:

  • Clear and Low-Iron Glass: Clear tempered glass is the standard choice for modern designs. It lets natural light travel unhindered, creating an open feeling in compact bathrooms. Low-iron glass removes the subtle green tint found in standard glass, offering pristine clarity.
  • Fluted (Ribbed) Glass: Inspired by classic Art Deco architecture, fluted glass features vertical grooves that refract light beautifully while obscuring direct views inside. It adds architectural depth and high-end style to any corner configuration.
  • Frosted Glass: If maximum privacy is your top priority in a busy household, upgrading your tub with frosted glass doors creates an opaque, satin-like barrier that hides water spots while diffusing soft light.

3. Structural Essentials: Glass Thickness and Wall Adjustability

A durable corner glass installation depends on robust materials and precise alignment. Because glass panels meet at custom angles along the tub rim, understanding glass thickness and wall plumbness is critical.

Feature 1/4-Inch (6 mm) Tempered Glass 3/8-Inch (10 mm) Tempered Glass
Structural Profile Lightweight, ideal for semi-frameless sliding systems Heavyweight, rigid, ideal for fully frameless designs
Hardware Requirement Aluminum wall profiles, u-channels, and top guide rails Solid brass heavy-duty hinges and structural clamps
Out-of-Plumb Flexibility High (often up to 3/4 inch per side via wall jambs) Low to none (requires plumb walls or custom-cut glass)
Visual Aesthetic Slim, framed or semi-framed modern profile Substantial, luxury frameless presence
Impact Resistance Certified safety tempered, standard residential grade Certified safety tempered, maximum residential strength

Balancing 1/4-Inch and 3/8-Inch Tempered Safety Glass

Tempered safety glass is manufactured through extreme thermal heating and rapid cooling, making it up to four times stronger than standard annealed glass. If broken, it crumbles into small, blunt granular chunks rather than dangerous jagged shards.

  • 1/4-Inch (6 mm) Glass: Standard for framed and semi-frameless sliding enclosures. Its lighter weight reduces wear on rolling hardware and simplifies installation while meeting all residential safety building codes.
  • 3/8-Inch (10 mm) Glass: The gold standard for fully frameless corner enclosures. This heavier glass provides superior structural rigidity, eliminating flex in stationary return panels and delivering a premium, solid feel when closing the door.

Managing Out-of-Plumb Walls in a Corner Tub Glass Enclosure

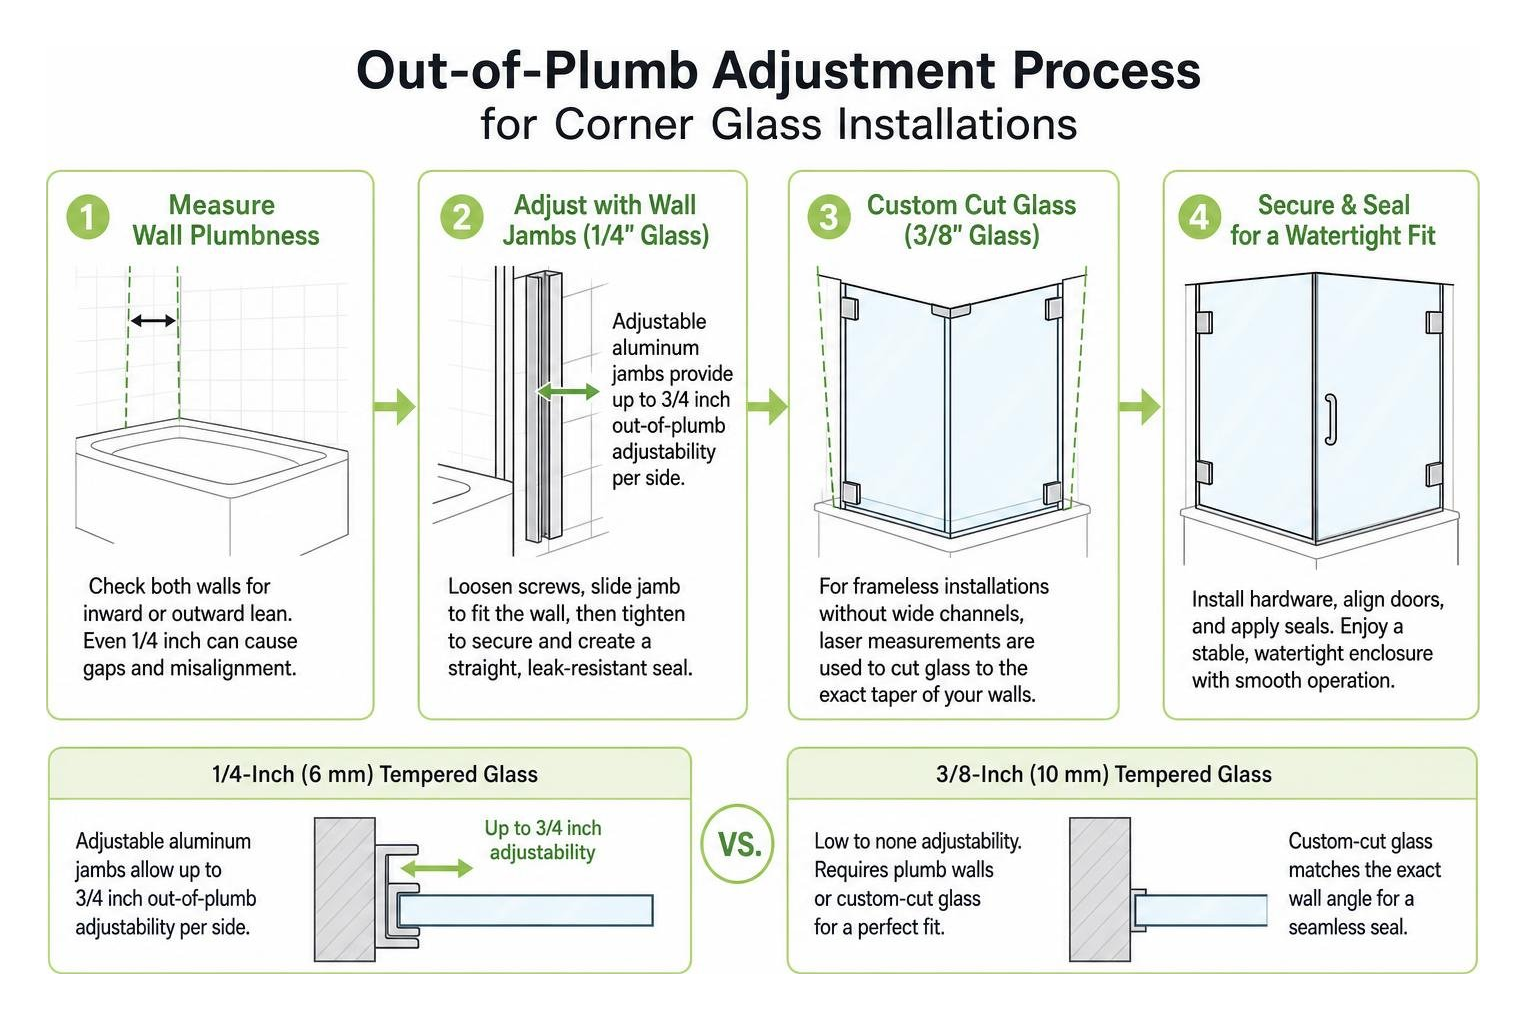
Bathroom walls are rarely perfectly plumb, especially in older homes. If a wall leans inward or outward by even 1/4 inch, a rectangular piece of glass will leave an uneven gap, causing water leaks and misaligned latches.

Out-of-plumb adjustment process for corner glass installations

Many pre-engineered kits manage uneven surfaces by using adjustable aluminum wall jambs that provide up to 3/4-inch out-of-plumb adjustability per side. Think of out-of-plumb adjustability like leveling the legs of a table on an uneven floor—it absorbs minor imperfections without compromising stability. For fully frameless 3/8-inch installations that do not use wide metal channels, our team takes custom laser measurements to cut the glass to the exact taper of your wall, guaranteeing a watertight perimeter seal.

4. Hardware Finishes and Easy-Clean Glass Coatings

The finishing touches define both the daily look and long-term maintenance of your enclosure.

  • Hardware Coordination: Match your glass hardware with your existing plumbing fixtures. Matte black delivers bold, modern contrast against white subway tile; polished chrome offers timeless reflection and pairs well with classic aesthetics; and brushed brass adds warm elegance. High-grade solid brass or stainless steel internal components prevent rust in high-moisture environments.
  • Factory-Applied Protective Coatings: Untreated glass is naturally porous, allowing hard water minerals, soap scum, and limescale to bond to the surface over time. High-performance hydrophobic coatings (such as ClearMax technology) seal these microscopic valleys, creating an ultra-smooth shield that causes water to bead up and roll off instantly. This can cut routine cleaning time by up to 40%.
  • Routine Upkeep: To maintain your glass, avoid abrasive scouring pads or harsh bleach-based chemicals that can degrade protective coatings and corrode hardware finishes. Keep a silicone squeegee in the shower to wipe down the glass after the last shower of the day, followed by a quick wipe with a microfiber cloth.

Frequently Asked Questions About Corner Tub Glass Layouts

Can a corner glass enclosure be installed on an existing bathtub?

Yes, as long as your existing bathtub features a flat, level rim with adequate width (typically at least 2 to 3 inches) to support the bottom glass channels or guide tracks. The tub must be securely anchored to the framing with no flex, and the surrounding walls must be finished with waterproof tile or acrylic panels.

How do out-of-plumb adjustments work on uneven bathroom walls?

In semi-frameless systems, an aluminum wall profile attaches to the wall, and the glass panel slides inside a telescoping channel. By shifting the glass deeper into or farther out of the channel (often allowing up to 3/4 inch of play), installers ensure the door hangs plumb even if the wall leans. For frameless installations, out-of-plumb walls are accommodated by custom-cutting the glass at an angle to match the wall’s precise slope.

What is the easiest way to clean and protect treated corner glass?

Daily maintenance takes less than 30 seconds: simply wipe the panels with a silicone squeegee after each use to prevent standing water droplets from evaporating and leaving mineral deposits. For weekly cleaning, use warm water with a drop of mild dish soap or a dedicated non-abrasive, pH-neutral glass cleaner, applied with a soft microfiber cloth.

Conclusion

Styling a corner tub enclosure is all about balancing smart geometry, durable materials, and refined design. Whether you opt for a modern neo-angle footprint to save floor space, a sliding system with exposed rollers, or an open walk-in shield, investing in certified tempered glass and precision installation elevates your entire bathroom.

At JP Precision Glass, we specialize in custom-tailored glass solutions designed to fit your unique space. If you are planning a bathroom renovation, explore our expert shower door installation in Chicago to discover how precision-crafted glass can transform your home.

bathroom cubicle glass door

No More Leaks: Sealing Your Bathroom Cubicle Glass Door Perfectly

Seal a Bathroom Cubicle Glass Door to Stop Leaks

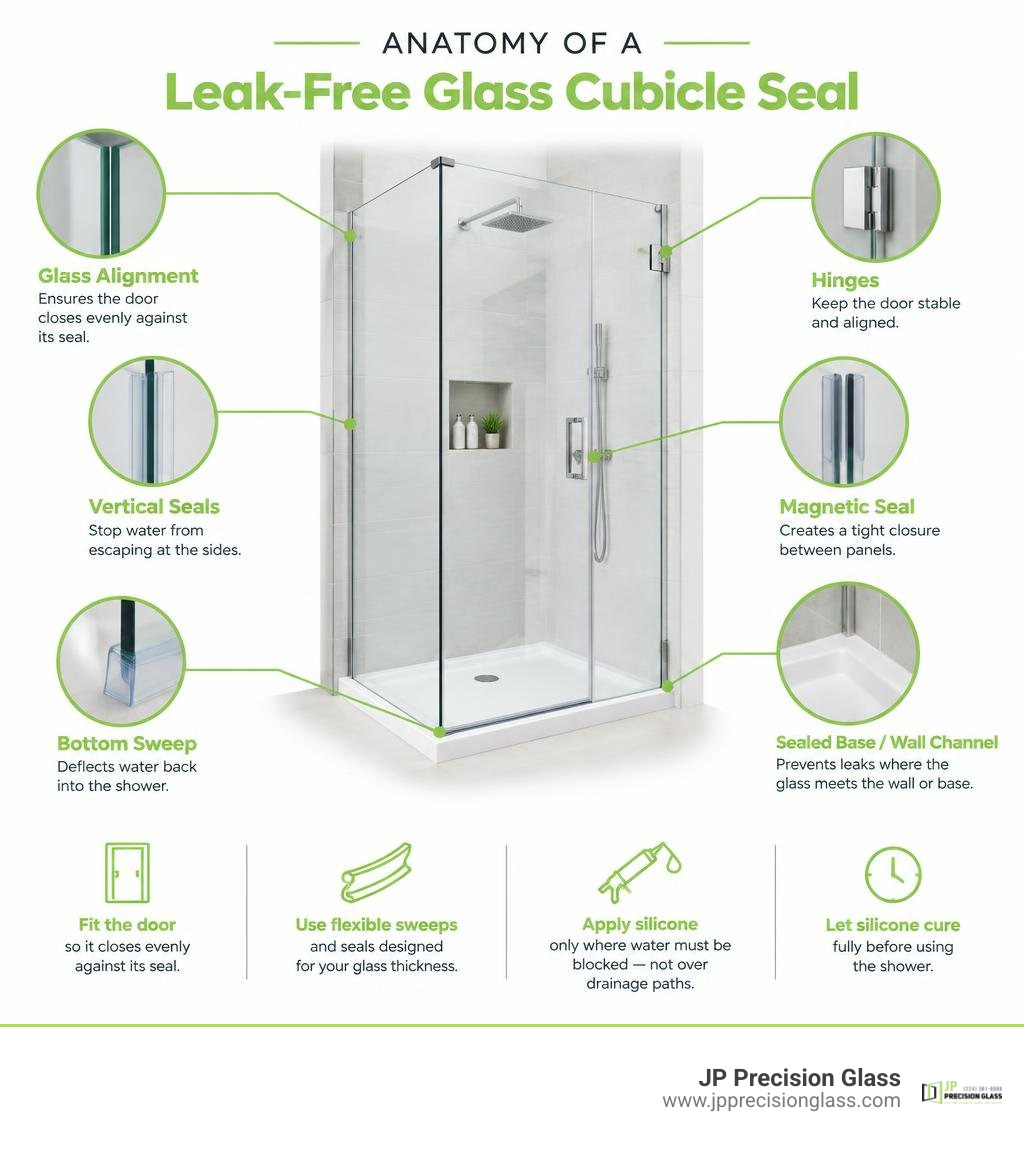
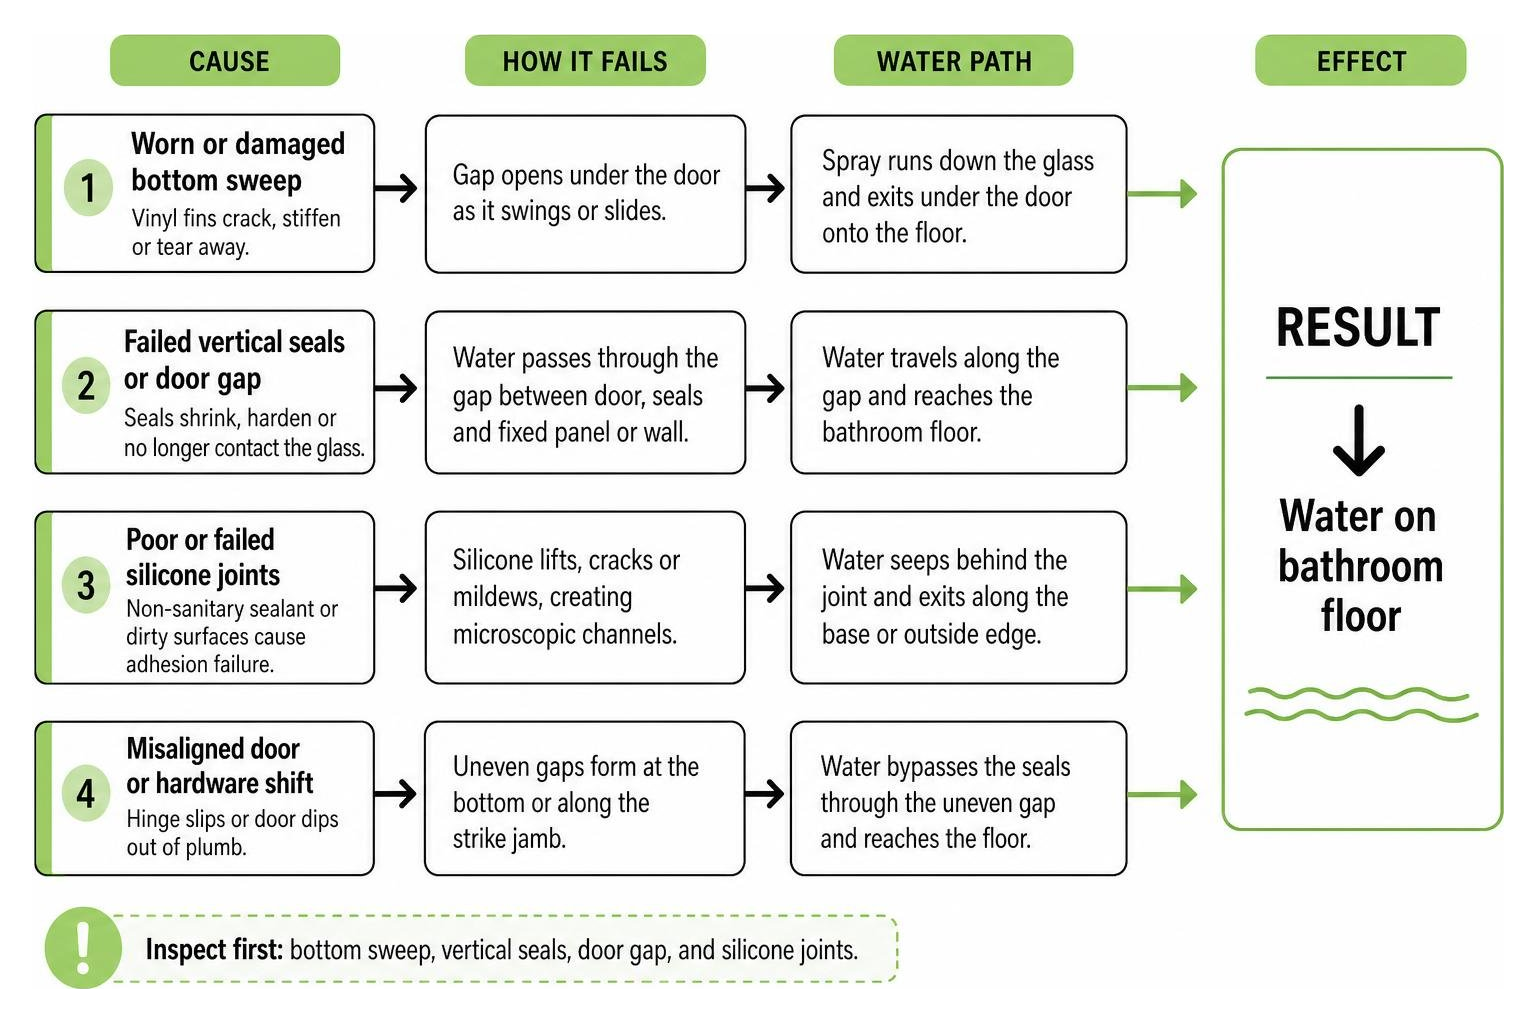
A leak-free bathroom cubicle glass door depends on three things: correct glass alignment, the right edge seals, and a properly sealed shower base or wall channel. If water is reaching the bathroom floor, inspect the bottom sweep, vertical seals, door gap, and silicone joints first.

For the best result:

  1. Fit the door so it closes evenly against its seal.
  2. Use a flexible bottom sweep and side or magnetic seals designed for the glass thickness.
  3. Apply sanitary-grade silicone only where water must be blocked – never over drainage paths.
  4. Let new silicone cure fully before using the shower.

Even a sleek frameless enclosure needs precise gaps and water-deflecting hardware. Glass may be toughened or laminated for strength, but leak prevention comes down to the fit of each panel, hinge, sweep, and seal.

anatomy of a leak-free glass cubicle seal infographic

Key bathroom cubicle glass door vocabulary:

Why Bathroom Enclosures Leak: Common Seal and Alignment Failures

When water escapes past your enclosure, it rarely means the glass has failed. Instead, the problem almost always points to degraded vinyl seals, shifting hardware, or improper slope. Over time, heat, hard water minerals, and daily use take a toll on moving parts and flexible strips.

worn shower door sweep and water pooling on floor

The most frequent culprit is a deteriorated bottom sweep. As doors swing or slide, these sweeps scrape against curbs or floor tiles. Eventually, the flexible vinyl fins crack, stiffen, or tear away, allowing water spraying off your body to sheet down the glass and bypass the curb entirely.

Silicone joint failure is another major issue. When non-sanitary sealants are applied—or when surfaces are dirty during installation—the silicone lifts from the tile or glass edge. Mildew burrows behind the bead, creating microscopic tunnels that channel water out of the shower.

Mechanical movement causes hidden leaks too. Heavy glass doors place continuous load on wall mounts. If a hinge slips by even an eighth of an inch, the door dips out of plumb, causing an uneven floor gap and breaking the seal along the strike jamb. If you are experiencing persistent sagging or sticking panels, scheduling professional shower door repair in Chicago can restore alignment before moisture compromises your subfloor.

shower leak cause and effect chain

Choosing the Right Bathroom Cubicle Glass Door for Leak Prevention

Selecting the right glass and structural style is vital for stopping leaks before they start. Heavier, thicker glass panels vibrate less under high water pressure and stay rigid, maintaining consistent tolerances against perimeter seals.

Modern enclosures rely heavily on rigorous manufacturing standards. Premium systems utilize laminated toughened glass standards up to 15.52 mm thick with low-iron formulations that eliminate green tinting while maximizing structural rigidity and long-term durability.

Understanding your glass options helps you balance aesthetic goals with water containment:

Glass Type & Thickness Structural Rigidity Water Deflection Performance Ideal Enclosure Application
8 mm Toughened Float Glass Moderate Good (best for standard shower heights) Semi-frameless and framed cubicles
10 mm Toughened Glass High Excellent (minimal flex under direct spray) Frameless pivot and sliding doors
12 mm Toughened Monolithic Superior Exceptional (remains perfectly plumb) Large custom frameless enclosures
11.52 mm – 15.52 mm Toughened Laminated Maximum Ultimate (heavy-duty stability) High-traffic, commercial, or wet-room cubicles

Frameless vs Fully Framed Glass Enclosures

A fully framed enclosure uses an anodized aluminum perimeter channel equipped with continuous vinyl gaskets. Fully framed doors provide exceptional water containment because the frame physically blocks spray from exiting the perimeter.

On the other hand, custom frameless showers in Chicago offer an airy, modern aesthetic. Because frameless enclosures lack thick metal framing, they rely entirely on precision engineering, clear polycarbonate profiles, and exact clearances. For compact layouts where outward-swinging doors might hit vanities or drip onto dry floors, smooth sliding shower doors glide along an overhead track, directing water straight back into the drainage pan.

Heavy-Duty Hardware and Precision Alignment

No seal can do its job if the hardware fails to hold the glass square. High-quality enclosures incorporate self-closing hinges with hydraulic dampening mechanisms. These hinges pull the door completely flush against magnetic stops or bulb seals every single time, eliminating the gap left by casual closures.

Advanced installations take inspiration from architectural glass cubicle specifications, which utilize anti-finger trap hinges, concealed fixings, and corrosion-proof stainless steel or satin anodized aluminum components. When anchored alongside fixed glass shower panels, top-tier hardware ensures the door maintains its factory-set plumbness for decades, preventing sagging that ruins watertight seals.

Essential Water Seals and Hardware for Watertight Enclosures

A watertight glass cubicle relies on a network of clear vinyl and polycarbonate components acting as barriers. Selecting the right shower glass accessories ensures a tight seal without compromising visual clarity.

shower door sweeps and magnetic profile seals

Types of Seals for a Bathroom Cubicle Glass Door

Different edges of the door demand different sealing profiles:

  • Bottom Sweeps with Drip Rails: These snap onto the bottom edge of the glass. They feature an angled deflector fin that sheds running water back into the pan, accompanied by vertical wipe fins that seal against the threshold.
  • Magnetic Closure Profiles: Paired 90-degree or 180-degree vinyl extrusions containing polarized magnetic strips. When the door closes, the magnets snap together, sealing the vertical latch edge completely.
  • H-Jamb and Bulb Seals: Fitted along the hinge side or between inline panels. The soft bulb compresses when closed to block high-pressure water jets from penetrating hinge gaps.
  • Star and Fin Seals: Multi-finned strips that slide into channel gaps to prevent splash-out along perimeter walls.

Drip Rails, Deflectors, and Threshold Bars

A bottom sweep works best when paired with a low-profile threshold dam or water bar. Anodized aluminum or acrylic threshold dams mount directly onto the shower curb beneath the door.

As water sheets down the inside face of the glass, the integrated drip fin guides it over the threshold bar. Even if a strong stream hits the base of the door, the physical barrier stops outward pooling. If an older door lacks an integrated deflector, it may be time to upgrade or replace your glass shower door hardware to incorporate modern splash guards.

How to Install and Maintain Watertight Cubicle Seals

Proper installation ensures your seals stay mold-free, functional, and clear.

Step-by-Step Guide to Resealing a Bathroom Cubicle Glass Door

Follow this straightforward installation sequence to replace aged seals and restore a watertight fit:

  1. Remove Old Seals and Silicone: Gently pull the friction-fit vinyl channels off the glass. Use a plastic razor blade and silicone remover to scrape away old caulk along fixed channels without scratching the glass or tile.
  2. Clean and Degrease: Scrub the glass edges and curb with isopropyl alcohol. Ensure surfaces are completely dry, free of soap scum, and bare of residue.
  3. Measure and Cut New Profiles: Measure your door width and vertical height. Cut the new polycarbonate sweeps to length using a fine-toothed hand saw or heavy-duty snips, notching around hinge cutouts where necessary.
  4. Snap On Friction Profiles: Push the new seals firmly onto the glass edges from bottom to top until fully seated.
  5. Apply Sanitary Silicone to Fixed Joints: Apply a continuous, smooth bead of 100% mold-resistant silicone sealant along the exterior perimeter of fixed channels.
  6. Allow Full Cure Time: Keep the enclosure dry and untouched for a full 24 hours while the silicone vulcanizes.

Preventative Care and Cleaning Best Practices

To keep vinyl seals supple and prevent cloudy discoloration:

  • Squeegee Daily: Run a squeegee down the glass and bottom sweep after every shower to prevent standing water deposits.
  • Avoid Harsh Chemicals: Bleach, ammonia, and abrasive scouring powders degrade vinyl, turning it brittle and yellow. Use mild, pH-neutral soap or diluted white vinegar.
  • Check Elasticity Annually: Inspect your bottom fins and magnetic strips once a year. If the fins feel stiff or remain bent out of shape, swap them out to maintain a tight seal.

Frequently Asked Questions About Bathroom Cubicle Glass Doors

How often should seals be replaced on a glass cubicle door?

On average, vinyl sweeps and edge seals last between one and three years depending on water hardness, shower frequency, and cleaning habits. Replace them as soon as you notice yellowing, hardening, cracking, or water pooling outside the enclosure.

What causes water to leak past a magnetic cubicle seal?

Leaks through magnetic seals typically stem from door sagging, which pulls the magnetic strips out of parallel alignment. If the magnets do not meet evenly along their entire vertical length, the magnetic bond weakens, leaving air gaps that allow shower spray to escape.

Can clear silicone prevent all leaks around glass partitions?

Silicone alone cannot solve all leaks. It must be applied correctly to stationary joints—primarily along the exterior edges of fixed glass channels. Never silicone the inside bottom of an operable door, as doing so traps moisture and blocks the natural drainage path into the shower pan.

Conclusion

Achieving a leak-free bathroom starts with precision engineering, durable glass, and high-performance sealing hardware. By choosing the right door style, maintaining flexible sweeps, and using high-grade sanitary sealants, you protect your home from water damage while enjoying an open, elegant aesthetic.

When you are ready to upgrade your space with tailor-made glass built to exact specifications, trust our team for expert shower doors Chicago installation services to ensure a watertight fit for years to come.

bifold tub enclosure

The Ultimate Guide to Folding and Bifold Tub Doors

Save Space With a Bifold Tub Enclosure

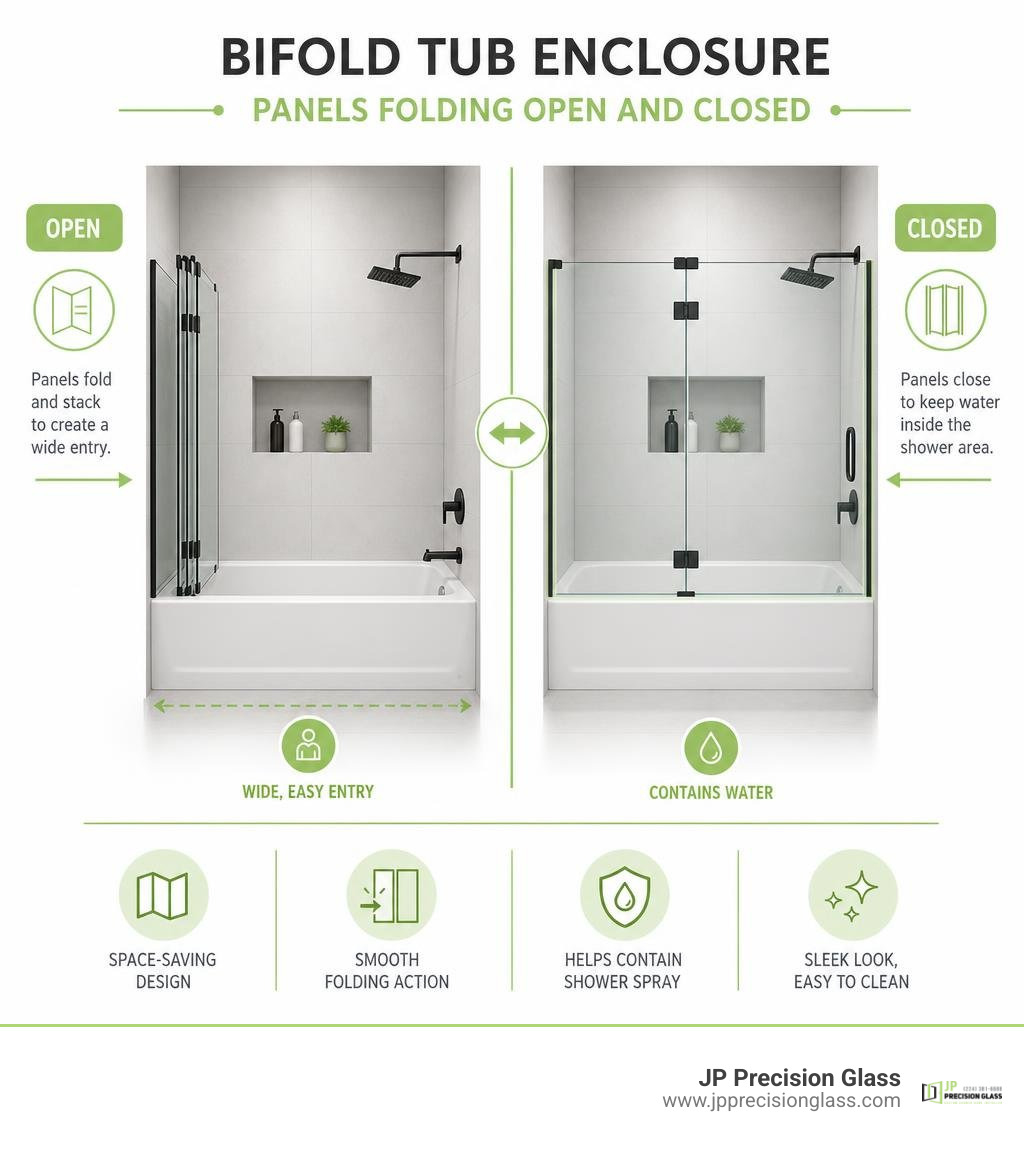
A bifold tub enclosure uses glass panels that fold together instead of swinging far into the room. It is a smart choice when a vanity, toilet, or narrow walkway leaves little clearance beside the tub. When open, the panels stack compactly; when closed, tempered glass and properly fitted seals help contain shower spray.

For a Chicago bathroom remodel, start with three decisions:

  1. Measure the finished tub opening and check whether the walls are level.
  2. Choose a frameless or semi-frameless design, glass thickness, and finish such as chrome, brushed nickel, or matte black.
  3. Plan the fold direction so the panels open away from nearby fixtures and provide a comfortable entry.

Unlike a sliding door, a folding design can create a wider usable opening without requiring a large swing arc. It can also be tailored for alcove tubs and some corner layouts, making it a clean, modern option for compact bathrooms with unusual dimensions.

This guide explains the key designs, sizing, installation needs, accessibility considerations, and simple care steps that keep folding tub doors operating smoothly.

Bifold tub enclosure panels folding open and closed infographic

Related content about bifold tub enclosure:

Why Choose a Bifold Tub Enclosure for Your Bathroom?

Compact bathroom layouts often present serious design puzzles. When square footage is at a premium, traditional shower doors can quickly become an obstacle course. A standard hinged door demands a wide outward radius that frequently collides with toilets or sinks, while standard sliding enclosures restrict entry to only half the tub width.

Folding systems solve these spatial dilemmas through ingenious mechanical articulation. Think of bifold systems as the origami of modern bathroom design: two or more linked glass panels fold neatly against one another along heavy-duty internal pivots. This configuration drastically cuts down the footprint required to access your tub and shower area. When you transform your space with modern bathroom shower glass enclosures, introducing an articulated bifold system delivers full walk-in accessibility alongside a clean, contemporary aesthetic.

Feature / Door Type Bifold Tub Door Sliding Bypass Door Single Hinged Pivot Door
Clear Opening Width 70% – 85% of total opening Max 45% – 50% of tub span 100% of door panel width
Outward Clearance Needed Minimal (panels fold inward/flat) Zero exterior floor clearance Full arc of door width (24″–36″)
Bottom Track Required? Optional / Low-profile guide Yes (collects water and grime) No (bottom sweeps only)
Best For Tight bathrooms, compact layouts Long tubs, standard alcoves Expansive, spacious master baths
Aesthetic Style Sleek, architectural, Euro-style Traditional or industrial modern Ultra-minimalist frameless

Maximizing Small Bathroom Space with a Bifold Tub Enclosure

In a compact footprint, every fractional inch matters. If your bathroom layout places the vanity counter or toilet within arm’s reach of the bathtub curb, an outward-swinging door is out of the question.

A compact bathroom with an open folding tub door stacked neatly

Bifold systems eliminate this conflict entirely. Because the dual-panel structure hinges in the center and can fold inward toward the tub enclosure walls, you never have to worry about bumping expensive fixtures or blocking traffic paths. When folded open against the interior tile, the panels sit virtually flush against the perimeter wall. This provides homeowners with a sweeping, barrier-free entryway that simplifies bathing children, washing pets, or stepping in and out of a soothing bath.

Comparing Bifold Doors to Sliding and Traditional Pivot Doors

When evaluating different glass doors, weighing functionality against daily maintenance is critical. Sliding bypass systems are a common builder-grade solution, but they come with two notable drawbacks:

  1. Fixed Obstruction: A bypass system traps you into only having one half of the tub open at any given time, making bathing or cleaning the back wall awkward.
  2. Track Build-Up: Sliding doors rely on deep bottom tracks that easily accumulate soap scum, mineral deposits, and stagnant water.

Single pivot doors eliminate the track hassle, but their sweeping swing arc monopolizes precious floor space. If you are debating between fixed screens and articulated glass, exploring the pros and cons of a bathtub glass half door highlights how stationary glass can sometimes limit your reach. Bifold configurations bridge this divide: they combine the open expanse of a pivot door with the compact spatial profile of a slider, keeping water strictly inside the tub perimeter.

Key Design Features and Configuration Options

Selecting the right enclosure requires matching engineering performance with your personal design aesthetic. Folding doors are engineered in both frameless and semi-frameless architectures:

  • Frameless Bifold Doors: These rely on heavy, ultra-clear glass panels connected by precision brass hinges and minimal wall clamps. They offer unobstructed sightlines, making even the smallest bathroom feel significantly larger.
  • Semi-Frameless Bifold Doors: These utilize slim, high-grade perimeter framing made from aluminum alloy 6463. This architectural alloy is polished before anodizing to provide exceptional corrosion resistance and rigid support, paired with clean, low-metal visual lines.

When evaluating multi-panel folding hardware, exploring why 3 panel shower doors for bathtubs are a total game changer reveals how additional folding leaves can span wider alcove openings without sacrificing stability.

Designing a Custom Bifold Tub Enclosure for Alcove and Corner Layouts

While standard three-wall alcoves are the most frequent setting for tub-shower combinations, bifold assemblies adapt gracefully to custom corner footprints as well.

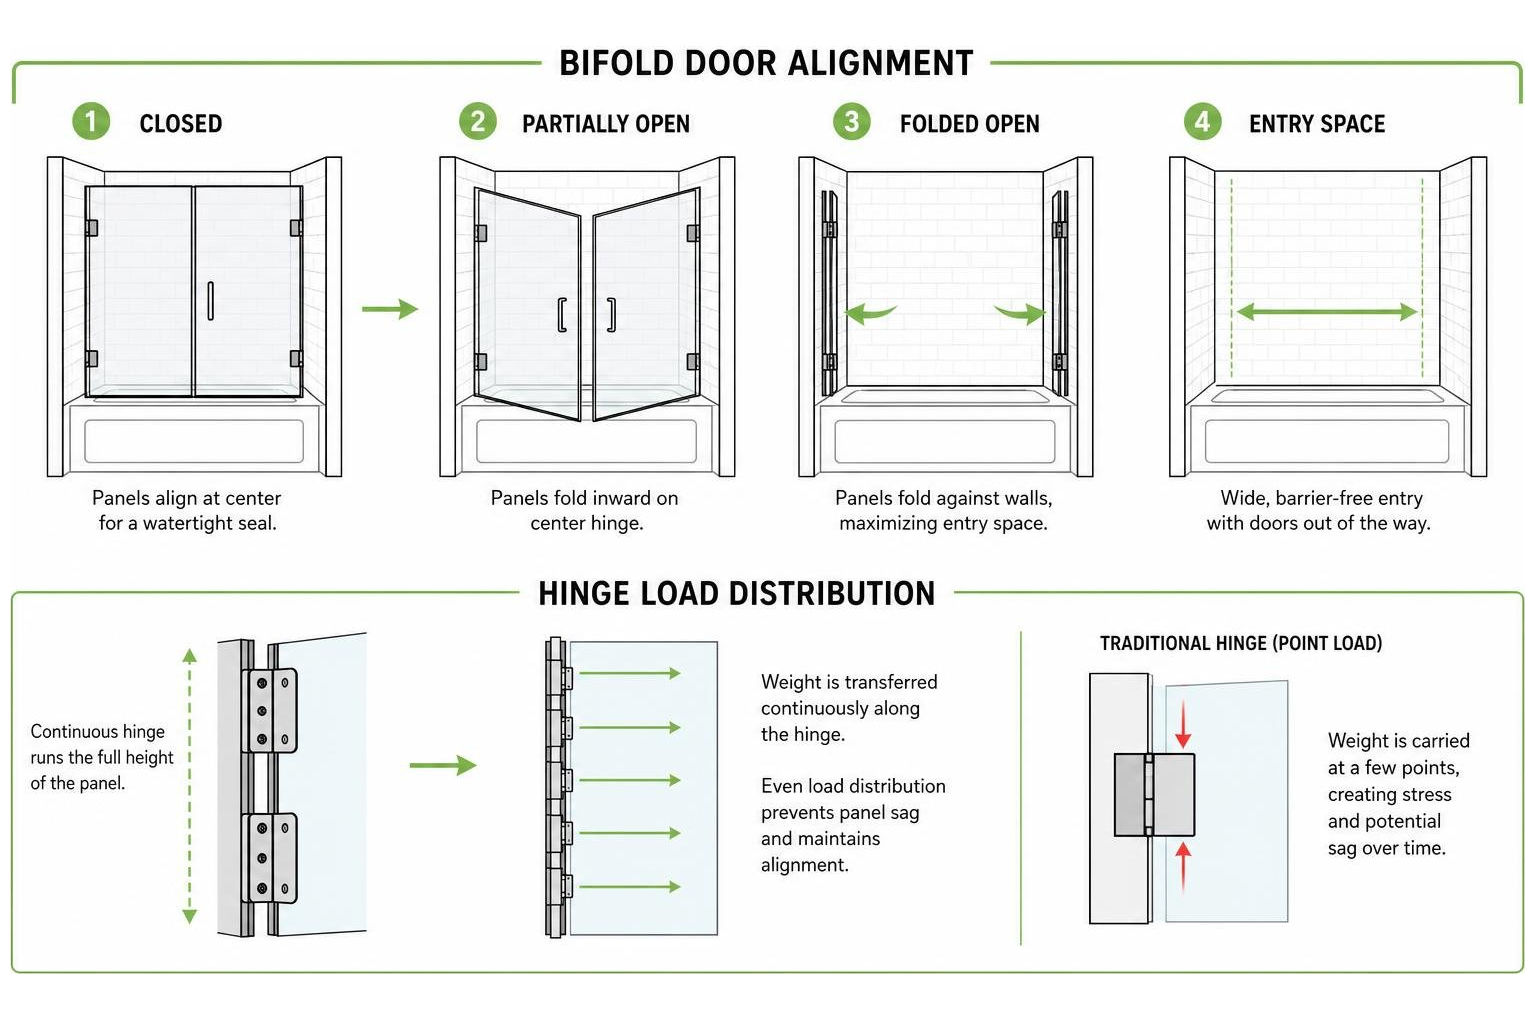
For corner configurations, a folding door connects with a stationary 90-degree glass return panel via continuous watertight gaskets. Continuous hinge systems distribute the weight of the glass evenly along the wall profile, eliminating panel sag over years of daily operation. Knowing how to choose the perfect glass tub enclosure for your bathroom ensures your selected hinge design accounts for wall plumbness and floor levelness across the entire span.

Hardware, Finishes, and Glass Thickness Selections

Hardware resilience is paramount in humid bathroom environments. Premium bifold systems incorporate heavy-duty brass hinges and hardened nylon roller assemblies paired with stainless steel ball bearings. These components ensure smooth, silent gliding that resists binding over time.

Diagram of bifold door alignment and hinge load distribution

When outfitting your enclosure, you can tailor the glass thickness and metallic finish to coordinate with existing fixtures:

  • Glass Thickness: Standard bifold doors utilize 1/4-inch (6mm) to 3/8-inch (10mm) tempered safety glass. Quarter-inch glass provides a lighter gliding feel ideal for multi-panel semi-frameless setups, while 3/8-inch glass provides structural rigidity for minimalist frameless designs.
  • Finishes: Architectural options include Matte Black, Brushed Nickel, Polished Chrome, and Oil Rubbed Bronze. High-end finishes feature multi-stage electro-static or anodized coatings to prevent flaking and water corrosion. Selecting quality shower glass accessories such as through-glass drilled towel bars and low-profile handles ensures durable day-to-day operation.

Accessibility and Tub Enclosure Integration

Accessibility is a major consideration for modern homeowners and multigenerational households. Folding tub doors offer distinct advantages for accessible bathing because they collapse away to open up the widest possible entry clearance.

When paired with walk-in bathtubs featuring low step-in thresholds, slip-resistant flooring, and gravity-driven dual-drain systems, a folding enclosure facilitates effortless wheelchair transfers and assisted bathing. Unlike fixed glass screens that trap an assistant outside the tub, bifold panels fold completely aside, allowing easy physical access and clear maneuverability.

Installation and Measurement Considerations

Precision measurement is the bedrock of a leak-free, smooth-operating bifold glass installation. Bathtub surrounds rarely feature perfectly square corners or plumb walls. Even slight framing shifts can cause folding panels to bind or leave gaps in water seals.

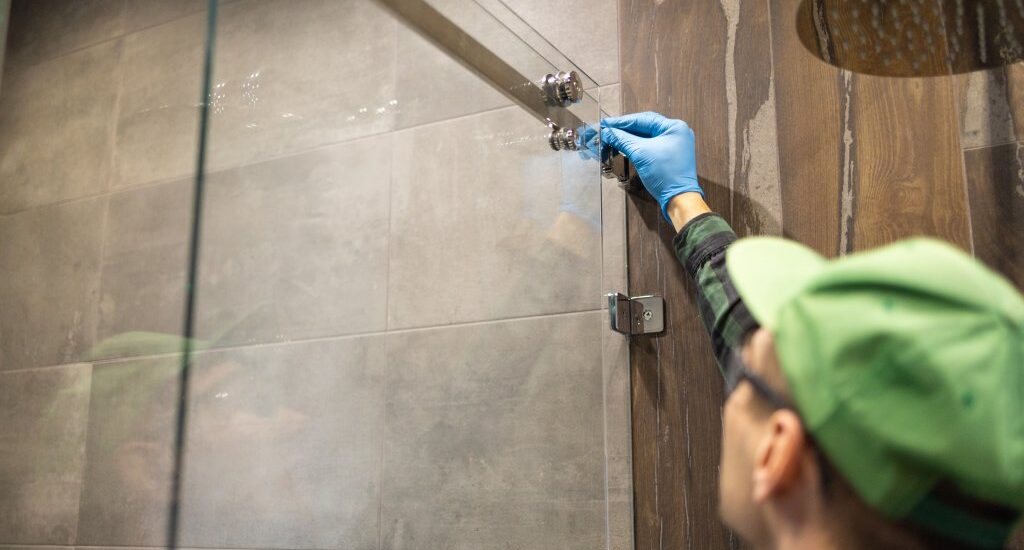
A professional glazier aligning folding door hinges on a tub wall

When preparing an alcove opening:

  1. Measure width across the tub threshold, the midpoint, and the top height opening.
  2. Verify wall plumbness using a 48-inch spirit level or laser level to identify vertical runout.
  3. Check that the tub deck is completely level along its entire length.

Many high-quality semi-frameless bifold systems provide up to 1/2-inch to 1-inch of built-in out-of-plumb adjustment within the wall jambs. Some aluminum frame components can even be cut down up to 4 inches in the field by certified installers to achieve an exact custom fit.

Tools and Preparation for Tub Door Installation

Installing glass enclosures demands careful handling and professional-grade tools:

  • Heavy-duty glass suction cups
  • 48-inch spirit level and laser level
  • Rotary hammer drill with carbide-tipped masonry bits (for ceramic, porcelain, or stone tile)
  • 100% architectural neutral-cure silicone sealant
  • Stainless steel, rust-free mounting fasteners
  • High-grade painter’s tape and rubber setting blocks

Installers anchor structural wall jambs directly into reinforced wall studs behind the tile or acrylic surround. Once the jamb is plumb and anchored, the folding glass panels are hung using heavy-duty hinge pins, followed by careful calibration of vinyl bottom sweeps and magnetic vertical strike seals.

Maintenance, Care, and Long-Term Durability

Maintaining the pristine sparkle of a glass enclosure is straightforward when you incorporate simple daily care habits. Because bifold systems eliminate the deep, dirt-trapping bottom channels found on standard sliding doors, cleaning is significantly faster.

To protect your glass and hardware:

  • Apply a Factory Glass Coating: Hydrophobic glass treatments repel water droplets, preventing dissolved minerals from etching the tempered glass surface.
  • Use a Daily Squeegee Routine: A quick squeegee wipe-down after showering prevents limescale buildup and keeps water spots at bay.
  • Lubricate Hardware: Clean hinge joints and nylon rollers every six months using a silicone-based spray lubricant. Avoid harsh abrasive cleaners or ammonia-based formulas, which can degrade protective anodized finishes and dry out vinyl sweeps.
  • Maintain Track Guides: If your bifold system uses a low-profile bottom guide, occasionally clear away debris so water channels freely back into the tub basin. For broader enclosure care strategies, learning how to install and maintain sliding glass shower doors provides valuable insight into gasket longevity and water-barrier preservation.

Frequently Asked Questions About Bifold Tub Doors

Can a bifold door be installed on any standard bathtub?

Yes. Bifold tub doors are designed to accommodate standard alcove bathtubs measuring between 54 and 60 inches wide, as well as compact 48-inch configurations and extended 72-inch layouts. The only prerequisite is having a flat tub curb surface (typically at least 1.5 to 2 inches wide) and solid framing studs behind the tile to support the hanging weight of the glass panels.

Are bifold tub doors effective at preventing water leaks?

When professionally fitted, bifold enclosures provide excellent water containment. They utilize interlocking vinyl magnetic seals along the closing jamb, flexible continuous water seals between the folding glass leaves, and angled bottom drip sweeps that guide runoff back into the tub pan.

How do bifold shower doors compare in overall investment to sliding doors?

Bifold doors represent an outstanding value by combining the heavy-glass visual appeal of a custom pivot door with the space-saving utility of a slider. Because they require precision hinges, specialized structural hardware, and tempered safety glass engineering, their investment profile is comparable to high-end semi-frameless sliding enclosures, while delivering a much wider walk-in opening.

Conclusion

Upgrading your bathroom layout doesn’t require knocking down structural walls to gain usable space. A folding glass door combines smart spatial ergonomics, premium architectural aesthetics, and robust water protection into a single design element. By tucking neatly out of the way when opened, it creates an airy, uncluttered environment that maximizes every square inch of your bath.

At JP Precision Glass, our specialists fabricate made-to-measure solutions crafted with premium tempered safety glass and architectural-grade hardware. Whether you are remodeling a compact guest bathroom or designing a custom master bath retreat, we help you select and install the ideal configuration for your home. Schedule a consultation for custom shower doors in Chicago with our design team today to explore how folding glass doors can elevate your space.

1 2 3 … 6